J Gleyzes
-
What's the difference between aeroponics and ultraponics?
10/09/2023 at 08:29 • 0 commentsI've had some feedback from people who don't understand the difference between aeroponics and ultraponics. I'll try to clarify my choice of ultraponics.
These two methods are derivatives of hydroponics. They involve suspending plant roots in an environment where a nutrient-rich mist is periodically delivered directly to the root zone. This design ensures that plants receive a highly oxygenated nutrient solution while maintaining optimal humidity levels. The absence of a growth medium reduces the risk of disease transmission and minimizes substrate costs. Compared with traditional cultivation, both systems reduce water consumption, and avoid soil contamination (for crops using pesticides and fertilizers).
To obtain a nutrient mist, there is either aeroponics, which uses a high-pressure pump coupled with nozzles to create the mist. This system has already proved its effectiveness, but it is often expensive and uses a lot of electricity.
Ultraponics, on the other hand, uses piezoelectric discs to create the fog. The ultrasonic spraying process consumes relatively little electricity, making it an attractive option for sustainable agriculture. And the disks are very affordable, reducing the cost of the system. But there are far fewer articles on this method. And a lot of questions like: Is the particle size sufficient for the root system?That's why I'm working on an ultraponic system inspired by medical inhalation respirators that use mesh discs with a frequency between 100kHz and 130kHz.

Microchip - Low-velocity aerosol -
Source code for the KMP app
10/04/2023 at 03:36 • 0 commentsOpen source code:
You can find the source code here :
- GitHub link: https://github.com/Gleyco/UltraTower_KMP
- Works with the new ESP32 code: https://github.com/Gleyco/UltraTower/blob/main/UltraTower_V2_auto_freq.in
Technical choice:
The app is coded with Kotlin Multiplatform (KMP). It's a library and set of tools that allow developers to create apps for Android and iOS, all using the same Kotlin code. I'd long wanted to try my hand at creating a cross-platform application using Compose and KMP.The cross-platform Kotlin app is fully open source and available on GitHub. You can explore the source code, contribute to the project, and even use it as a basis for your own applications.
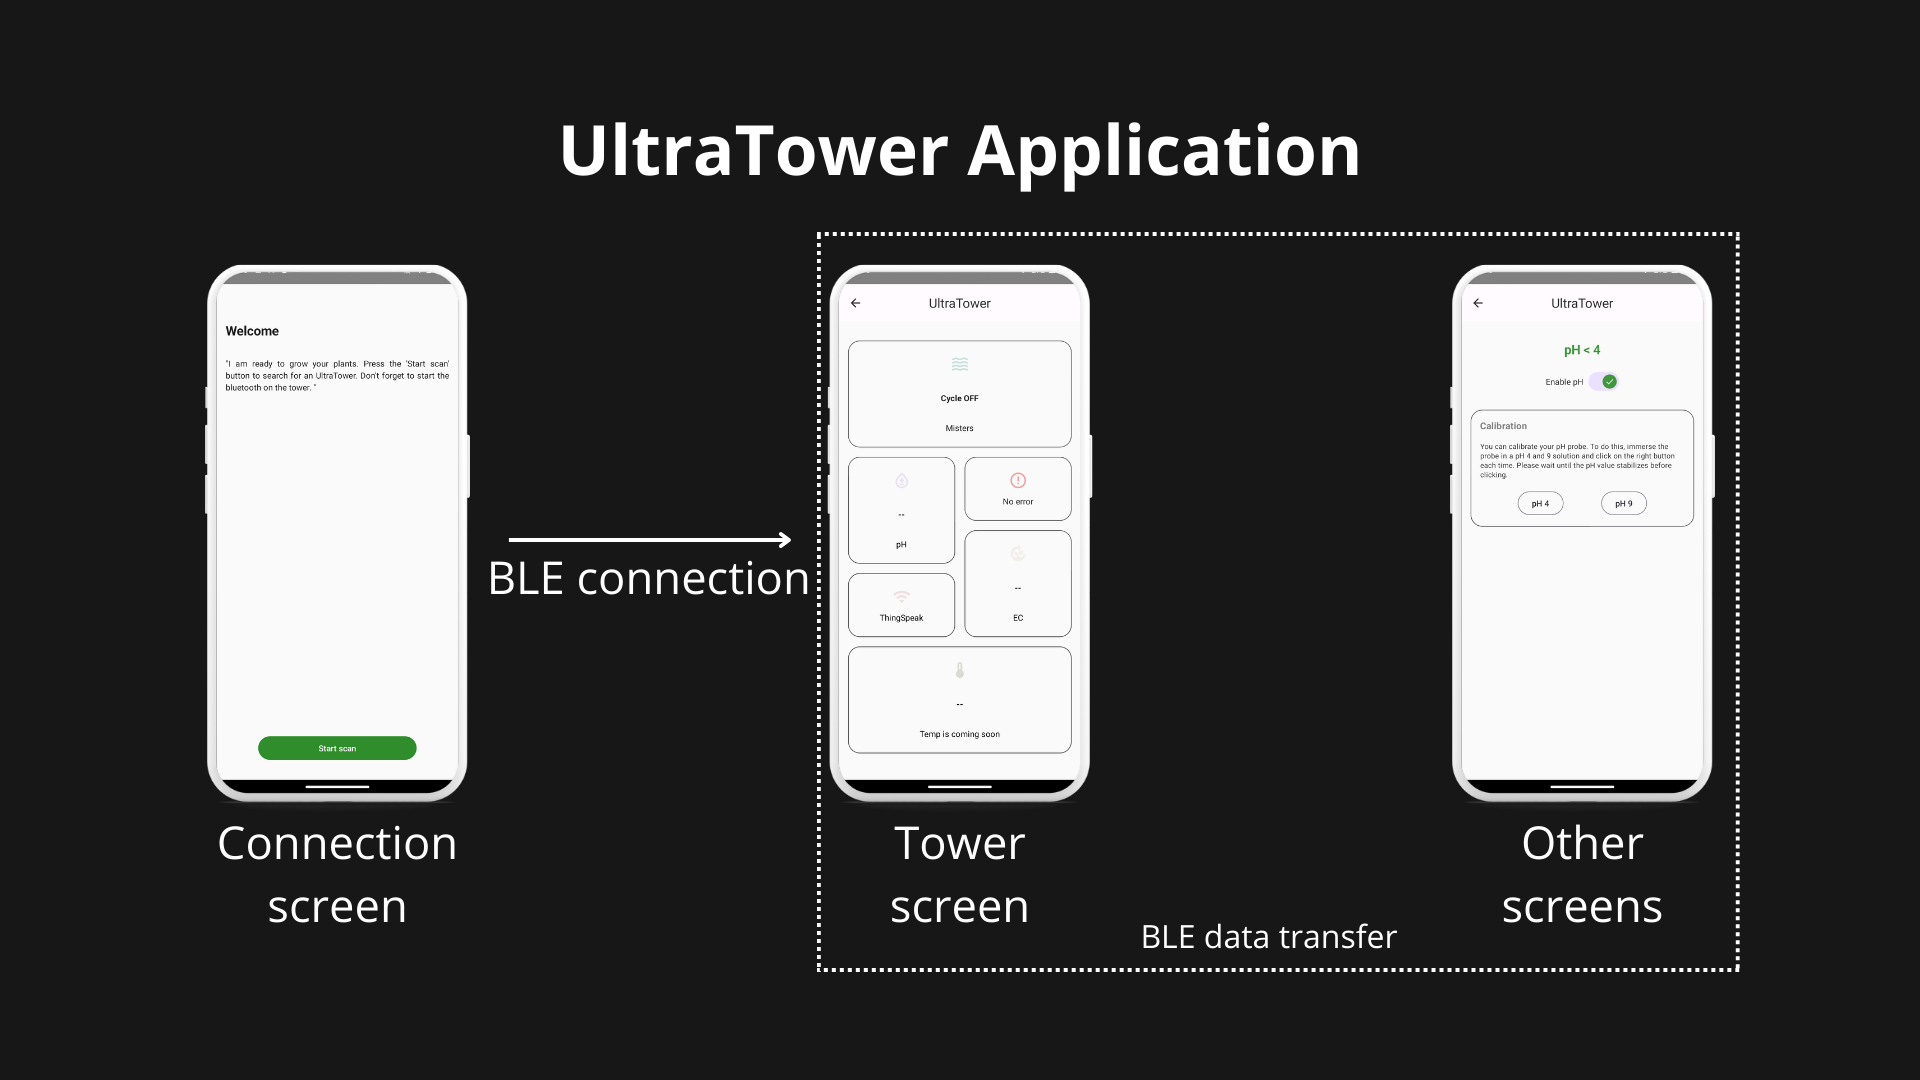
The application is under development at the moment, and includes disc settings, pH settings and thingspeak settings. Thermometer and EC probe settings are coming.
I wasn't able to test the code on IOS because you need a MAC to do so.
App screenshots:
![]()
Link to learn about KMP:
https://github.com/JetBrains/compose-multiplatform-template#readme
-
Code UltraTower V2
07/04/2023 at 09:23 • 0 commentsYou can find the new code in the github associated with this project or by following this link.
The major change compared to the first code is the search for the best frequency to make the discs vibrate.
I use 16 mm discs with a resonance frequency of 108 kHz +/- 3 kHz.
The disc may also change frequency slightly as it ages. That's why, at Esp32 start-up, the code now analyzes the current consumption of each frequency in the 108kHz +/-3 kHz interval.
The code is as follows when the esp32 has found the consumption peak, it will use this frequency until it restarts (forced or automatic every 24 hours)
void searchForBestFrequency (int mistPin) { int32_t buf[ADC_BUFFER_SIZE]; int minFreq = frequencyMisterDefault - 3000; int maxFreq = frequencyMisterDefault + 3000; int freqMaxADC = 0; int minADC = 0; int maxADC = 0; int32_t sample = 0; // analogSetPinAttenuation(ADC_PIN, ADC_0db); for (int i = minFreq; i < maxFreq ; i += 250) { ledcSetup(LED_CHANNEL_MIST_TEST, i , LED_CHANNEL_RESOLUTION); ledcAttachPin(mistPin, LED_CHANNEL_MIST_TEST); ledcWrite(LED_CHANNEL_MIST_TEST, LED_CHANNEL_DUTYCYCLE); Serial.println("************************************"); Serial.print("Freq : "); Serial.println(i); delay(500); for (int j = 0; j < ADC_BUFFER_SIZE; j++) { buf[j] = analogRead(ADC_PIN); delay(4); } sample = getAverage(buf , ADC_BUFFER_SIZE); Serial.print("ADC : "); Serial.println(sample); if (i == minFreq) { minADC = sample; maxADC = sample; freqMaxADC = minFreq; } else { if (sample + OFFSET_ADC < minADC) { minADC = sample; } if (sample - OFFSET_ADC > maxADC ) { maxADC = sample; freqMaxADC = i; } } } Serial.println("************************************"); Serial.print("MAX Freq = "); Serial.println(freqMaxADC); Serial.print("MIN ADC = "); Serial.println(minADC); Serial.print("MAX ADC = "); Serial.println(maxADC); if (maxADC <= 80 && maxADC - minADC <= 70) { if (maxADC <= 80) { Serial.println("ERROR INIT MIST : DISK NOT DETECTED"); } else { Serial.println("INIT MIST : PEAK DETECTED"); } blinkLED(LED_ERROR_PIN); if (mistPin == MIST1_PIN) { statutMist1 = MIST_ERROR; } else { statutMist2 = MIST_ERROR; } } else { Serial.println("INIT MIST : PEAK DETECTED"); if (mistPin == MIST1_PIN) { freqMist1 = freqMaxADC; statutMist1 = MIST_OK; ledcSetup(LED_CHANNEL_MIST_1, freqMist1 , LED_CHANNEL_RESOLUTION); } else { freqMist2 = freqMaxADC; statutMist2 = MIST_OK; ledcSetup(LED_CHANNEL_MIST_2, freqMist2 , LED_CHANNEL_RESOLUTION); } } } -
PCB V2
07/04/2023 at 07:30 • 0 comments![]()
Like the previous PCB, you can choose the modules you want. This board has been designed to be modular to suit your needs.
Update :
- New alternating current circuit for disks and current control circuit (log)
- Power supply voltage changeover from 18V to 12V
- The 5V problem seen in this log has been corrected by adding a second CN3903 3A.
- Change of layout to avoid mixing voltages
- Component optimization
We will look at each module one by one:
Main module :
This module is mandatory. It is the brain of the tower with the ESP32 and it is the one that allows the power supply of the board, the generation of the fog and the filling of the small tank thanks to the pump.
Component Quantity Cost Link PCB V2 1 1.6€ Lolin 32 Lite 1 2.85€ Aliexpress CN3903 5V 3A
DC-DC Step down2 0.5€ Aliexpress Capacitor 200V 100nF 1206 3 0.02€ Capacitor 200V 4.7nF 1206 2 0.02€ IRLML2502 1 0.3€ DC Charger connector 1 0.2€ 12V 3A Charger 1 5.23€ 330uH coil 4 0.32€ 100 ohm resistor 2 0.025€ 10K ohm resistor 3 0.025€ FDD7N25LZTM 2 0.3€ Onsemi Mini JST 2.0 PH 3 0.088€ Usb Pump connector 1 0.3€ 5V Pump 1 10€ Aliexpress 108kHz Disk 2 2€ Aliexpress 1N4001 Diode 1 0.014€ 2 Kohm resistor 2 0.025€ 470 Kohm resistor 1 0.025€ LED 2 0.57€ 2 ohm resistor 1 0.025€ EC module:
This module allows you to know the mineral concentration of the solution. Optional module.
Component Quantity Cost 330 ohm resistor 2 0.025€ 22nF capacitor 1 0.013€ Mini JST 2.0 PH 1 0.088€ EC probe 1 1€ pH module:
This module allows the acidity of the solution to be known, given that a pH between 5.5 and 6.5 is desired. This module is optional.
Component Quantity Cost Link MCP6487 1 0.4€ Microchip TC7660 1 0.99€ Microchip BNC connector 1 0.73€ Aliexpress pH probe 1 11€ 200k ohm resistor 2 0.025€ 10k ohm resistor 2 0.025€ 22K ohm resistor 1 0.025€ 82k ohm resistor 1 0.025€ 4.7k ohm resistor 1 0.025€ 1uF capacitor 2 0.013€ 10uF capacitor 2 0.013€ Temperature module:
It provides information on the temperature of the ambient air, the root chamber and the water in the main tank. It also compensates for pH and EC sensor values that are correlated to the water temperature. This module is optional. You can also use a single sensor depending on your needs.
Component Quantity Cost DHT22 1 2.46€ DS1820 2 2€ 10k ohm resistor 1 0.025€ 4.7k ohm resistor 1 0.025€ Conclusion:
The electronics of the tower cost 49,5€ with all the modules but it works with only the main module which costs 28,1€. You can reduce the price by recycling an old 12V 3A charger.
You can find the gerbers in the project files. (PCB_V2)
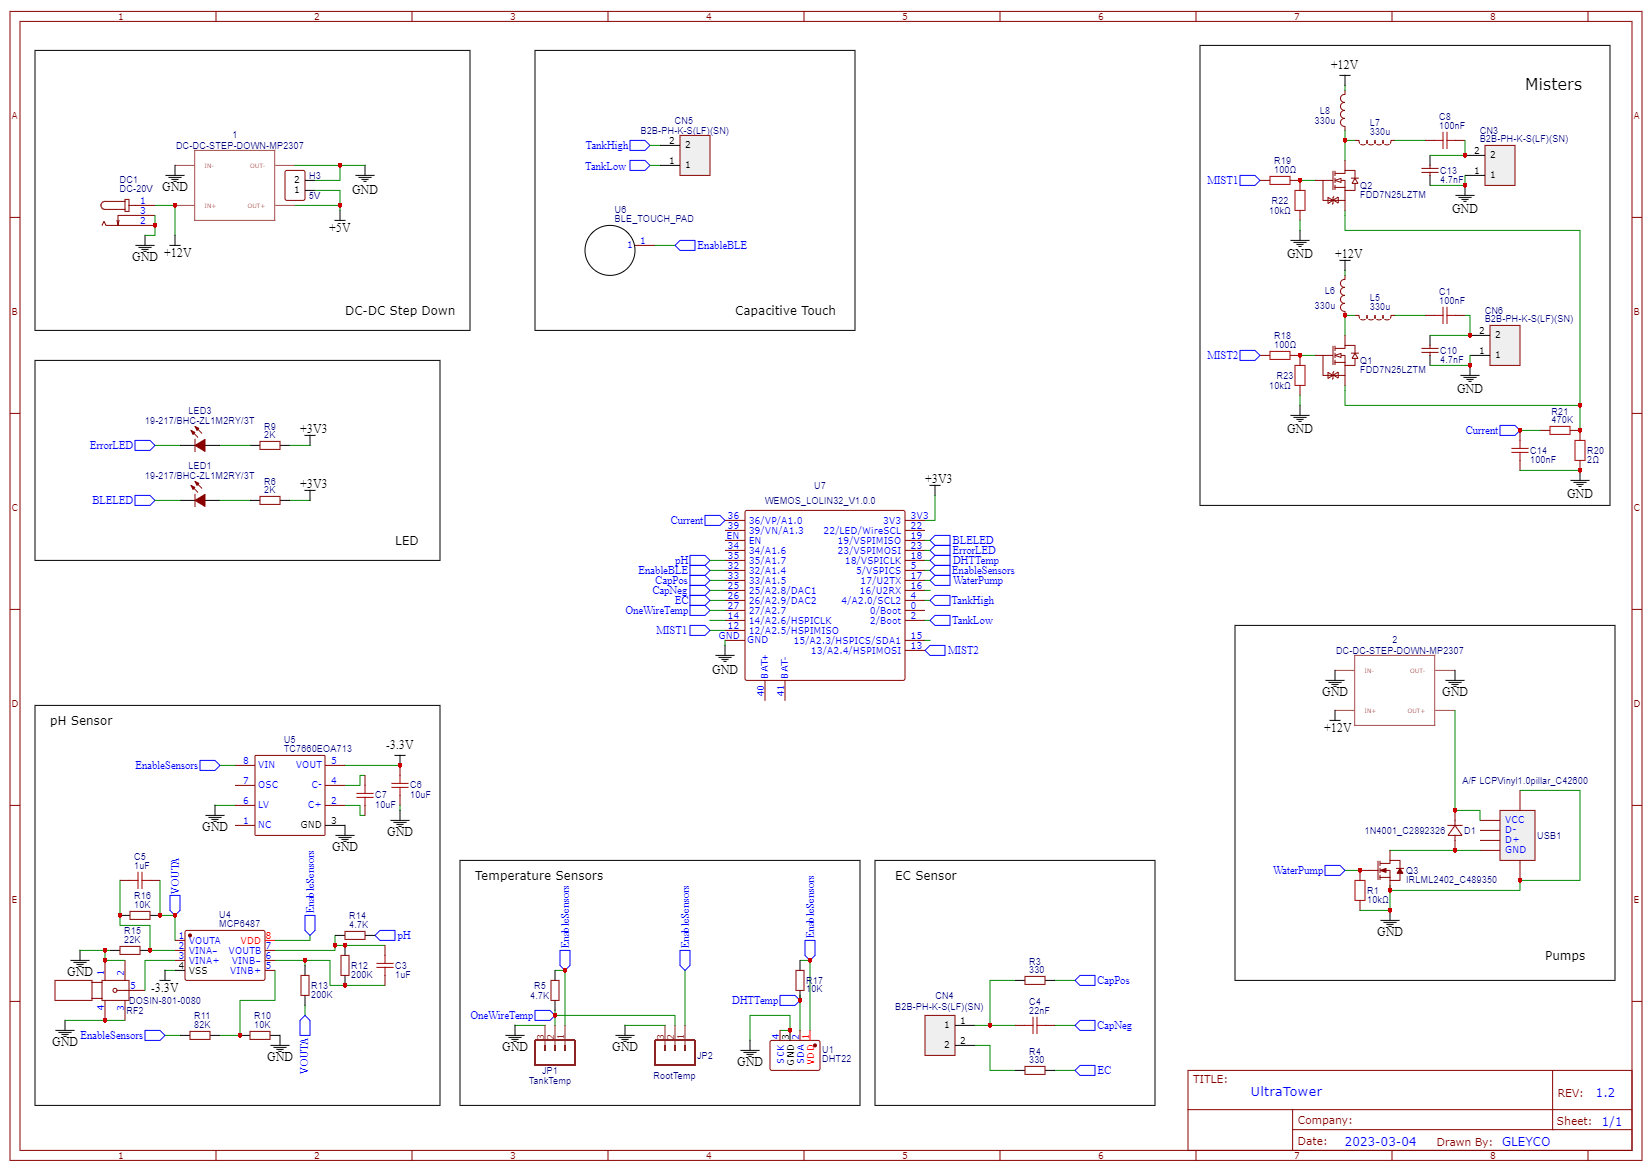
Schematic:
![]()
-
Quick Update 23/01/23
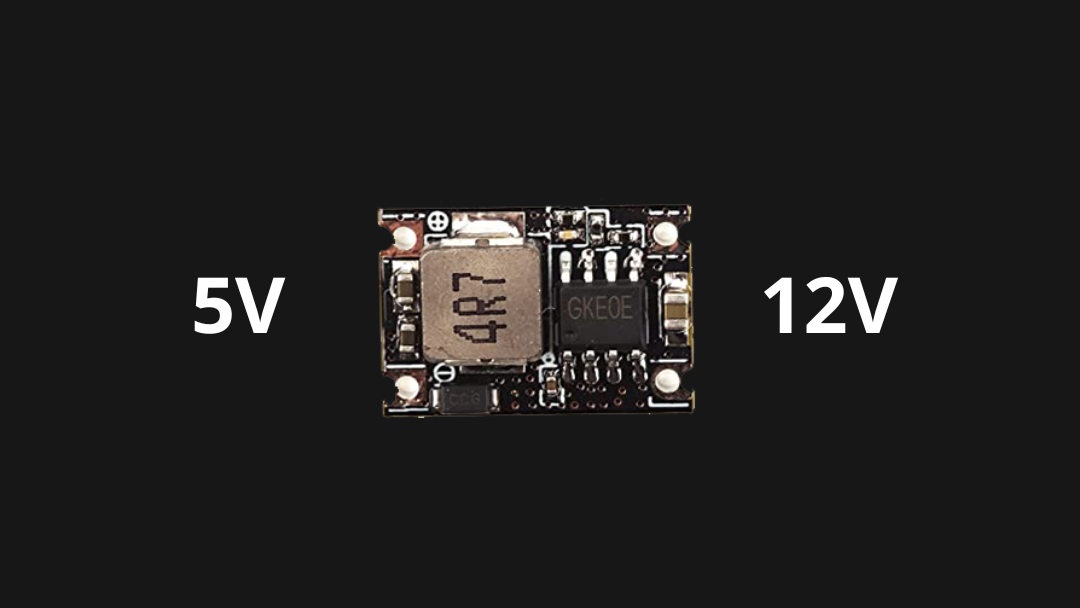
07/04/2023 at 05:31 • 0 commentsThe DC-DC Buck Step Down Converter problem
![]()
I use this module (CN3903 3A) to convert 12V to 5V to power two components: the esp32 and the 5V mini pump.
However, it is not capable of feeding both at the same time. After several tests, activating the pump causes the esp32 to crash.
But separately everything works.
Several solutions are possible:
- Put two CN3903 one for the pump and one for the esp32
- Take a 12V pump, allowing to power directly to the charger (but it is not a USB connector for the pump anymore)
- Use a 5V charger for the PCB and then use a boost converter to power the disks at 12V
For the moment I use solution 1 which allows me to test easily.
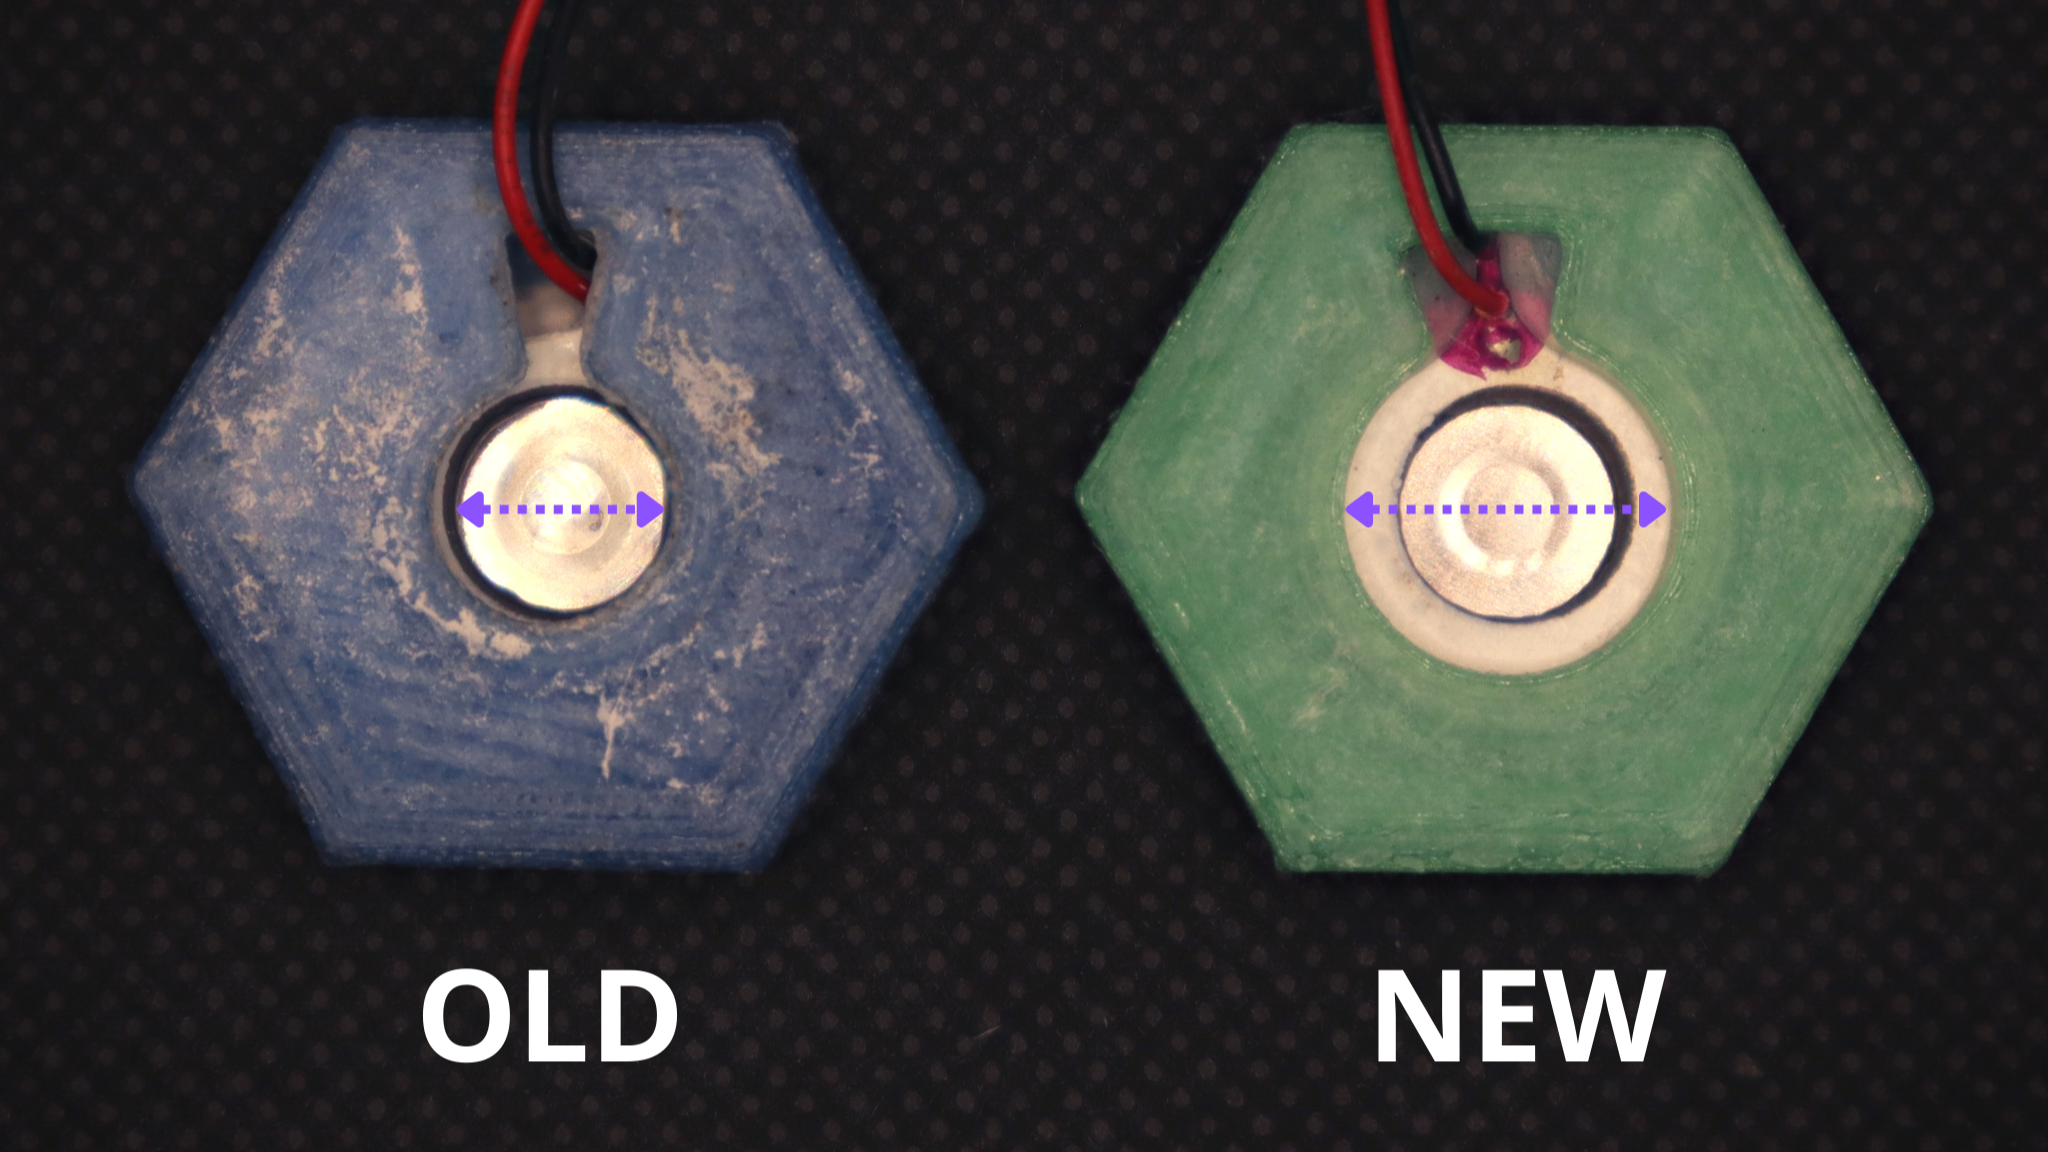
Disc nut optimisation
![]()
The old STL design, was too closed on the disk creating a water droplet retention preventing the creation of fog afterwards. The new design seems to solve the problem.
New PCB
I'm still testing the latest version of the PCB, the fog creation is good now I'm waiting to see if the disks don't get damaged over time.
-
Quick Update 21/11/22
07/04/2023 at 05:30 • 0 commentsI have been testing for several weeks a new circuit to create a better AC current with a current sensor to adapt the frequency.
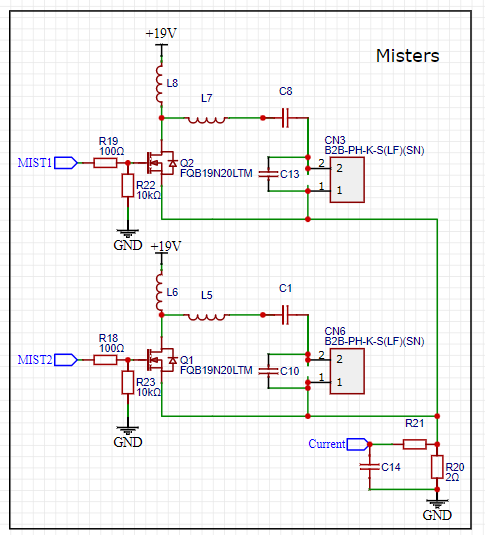
Schematic:
![]()
By adding coil L7 and capacitor C13, the generation of alternating current is balanced in the negative and positive directions.
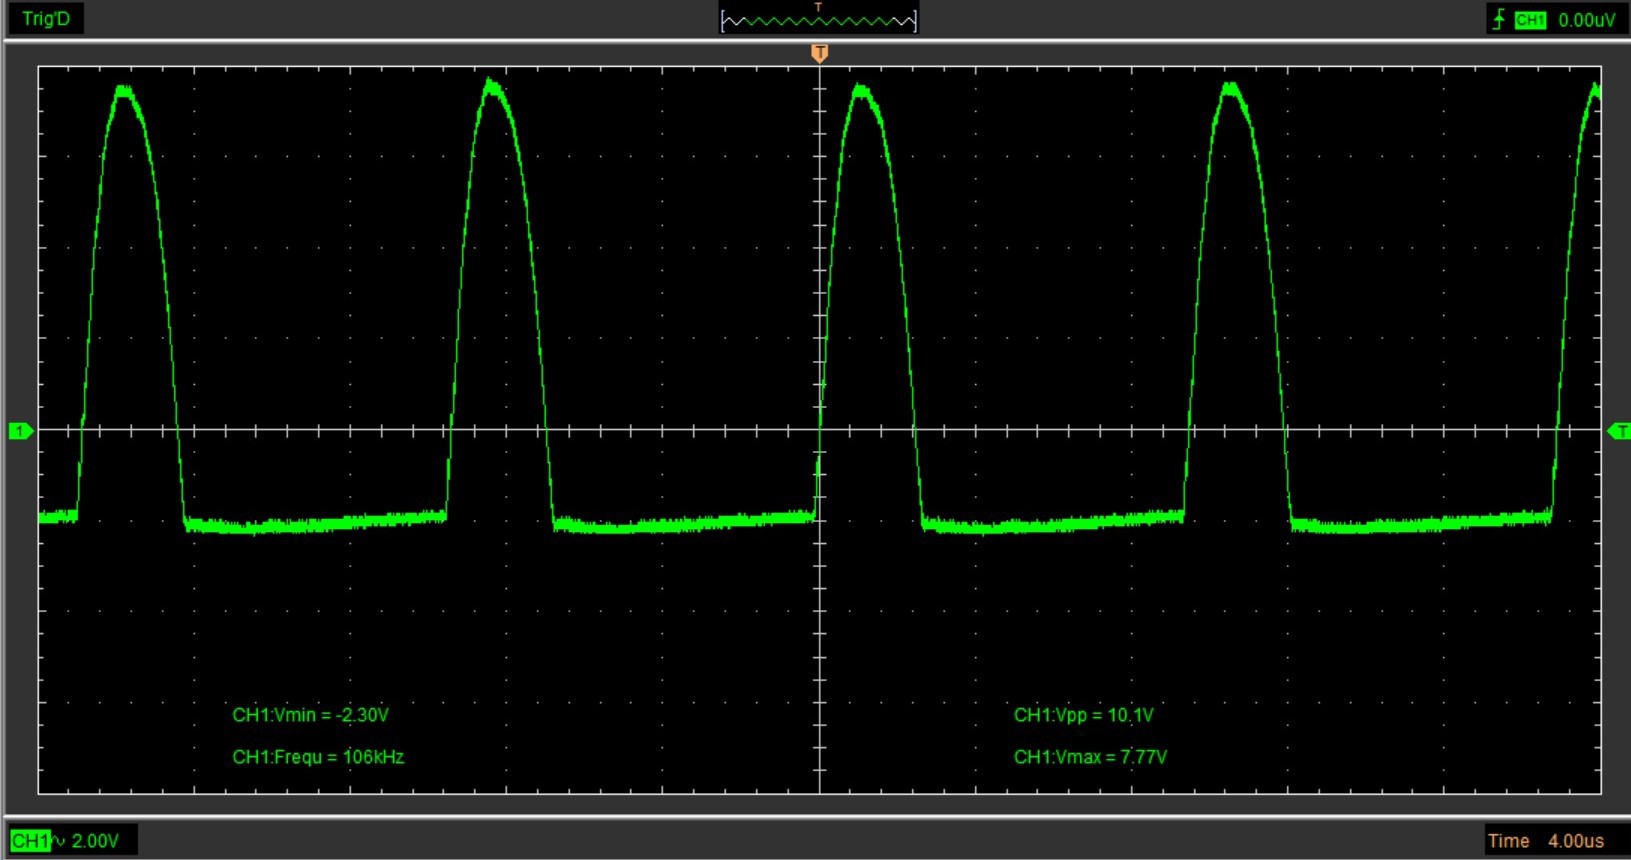
Old circuit:
![]()
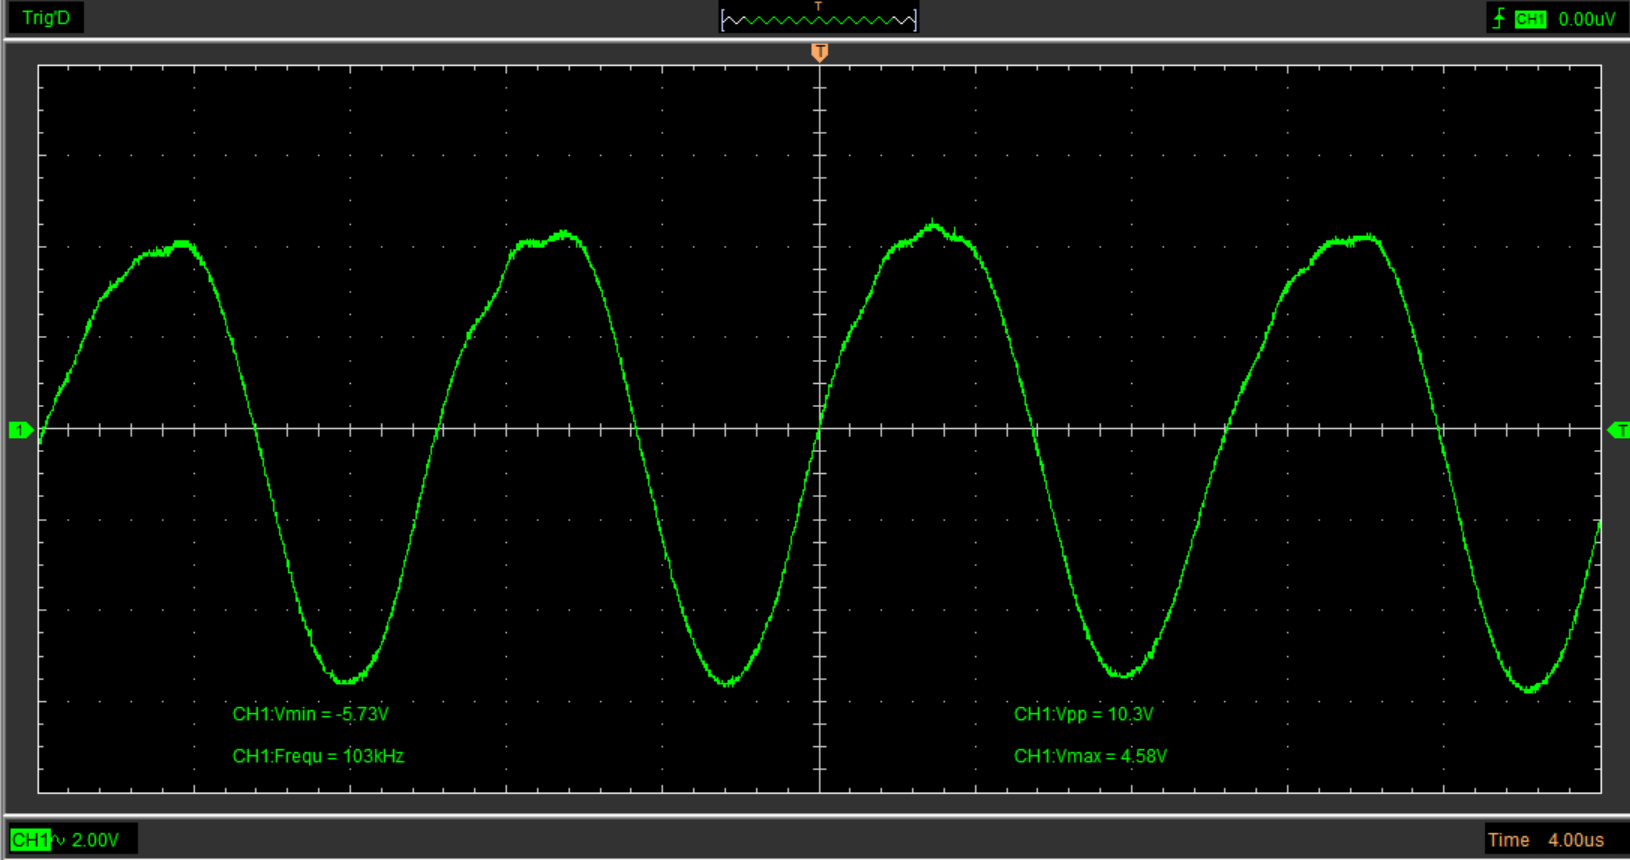
New circuit:
![]()
I also added a shunt resistor to measure the current. By changing the frequency we can detect the peak of fog creation which corresponds to the current peak.
I have ordered the new PCB with the modifications. I will test it before publishing it.
-
Quick Update 03/11/22
07/04/2023 at 05:29 • 0 commentsI changed the ESP32 code, the new code is in the project github.
The changes:
- The pH sensor reading switches from pin 13 to 35 because pin 13 is unusable in ADC when bluetooth is enabled
- The code for activating the pump has also been changed
- Other minor bugs fixed
Water level sensors get damaged very quickly even when using the capacitive function of the esp32. I think I will use stainless steel wire to limit corrosion.
The root system of plants is quite impressive. The lettuce on the top left has already been cut three times (leaving some leaves on). It has grown back to its pre-cut size in a week.
![]()
-
Scalability
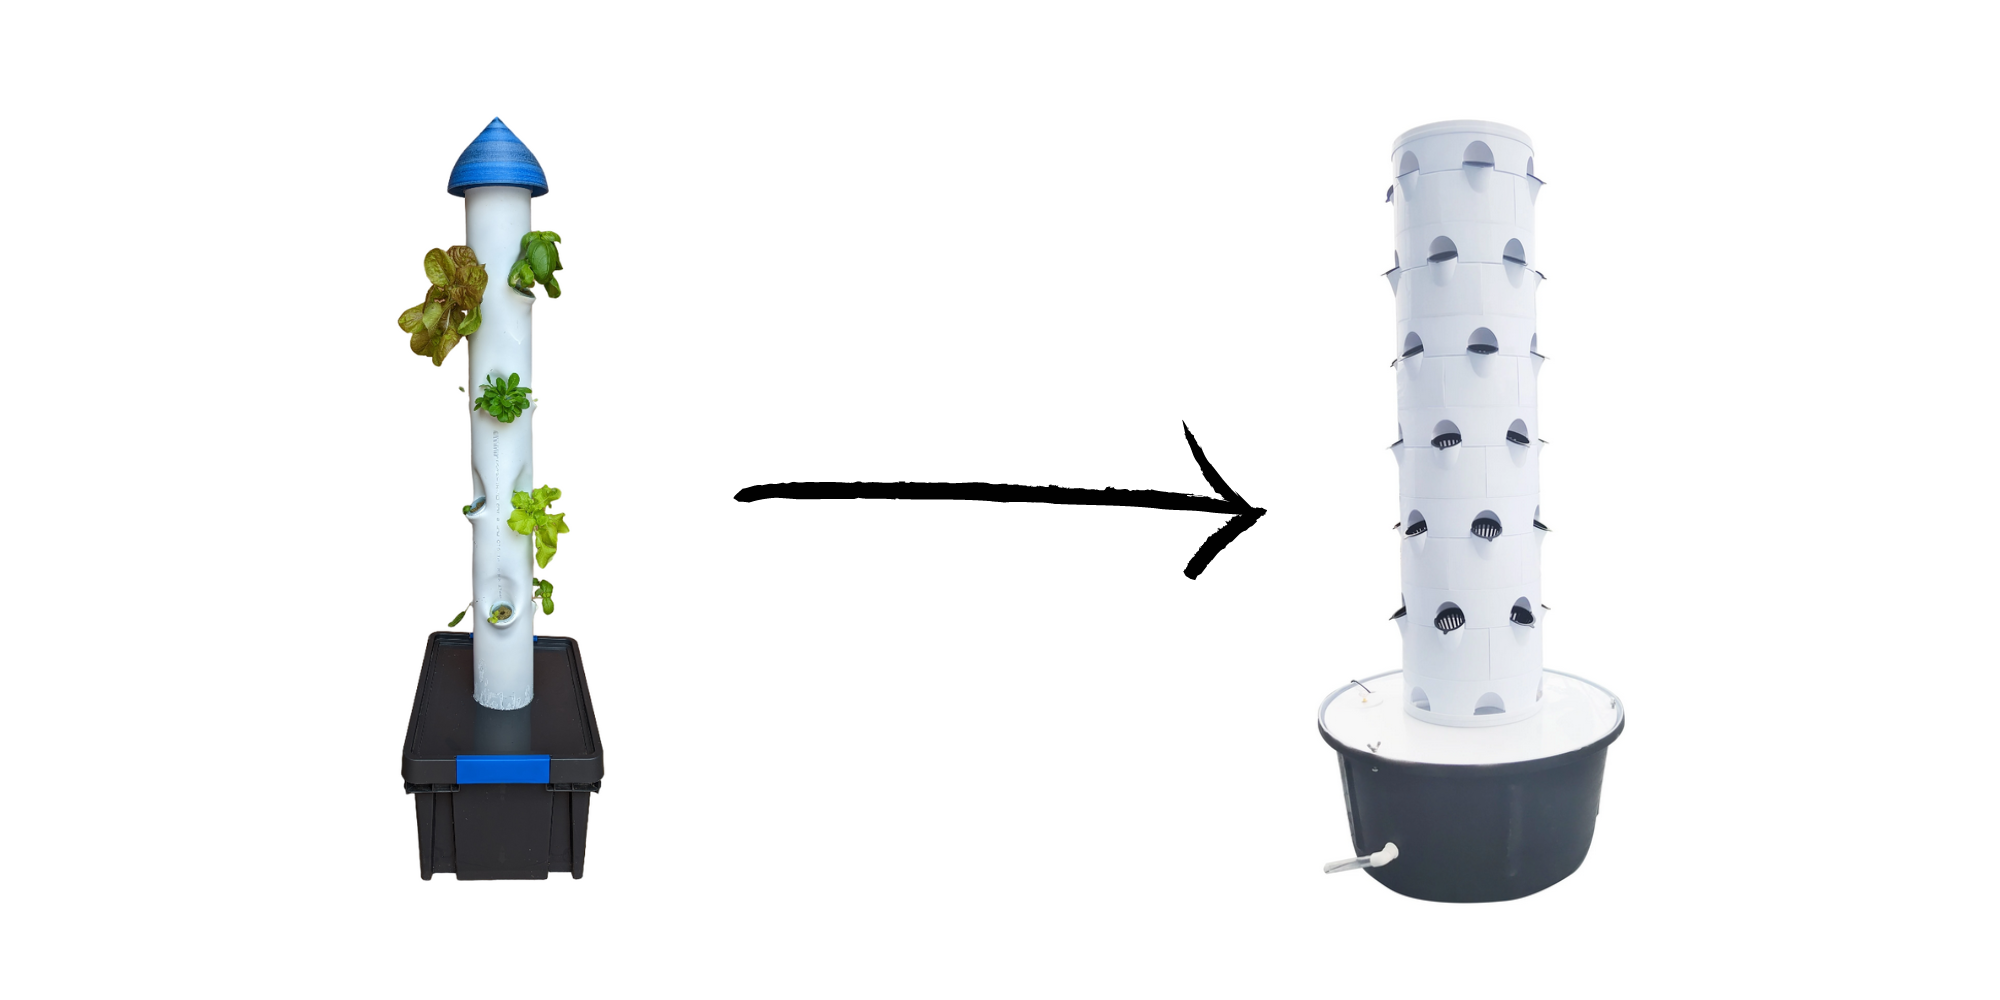
07/04/2023 at 05:28 • 0 comments![]()
The current design is great for a low cost tower and quick to build. But the discs can be used to water more plants. So a tower design with stackable tiers would allow to grow more plants.
Here is the evolution of an individual tower but for building roofs we can still optimise
Farm on a building
![]()
The concept is a main reservoir that manages water quality (ph, nutrients, temperature). It is located high above the tower and allows the smaller tanks to be filled by gravity.
Then there is an indeterminate number of ultratowers depending on the space available on a roof or other.
The PCB of the towers only needs to manage the activation of the disks, the water level of their small tank and a valve to fill it and stop the filling.
According to my calculation the cost for a PCB could be around 8~10€ for orders of 100 pieces.
There would be a single pump that brings the water from the bottom of the towers up into the large reservoir to close the loop.
This farm concept would optimise material costs, running costs and electricity consumption.
-
Android Application
07/04/2023 at 05:27 • 0 commentsThe android application is online. You can download it on the google play store : https://play.google.com/store/apps/details?id=com.gleyco.ultratower
![]()
This application allows you to change all the parameters of the tower without having to modify the arduino code. It also allows you to configure a data transfer to ThingSpeak. And most importantly, you can calibrate your sensors easily.
I am not a professional developer, I only know how to develop applications in Kotlin for Android and unfortunately I could not make the application for IOS.
For non android users I would make an arduino code where you can easily modify the variables.
-
ESP 32 Code upload
07/04/2023 at 05:27 • 0 commentsI have updated the code on github for the new PCB.
In this new version there is :
- the pH sensor
- the EC sensor
- the temperature sensors
- the data sending to ThingSpeak
The entire bluetooth communication routine between an android smartphone and the esp32 is also complete.
This application, which should arrive this week, will allow you to modify the parameters of the tower (such as the time of the cycles, activate or deactivate the sensors, ...)
But most importantly, the EC and pH sensors can be easily calibrated through the application.