Close
0%
0%

CircuitScout

A DIY Probe Testing system that helps with automatic PCB in-circuit debugging.

Public Chat
Similar projects worth following
CircuitScout is a DIY probe system designed to simplify the process of testing PCBs, by automatically probing desired signals. Through an intuitive web-based GUI, users can upload their KiCad files and have the system automatically navigate and probe their PCBs. With the help of CircuitScout, all you need to do are selecting signals from the schematic and checking the output.


System description

  • Mechanical system (CircuitScout machine):

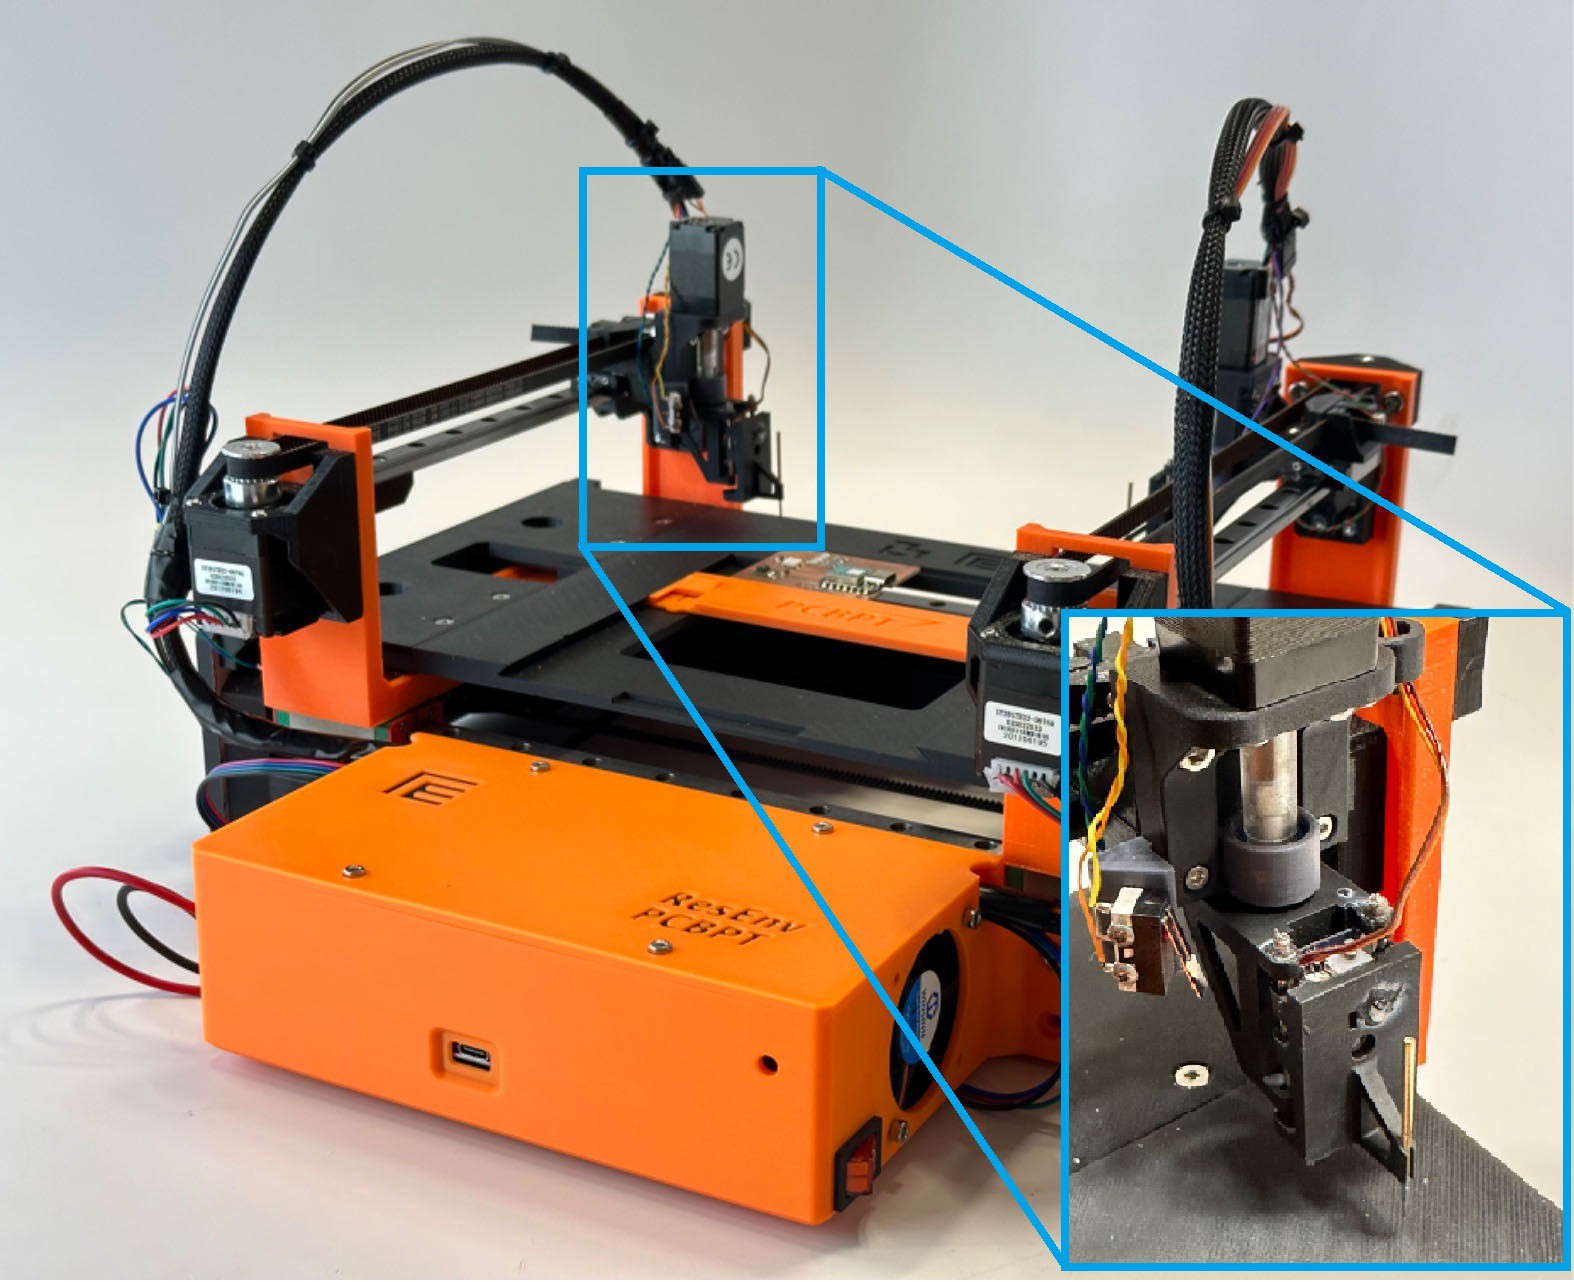
The CircuitScout machine is a CNC machine (35cm x 33cm x 18cm) that features a dual-probe system designed for precise robotic probing of specific pads on PCBs. The PCB to be tested is positioned and secured on the machine platform. Stepper motors are employed for precise XY-axis movement, while compact linear servos control the Z-axis motion of the two probes. The 3D files that are required to be printed can be found below, and the assembled modelization can be found on onshape.
  • Control electronics:

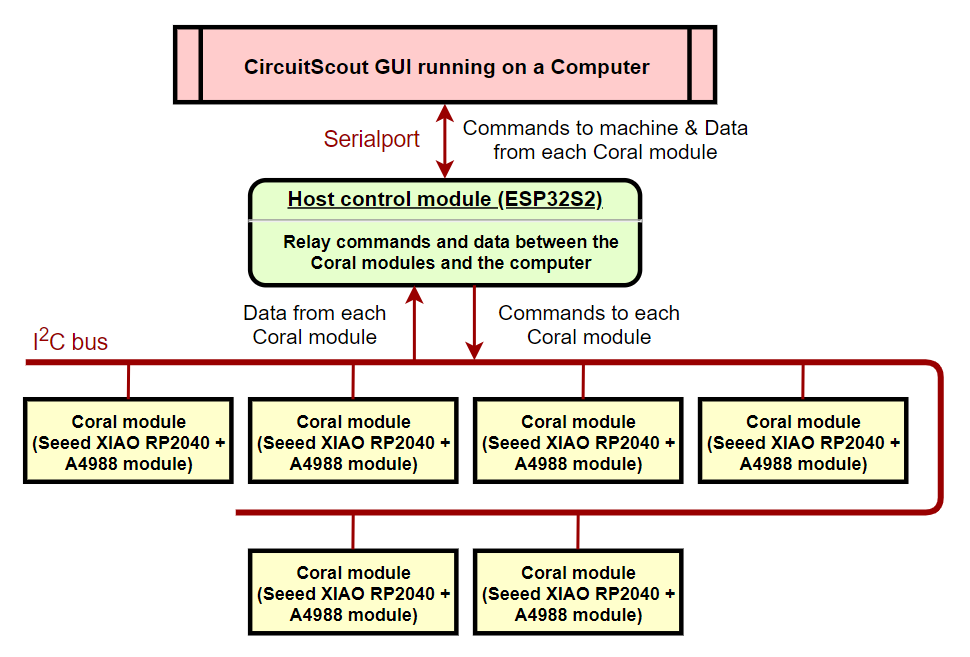
The machine's controlling electronics are illustrated below, consisting of an ESP32S2 module that is connected with six separate stepper motor/servo control modules, which we named the “Coral” module. Each Coral module is a fusion of a Seeed XIAO RP2040 module and an A4988 stepper motor controller module that can control both a stepper motor and a servo.
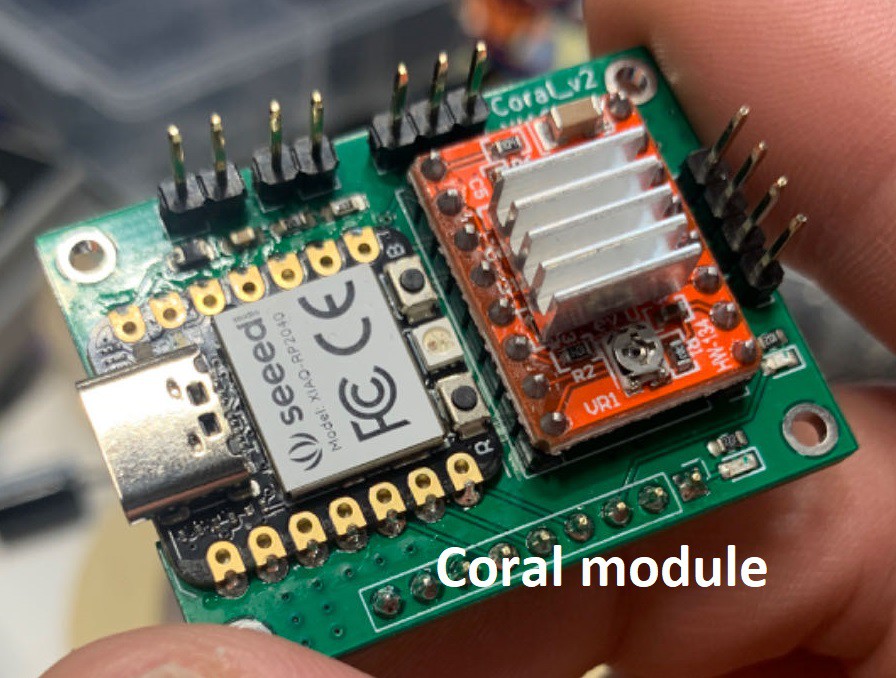
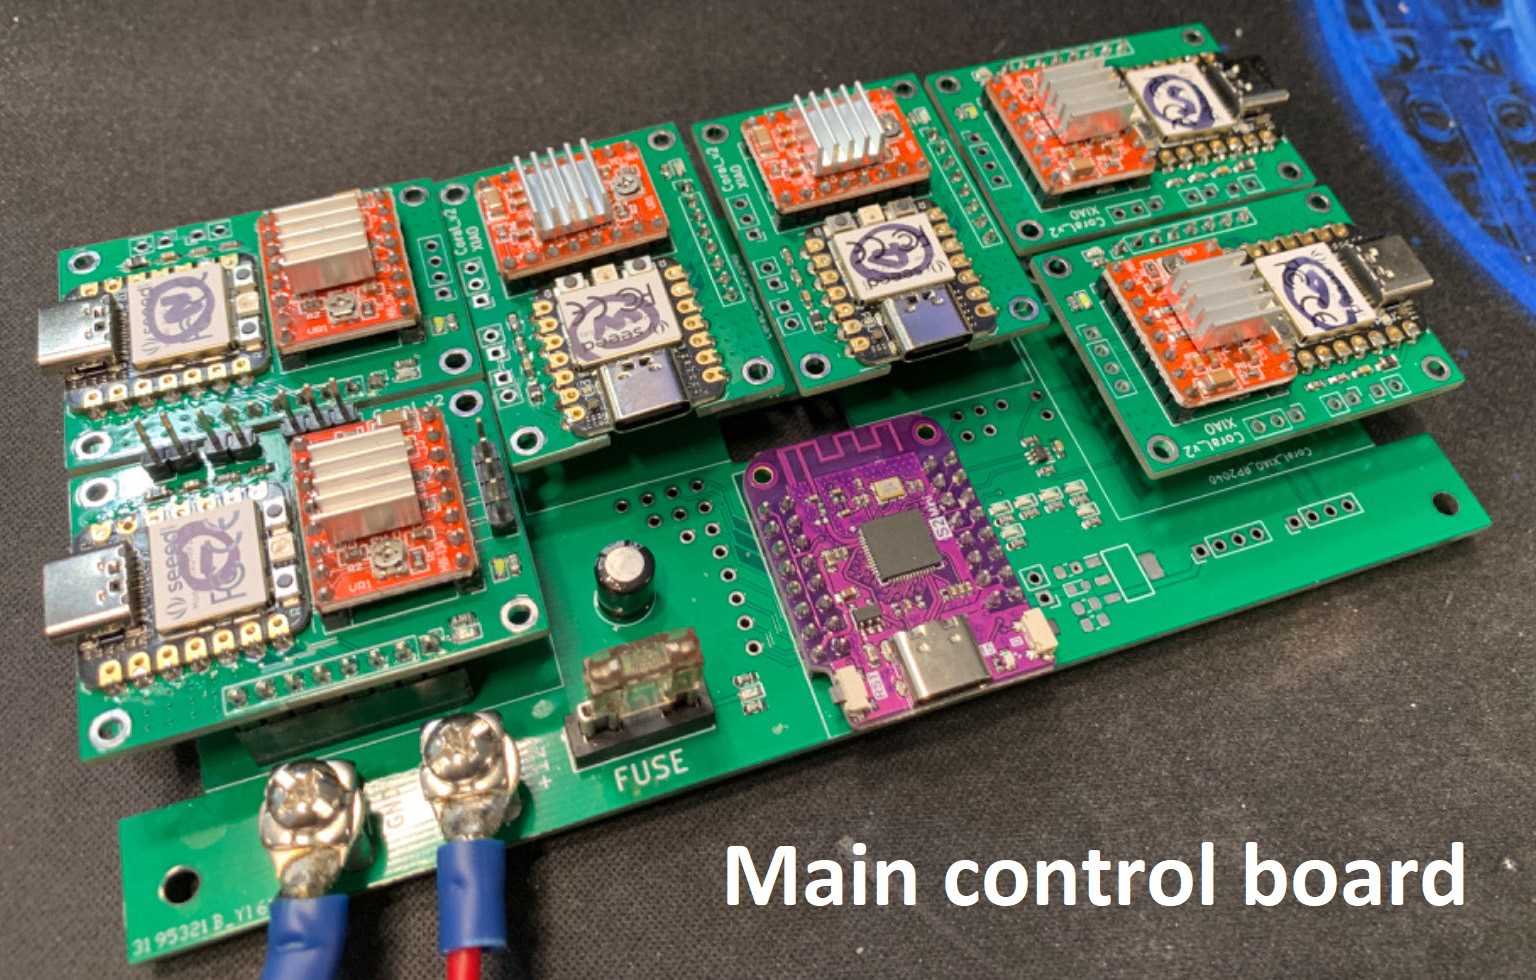
These Coral modules are connected to an ESP32S2 module, itself is connected to a computer where the GUI server is running. The GUI communicates with the ESP32S2 module through Serial. The GUI sends the coordinates of the desired pads to be probed and receives data on the status of each Coral module. All Coral modules are connected to the ESP32 through an I2C bus. The ESP32 can also use a wireless connection between the machine and the GUI.
The CircuitScout system is compatible with KiCAD design files. After users select desired signals to be measured from the schematic in the GUI, the system will automatically select proper pads for the corresponding signals and control the machine to probe the pads. With the help of CircuitScout, all the user need to do is select signals from the schematic and check the output.

  • Graphical User Interface:

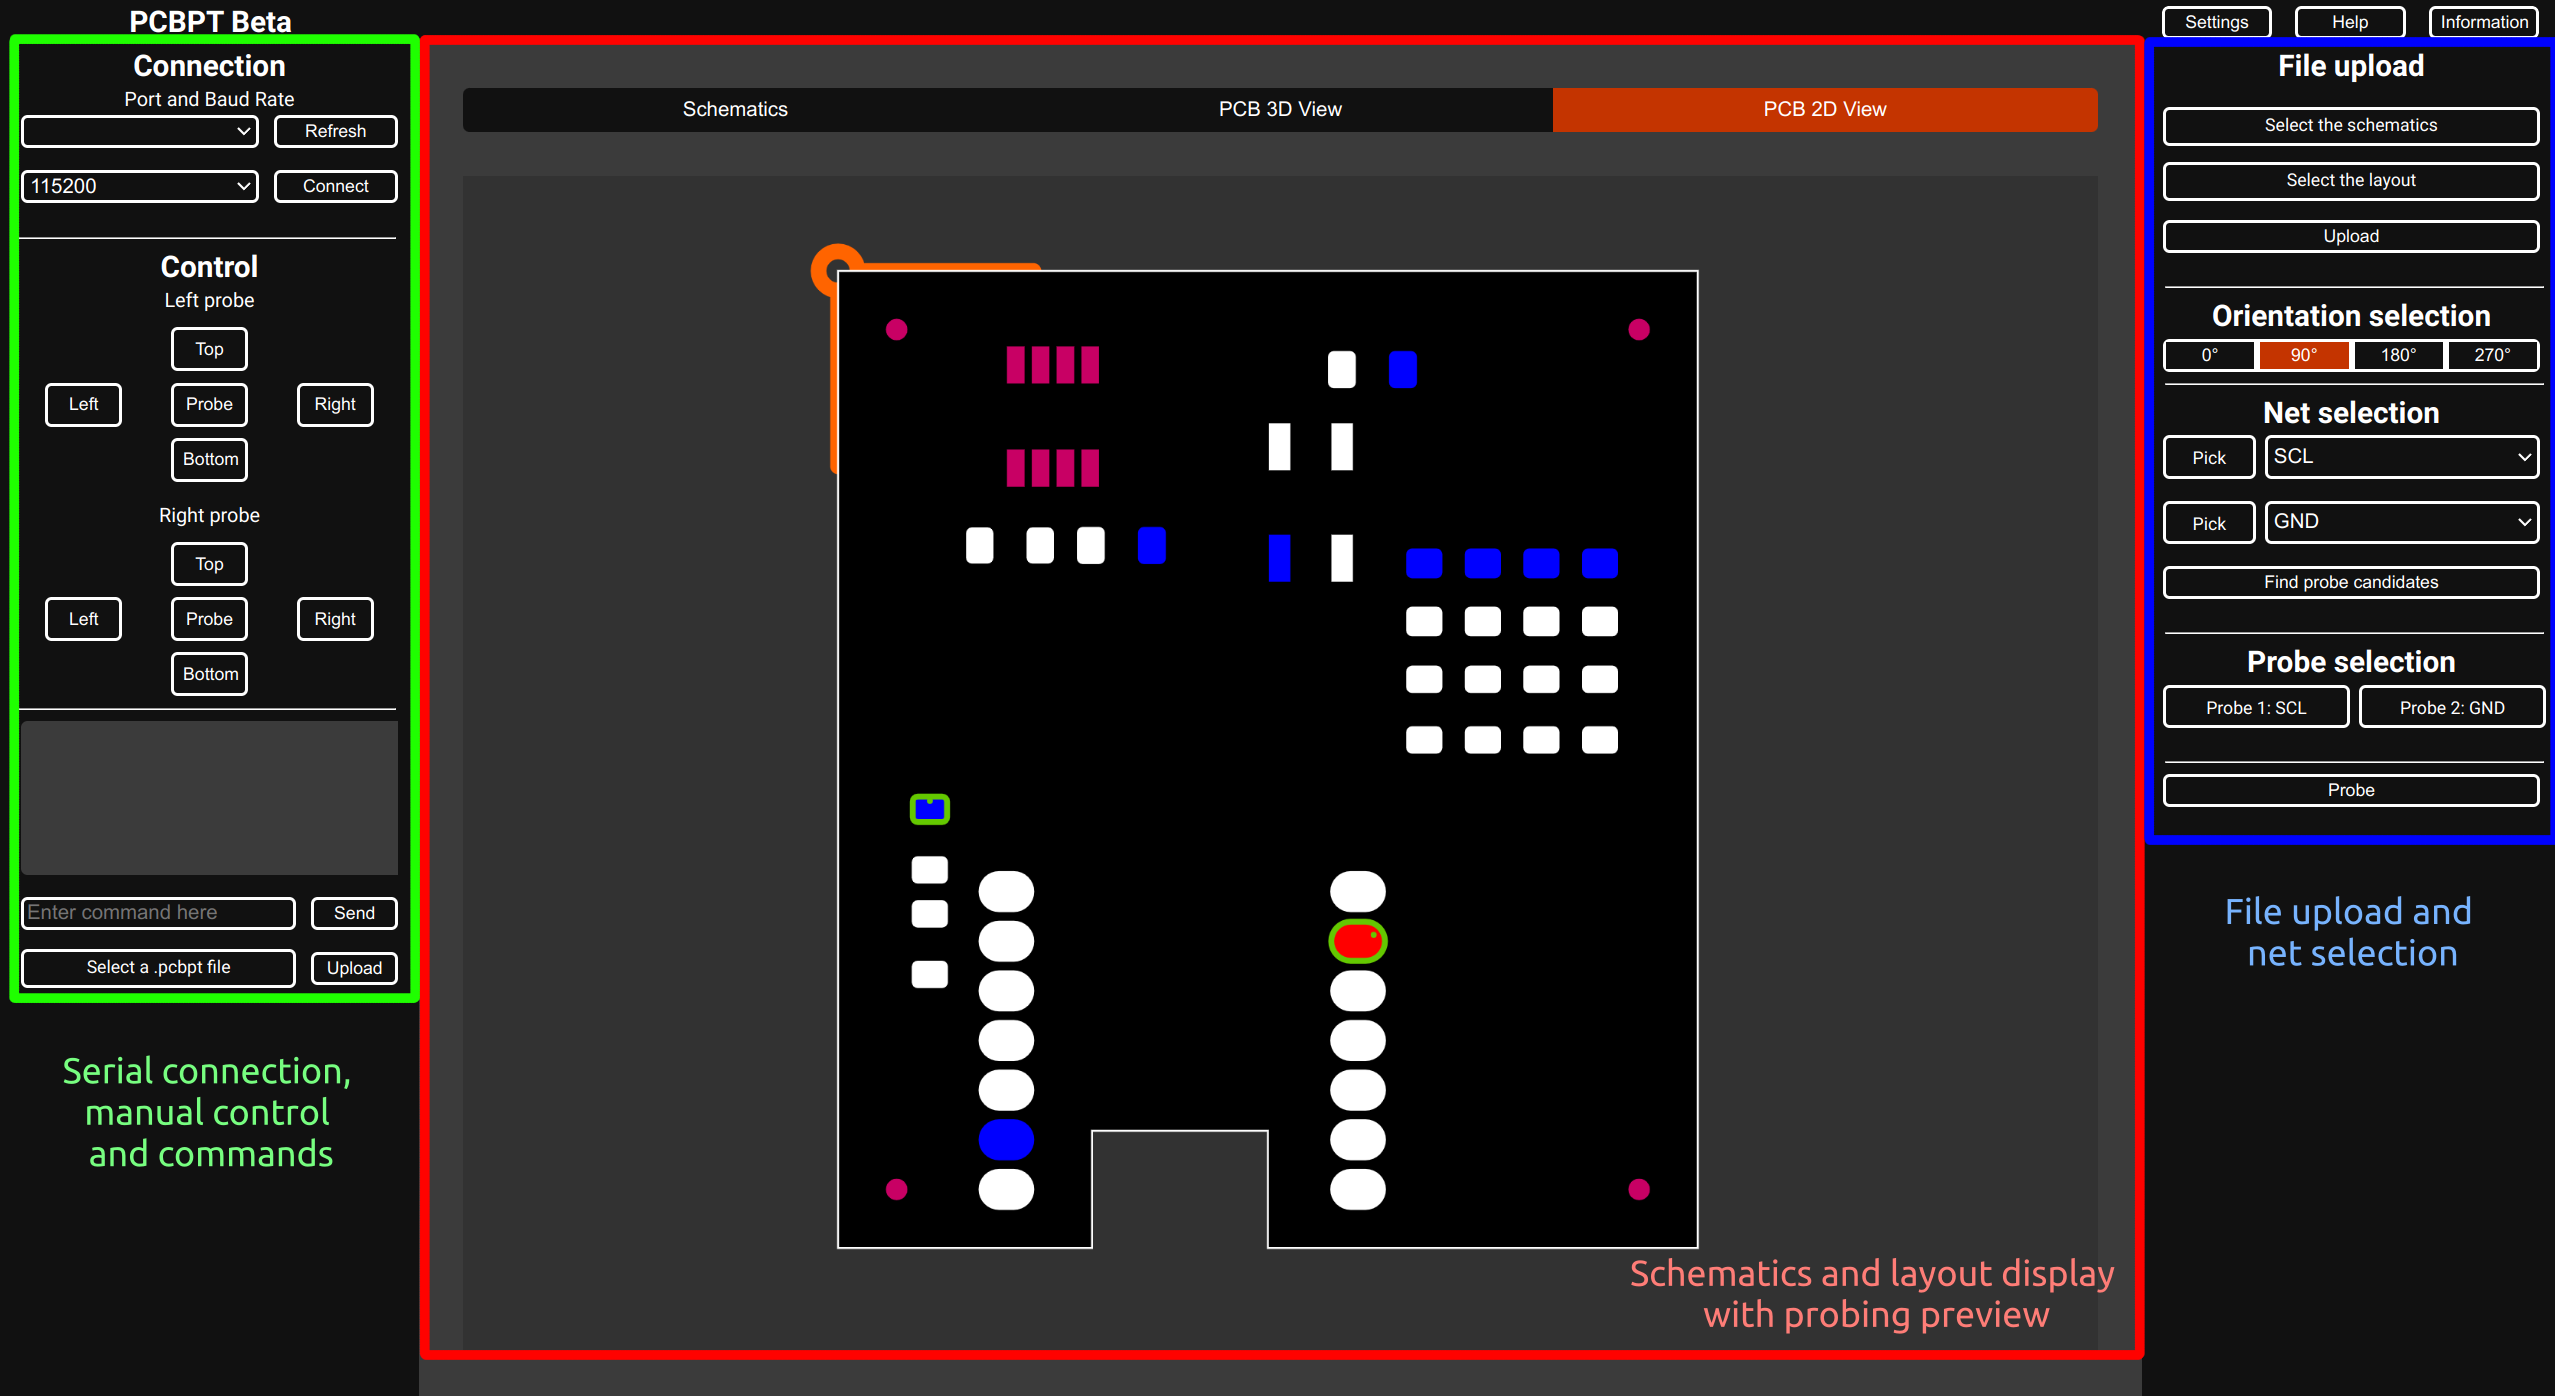
The GUI is hosted by a Python server that uses Flask-SocketIO as the backend. Any device on the same network can access and use it. The interface is divided into three sections: on the left, the user can connect to one or multiple machines by selecting the port and the baud rate. Since the main board receives commands through serial, any serial interface, such as the Arduino IDE, can be used to send commands. Commands can be written and sent using an input, and a console output displays the response of the device. A .pcbpt text file containing multiple commands can be uploaded if needed, and each command is executed at a fixed delay (1 second by default). The delay can be set in the file using SETDELAY n, with n being the number of milliseconds to wait after each command. 

In the center, the board’s schematics and a 2D and 3D view of the layout are displayed. These drawings can be interacted with to select the desired nets to probe.  The pads selected to be probed are highlighted in green, with a dot representing the position the probe will aim for. 

On the right, users can upload their project’s Kicad files. These files are then hosted on the server side and the session of the user is preserved between page refreshes. The orientation of the board can be set to match how the physical board is placed on the device. Some selectors allow you to choose which net to probe, and "Pick" buttons allow you to select the nets directly from the schematics or the layout by clicking on the wires or the pads. Pressing "Find candidates" will select the best pads to probe from the selected nets by maximizing the distance between the probes. Two buttons allow the direct selection of the pads to probe, bypassing the automatic selection. Finally, a "Probe" button sends the probe command to the device.
All the relevant files can be found on the project's GitHub organization.

Future works:

A lot more work needs to be done to reach a product-like state, but the current priorities are the following:

- Improving the interactivity of the layout and schematics displays

- Redesign the probes to allow more retractation during movements:...

Read more »

coral_board_bom.txt

A BOM of the components necessary to create the individual Coral modules

plain - 1.62 kB - 08/08/2023 at 05:09

Download

main_board_bom.txt

A BOM of the components necessary to create the main board

plain - 2.16 kB - 08/08/2023 at 05:09

Download

Full Assembly.zip

A collection of STL files that can be printed to create the machine

Zip Archive - 2.84 MB - 08/08/2023 at 05:03

Download

View all 11 components

  • Control PCB

    Fangzheng Liu08/10/2023 at 16:33 0 comments

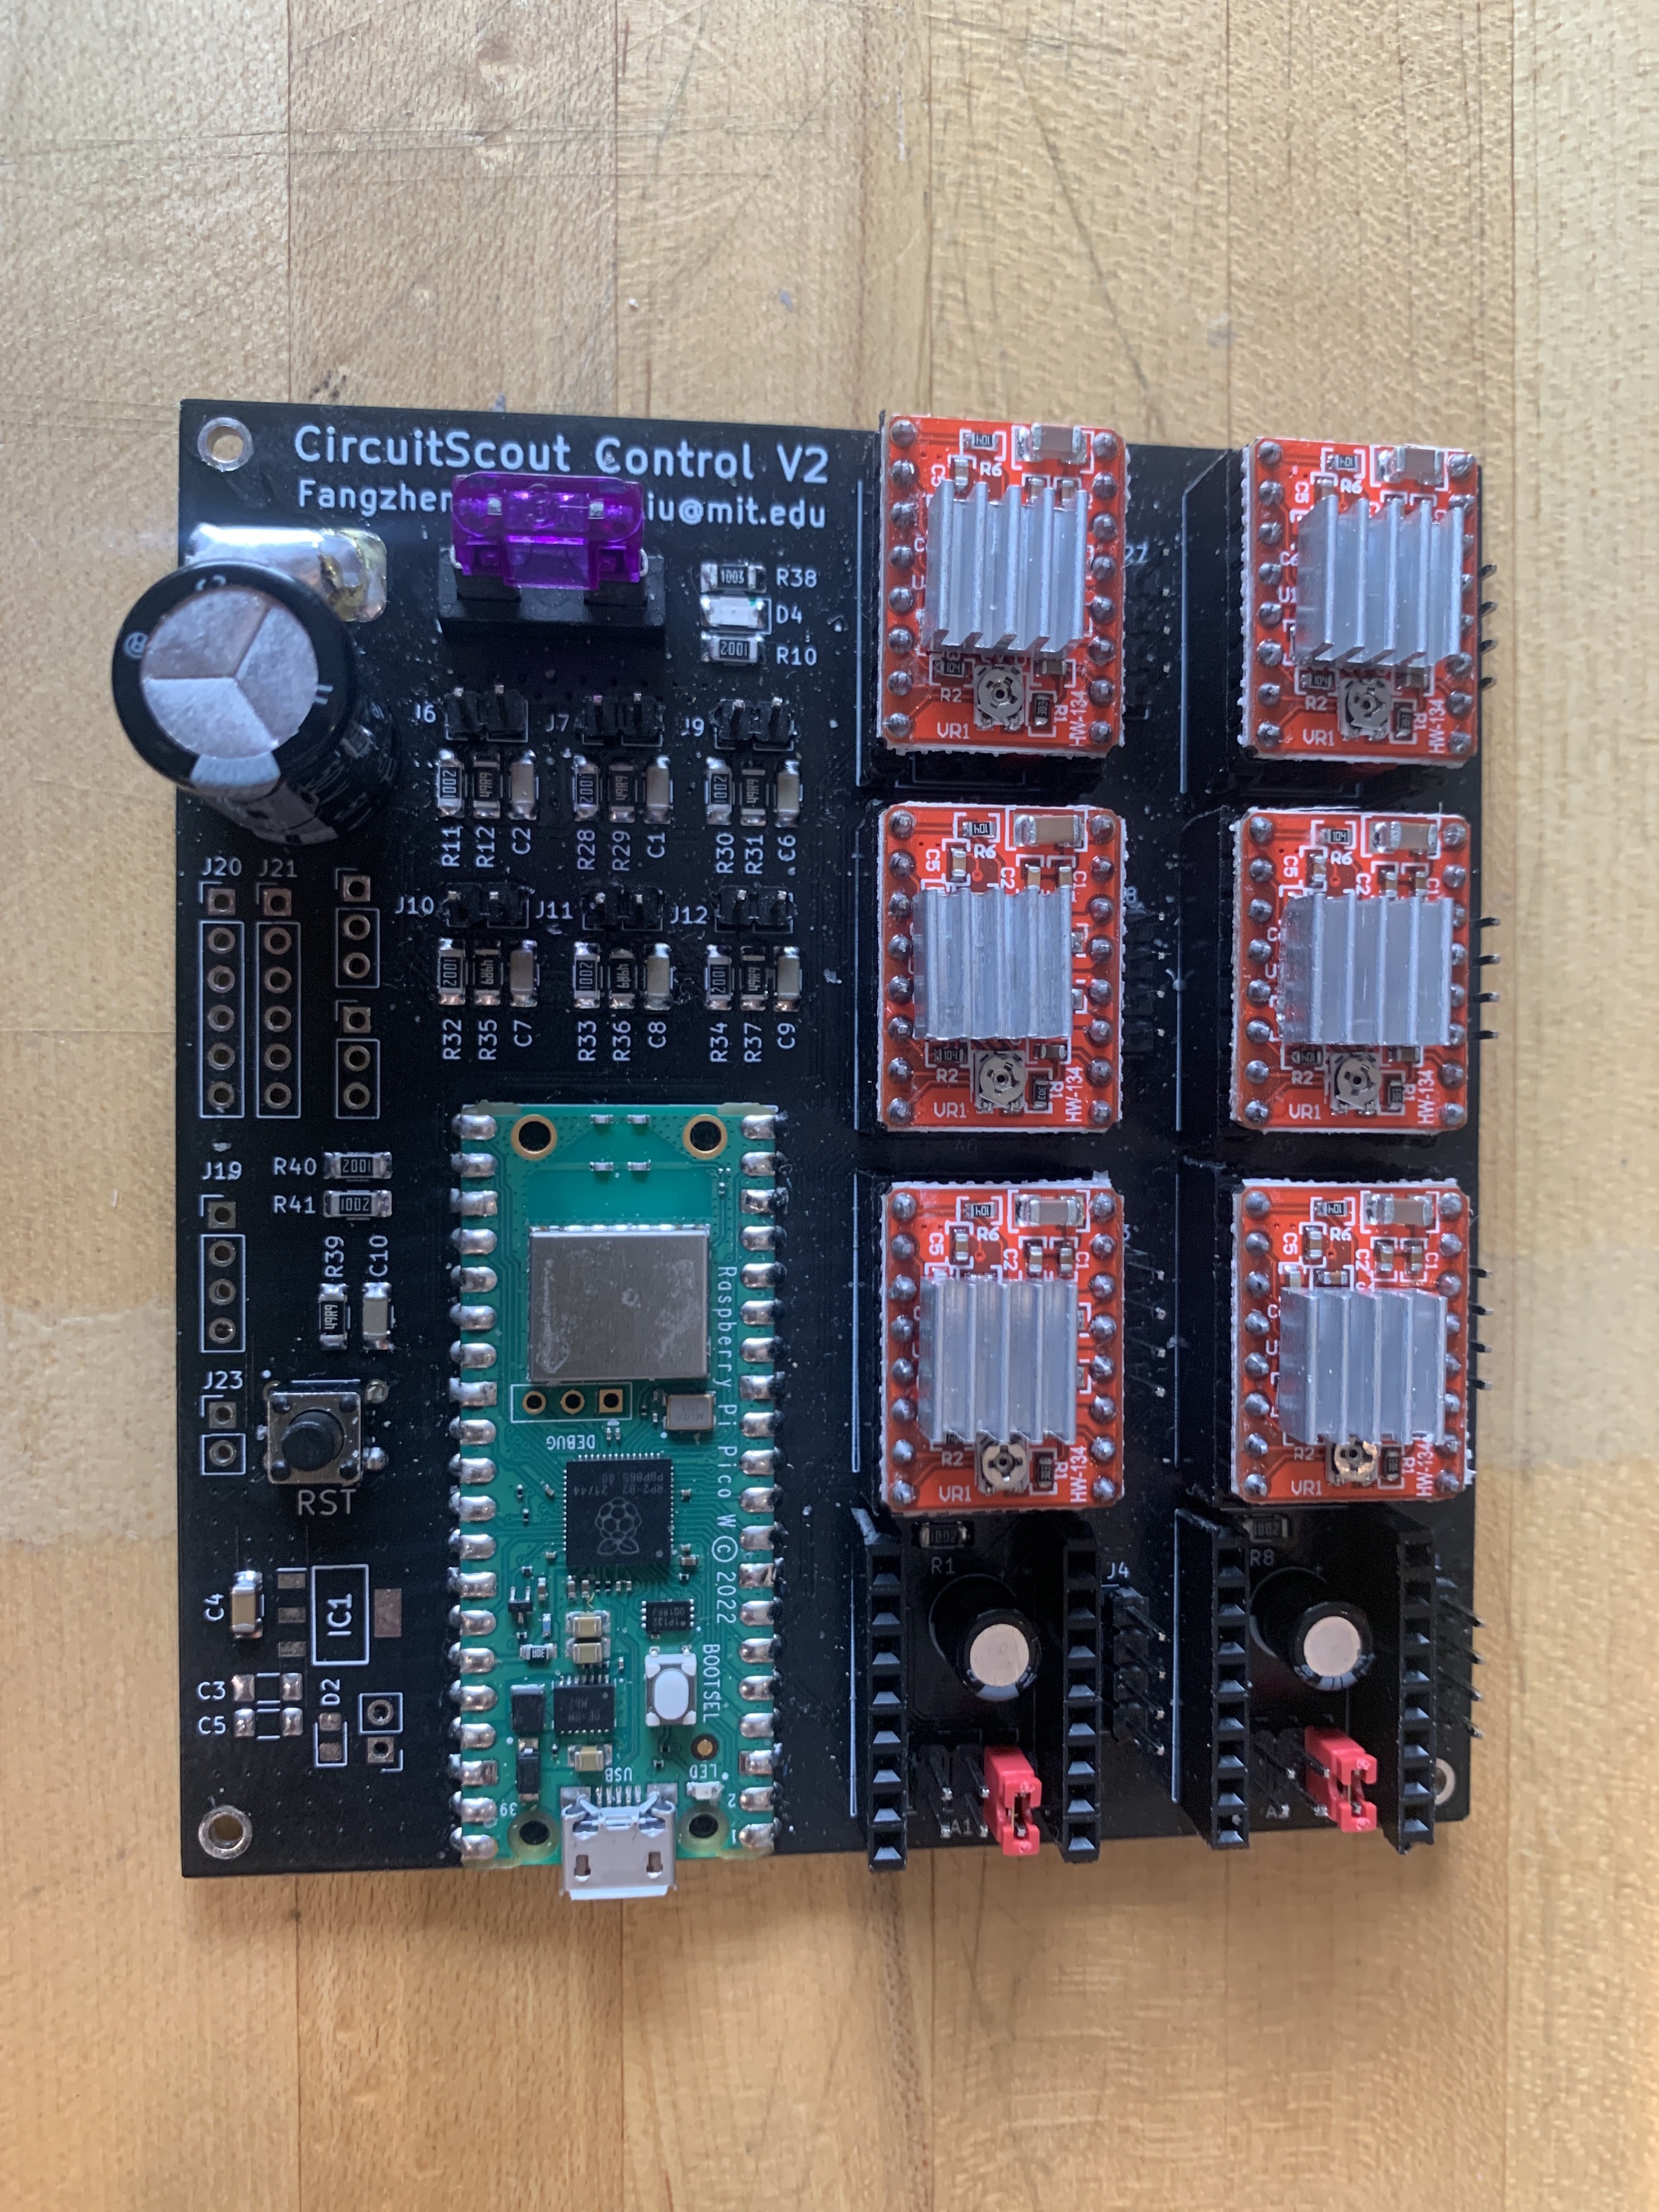
    The current control board is a board that holds multiple separate modules, and each module can control a stepper motor and a servo. All modules are connected through I2C. I thought this Is a cool design since it is a distributed system and each module can be custom programmed. However, as there are only 6 steppers, and the CircuitScout function is not that complex, this kind of structure introduces some problems, the host ESP32 module needs to have frequent communication with each module to check the machine's status and decide what to do next. This is not a very efficient way. If the whole machine is controlled by a single MCU board, things will get easier. So I designed a new version of the main control board.

    It's an RPi Pico W + 8 A4988 module. The RP2040 is dual-core, so I can use one core for communication between the machine and the GUI, and another core used for machine control. It's basically a PicoW + an A4988 Arduino shield, but I really enjoy designing my own board :)

  • Probe actuator

    Fangzheng Liu08/09/2023 at 20:40 0 comments

    Currently, the probes are driven by tiny linear servos, but these actuators are too weak and a little bit noisy. A better linear actuator needs to be designed. Currently, one idea is using a stepper motor with a built-in gear head combined with a  long screw.

  • Pads selecting approaches

    Fangzheng Liu08/09/2023 at 20:34 0 comments

    The schematic has all the information about the connections between components, and normally the PCB debugging starts from locating desired signals from the schematic. However, for some simple PCBs, it's not that difficult to recognize which signal a pad holds, and the pads picked by the system may not be proper or the ones the users want, so we add another pad-selecting approach: users can pick the pads to be probed directly from the PCB layout in the GUI.

  • Probe design

    Fangzheng Liu08/09/2023 at 20:30 0 comments

    we have designed two kinds of probes, one can probe vertically (the one we used here). Another one can probe from a tilted angle, which can probe a pad from the side. We decided to use the vertical probe since it's currently easier to realize. The probing position is not the center of the pads, but add a tiny bias from the center, so the probe won't be blocked by the components. We will improve the design allowing probe tilting for use in cases where a pad can’t easily be accessed only by vertical movement and/or component shape inhibits easy access to a pad.

View all 4 project logs

Enjoy this project?

Share

Discussions

Oraine M wrote 09/01/2024 at 19:52 point

Plans to post information for CircuitScout Control V2?  Looks like a nicer board :)

  Are you sure? yes | no

canned-slammin wrote 11/22/2023 at 19:42 point

I'm super interested in implementing this in the lab I work in, but none of the boards we'd be testing were built in KiCad. Is there a list of serial commands that could be used to manually create "toolpaths" for the probes?

  Are you sure? yes | no

Fangzheng Liu wrote 12/21/2023 at 16:44 point

Hey, yes, I designed a kind of communication protocol for the software to control the machine, you can send these different commands to move the gantries to the desired positions. But you will need to know where the pads are.

  Are you sure? yes | no

Fangzheng Liu wrote 12/21/2023 at 16:44 point

what PCB EDA do you normally use BTW?

  Are you sure? yes | no

canned-slammin wrote 01/18/2024 at 17:06 point

The designs we work with are mostly built in Allegro, some in Altium. 

  Are you sure? yes | no

Dan Maloney wrote 08/09/2023 at 22:07 point

Hey, great timing, I literally just finished up a post about this when your tip came in. Great project, really looking forward to seeing more development. Thanks!

  Are you sure? yes | no

Fangzheng Liu wrote 08/09/2023 at 22:56 point

Thanks so much and we are keeping improving the project. Will keep the whole community updated!

  Are you sure? yes | no

Similar Projects

Does this project spark your interest?

Become a member to follow this project and never miss any updates