 doctek
Update 9/3/25; This revision adds capability to use the Arduino Debugger with either the STLink or the DapLink.

The Arduino debugging capability requires use of OpenOCD. As the menu shows, both STLink and DapLink can be used. Selecting either one as the Upload method will automatically make them available for use in debugging. Many thanks to my friend Doug LaRue for figuring out how to make DapLink work and for making sure the menu selections worked properly! The only thing lacking is a good tutorial on actually using the Arduino Debugger.
To install this capability, just follow the instructions given below, but use WeActDuino_R2.zip from the Files area.
Update 8/24/25: This revision will add Generic Serial support. In addition to using HardwareSerial to enable the UARTs, you can now just use Serial without any other definitions just like on any other Arduino. This is especially important when using libraries that assume Serial is available for debug, etc. Sketches using these libraries now compile without error.
To install this new capability, close Arduino (if it is open) and simply go to the hardware directory, as described a few paragraphs down, and delete the WeActDuino directory. Then download WeActDuino_R1.zip from the Files area for this project. Unzip the zip and move WeActDuino into the hardware directory. Now reopen Arduino and press Reload Board Data on the Tools menu. Serial should now be available and sketches using it will compile. Serial will use pin A9 for TX and A10 for RX as shown on the WeAct_Pin_Map_R1.png (in the Files area).
I am now using Arduino 2.3.6, and STM32 MCU Boards version 2.11.0. Earlier versions should work as well, but these are what I've tested.
Complete update on how to get going. (3/25/25) You can read all about the project after this, but this is important!
As a preliminary, install Arduino 2.0 or later for your system.
First you must install STM32 support to Arduino. Follow the instructions here . Start with "Installing STM32 Cores" and proceed through "Extra step" to install the STM32CubeProgrammer.
Install the STM32CubeProgrammer following the instructions here. Download the software by scrolling down to Get Software and choose the correct version for your operating system. More information can be found here. To program the WeAct Duino, you will need an St-Link. The one from WeAct works well. You may need to install the ST-Link Driver. If using an ST-Link on a Nucleo board, you may need to update the software. Google should get you to the right areas.
The final step is to install the files to support the WeAct Duino variant. That process is described in the below, but is included here for simplicity. Find your Arduino Sketchbook location from the Arduino IDE using File > Preferences. The Sketchbook location is the first entry in the window. In that location, create a new directory named "hardware" (without the quotes). Then download WeActDuino.zip from the Files area of this project. Unzip it into the hardware directory you just created. once the files are in place, select the tools menu in Arduino and click Reload Board Data. You should see an entry in the Tools -> Board menu named "WeActDuino Boads (in sketchbook)" with a single entry "weActDuinoG431". The old way to force new Board Data to be read was : "Once the files are in place in the hardware directory, you must close Arduino if it's open, delete ~/.config/arduino-ide, and restart Arduino. Do this anytime the files in the WeActDuino directory are changed. (It's a bug in Arduino.)" This is no longer necessary as of 4/15/25. I leave these old details just in case things don't work as expected, you can try the old method.
OK, now you can read about how we got here. Please note that all the items in tArmDuino that were indicated as "broken" have been fixed and are working well. Further, I'm now running Ubuntu 24.04 and using Arduino 2.3.4.
My first serious work with STM processors as powerful ARM-based Arduinos started with ST32L071 and is documented here. As part of that article, I found a way to integrate a custom board into the Arduino environment and how to use the ST-Link to upload a sketch from the Arduino IDE. Satisfied as I am with that work, I realize that no one is likely to build any of my L071 based Arduinos, even if they can be itsy-bitsy, low power, etc. However, my work may still be very useful!
Let's talk about the WeAct Duino. As discussed in the Description section above, the STM32G431 on the WeAct Mini Core Board offers a lot of power along with many peripherals. WeAct offers this unit at a very affordable price - less than three bucks! (Even in quantity, the G431 chip from Digikey costs more than the cost of the system from WeAct. How can they make it so cheap? Who knows! But we can all benefit!) While the G4xx draws more power than the L0xx, it is an M4 core with floating point hardware, runs over 4 times faster, and has additional resources. The version from WeAct is in a 48 pin package, so more of the resources are accessible. ST Nucleo versions of the G431 are available from Digikey (and others). The 32 pin version costs $12 and the 64 pin version is $16. Both are significantly larger than the WeAct board, but not any more powerful (same chip).
As a useful bonus, WeAct also offers a clone of the ST-LINK_2.1 programmer. Not only does it cost half what the cheapest ST version costs, it also provides a serial interface. The usual sort of Serial.print() debug can be easily used for program debug; for harder problems, gdb (g-debugger) can be invoked as described here NOTE: As of 3/24/25, the STML071 project is fixed and the explanations and details are updated and correct! NOTE: As of 3/24/25, the STML071 project is fixed and the explanations and details are updated and correct!
So lots of reasons to love the G431, but how do we use it as an Arduino?? That brings us back to my work on the L071! As mentioned above, that project is currently broken. It will be fixed soon and the documentation will be directly applicable to the G431. In the paragraphs to follow, I will explain how to make the G431 into an Arduino: WeAct Duino!
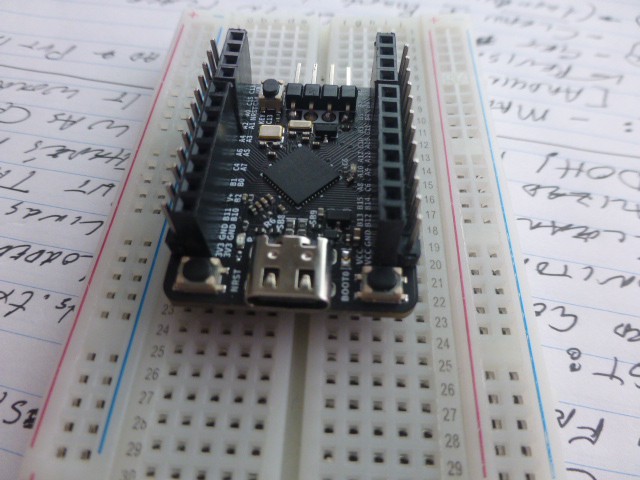
Let's have a look at the hardware side. WeAct supplies dual rows of square pins to be soldered into the holes in the board, but I wanted something that could plug into a breadboard. I used Arduino connectors on the inside rows and standard square pins on the outer rows as shown.

Now I can plug the WeAct Duino into a breadboard if I want and still have a row or two of connections available for each pin.
WeAct kindly provides pdf versions of the schematics and the board layout. These are very helpful in understanding the design and how to use it effectively. I've included these in the Files section.
The files that actually define a board to the Arduino IDE are those in the variant directories. This is all (or soon will be) explained in the revisions to the tDuino prject referenced above. For now, know that the necessary files (which you will put in place in a few paragraphs) have been suitably modified for the WeAct Duino. The external 8MHz clock crystal on the WeAct board is implemented as the system clock source. The WeAct Duino board runs at 170MHz.
To assist in understanding and using the resources of the WeAct Duino, I created a map of the pin functions. This is WeAct_Pin_Map_R1.png in the Files section, and will be used as a guide to experiments in the Project Logs to follow.
Final hardware note: There are still a few details of the WeAct board that are not clear to me. I am still investigating and will report as I learn.
Hardware ready, let's look at software. Although I will explain all the steps I went through to add the WeAct Duino to the Arduino IDE (as part of the update to the tDuino project), I've provided the necessary files so you can just copy them and go. I'm now running Ubuntu 18.04, but this should work with other recent versions and operating systems. My Arduino version is 1.8.15, but more recent versions should work also. (However, I haven't tried Arduino 2.0 or later.)
To begin, install the STM32 MCU Based Boards version 2.6.0. This isn't quite as clean as it might be and can't be done from the Arduino Boards manager as might be expected. ST provides simple instructions. Follow these, restart Arduino, and verify that the ST processors show up in the boards menu as shown in the instructions. (I'm not sure if you need to install STM32CubeProgrammer or not. If you try uploading to the WeAct Duino from Arduino and it doesn't work, then install the STM32CubeProgrammer per the instructions.) I'm don't know exactly how to test this on my system.
Next, you'll need a place to put the WeAct Duino variant. Find your Arduino Sketchbook location from the Arduino IDE using File > Preferences. The Sketchbook location is the first entry in the window. In that location, create a new directory named "hardware" (without the quotes).
Then copy WeActDuino.zip from the Files area of this project. Unzip it into the hardware directory you just created. Verify that you have the correct structure, then restart Arduino. You should see an entry in the Tools -> Board menu named "WeActDuino Boads (in sketchbook)" with a single item: "weActDuinoG431".
Project Logs:
Each Project Log will show how to implement a feature or one of the interfaces for the G431. I'll start with a couple of obvious ones, and build. If there are any specific requests, please post them to the Comments. I'll try to respond to them. Don't expect everything to be revealed at once!
First Log: Getting Started and Blinky. Blinky, of course! But this really explains how to download a program using the ST-Link. Coming soon:
Second Log: Digital, Analog, and Serial Capabilities. Includes example using External Interrupts, 5V tolerant inputs, and Serial output.
Things left to do (partial list):
I2C interface - OLED Display Must add pullups.
SPI interface - TFT Display Must be sure interfacing is correct (as discussed by pjrc LINK)
Additional serial interfaces - GPS read out.
External interrupt capability. All GPIO pins should have interrupt capability. Need to test and verify.
Using the ADC inputs.
Using PWM. Note that PWM may work on more pins than currently indicated, I just haven't tested it.
Using the DAC outputs.
Timer functions including input capture.
Sleep and low power modes (maybe someday).
And more ...