 doctek
Things to know about I2C on WeActDuino:
- two ports are usable. I2C1 & I2C2 or I2C1 & I2C3.
- all I2C lines are 5V tolerant.
- the correct clock (SCL) and data (SDA) pins must be assigned before the begin() method is called for the I2C port.
- the I2C lines must be pulled up to the correct voltage: 1.8K to 3.3V or 5.1K to 5V. (the resistor values don't have to be exact.) Sometimes these are built into I2C peripherals, sometmes not.
- Pin 36 (B8) is the boot0 pin. If it is not floating or low at reset, then the WeActDuino won't boot. So it is best not to tie any inputs to it.
Note that although there are three ports, only two of them can be used at a time. There is only one possible pin for SCL3 and SDA2 and it's the same pin (PA_8), so either I2C2 or I2C3 can be used, but not both at once. (ST is not doing this just for marketing purposes; G431 chip versions with more pins make the third port available.) Anyway, let's see how to use the I2C ports. All G431 I2C pins are 5V tolerant and they will work fine on 3.3V also. I2C is bidirectional, so 5V pulses are returned from a 5V device even if only 3.3V pulses are sent. The pull-up voltage must match the operating voltage of the I2C device(s) being used. A peripheral device operating at 3.3V may be damaged by 5V I2C pulses.
Since there are three possible I2C ports, we must declare one as an I2C object and assign the correct SDA and SCL pins before use. There are two ways to configure the I2C pins. We can assign them after instantiating the TwoWire object but before doing begin(), or we can instantiate a TwoWire object with pin assignments. Either method works. The assignment method may be required if the name of the TwoWire interface can't be passed in to the library using it. In this case, the library will use Wire as the I2C object, as instantiated in the Wire.h file. SDA and SCL must be assigned.
Examples of both methods are included. G431_72x40 uses Wire.setSDA() and Wire.setSCL() to use the u8g2 library which does not allow the I2C object to be passed in. It uses the default Wire object declared in Wire.h. G431_Dual_I2C uses libraries that allow the I2C object to be passed in. These objects are declared in the Arduino sketch before instantiating the display objects.
The Arduino files we will use go in the Sketchbook directory. Find your Arduino Sketchbook location from the Arduino IDE using File > Preferences. The Sketchbook location is the first entry in the window. Download one of the zipped archives from the Files area and unzip it into your Sketchbook directory. Then open it in the Arduino IDE using the File > Open command. You can now edit it or upload it to the WeActDuino.
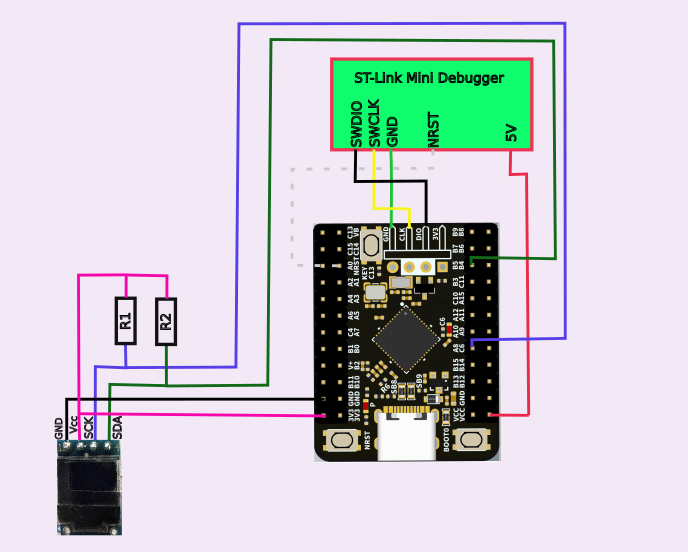
72x40 display version:
Parts:
WeActDuino (STM32G431)
72x40 LCD with SSD1306 controller; I2C interface, 3.3V
2 1.8K Resistors
Hook up:
| Component | Component Pin | WeActDuino Pin | Comment |
|---|---|---|---|
| ST-Link Mini Debugger | SWDIO | DIO | 4 Pin Header |
| ST-Link Mini Debugger | SWCLK | CLK | 4 Pin Header |
| ST-Link Mini Debugger | GND | GND | 4 Pin Header |
| ST-Link Mini Debugger | NRST | NRST | |
| ST-Link Mini Debugger | 5V | Vcc | |
| 72x40 Display | Vcc | 3.3V | |
| 72x40 Display | GND | GND | |
| 72x40 Display | SCK | A8 (SCL3, D21) | 1.8K to 3.3V pullup |
| 72x40 Display | SDA | B5 (SDA3, D31) | 1.8K to 3.3V pullup |
Notes:
Have a look at the code. Use the procedure described above to load G431_72x40. This is a simple example. The first step is to define the pins that will be used for I2C. This has to be done before calling the display initialization routine. The Wire object is instantiated in Wire.h, so sending messages to it works. There is no other way to pass this information to the u8g2 object, but this method works fine. After calling Wire.setSDA() and Wire.setSCL(), the pins designated will be used whenever u8g2 uses the Wire routines. The Wire object is instantiated in Wire.h, so the "Wire" label must be used even if the pins assigned belong to I2C3. The pin definitions must be done before Wire.begin is called. In this case, Wire.begin() is called from the u8g2 package when u8g2.begin() is called. (NOTE: The actual name of u8g2 routine will depend on name given when it is instantiated. In our case, that's "u8g2".) The actual pin numbers used are found in WeAct_Pin_Map_R1.png for I2C3. The rest of the code is from a simple u8g2 example.
Since the 72x40 display uses 3.3V, the I2C lines are pulled up to 3.3V using 1.8K resistors.
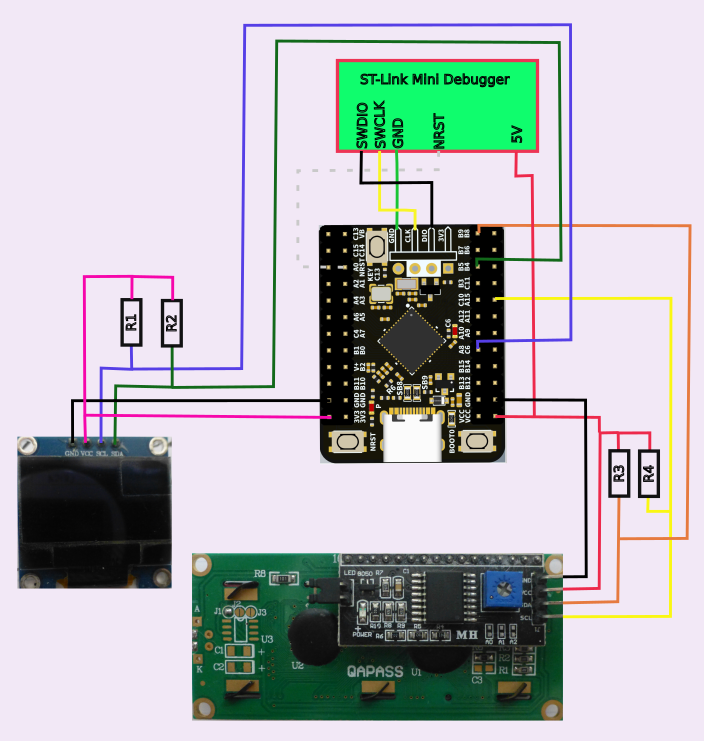
Dual I2C displays version:
Parts:
WeActDuino (STM32G431)
128x64 LCD with SSD1306 controller; I2C interface, 3.3V
16 x 2 line LCD with HD44780 controller and PCF8574 I2C Interface, 5.0V
2 1.8K Resistors
2 5.1K Resistors
Hook up:
| Component | Component Pin | WeActDuino Pin | Comment |
|---|---|---|---|
| ST-Link Mini Debugger | SWDIO | DIO | 4 Pin Header |
| ST-Link Mini Debugger | SWCLK | CLK | 4 Pin Header |
| ST-Link Mini Debugger | GND | GND | 4 Pin Header |
| ST-Link Mini Debugger | NRST | NRST | |
| ST-Link Mini Debugger | 5V | Vcc | |
| 128x64 Display | Vcc | 3.3V | |
| 128x64 Display | SCK | A8 (SCL3,D21) | 1.8K to 3.3V pullup |
| 128x64 Display | SDA | B5 (SDA3,D31) | 1.8K to 3.3V pullup |
| 128x64 Display | GND | GND | |
| HD44784 Display | Vcc | 5V | |
| HD44784 Display | SCK | A15 (SCL1,D28) | 5.1K to 5V pullup |
| HD44784 Display | SDA | B9 (SDA1,D35) | 5.1K to 5V pullup |
| HD44784 Display | GND | GND |
Notes:
Two I2C displays are used. The HD44780 runs at 5V while the SSD1306 runs at 3.3V and will be damaged by operating it at 5V. Separate I2C channels are used so the lines can be pulled up appropriately. The 5V tolerance of the G431 is perfect for this application. The SDA and SCL lines for the two ports are chosen from WeAct_Pin_Map_R1.png for I2C 1 and 3.
Let's consider the software now. Use the procedure described above to load G431_Dual_I2C. We use two different display libraries as noted in the comments. Since the libraries for both displays allow the I2C object to be passed in, we first create the TwoWire objects. Then we instantiate the display objects and pass in the names of the TwoWire (I2C) objects. These names will be used in all calls to the display libraries and we need not worry further with them. Note that the SCL and SDA pins for each of the TwoWire objects were passed when the objects were created (or "instantiated").
Discussions
Become a Hackaday.io Member
Create an account to leave a comment. Already have an account? Log In.