Close
0%
0%

VHDL training board

I still feel commercial FPGA boards are expensive and too complicated for "real beginner". Here I made an alternative.

Similar projects worth following
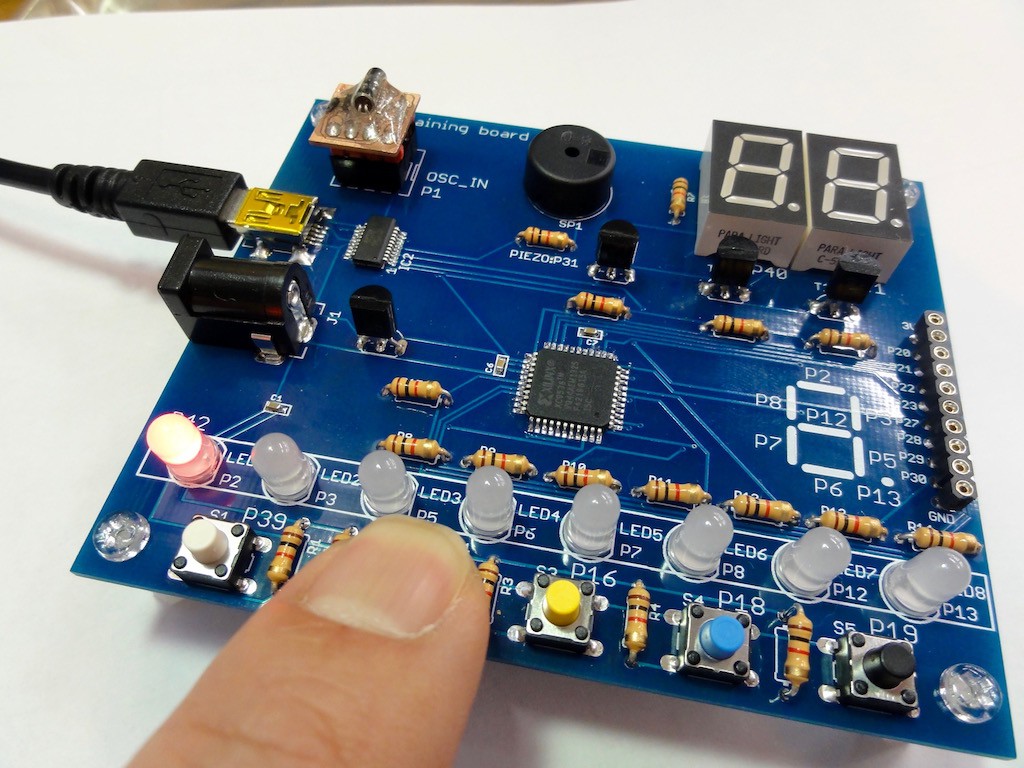
We can find lots of commercial FPGA board but I still feel they are too powerful and too complicated for "real beginner". Here I made an alternative board having 7-segment LED and switches, piezo and on-board oscillator. Good point of this board is that, we can have "making from root by soldering" and nothing useless (because it is really simplified). Also, the cost will be very competitive. The CPLD on this board is very classical but it can still work for educational purposes since VHDL knowledge is common for both up-to-date FPGA and this CPLD. You may think "obsolete" just to see CPLD but when we think the essence of learning hardware description language, CPLD or FPGA does not matter. This board is available at my tindie store: https://www.tindie.com/products/microwavemont/vhdl-training-board/

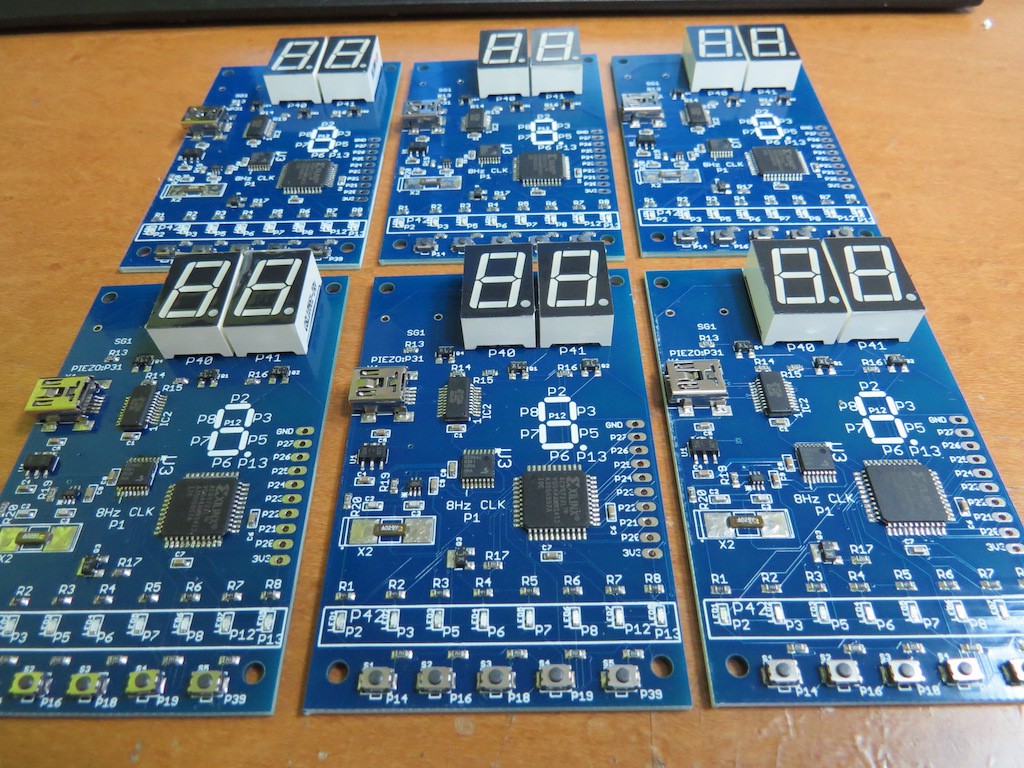
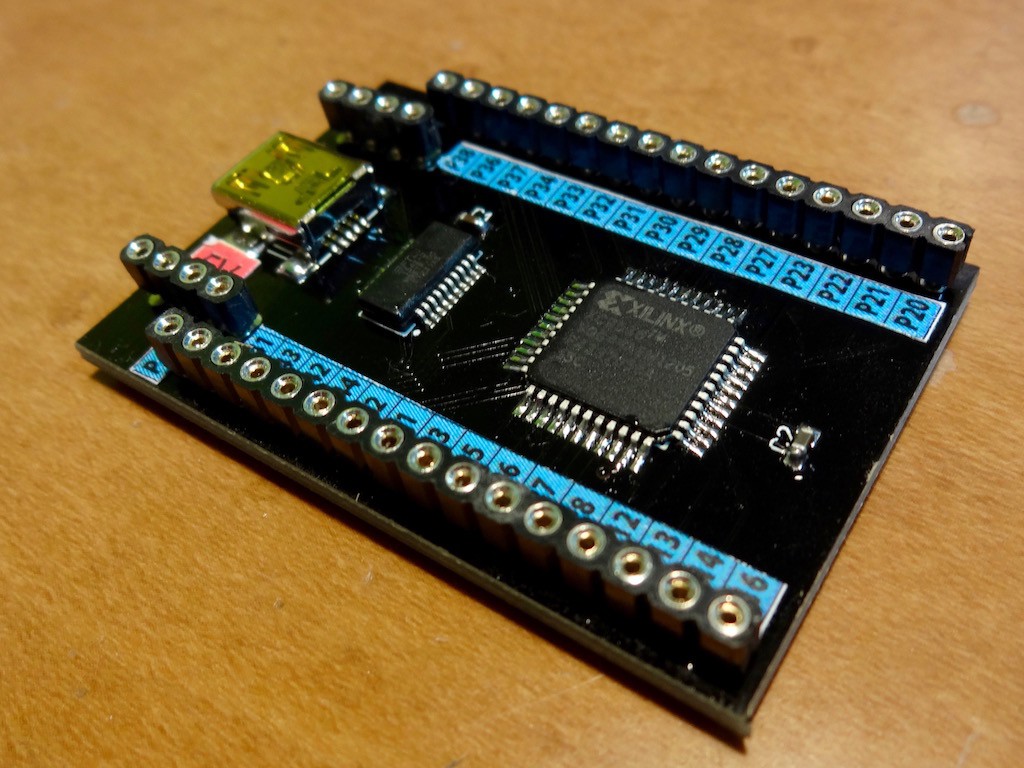
My previous creation of CPLD board in the above picture is surely working for VHDL training, but it is too simplified and we need wiring of switches and LEDs for testing the results. Indeed the macro-cell in this CPLD is just 36 and just switch and LEDs are enough to test its function. (If our project excesses the level of CPLD, then we should jump expensive FPGA board!). This time I made a bit more 'complete' learning board as in the picture below.
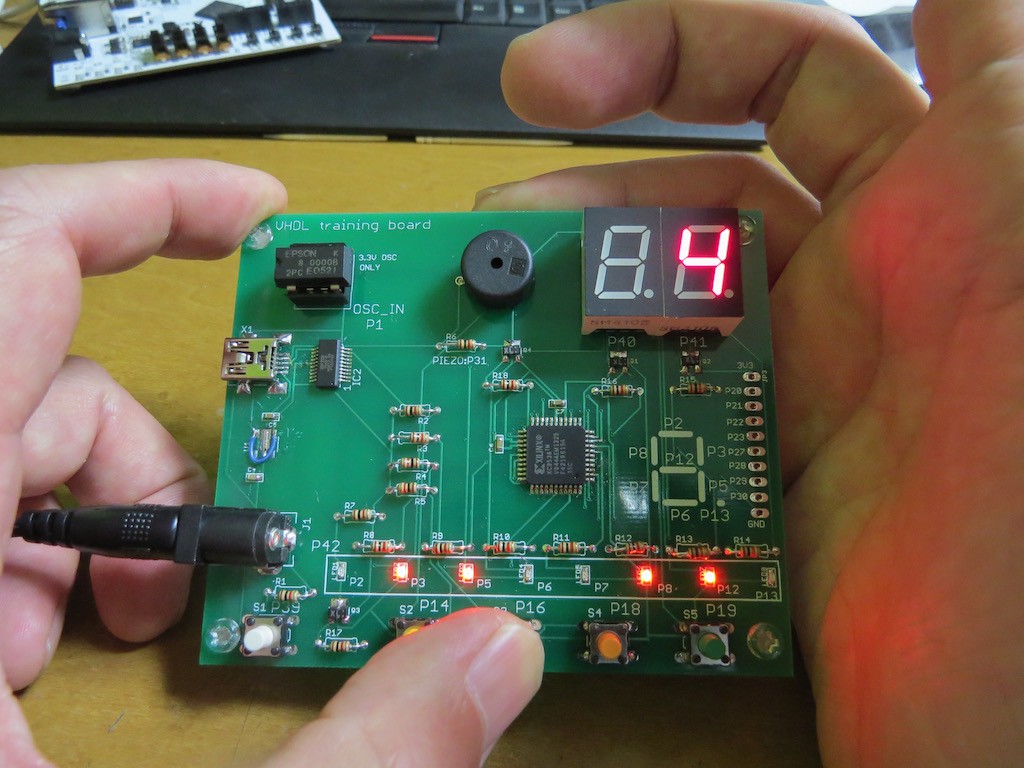
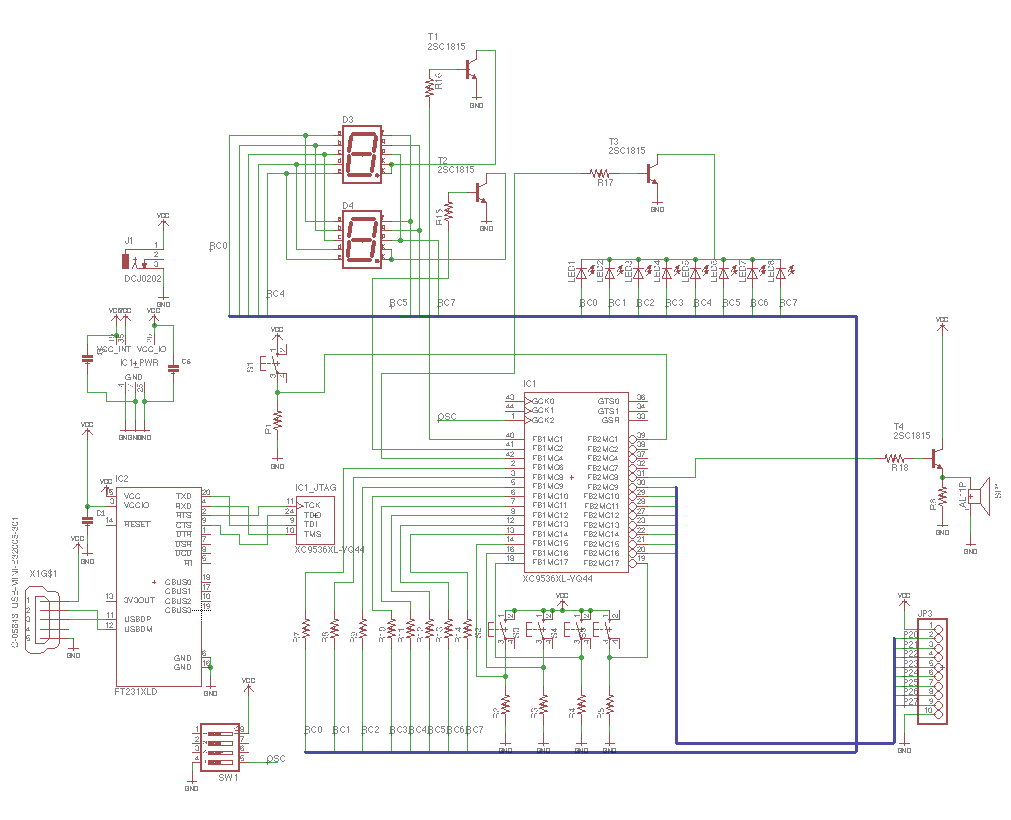
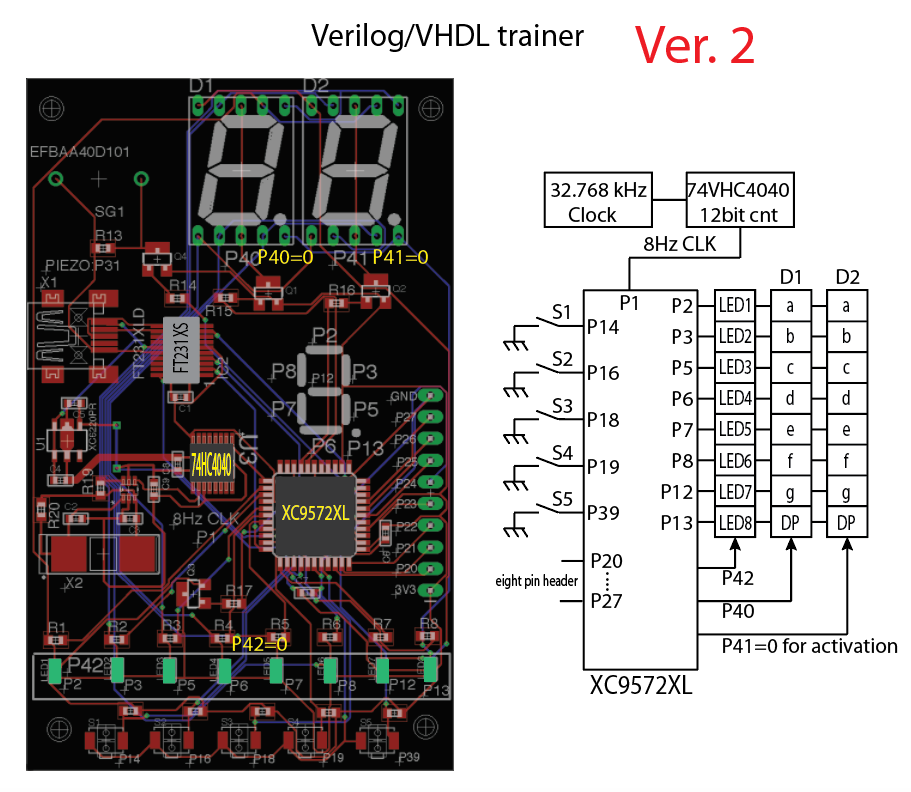
Two 7-seg LEDs and 8-LEDs has a "bus-connection", and another single bit requires for the activation for each components. On-board OSC is connected to P1 and we can learn counter description and some timing device implementation. This is really optional but I also put one piezo element as a sounder through impedance converter.

The board in the picture is still prototype and I may sell this board at my tindie store later.....

  • Very detailed and useful information for VHDL board usage

    kodera2t07/23/2017 at 12:05 0 comments

    Just now I received a very useful information from Hungary. One great user of VHDL training board, which is available at my tindie store,  kindly sent me very useful information about .svf file uploader.

    I got the permission to share this information and would like to write here. Thank you so much HA5OF !!

    ------- quote begin ------

    I had some issues trying to compile Mr Koichi Nishida's SVF programmer for Linux, so I thought you may like to know about another newer fork of the programmer, it is a nice fork because it now uses libfdi instead of FTDI's proprietary libraries. It is available here - https://bitbucket.org/skoe/easp/overview


    Compilation instructions for Debian Linux (should work fine with Ubuntu or any other Debian derivatives), other Linux variants just install the necessary packages using your system's package manager.


    # Install the prerequisite packages - 

    sudo apt-get install mercurial libftdi-dev

    # clone the source using mercurial

    hg clone https://bitbucket.org/skoe/easp

    # Change directory into the "easp" directory

    cd easp

    # Run the author's custom build script

    ./make.sh

    # As a test, wget one of Mr Kodera's example raw 9572XL SVF files from his github 

    wget https://raw.githubusercontent.com/kodera2t/CPLD_trainer/master/9572XL_sample_svf/9572XL_sevenseg.svf

    # Initialise the easp application with the verbose switch and use the PID of the FTDI FT231x chip. 

    ./easp -v -p 0x6015 9572XL_sevenseg.svf 

    --------quote end------

  • New revision 2 board is prepared!

    kodera2t07/14/2017 at 11:47 0 comments

    Now the rev.2 of VHDL/Verilong training board is done!

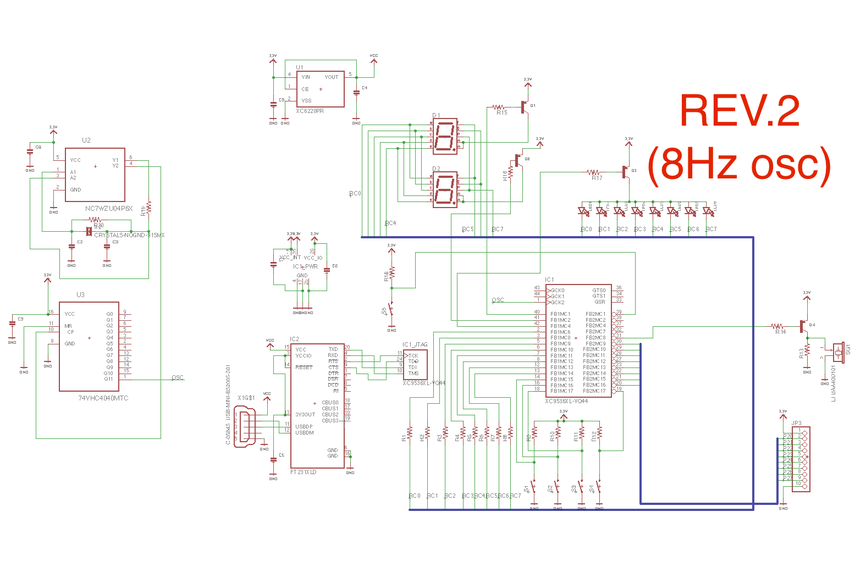
    Basically the same circuit but now it's 3.3V operation with XC9572XL (72 macro-cells), which is double sized to the previous one. In addition, 8 Hz (not 8 kHz, also not 8 MHz) clock generator provided by 32768/4096 is on board. For real starting point of hardware description language study, this type of very slow clock is very useful for fundamental confirmation. Tactile switch and LEDs are switched to SMT type for smaller footprint.

    As you would see, empty area can be found. This space is prepared for Piezoelectric speaker for sound application it is totally useless for 8-Hz operation (too low for audio signal generation) so the piezoelectric speaker is NOT populated. The circuit is connected to P31 of XC9572XL and if 32768Hz crystal will be swapped with higher frequency , for example 16MHz crystal, we will hear 3.9kHz sound for proper implementation. Please add speaker for such cases by yourself. (or taking another tap of 74VHC4040 will also work..)

    How to use this board by ISE

    As same as previous version, XC9500XL series also not supported by up-to-date Xilinx Vivado but perfectly works with Xilinx ISE. Setting is almost same as previous one and I would show here only for the different part.

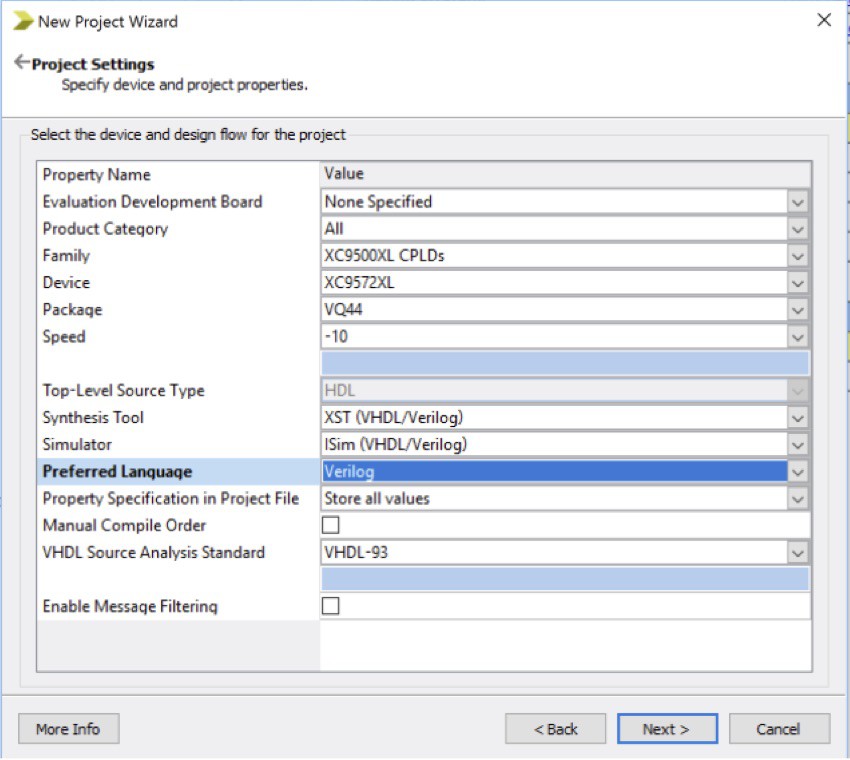
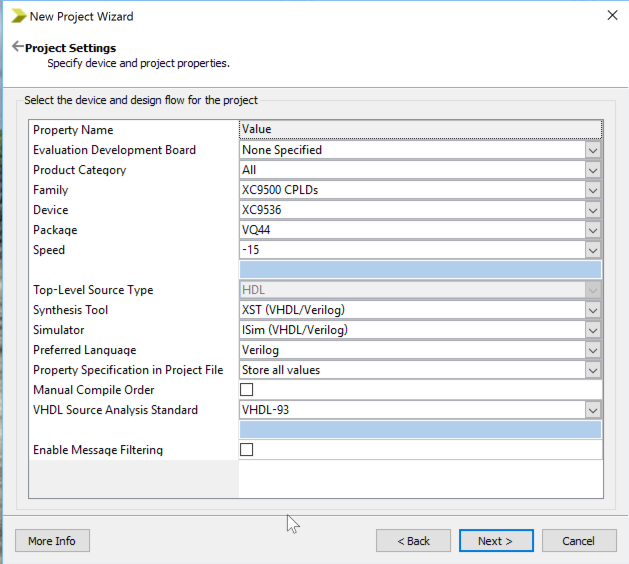
    In the project setting, please select XC9572XL/VQ44 speed -10 version. Other part of setting are exactly the same as previous XC9536/5V version. please refer my previous log

    In some case, we will see this kind of error message. (once board is well recognized by your computer, we will seldom meet this situation..)

    This is saying "32538 TDO didn't match" meaning writing is not succeeded. In such a case, please do not throw the board to trash but just simply, plug-off USB and plug-in USB again, and write the same .svf file again. Just repeating again,,

    You will see "No error" message. As same as previous board, after writing new .svf file, we need to restart CPLD by plug-off-in process.

    The circuit is not so complicated and you would try to make by yourself but also this board is available at my tindie store!

  • Counter implementation

    kodera2t01/30/2017 at 04:35 0 comments

    I know lots of hackaday readers are HDL specialist and this content may not be useful, but beginner (including me) needs some struggle just for simple application. Here I would introduce "how to make simple counter" using my training board.

    The training board contains 32.768 kHz crystal oscillator and the frequency is very low , compared to general 8-pin DIP crystal oscillator but for making "count-up every second" requires still 15bit (32768 divider) to this frequency. Also 7-seg LED utilisation needs binary to display recorder. In the case of hardware logic (or combination of 74 series), we need to prepare specific ICs, but in the case of HDL, we just need to write how it works.

    module counter(
        input CLK,RST,
    	 output reg [6:0] nSEG,//seven segment output
    	 output		[2:0] nSET//activation digit output
        );
    
    
    	assign nSET=4'b111;//all of LEDs are activated
    	reg [17:0] cnt;// 18bit counter bit, 2^18=262144
    	reg [3:0] nNumber;// seven segment decoder input(4-bit)
    	
    	always @( posedge CLK ) begin// exexcute at clock rise up
    	if(RST)
    	cnt<=18'b0;//counter reset if RST(P39) press
       else
    	cnt <= cnt +1'b1;	// add one to counter
    	nNumber <= (cnt>>14);//prepare top 4bits for 7-seg decorder
    	end


    	always @* begin //7-seg part
    	
    case( nNumber )//seven segment decorder
    	4'h0: nSEG = 7'b0111111;//0
    	4'h1: nSEG = 7'b0000110;//1
    	4'h2: nSEG = 7'b1011011;//2
    	4'h3: nSEG = 7'b1001111;//3
    	4'h4: nSEG = 7'b1100110;//4
    	4'h5: nSEG = 7'b1101101;//5
    	4'h6: nSEG = 7'b1111101;//6
    	4'h7: nSEG = 7'b0100111;//7
    	4'h8: nSEG = 7'b1111111;//8
    	4'h9: nSEG = 7'b1101111;//9
    	4'ha: nSEG = 7'b1110111;//A
    	4'hb: nSEG = 7'b1111100;//b
    	4'hc: nSEG = 7'b0111001;//C
    	4'hd: nSEG = 7'b1011110;//d
    	4'he: nSEG = 7'b1111001;//E
    	4'hf: nSEG = 7'b1110001;//F
    	default:nSEG=7'bxxxxxxx;
    	endcase				
    	end
    endmodule
    

    The source above is not "ultimate" nor "perfect" one but it describes counter and 7-segment decoder. As we know, in addition to verilog source, .ucf file defines the hardware connection is required as below.

    NET "nSEG<0>" LOC="P2";
    NET "nSEG<1>" LOC="P3";
    NET "nSEG<2>" LOC="P5";
    NET "nSEG<3>" LOC="P6";
    NET "nSEG<4>" LOC="P7";
    NET "nSEG<5>" LOC="P8";
    NET "nSEG<6>" LOC="P12";
    
    NET "nSET<0>" LOC="P40";//activation digit of second 7-seg LED
    NET "nSET<1>" LOC="P41";//activation digit of first 7-seg LED
    NET "nSET<2>" LOC="P42";//activation digit of seven LEDs
    
    NET "RST" LOC="P39";
    
    
    NET CLK	LOC="P1";
    NET CLK TNM_NET=CLK;
    TIMESPEC TS_CLK = PERIOD ck 8000 kHz;
    The "P1" is connected to clock generator in my training board, and we need to write some special notation clearly indicate P1 is clock input. The rest are the same as my previous sample.

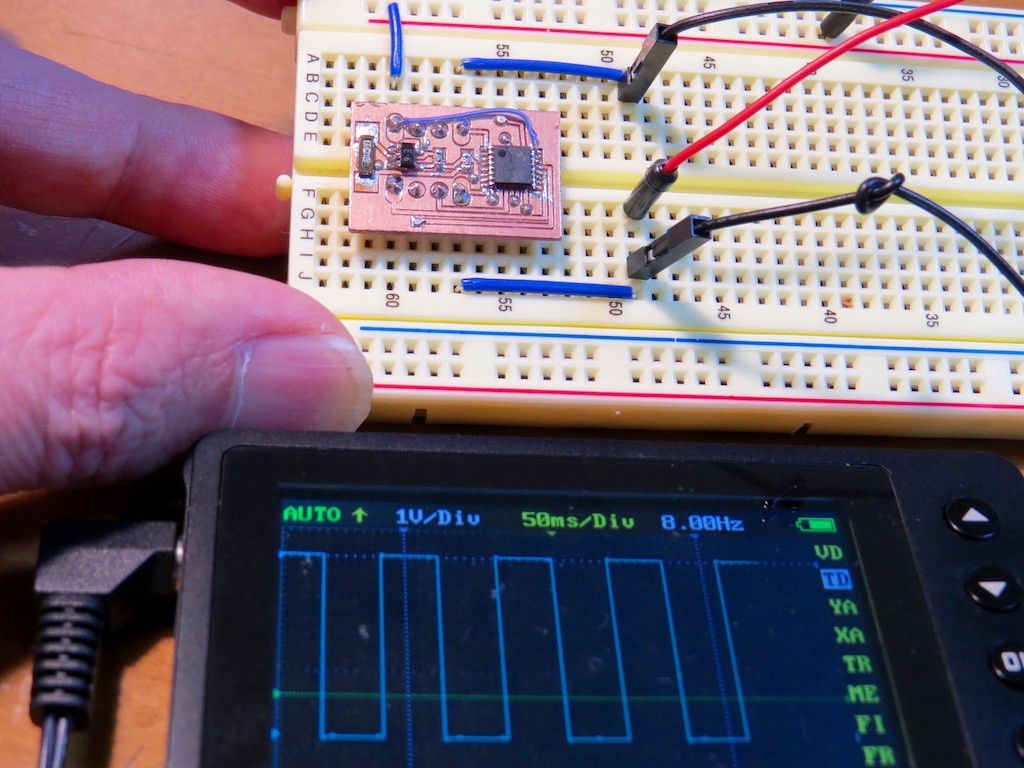
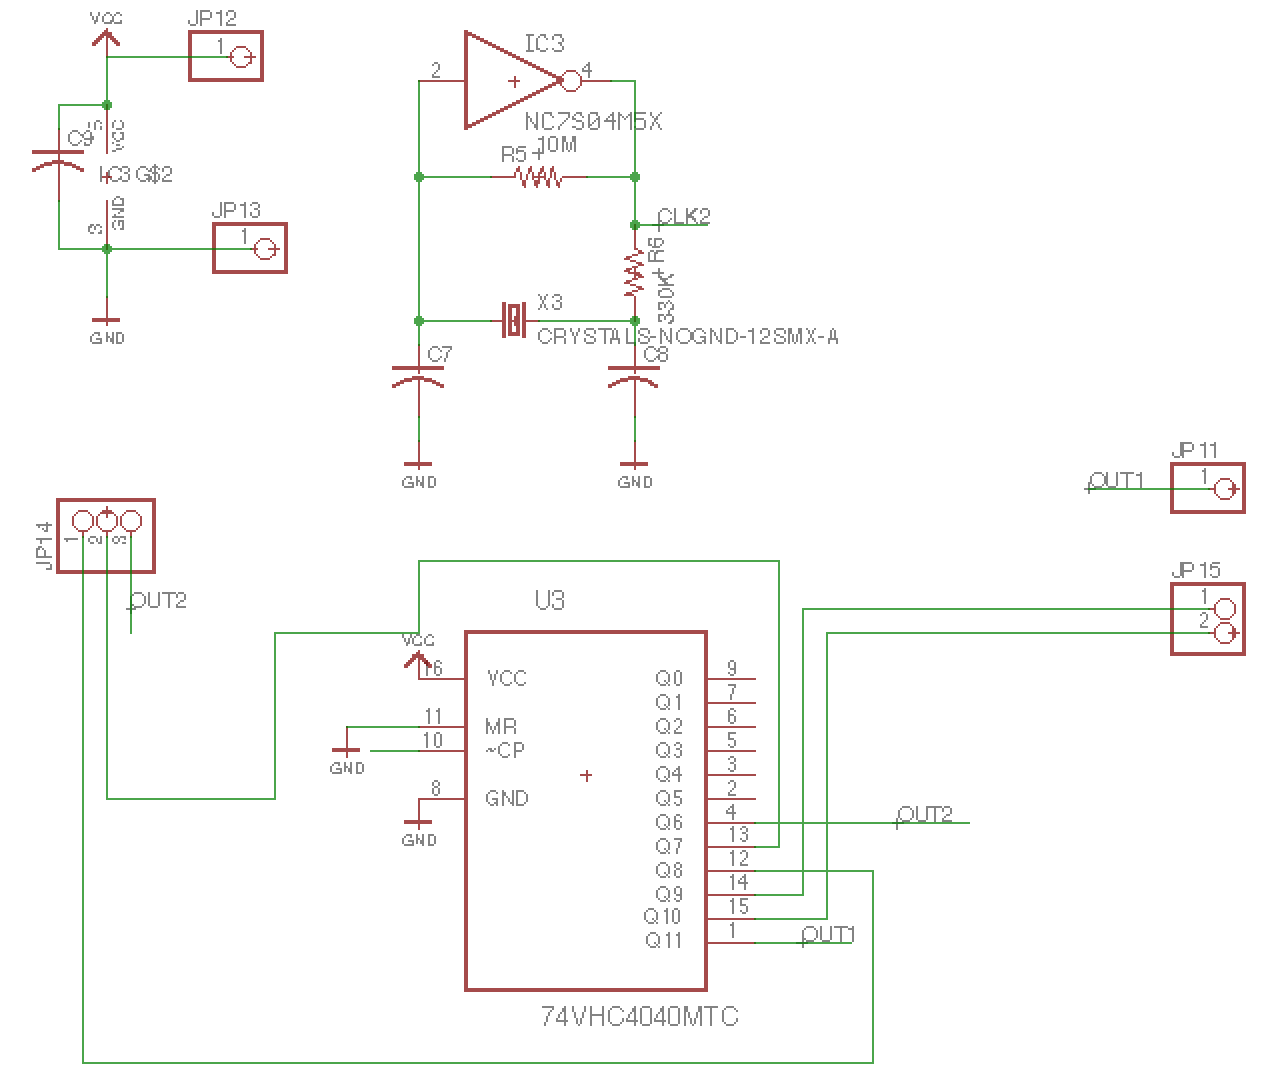
    The result of implementation in ISE is as shown above. Unfortunately it consumes 89 % of all macro cells, but indeed we don't need big 18-bit counter if we can prepare much lower clock module. For this purpose, I made an alternative "8 Hz" clock module made of 32.768 crystal oscillator and 74VHC4040, 12-stage flip flop

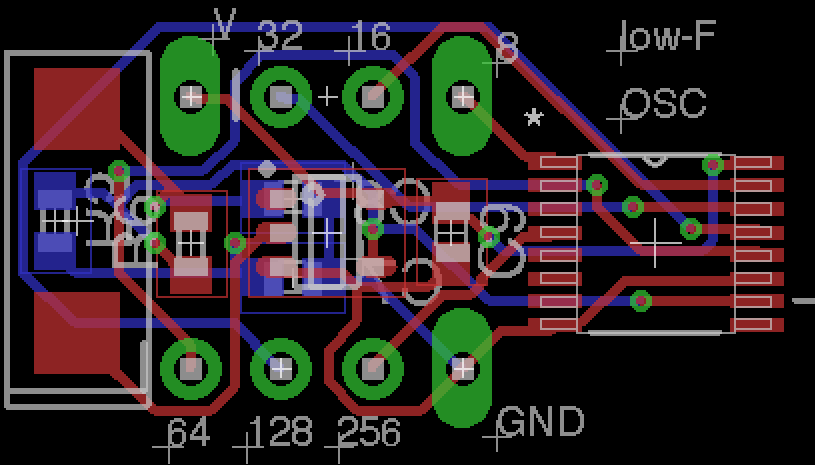
    The circuit is very simple one. Of course we can make clock "around 8 Hz" by 555 or RC oscillator but the timing is not accurate at all. Here the frequency is stabilised by crystal resonator and we can make "kitchen timer" not make your Mom angry by burning cake by unreliable clock. Not only 8 Hz, it has ..

    This modules has 16 to 256 Hz output. By using "8-Hz" clock timing, verilog source can be modified as,

    	assign nSET=4'b111;//all of LEDs are activated
    	reg [7:0] cnt;// 8-bit counter bit, 2^=256
    	reg [3:0] nNumber;// seven segment decoder input(4-bit)
    	
    	always @( posedge CLK ) begin// exexcute at clock rise up
    	if(RST)
    	cnt<=8'b0;//counter reset if RST(P39) press
       else
    	cnt <= cnt +1'b1;	// add one to counter
    	nNumber <= (cnt>>4);//prepare top 4bits for 7-seg decorder
    	end

    This modification leads to smaller usage of macro-cells, as

    Hmmmmm it still use 62 %. Now let us assume we don't use 7-segment LED decoder, as is
    module counter(
        input CLK,RST,
    	 output reg [6:0] nSEG,//seven segment output
    	 output		[2:0] nSET//activation...
    Read more »

  • How to setup Verilog writing environment

    kodera2t01/13/2017 at 05:55 2 comments

    Before I explained the environment setting in another project but I here would like to explain again from the beginning. We need three softwares and before setting up all of them should be installed in your computer

    Preparation of softwares:

    (1) Xilinx ISE

    The update of this software is finished at 2013 but still we can download from Xilinx's homepage. ISE has some stability problem for 64bit Windows and it can be fixed bysome additional procedure.

    (2) USB CPLD Programmer

    I would like to thank the author of this software for releasing on the net. This software support .svf file upload to various Xilinx CPLD devices. The zip can be downloaded at the bottom of this page.

    (3) FTDI D2XX driver

    From FTDI official homepage, we can download up-to-date D2XX driver.

    After installing all of them, let's get started!

    ISE setting:

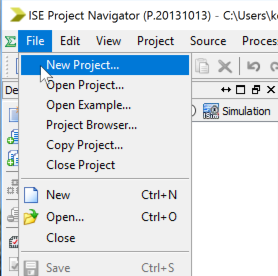
    Just selecting "New Project" leads to "New Project Wizard". We need to set up the information of the new project. Please set up as is in below and click "Next".

    For making something on CPLD and FPGA, we need at least two files

    xxxxxx.v (verilog-source file, contains description of logic)

    and

    *******.ucf (pin assignment between verilog description and real device)

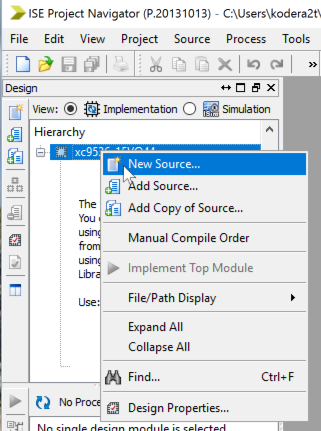
    Firstly we can add verilog source by selecting "new source" and selecting type of "velilog"

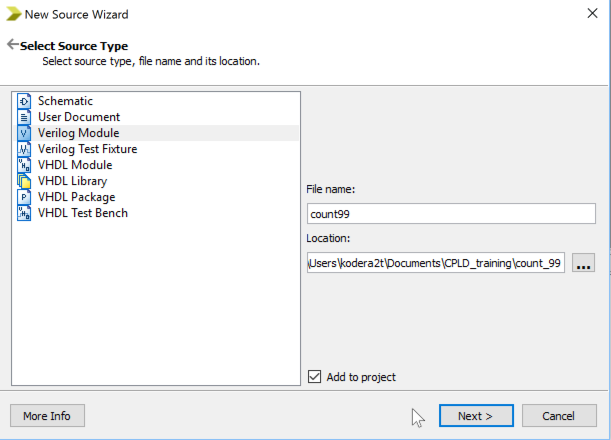
    After selecting "Verilog Module" and, put name of verilog source file and click next...

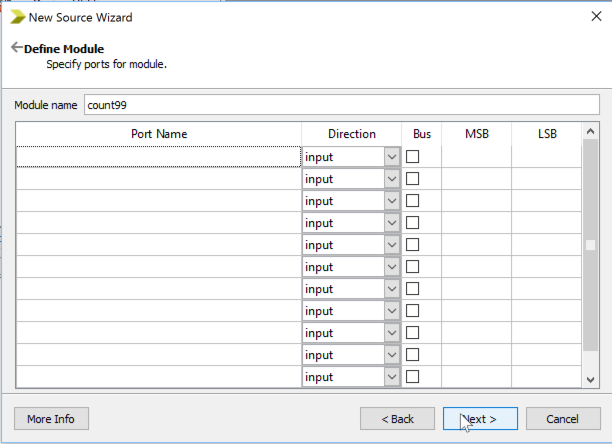
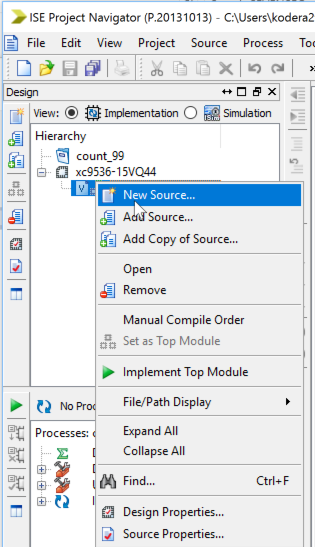
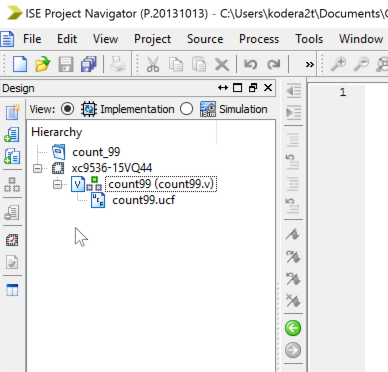
    We will see define module but just ignore (we can write these information directly in source file) and click next will see the addition of .v file in the source tree. Here again we need to add "New Source" by right-click on the added .v file and

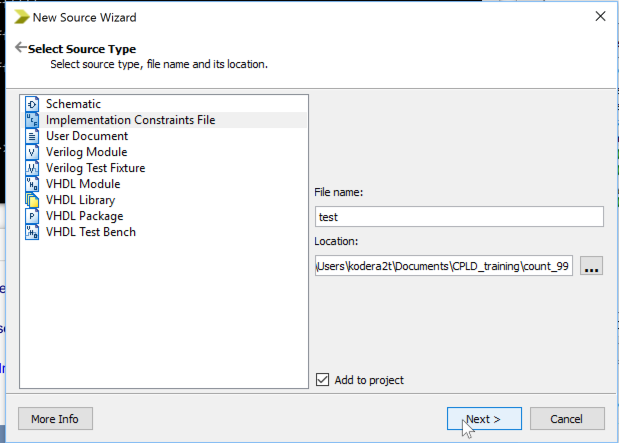
    This time we need to select "Implementation Constraints File" as a file type. Just putting name and click next, we will finish the file preparation.

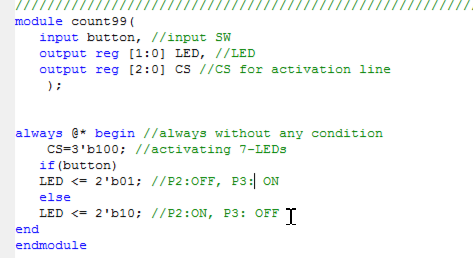
    In the .v file, let us write very simple program which drives two LEDs on board by one tact switch.

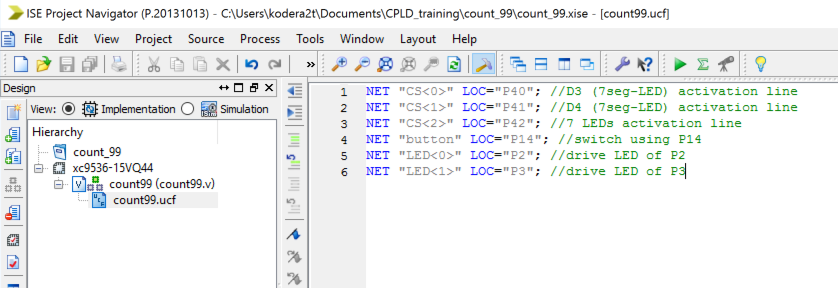
    Please find details of description on books or website but this short verilog source will enable two LEDs controlled by the state of input SW. However, just write this source is not enough, because CPLD does not know which is LEDs and which is switch. In order to add these information we need to write .ucf file as follows:

    In these expression, "Pxx" corresponds to physical pin number of CPLD, so P40 corresponds to 40-pin of XC9536. NET "xx" connects the real device with verilog source. So LED0 is connected to P2 of CPLD.

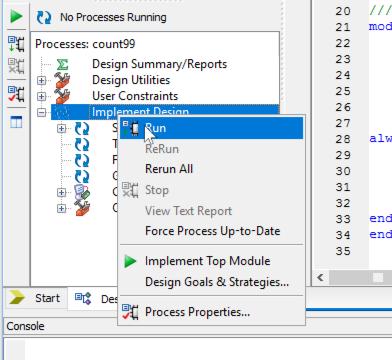
    After finish preparation and writing verilog and ucf, we can "synthesise" logic just by right-click on "Implement Design" and "Run"

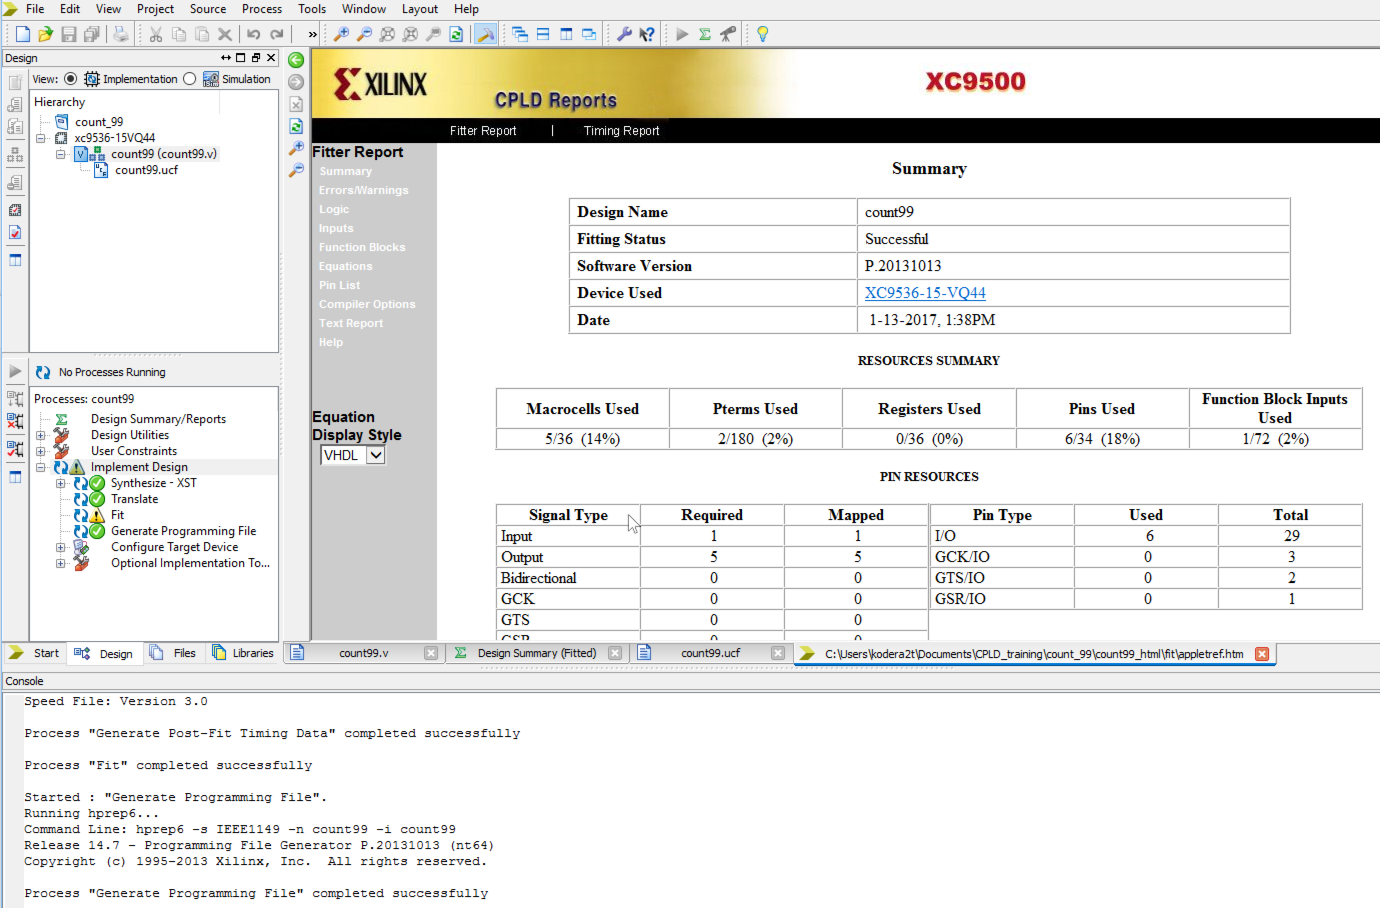
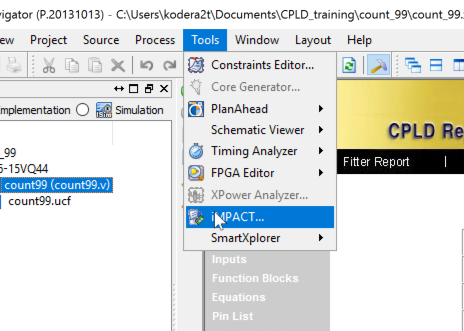
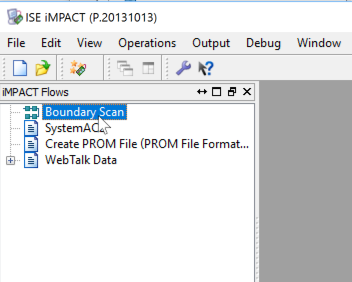
    If no error, we will see the result of implementation in CPLD. As we see. Now we need to prepare .svf file which can be uploaded to CPLD. Selecting Tools->iMPACT,

    Double clock the Boundary Scan and,,,

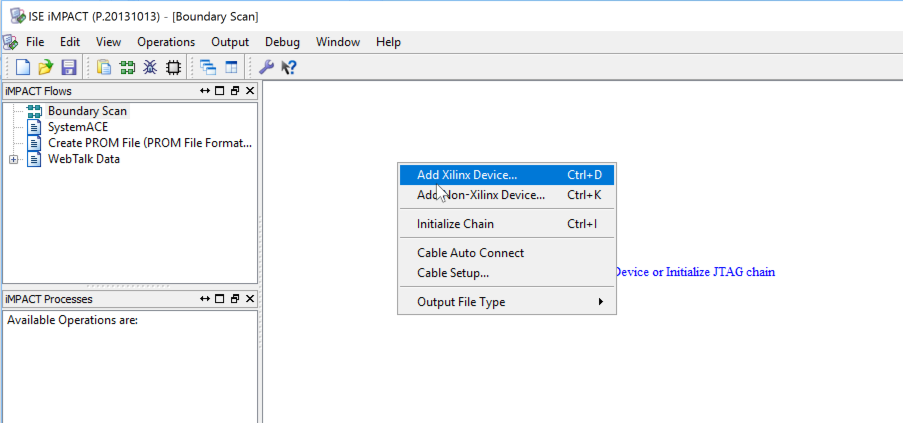
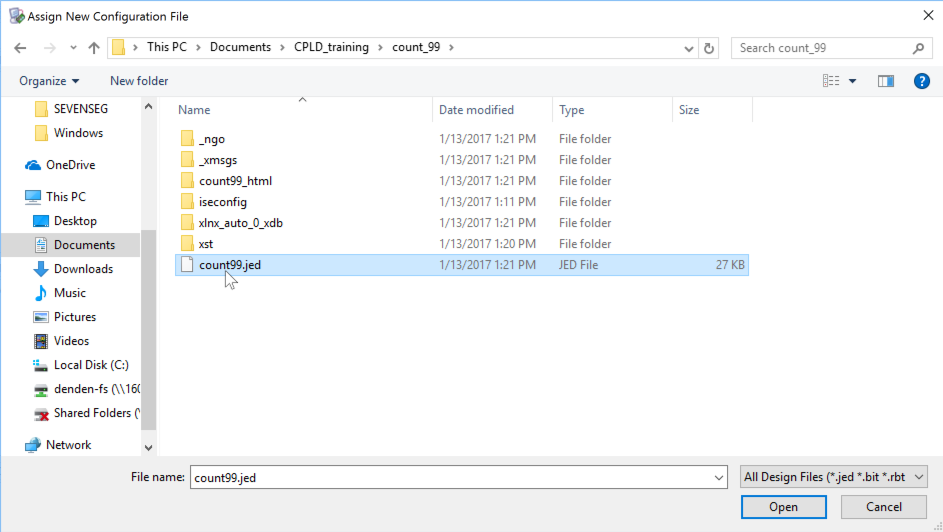
    Select "Add Xilinx Device..." by right-click on the right windows, and select .jed file, which is automatically generated in the previous step.

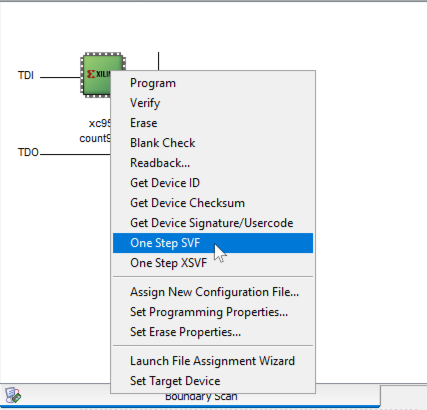
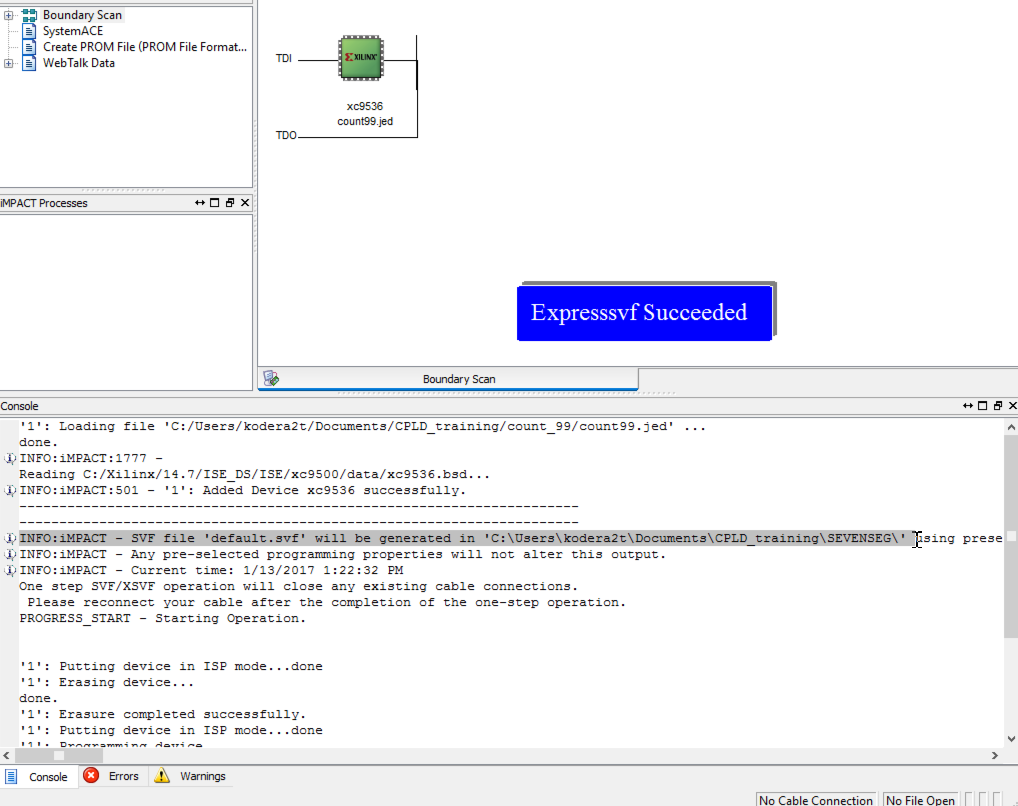
    Right click the icon of xc9536 and select "One Step SVF" will generate .svf file, which should be uploaded to CPLD.

    Sometimes we lost where the .svf file is generated but we will see the location of .svf file in the lower window. These are all done in ISE environment.

    Now connect the board to computer, copying the generated .svf file into the directory of CPLD programmer and execute the command,

    where the last argument is the .svf file name and modify as you wish.

    After several time we will see this message, DONE!!!!!!!

    After writing, we once plug-off USB and plug-in USB cable again and we will get "two LEDs controlled by switch connected to P14". YES! We made logic circuit without soldering nor wiring, just writing verilog source!!!! WELCOME TO SOFTWARE DEFINED CIRCUIT WORLD!!

View all 4 project logs

Enjoy this project?

Share

Discussions

Similar Projects

Does this project spark your interest?

Become a member to follow this project and never miss any updates