 tomcircuit
I was able to spend some time working on the 3D printed lid for this project. The RCL-57 electronics expect a supply between 3.3 and 5.0V, not the 9V from which the original calculator operated. Conveniently, a 3.6-ish volt LiPo cell does the job nicely, and the "rcl57_psu_debug" portion of the project includes a simple USB powered LiPo charger circuit that has served me well for HP Classic (35/45/55/65/67) and TI-58/59 calculator retrofits that I did previously.

Yawn, nothing new to see here, move along...
For the custom lid for the TI-57 calculator, I used the OpenSCAD lid design I made for the TI-58/59 calculator as a starting point. It only took 4 tries to end up with a tweaked lid that fits well and (more importantly) latches into the base.
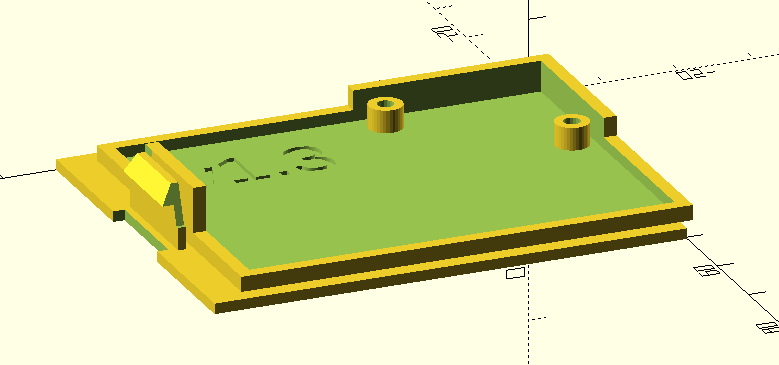
The "walls" in the corner provide a bit of protection around the outside perimeter of the PCB, but otherwise nothing really special here. I am very happy with the latch - despite being printed in an unfavorable orientation, it doesn't want to shear off so easily. I added the "backstop" wall behind it to prevent overflex; hopefully that leads to a robust solution. I do need to add some LiPo cell retention features so that the cell isn't rattling around inside the calculator - but for now I can use a piece of double-sided tape to hold the cell. Hopefully that solution does not become another example of the mediocre being the enemy of the good. OpenSCAD source and 3MF files are committed to the GitHub repository.
Oh, some other tidbits:
Another nod to @Jeff Parsons who made the TI-55 ROM image easy to find By including the TI-55 image in the Keil project, I am able to make my TI-55 "donor calculator" run the correct firmware, as opposed to pretending to be a TI-57. A #define in the software determines which ROM image to use, with the appropriate "splash screen" at power-on.
I'm waiting on some samples from Samtec for low-profile 2.54mm pitch headers, so that I can actually put the RCL-57 board into a calculator directly, instead of relying upon the dip socket + header test setup monstrosity that I've been using. Other than my missing pulldown resistors, the hardware is 'good enough' and all that seems to remain is to polish the software - mostly the "program manager" for the EEPROM-based storage feature.
3D printed lid w/LiPo charger board installed

Lid fits nicely into the Majestic calculator back shell

Discussions
Become a Hackaday.io Member
Create an account to leave a comment. Already have an account? Log In.