Introduction
Since I work on Involt, I'm constantly looking for solutions to use Javascript to communicate with hardware devices. I've tried a lot of combinations to achieve that and these experiments inspired me to another uncommon thing. By using that experience with my skills in MIDI instruments I made a simple boilerplate to read and write data with MIDI protocol but instead of playing notes it's used to control pins.
Web MIDI API allows to use any instrument within your web project.
It's easy to make this work, you need chrome browser and Arduino Leonardo (or any other with ATmega32u4 that can work with MIDIUSB library). There are no additional plugins or browser extensions required.
How does it work?
In this article I will focus directly on receiving and sending. However, before doing that you need to get the available MIDI devices (output and input for each device is separated). Everything is handled by requestMIDIAccess function. I've attached the required code to this project.
1. Sending the value - analog write and LED brightness:
This is tricky, it's obvious that this concept should be based on noteOn and noteOff messages but I had to figure out how to divide MIDI data that could allow to send PWM range 0-255 instead of MIDI velocity which is 0-127. Other problem was to assign a certain pin to received data.
To extend this range I divided the PWM range between noteOn and noteOff where noteOn is the first half ( 0-127) and noteOff is second (128-255). The pitch is used to define target pin making it possible to work as firmata-like protocol. Below is simple explanation:
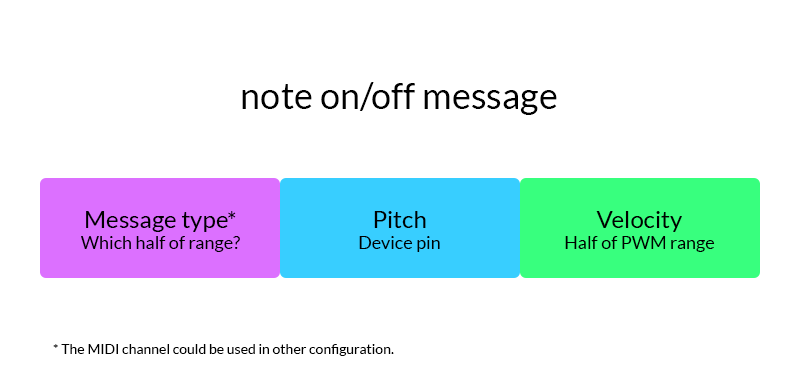
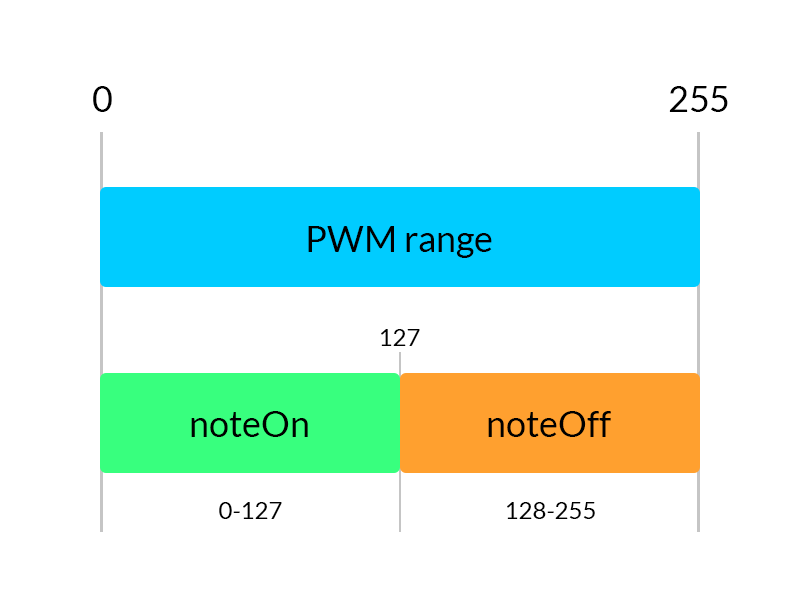
In other configurations the pin could be defined as MIDI channel but this is in my opinion more self explaining. Pitch instead of note is a pin and velocity is its value.
In code conversion is simple:
var changePWM = function(value){
	if (value <= 127) noteOn(9,value);
	else noteOff(9, value-128);
};
I use it with LED on pin 9 and HTML rangeslider:<input type="range" id="range" max="255" value="0" oninput="changePWM(this.value)">2. Receiving the value
Receiving from Arduino is made in similar pattern. The code includes simple reading of 0-127 range which was mapped from 0-1024 range in sketch (pin A0 in code). Due to fact that 1024 is 4 times more than PWM it requires more bytes to divide than note on/off (for example different control changes) or each range could be separated by channel. Parsing the received value can be done in many ways so I let you to choose by yourself.
The listener is added like this:
//Listen for received value from pin A0 and change input value

var addListener = function(receivedData){
	//receivedData.data[1] contains pin index
	document.getElementById('read').value = receivedData.data[2];
};

selectedDevice.input.onmidimessage = addListener;
It updates a simple text input value:<input type="text" id="read" placeholder="Analog read value">The layout and Arduino sketch
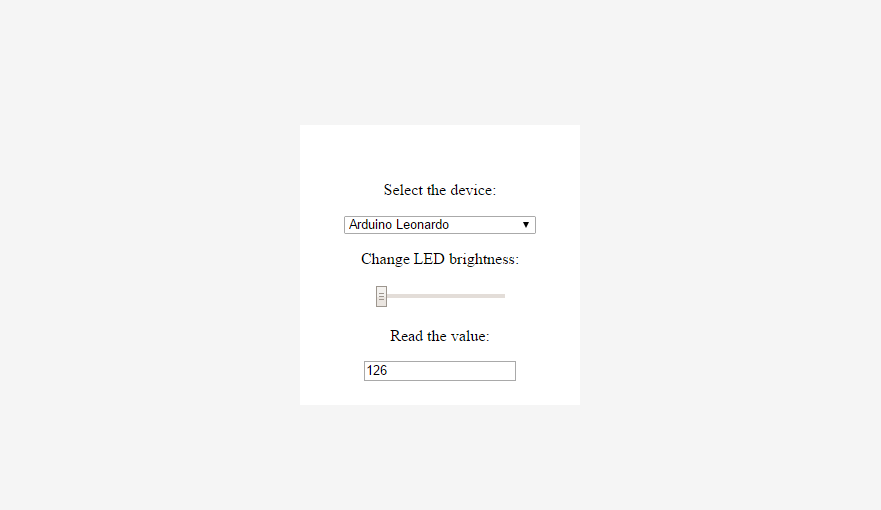
The app consists of three elements:
- Device selection. You should see your Arduino name.
- Changing the brightness of LED attached to pin 9
- Displaying the value of potentiometer connected to pin A0
The Arduino sketch uses MIDIUSB library.
To test, upload the included sketch and open the html file in your browser.
 Ernest Warzocha
 Hulk
Hulk
 I_void(warranties)
 Sagar 001