This article will explain the essential design considerations we put into our Tin Can Mic. You should be able to adapt and apply these principles to your own unique project.
The Essentials
Figure 2 illustrates the essential components of our Tin Can Mic. These are the parts that we think are key to the performance of the microphone. They include the Resonator (A), the Shielding Container (B), the Balancing Circuit (E) and its Grounding Wire (F), and the Resonator Suspension system (I). Following are some comments on each of these features with suggestions for variations and custom mods.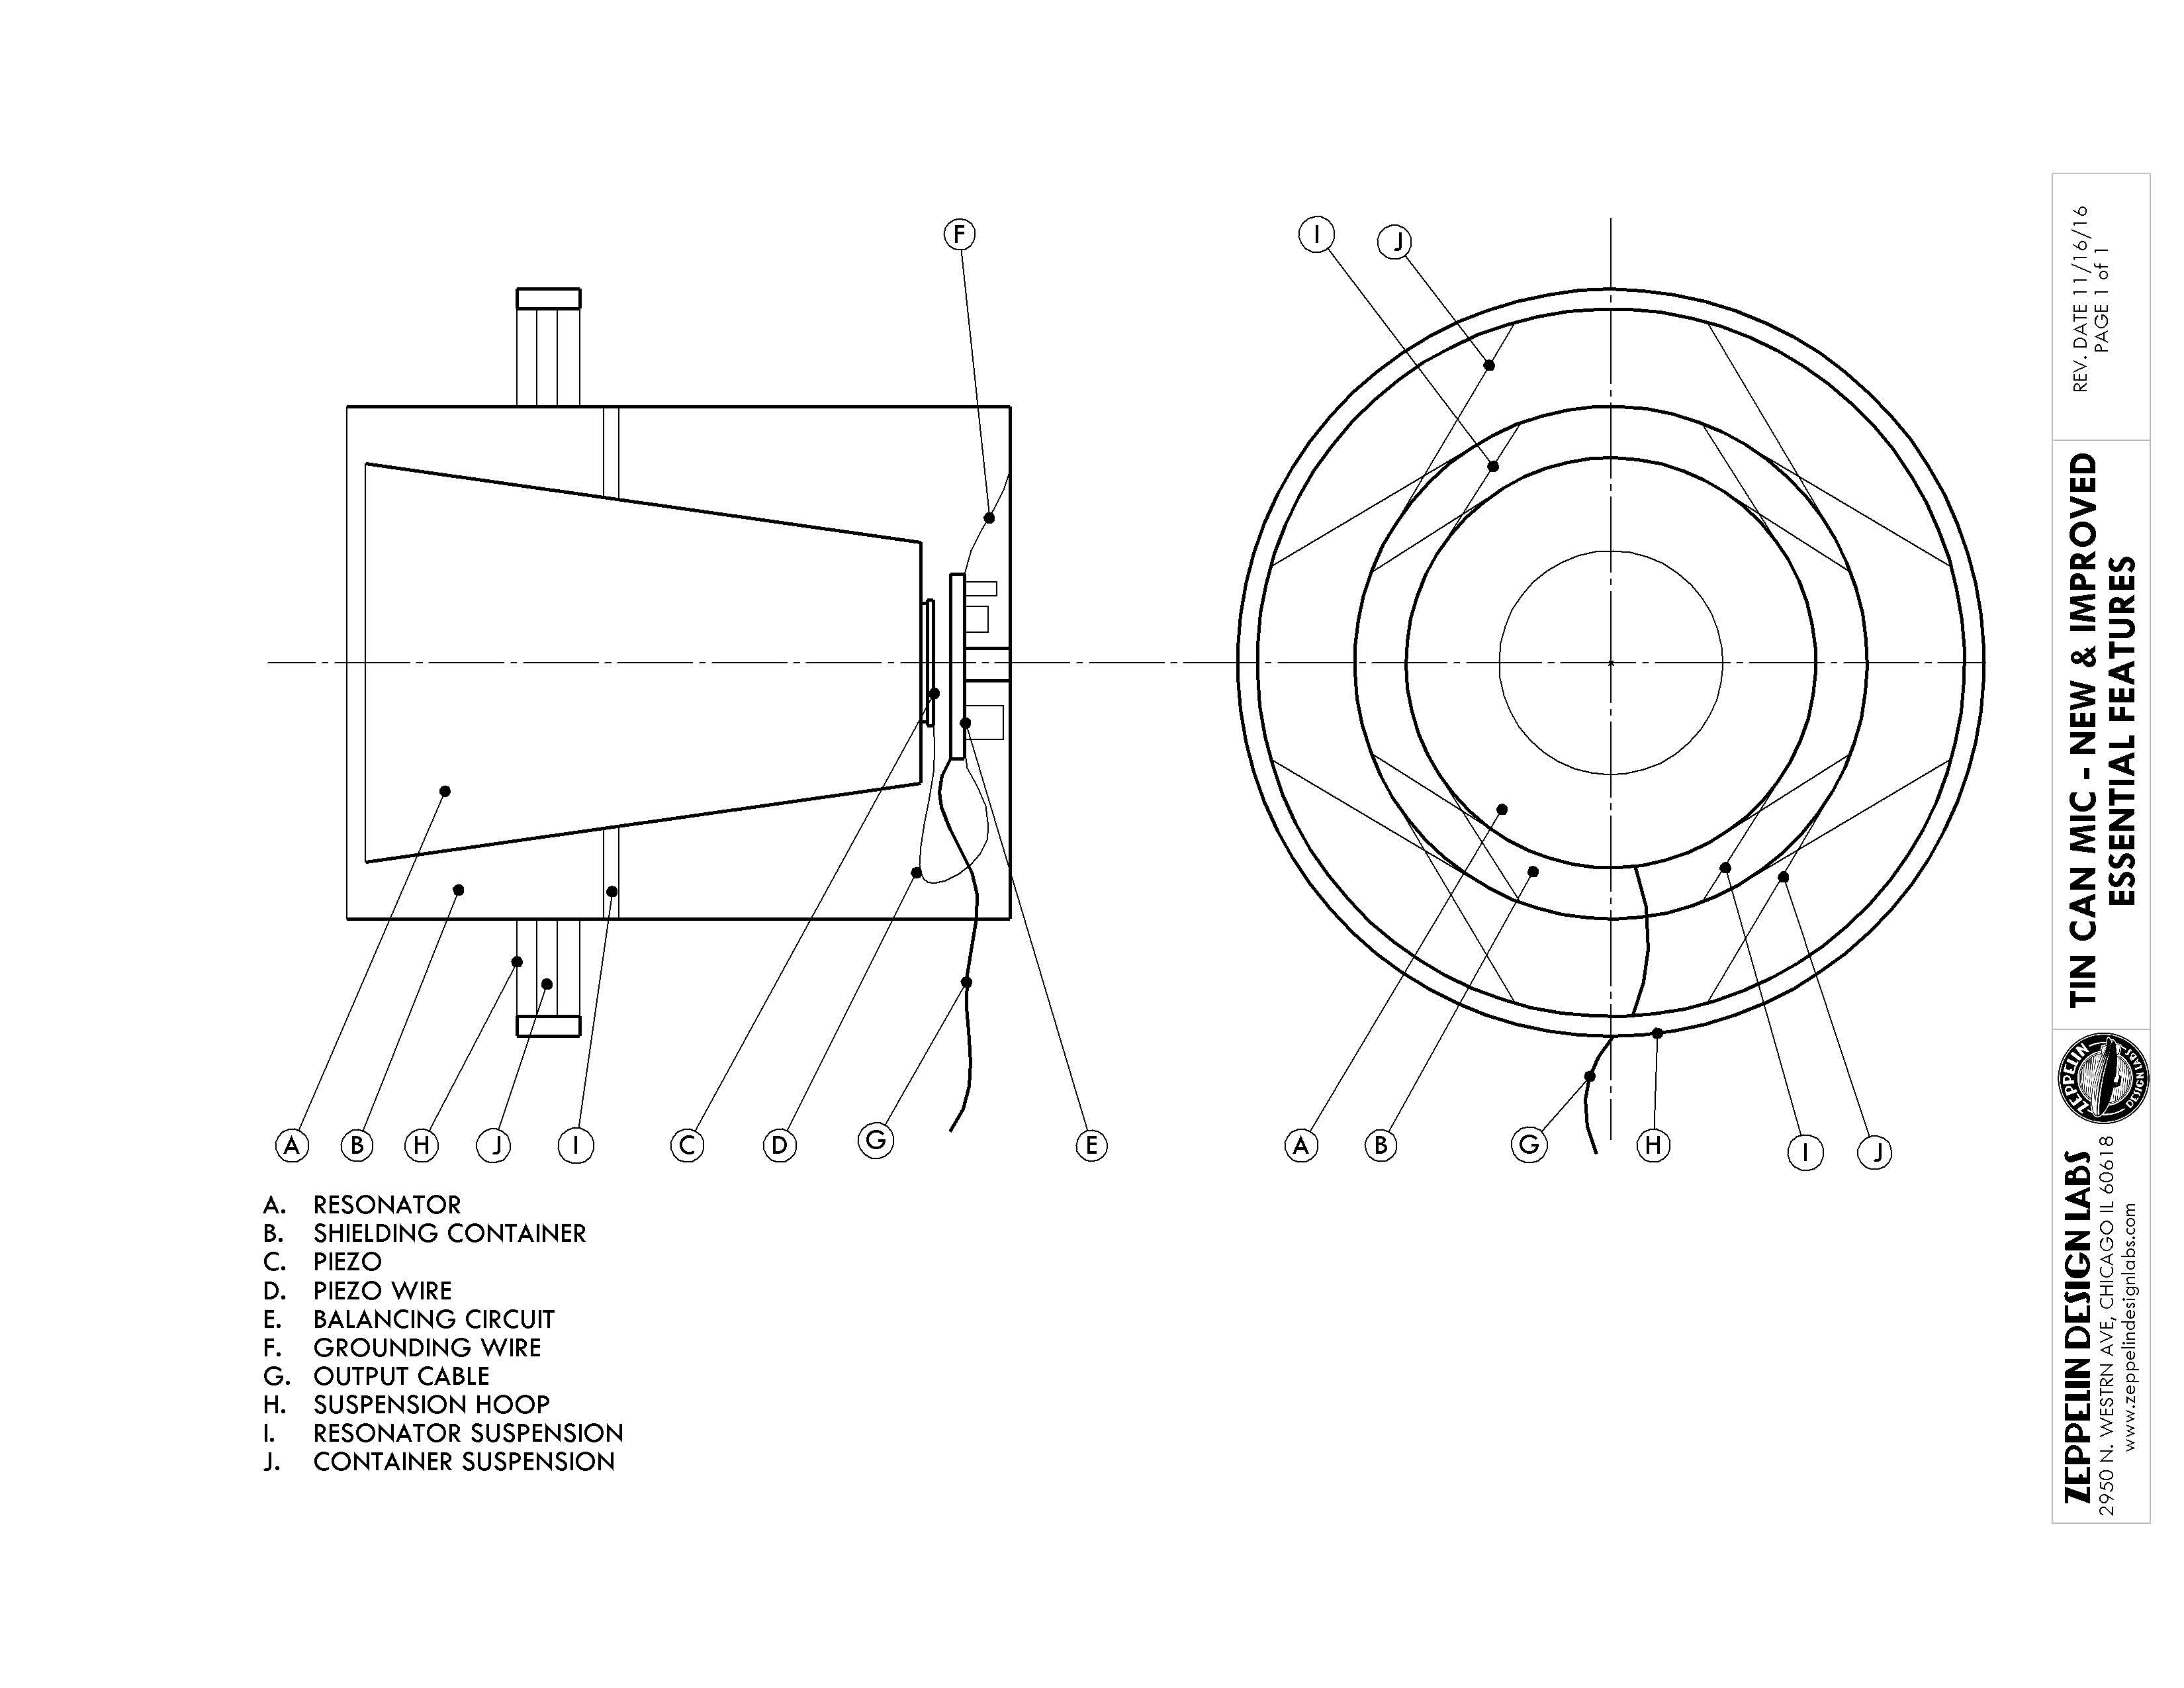
Balancing Act
The heart of the mic is a tiny phantom-powered circuit (originally designed by Alex Rice) which creates a balanced output signal from the piezo disc. A balanced signal is extremely quiet, providing high signal-to-noise ratio. Further, this circuit provides a high input impedance to the piezo disc, and also a low output impedance to match a mixing console input. By properly matching the input and output impedances we achieve a much wider bandwidth than the original tin can mic, and also the circuit can drive the signal along a very long run of mic cable. Figure 3 shows the schematic of our circuit, which we call the Cortado. Our Instructable includes a complete bill of materials from which you can build your own circuit, or you can get a kit from Zeppelin Design Labs.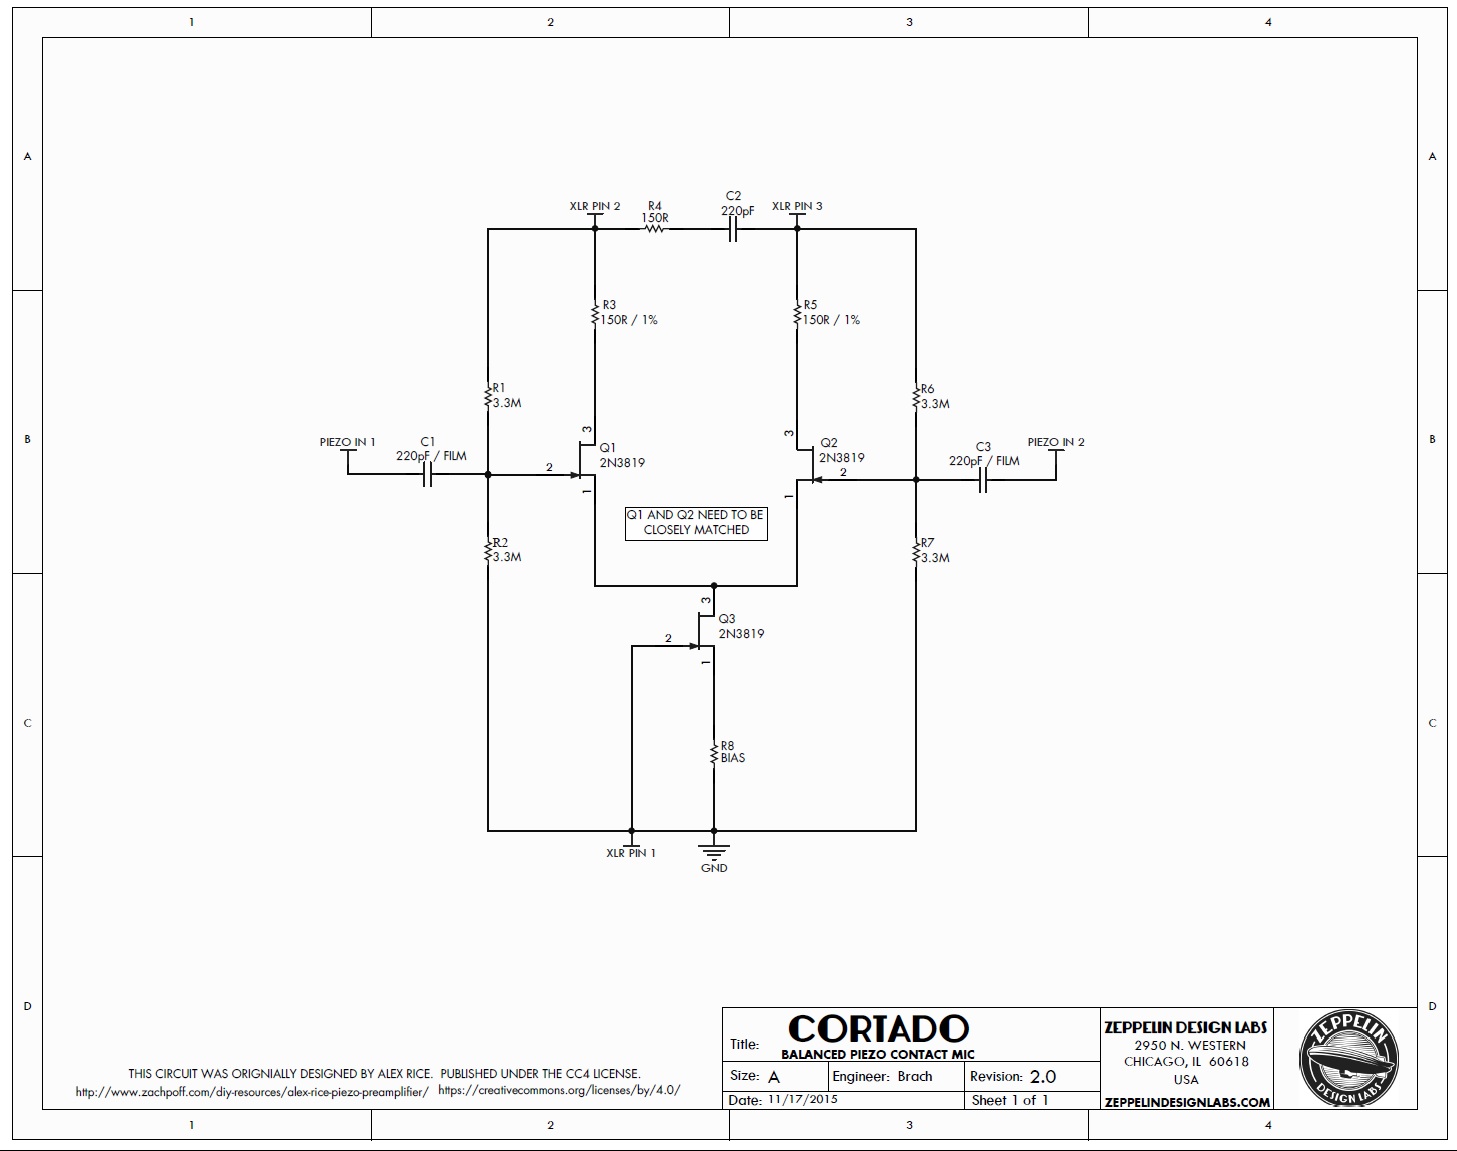
Speak To Me, or, That Really Resonates With Me
The one piece that most affects the tonality of the microphone is the Resonator, the thing the piezo is stuck to. A piezo disc does not respond to sound in the air; it is only sensitive to vibrations in a surface to which it is stuck, or “coupled”. For the resonator, you want an object that is stiff enough to propagate sound vibrations, but light enough to respond to your voice in the first place. For example, a thin piece of foam padding is very lightweight, and your voice is loud enough to cause it to vibrate. But it is very soft and flexible, and the energy of your voice is quickly absorbed by the foam. A plate of glass will transmit sounds instantly and with great fidelity, but it takes a lot of energy to get a plate of glass to vibrate. You could use a piezo to record the sound of marbles pattering on a glass pane, but even if you shout at that glass, your mic will likely hear nothing.
For these reasons, we settled on a Styrofoam cup for our resonator. There are many other common objects you could use for the resonator: paper cups — small or large, waxy or plain; plastic cups; plastic food containers of various materials, shapes and sizes; aluminum cans; and of course the original, a steel soup can. Each one will sound significantly different. Even trimming the curled lip off the end of a paper cup will affect the tone. Experiment!
Stick it to me!
For maximum bandwidth, the piezo needs to be tightly coupled to the bottom of the resonator, Figure 2 (C). We think the best thing to use for permanent installation is a good quality double-sided tape (carpet tape), but various glues could work too. Glues will likely filter the sound in different ways. If you want to try the piezo on lots of different resonators, you can just use masking tape or painters tape temporarily; or use poster putty like Blu-Tac or PlastiTack.
For the piezo to respond to the vibrations in the Resonator, it is important to use very fine, flexible wire between the piezo and the circuit (D). We use 30 gauge wire in the Cortado. We have found that the wires inside a computer monitor cable make an excellent choice.
EMF Defence Shield
To eliminate noise from the circuit, every element must be carefully shielded, from the piezo all the way to the recorder input. This is why the Resonator, piezo and balancing circuit must all be contained within a conductive Shielding Container, Figure 2 (B). Additionally, the Shielding Container must be grounded to the circuit (F), and you must use a decent-quality shielded mic cable coming from the circuit output (G)....
 Zeppelin Design Labs
 Dr. Cockroach
 Andrea Console
 MaBe42

 Kelly Heaton