Close
0%
0%

KEYBOARD/4A-99

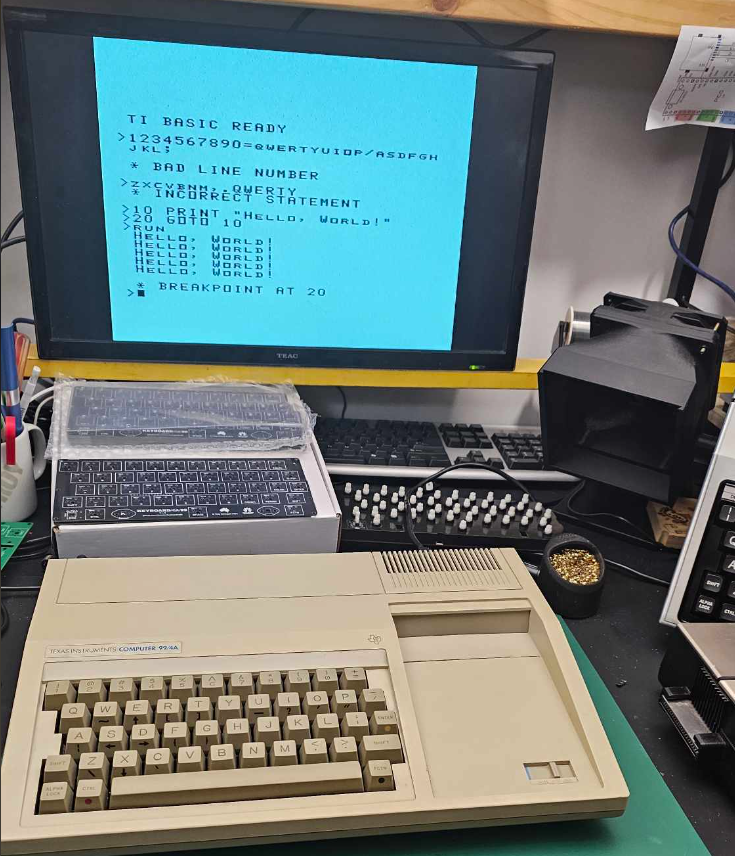
Cherry MX compatible upgrade for Mitsumi mylar keyboards in Texas Instruments TI-99/4A computers - using original keycaps.

Similar projects worth following
Many Texas Instruments TI-99/4A have been cursed by cheap Mitsumi mylar keyboards which are prone to failure with age. Even the NOS replacement keyboards are often in bad shape.

This project aims to provide a drop-in replacement for the Mitsumi keyboard using modern Cherry MX compatible switches, with adapters for the original TI-99/4A keycaps.

Purchasing options:

These are now available at https://www.arcadeshopper.com/wp/store/#!/Keyboard99-Mitsumi-membrane-replacement-PCB-only/p/648592668

For those outside the US, you can support the project by purchasing direct from my PCBWay project page: https://www.pcbway.com/project/shareproject/KEYBOARD_4A_99_0361cd65.html

Finally! a Cherry MX compatible upgrade for the infamous Mitsumi mylar keyboards that plague many unfortunate Texas Instruments TI-99/4A computers.

The upgrade consists of a new PCB and a handful of 3D printed parts. The original look is maintained by re-using the original key caps (and some other original parts). Add the switches of your choice and you're set! A brand new keyboard for your TI-99/4A.

Only Mitsumi boards?


Currently, the upgrade is designed for the Mitsumi keyboards since their mylar innards gives the most grief to TI-99 users. It is possible other TI-99/4A keyboard brands could be adapted to use this upgrade in the future, hower that would rely on community input.

The hardware


The Gerber file for the KEYBOARD/4A-99 PCB is available in the /pcb directory. I recommend the PCB is ordered in black.

STLs for all 3D printed items are located under /stl.

Note: Not all STLs are required.

Check out the documentation for more details, including a bill of materials and full build process.

View all 2 project logs

  • 1
    Introduction

    KEYBOARD/4A-99


    Introduction


    This project is intended as an upgrade for an existing Mitsumi mylar "keyboard". As such, you will require one of these (probably non-functioning) "keyboards" to begin. We will be re-using all of the original keycaps, the metal PCB support strips and screws, and (optionally) the space bar support brackets and 15-pin ribbon connector.

    Don't feel bad for it. That brown abomination should have been relegated to landfill years ago. It's one of the lucky ones!

  • 2
    Bill of Materials

    Here's the full list of items you'll need to complete this upgrade. Some of these items are optional, many are 3D printed, and some can be salvaged from your mylar monster.

    Qty.DescriptionThumbnailNotes
    1Mitsumi mylar TI-99/4A "keyboard"To pillage keycaps and (optionally) other components
    1KEYBOARD/4A-99 PCBI recommend ordering it in Black. But, you do you. See /pcb
    47Cherry MX compatible key switchesI have tested Akko V3 Cream Black (Amazon).
    Unfortunately, they only come in 45 packs. Such is life.
    Important: Check your switches have the two additional locating pins.
    Some of these only have the center locating pin. These won't be as stable.
    18mm latching buttonFor Alpha lock. GPBS-800L (Mouser)
    11N4148 Diode (Optional)Can be jumpered if you don't want the ALPHA LOCK fix
    115-pin 0.1" pitch x ~75mm+ female IDC cableCan re-use cable from original "keyboard".
    Can use new Dupont cable (optionally, with a header on the PCB).
    New parts:
    Can get two from a IDSS-15-D-06.00-G-R (Mouser)
    OR
    one from a IDSS-15-S-03.00-T-G-ST4 (Mouser)
    103x8mm self-tapping
    OR
    M3x5 machine screws
    Either 3x8mm self tapping (Amazon)
    OR
    M3x5 machine screws (Amazon) to suit brass inserts.
    10M3 x 5.7 x 4.6mm brass inserts (Optional)M3 x 5.7 x 4.6 from Amazon
    1PCB mount (left)3D printed (self tapping or brass insert options available)
    1PCB mount (right)3D printed (self tapping or brass insert options available)
    2PCB support backer3D printed.
    The metal supports on the original keyboard will screw into these.
    2Space bar support3D printed (self tapping or brass insert options available)
    Two model options available:
    * One to re-use Mitsumi spacebar support (pictured)
    * Another two-piece model using all new 3D printed components
    45Keycap adapter (standard)3D printed. 7x7 array model is also available.
    1Keycap adapter (space bar)3D printed. I've found the slot in the space bar is slightly larger.

    It could just me mine?.
    1Keycap adapter (right shift)3D printed
    1Keycap adapter (alpha lock)3D printed
  • 3
    3D Printing Notes

    All 3D printed models were designed using Onshape. If you need to make modifications, the project is available here: KEYBOARD/4A-99 on Onshape

    In developing this upgrade, all items were printed using:

    • Printer: Creality Ender-3 V3 KE
    • Nozzle: 0.4mm
    • Filament: 1.75mm Elegoo PLA+ (PETG would likely work very well too)
    • Layer height: 0.15mm
    • Supports: Yes, from bed only (except for standard keycap adapters - no supports)

    Note: The keycap adapters in particular require very fine tolerances. The models I've provided may or may not provide the correct tolerances with your printer/material/settings and also minor differences in keycaps and switches. Again, the Onshape project can be used to adjust these for your specific setup.

    Threaded inserts


    All of the models which accept screws have two versions. One which takes threaded inserts and another designed to take a self-tapping screw directly. e.g.

    keyboard4a99-pcb-mount-left-inserts.stl
    keyboard4a99-pcb-mount-left-selftap.stl
    
    TypeHole diameterNotes
    Brass inserts4.5mmM3 x 5.7 x 4.6 from Amazon
    Self tapping2.8mm3mm x 8mm self tapping screws from Amazon

    If you require a different hole size, the Onshape project includes a global variable #threadsize to control this.

View all 6 instructions

Enjoy this project?

Share

Discussions

Slowbee Probe wrote 04/12/2024 at 19:47 point

What a great pleasure to see this project. 😃👍

I have just bought a second TI-99/4A and an extra loose keyboard to assemble at least one working system, from old parts.

Hope to get one of your boards to replace the faulty keyboards.

  Are you sure? yes | no

Troy Schrapel wrote 04/13/2024 at 06:03 point

Thanks. Note: this upgrade only works on Mitsumi branded TI-99 keyboards at this stage. They're easy to recognize due to the brown "pcb" which is visible through the bottom of the case. Also, the key caps are slightly more square than other types.

  Are you sure? yes | no

powiadam.ci wrote 04/06/2024 at 06:38 point

why not replacing a big space to more keys?

meybe adding a rotor/knob/potenciometer in top,right ?

  Are you sure? yes | no

Troy Schrapel wrote 04/06/2024 at 07:33 point

A couple of reasons:

1. I'm re-using the original keycaps, so stuck with the sizes they are.

2. I'm using the original 15-pin button array connector, so can't support additional buttons/functionality. Technically, there are two unused combinations in the array which could be used for "new" buttons, but...  

 I'm going for the stock look, stock keycaps, but with modern switches that actually work well. 

  Are you sure? yes | no

arto.heino wrote 04/04/2024 at 06:09 point

Hi Troy, I just found your project on the Atari Forum, great work, I have been working on my version on and off for a while,  you have done such a stellar job,  I won't need to finish mine. Regards Arto. 

  Are you sure? yes | no

Troy Schrapel wrote 04/04/2024 at 07:06 point

Thanks. I had seen someone else on Atari Age (Duewester) had some very old posts about a similar project, but it seems nothing came of it.

  Are you sure? yes | no

Similar Projects

Does this project spark your interest?

Become a member to follow this project and never miss any updates