Close
0%
0%

3D Haptic Vest for Visually Impaired and Gamers

This project's goal was to make a vest that a visually impaired or gamer could use when moving around in their environment(real or virtual).

Similar projects worth following
This vest allows the visually impaired or blind to perceive their environment in 3D through its array of 48 vibration motors. This vest could also be used for gamers that play online or console games to give them cues and other important information. This vest is intuitive to use.

NEW VIDEO FOR SEMIFINALS

ORIGINAL VIDEO

How the vest works:

This project uses a matrix of 48 vibration motors that wraps around the torso. The vest sends tactile feedback to the user in such a way that they can perceive the environment in front of them in 3d. This is done by using varying levels of vibrations. Eight levels of vibration were used of the possible 4096 levels. The closer something is to the wearer (or the louder the sound in gaming), the higher the intensity of vibration in the motors that correspond to the location of the object (or sound). Each motor used a maximum of 60 milliamps. If all 48 motors were running at the maximum speed for an hour, 2.88 amps would be consumed. A depth sensor, a computer, battery pack, and a microprocessor with IC’s (Integrated Circuits) are needed to run the vest. The computer, the battery pack, and the electronics are contained inside a backpack.

The depth sensor used in this project is the Microsoft Kinect. By using the Kinect the vest can still work in complete darkness. This was because the Kinect uses an infrared camera sensor.

https://www.google.com/search?q=microsoft+kinect&safe=active&rlz=1C1CHFX_enUS562US562&espv=2&source=lnms&tbm=isch&sa=X&ei=Z9nJU-nVMYaSyATaroKwAQ&ved=0CAoQ_AUoAw&biw=1280&bih=737

The vest would use a stereo video camera (like one from an Xbox Kinect), processors, a computer, and a battery supply. The electronics other than the Kinect would be stored in a backpack.

The skin, a sense organ, contains the biological sensors of touch which are the thermoreceptors (responsible for thermal sensing), the nociceptors (responsible for pain sensing), and the mechanoreceptors (sensitive to mechanical stimulus and skin deformation.) Of the four kinds of mechanoreceptors, the one that is relevant to this project is Pacini corpuscles which respond to vibration.

The ability to discriminate stimuli on the skin is different throughout the body. The two-point discrimination threshold (TPDT) is a measure of how far apart two pressure points must be in order to be perceived as two distinct points on the skin. The measurements shown in the link were used in the design of this project. The link shows the TPDT for different areas of the body. 

http://www.robotica-up.org/PDF/Wearable4Blind.pdf

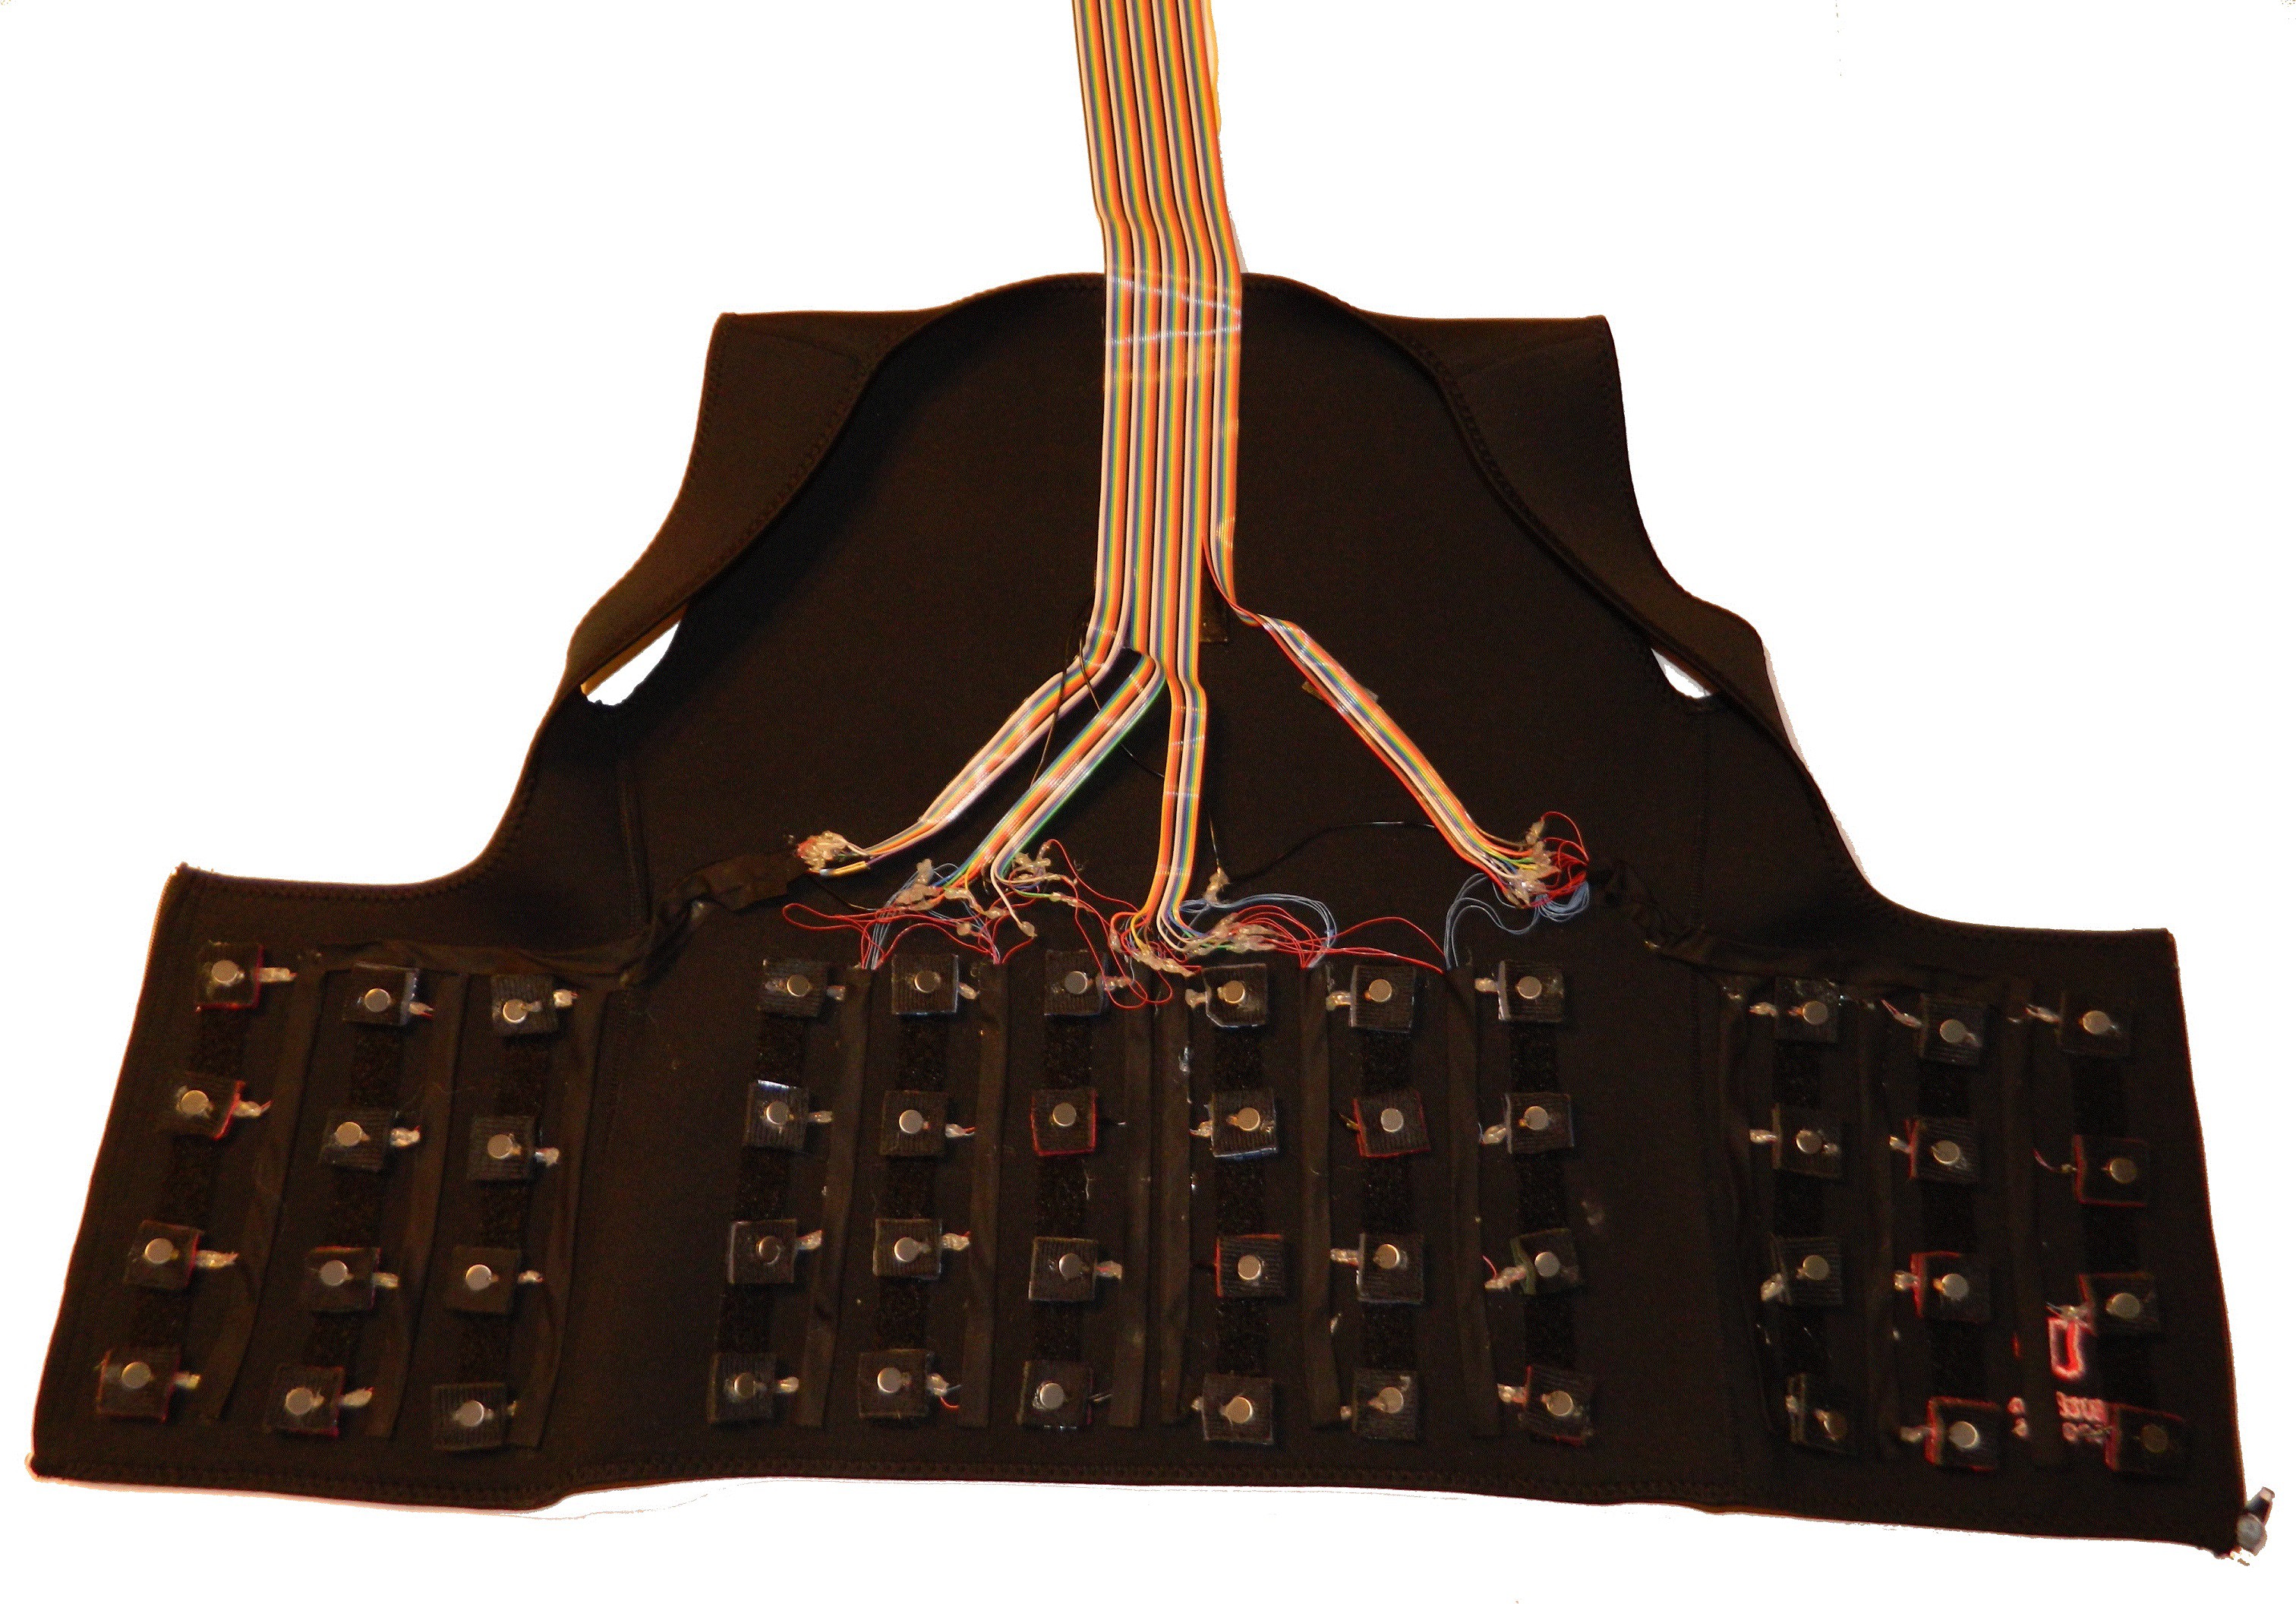
The final product used neoprene squares that were put on a 1” piece of foam. Vibration motors were mounted on the neoprene platforms. The neoprene platforms were mounted on the neoprene vest to be 2" apart. This vest worked significantly better because the motors did not spread vibrations throughout the entire vest.

Figure 2: Vest

The final design is a purchased neoprene vest with 48 motors on neoprene pads attached with Velcro. The vest has a 50-wire ribbon cable and a ground cable that connect to the electronics box. Solder was used to connect the ends of the wires to the ribbon cable at the back of the vest. Connections were insulated and fabric glue was used to attach double fold bias tape to cover the wires. All ground wires were connected together to a long ground wire.

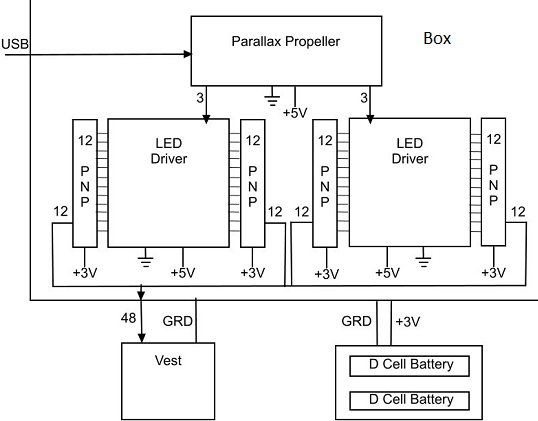
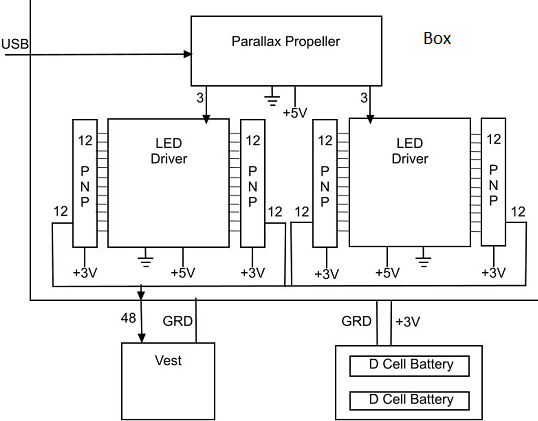
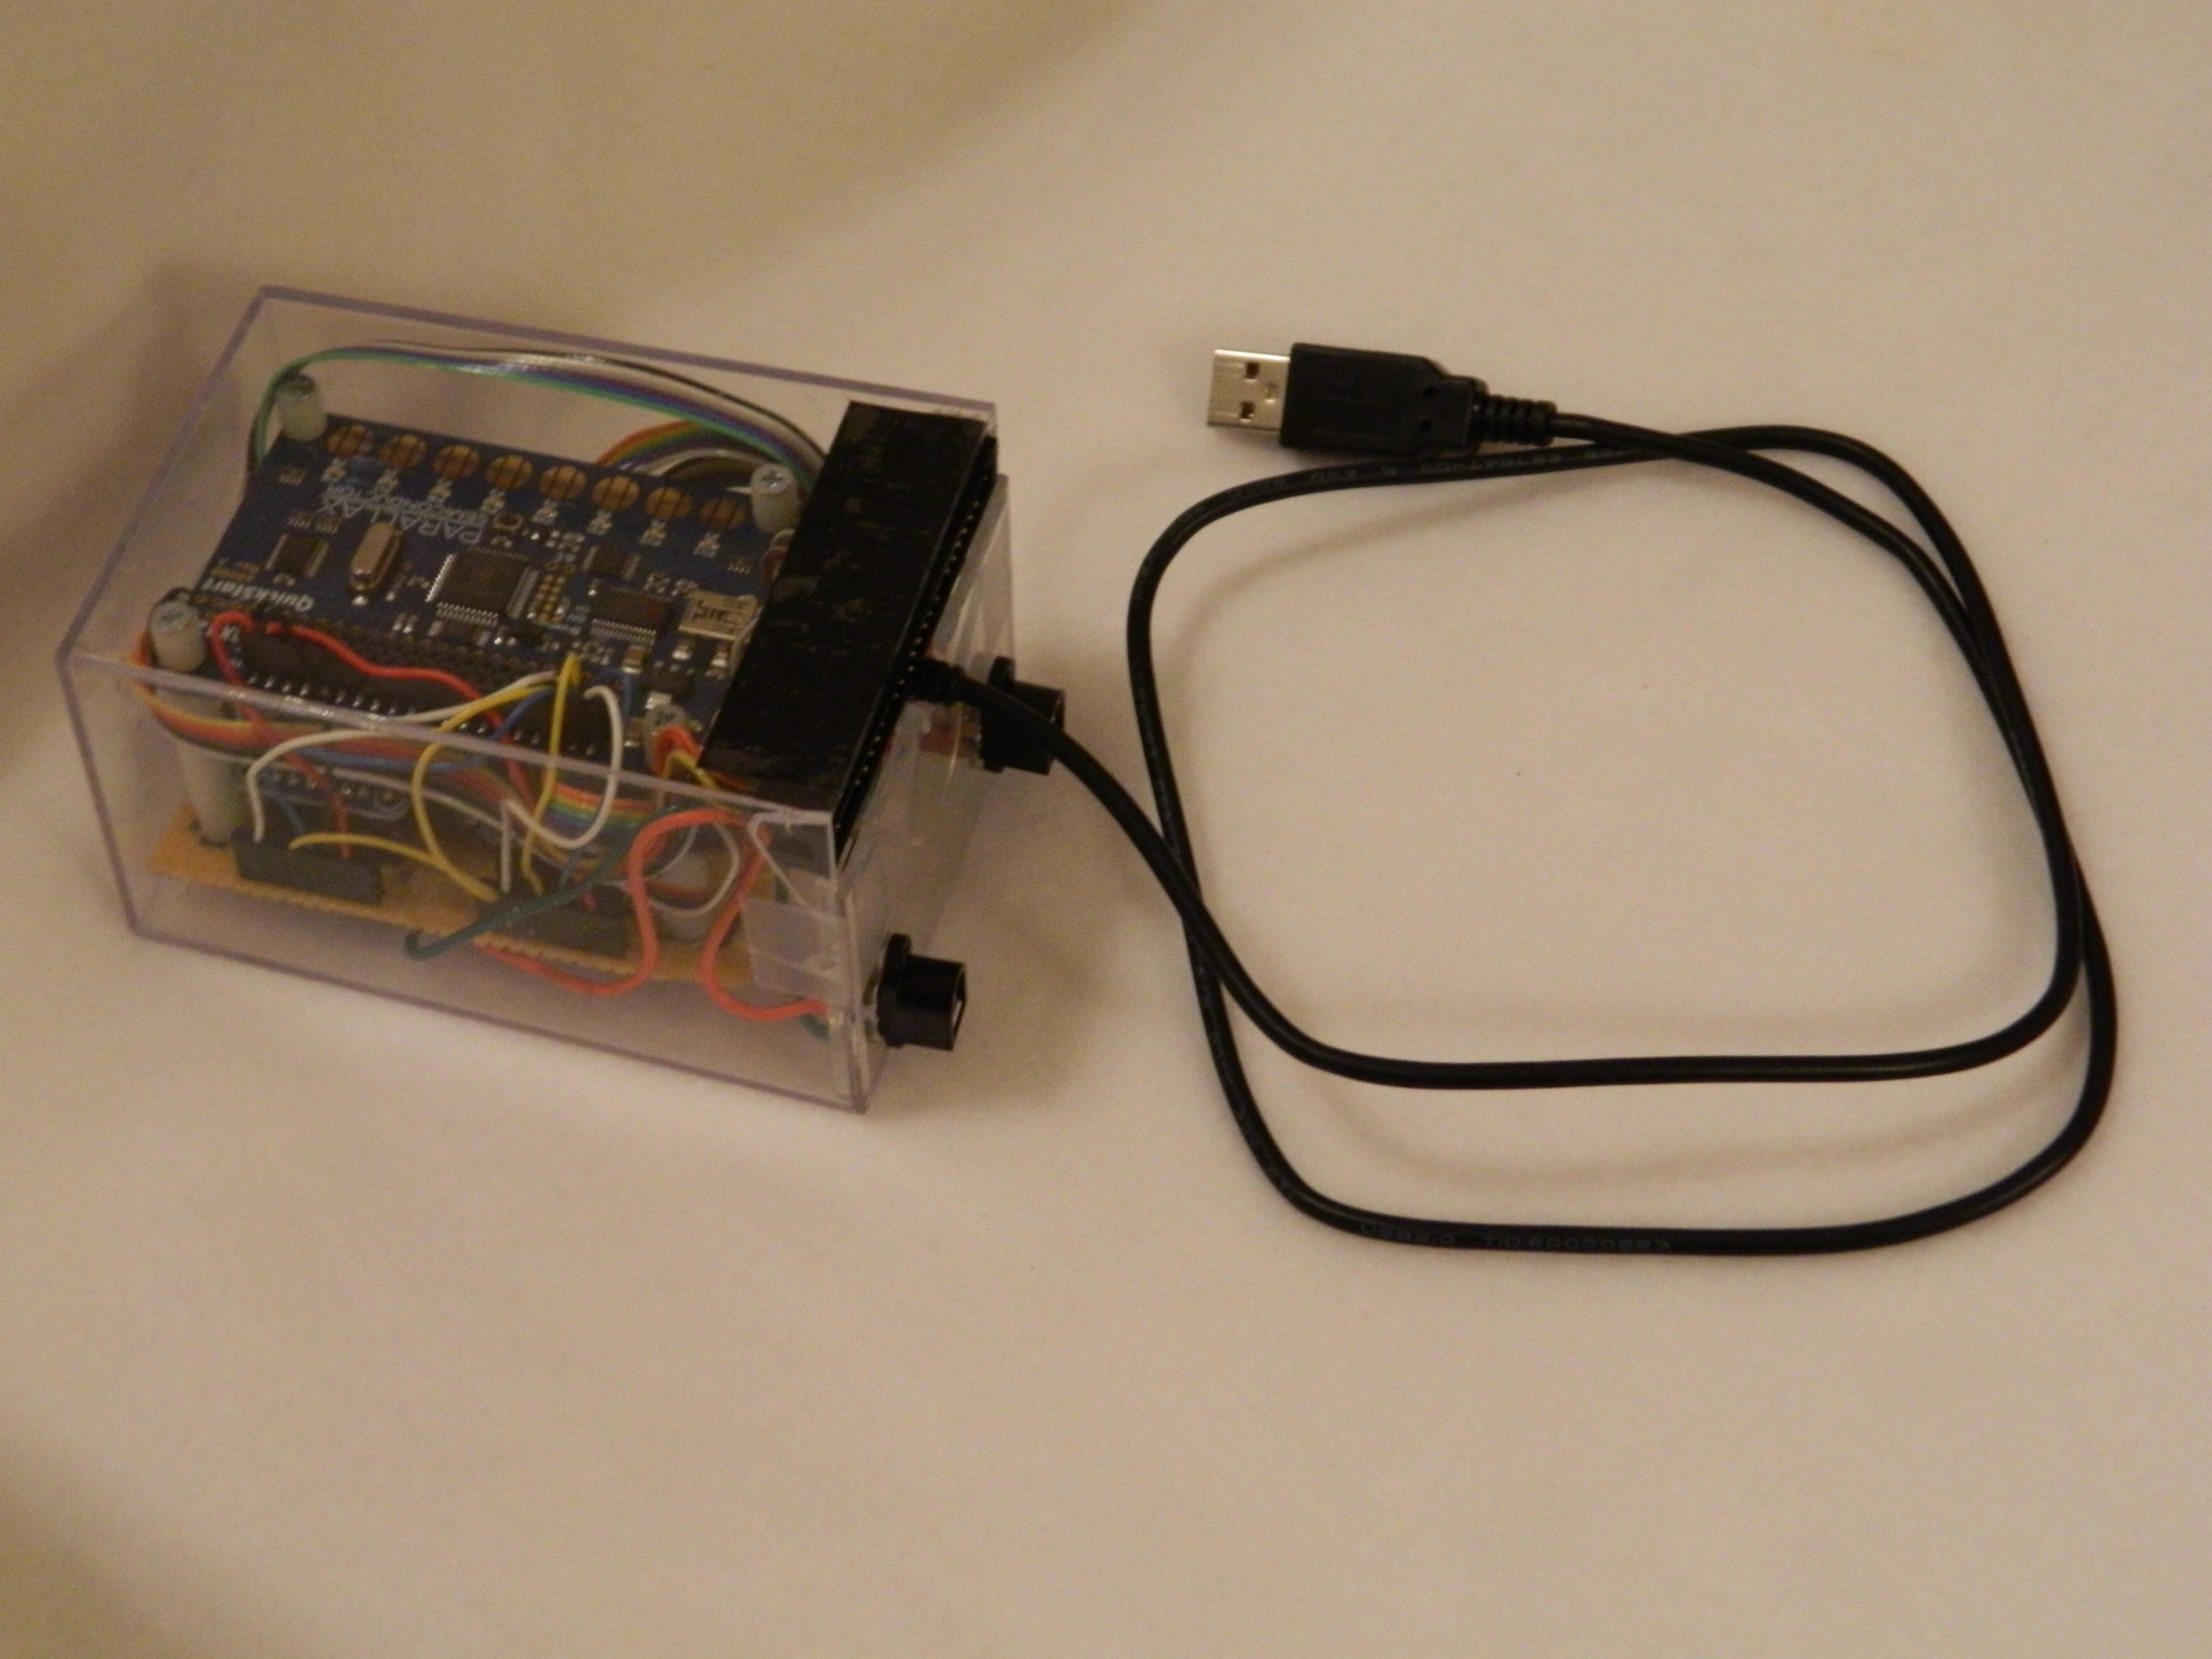
Both the ribbon cable and the ground cable were attached to an electronics box. This box (see Figure 3) contained a specialized circuit board (see Figure 4) with 48 transistors and two LED driver boards attached. Also in the box was a propeller board, a ribbon cable plug, a USB plug and two power plug adapters.

Figure 3:  Electronics Box

Figure 4: Circuit Diagram

Figure 5 shows the flow of information from the depth sensor to the vest. The C# Master Controller Program (MCP) collects data from the depth sensor (which is the 3D video camera) and converts it to low resolution 3D video. That picture is sent to a communicator program. The C# Communicator Program takes the information from the MCP and sends it to the propeller microprocessor through the USB cable. The Parallax Propeller program takes the low-resolution 3D video and sends it to the LED drivers in the circuit box. The LED drivers convert the depth video...

Read more »
  • 2 × Adafruit 12-Bit 24-Channel Led Drivers
  • 1 × Raspberry Pi
  • 1 × Parallax Propeller Microcontroller
  • 1 × Microphone
  • 1 × Laptop running Windows

View all 40 components

  • How to use LED drivers to run vibration motors

    Sean Benson09/29/2014 at 01:20 0 comments

    The code to run the motors from the Parallax Propeller is here. This code is for the Adafruit 24-Channel 12-bit PWM LED Driver - SPI Interface (TLC5947). The following is an explanation of how it works. To run the LED drivers first send out a 0 signal to the clock and the latch. Then send out 12 bits of information to the driver and shift them in by sending a pulse to the clock. Repeat that process 24 times (one for each LED or Motor). When all the data is in, the program sends a pulse to the latch which starts the PWM. Then the program constantly repeats this PWM process.

    Note: There is a big difference for shifting in information between the Adafruit 24-Channel 12-bit PWM LED Driver - SPI Interface (TLC5947) which I got to work and the Adafruit 12-Channel 16-bit PWM LED Driver - SPI Interface (TLC59711) which did not work for me.

    The difference is that the TLC5947 http://www.adafruit.com/datasheets/tlc5947.pdf has an input for the latch that the microcontroller can physically be attached to unlike the TLC59711 http://www.adafruit.com/datasheets/tlc59711.pdf. The TLC59711’s latch is controlled through sending a specific code then shifting in data for LED groups and individual pins for PWM of the 12 output pins. The speed for sending in this information exceeds the speed of Python running on the Raspberry Pi at 700 MHz (the default speed). If I used C or C++ on the Raspberry Pi or SPIN on the Parallax Propeller to send out the information I believe it would have worked properly.

  • Fast Fournier Transforms (FFT) on the Raspberry Pi

    Sean Benson09/29/2014 at 00:38 0 comments

    To run FFT on the Raspberry Pi I downloaded and modified the FFT Program. This allowed me to run real-time FFT. In that code they put down 2^11 as the minimum chunk (a piece of audio) size over the regular 44,100 Hz audio setting. Originally I used 2^13 for the real-time FFT because it worked on the Pi. In order to speed up the process so that the motors would react instantaneously to the noise I lowered the setting from 2^11 to 2^8 with a rate of 14,400 Hz. In order to lower the rate of audio sampling for playing the Call of Duty game I used a USB microphone instead of using a male-male adapter for the microphone slot in the USB sound card. The other one of the male-to-male adapters connects to the audio output of the Xbox.

    Lowering the Hz to 14,400 and the chunk size to 2^8 enables the Pi to handle the FFT computations which intern increases the speed proportionally from 5 times to 56 times each second. I was shocked that I was able to get this far with the processing power of the Raspberry Pi. In the process of making the program faster I send out 4 control bytes and a 2-character return byte for each FFT iteration to control the vest. This program takes up about 60% of the computational power of the Raspberry pi excluding the GPU  while still running the python program with c libraries. I was also shocked when I found that out. So in the future I will be making a better pattern recognition program and will hopefully remove the parallax propeller from the equation to have only one main microcontroller running the whole process. I also wrote code for running the vest at different frequencies so that anyone can use it for different games by changing the settings of the code a little. The Raspberry Pi required extra libraries PyAudio, PySerial, NumPy to run the code. This gamer vest is so fun! 

  • Gamer Vest - Feel like you are in the game!

    Sean Benson09/28/2014 at 23:12 0 comments

    I researched Fast Fournier Transforms (FFT) on the Raspberry Pi and decided to implement it in this vest for gamers. I tested the vest using the Call of Duty game. The wearer can now feel the recoil when they shoot their gun and other bass sounds like heart thumps from low health, enemy’s loud shots, grenades and rocket launchers. It’s really fun! The vest can be used in other games and also for watching movies. It would be fantastic if the motor array was embedded into the back of movie theater seats to add another dimension to the movie viewing experience. Kind of like the Mickey's PhilharMagic® show/movie at Disney World where you get to smell a scent or feel something run across the room by having your ankles tickled with air.

    FFT enables the Pi to make spectrograms of the audio from any sound. A pattern recognition program is used to determine when there are audio cues. Then a signal is sent through a USB cable to the Parallax Propeller which then sends information to the Adafruit 24 PWM LED drivers which turns on the motors in the vest.

  • Engineering Innovation – a new way to use LED Drivers

    Sean Benson09/17/2014 at 17:06 0 comments

    The vest uses LED Drivers to control 48 vibration motors. I researched and couldn't find a good solution so I originally used shift registers to do the pulse width modulation. But then I thought of LED drivers and they worked much better. Coincidentally both of them have similar properties.

    I will publish the code soon.

    9/28/14 Update:  The code can be found here.

  • Raspberry Pi

    Sean Benson09/17/2014 at 16:57 0 comments

    I wanted to use the Raspberry Pi in this project because it is a miniature computer that could replace the big laptop I use to control the vest. Originally, because I wanted to make another box, I made a Python program to control Adafruit 12 PWM port LED Drivers but Python on the Raspberry Pi is too slow to run them. So for my second attempt to make the Raspberry Pi (that I purchased from Element14) control the vest I sent the startup and controller commands to the Parallax Propeller and let it do the hard work to control the Adafruit 24 PWM LED drivers in the original box.

    Currently my Raspberry Pi can control the vest and pretty soon I will have code written for it for gaming. I have also 3d-printed a case for the Pi to prevent me from frying it when I handled it. 

    9/28/14 Update:  See the journal entry "Gamer Vest - Feel like you are in the game!" and code and video updates for more on the gamer vest.

  • Engineering Innovation

    Sean Benson09/17/2014 at 16:56 0 comments

    To my knowledge a vest like this has not been done for the visually impaired. My vest has 48 vibration motors which is a whole lot more compared to other gaming vests.

    I also use an innovative way of suppressing the transfer of vibrations from motor to motor. I use a neoprene vest with neoprene pads on which the motors are mounted. This reduces the vibration transfer between motors and also reduces the transfer of vibrations between the wires and the motors.

    Fast Fournier Transforms (FFT) on the Raspberry Pi:  I used Python to make calls to multiple libraries (such as NumPy, PyAudio, PySerial) to implement FFT 56 times per second at sample rates of 14,400 Hz from the audio stream.  This was unusual since other people using the Raspberry Pi without the GPU could only get the FFT to 5 times per second.  But what was extra special was the process only took about 60% of the computing power. This gave me really good response time with no noticeable lag.  Game playing wearing the vest is awesome!  

  • Connectivity

    Sean Benson09/17/2014 at 16:55 0 comments

    I added a button to the vest so that the visually impaired person can send an email to someone who can help them in case they have fallen or need help. The email address and message are preconfigured. It uses Wi-Fi to make the connection.

    9/28/14 Update:  The additional button on the vest, when pushed, now sends an email to a remote assistant that includes a picture taken by the Kinect. This way the assistant can call the wearer and tell them what is in the picture.

  • A Professional Opinion

    Sean Benson09/17/2014 at 16:54 0 comments

    I demonstrated my vest for Dr. Joe Fontenot of the Community Services for Vision Rehabilitation (CSVR) in Mobile, AL. on September 2. (See http://csvrlowvision.org/ for more information.) Dr. Fontenot, who is legally blind, also tried on the vest. He gave some positive feedback. We also discussed the challenges that visually impaired people face in everyday life. He was impressed by the vest and was not aware of anything like it in the marketplace. He liked the idea of using it to communicate to a remote assistant. If I can make the vest send emails with pictures then a remote assistant could call and help identify items in the surrounding environment. The remote assistant email could be configured to be that of a relative or a friend.

    9/28/14 Update:  I was able to get this to work. See the Connectivity log entry.

  • Testing

    Sean Benson08/21/2014 at 02:23 0 comments

    To test this project I got a dozen volunteers to use the vest while blindfolded and some of them listened to loud rock music.  They did not have any direct collision when put into a maze of obstacles.  They all took about a minute or less each to learn how to use the vest.  So it is very intuitive.  What is directly in front of the sensor is displayed on the belly and the peripherals are displayed on the left and right portions of the back.  High objects can be determined from low objects because of the 4 rows of motors.  Higher objects are on the higher rows and lower objects are on lower rows.  Soon I will try the vest on legally blind people.

  • Cheap Buys

    Sean Benson08/21/2014 at 02:15 0 comments

    If anyone is searching for a cheaper parallax propeller board.  When I last checked,  I think I saw that Adafruit sells them for less than parallax does(lol).

    This project is not limited to only using the propeller board, others can most definitely use Arduino with Adafruits open source led driver code.

    The vibration motors should be bought in bulk so they cost less.  I bought mine off of ebay.

    The neoprene sports vest was also bought from ebay.

View all 12 project logs

  • 1
    Step 1

    Procedure for Vest

    Purchase a Neoprene Vest.

    Put neoprene squares on 1" pieces of foam.

    Mount vibration motors on Neoprene platforms.

    Mount neoprene platforms onto the vest to be 2" apart in a grid pattern so that the vibrations can be recognized one from another.

    Solder the ends of the wires from the motors to the ribbon cable at the back of the vest. (I used 30 gauge wire. DON'T use 30 gauge, use a lower gauge but not too low.  I used a high gauge to prevent vibrations from spreading and it worked.)

    Insulate the connections.

    Attach double fold bias tape to the vest with fabric glue to cover the wires.

    Connect all ground wires to a long ground wire.

    Procedure for Electronics Box

    To control 48 motors at once (THIS IS AWESOME) follow the diagram.

    This uses 2 Adafruit LED Drivers, 48 PNP Transistors (that can handle at least 60 milliamps, mine could handle 800 milliamps), a box, 1 Parallax Propeller, and D Cell Batteries (they can have about 12 amp hours of electricity).

View all instructions

Enjoy this project?

Share

Discussions

flamesofhearts wrote 05/05/2021 at 09:53 point

Hi I know this is a long shot now, that time has passed... I hope at least the author can point me in a direction of how to make my own vest for gaming. I’m 100 percents deaf and I have been playing oculus quest 2 and it’s pretty obvious that I’m alway gettin gunned down cuz I can’t hear people sneaking up or shooting nearby. So yeah I want to make a tactile points for the headset for headshots and a vest but I’m seriously a noob in engineering or anything of like and I cannot afford 500 for bphaptic lol so that’s why I’m here..: talk to me anytime ! Thanks- lu

  Are you sure? yes | no

Rishi Gaurav Bhatnagar wrote 03/03/2015 at 09:58 point

I have been trying to install Kinect on  a Pi, haven't been able to do that using the xxcorde documentation on github. How have you done it? Could you point me to a blog or something else I could use for this?

  Are you sure? yes | no

Sean Benson wrote 03/03/2015 at 14:04 point

The Kinect works with the project for the visually impaired on a laptop.  The Pi runs a FFT program to understand what the sound from the video game means.  So they are two separate things that do not work together.

  Are you sure? yes | no

peter jansen wrote 09/21/2014 at 18:08 point
neat!

  Are you sure? yes | no

David Cook wrote 07/21/2014 at 00:59 point
Cool demo video!

  Are you sure? yes | no

Sean Benson wrote 07/21/2014 at 04:00 point
Thank you!

  Are you sure? yes | no

Similar Projects

Does this project spark your interest?

Become a member to follow this project and never miss any updates