Close
0%
0%

X1Plus Expander

Add lights, sensors, cameras, and more to your Bambu Lab X1 Carbon printer

Similar projects worth following
The X1Plus Expander is a hardware companion to the X1Plus open-source custom firmware distribution for Bambu Lab’s X1 3D printers. It adds printer expandability with an Ethernet port, two USB ports, a STEMMA-QT / Qwiic-compatible I2C connector, and four interchangeable GPIO headers for pluggable add-in adapters. The hardware is open source, too, and I'm gearing up to sell it on Crowd Supply!

This project log is definitely going to come in media res -- as of the time I start writing this, we're on the second rev of most boards involved.  But the gist of it is that Nixiebunny and I fabbed out a prototype of an expansion board that adds a handful of features to the Bambu Lab X1 Carbon (Ethernet, two USB ports, I2C, and a bunch of other GPIO).  The impetus is that the built-in WiFi on the printer is really bad, and it would be nice to have some expandability.  Once we had a basic prototype up and running, I posted about it on the Bambu Lab forums, to see if anybody else would want one, and the good news was that lots of people wanted one! The bad news, also, was that lots of people wanted one, because then it meant that I was going to have to figure out how to manufacture this thing.  Here's the video I posted on the Bambu forums, before we had any plugins for it:


I've partnered with Crowd Supply to bring it to life, and over here, I'll write about the development process of this thing. This project log will talk about some of the milestones of bringing up the software and hardware, progress on new board revs, and, of course, how much Finding Out I do when it comes to manufacturing.  I think a pretty good success criterion would be to sell this thing to a hundred or so people and break even on the manufacturing, and learn from it -- if it works out, I have other hardware projects I want to design that other people might like... If I end up doing more volume, and manage to recoup the prototype costs, I'll be over the moon thrilled.

  • What's between here and there?

    Joshua Wise12/01/2024 at 03:52 0 comments

    I kept meaning to write this for quite a while, and I kept not getting to it.  Ugh!

    Anyway, a handful of people keep asking me, like, what needs to happen between now and when? And when am I going to do what? So I figured I'd better write out my checklist of what's between here and there. Basically, I'm splitting this up into four major milestones:

    What needs to happen before crowdfunding ends?

    • I'd like to get a final firmware update to a few early testers that has a representative UI that they can mess with and make some videos with.

    What needs to happen before I order boards?

    • Money needs to come in from Crowd Supply.
    • There are a few changes left to X1P-002's schematic and layout that I need to make -- mostly, a few stability changes to the voltage regulator, and a few value changes to the overcurrent protection circuit.
    • I need to validate using the GPIO on LAN9514 to reset RP2040.
    • I need to quickly prove out in some early firmware that x1plusd can talk to RP2040, through a LAN9514, on a real printer. It doesn't have to support everything but it does have to work at least a little bit.
    • I'd like engineering samples of the X1P-001-A03 cables to come back. That would be nice.

    What happens between ordering boards and getting boards?

    • Finalize SLS plastics -- do a sample order, and then order in volume.
    • I need to fab out and check out X1P-003, the manufacturing test jig. That can be quick-turn since there are just a few of them. Design and print plastics for the test jig, and then machine a few dowels to hold the boards.
    • Production samples of boards need to come back so I can check them out. Then, I can P-release boards.
    • P-release cables (should be shorter lead time than boards).
    • Final RP2040 firmware gets written then against the production-sample boards.
    • The lead time on boxes is short, but I definitely need to do art for the boxes, because man, all those converging lead times creep up on you!
    • Will I have time to make a trip to Shenzhen? That would be nice!

    What happens when I get boards?

    • Pizza party at my house! If you live in the Bay Area, and you want pizza and beer, send me some e-mail, and we'll have an assembly party. There's going to be a bunch of work testing and labeling boxes, and stuffing packing peanuts. And petting Peanut.
    • Ship a bunch of large boxes over to Mouser.
    • Hopefully that will coincide with X1Plus release 2.1. If not, hurry the hell up before people get boards.

    Huh, wow, that list was a lot shorter than I thought. Is this actually going to work out? Stay tuned...

  • Making beautiful timelapses with a mirrorless

    Joshua Wise11/19/2024 at 06:42 0 comments

    OK so I had planned to write a bit about, like, the manufacturing work still to go, and where we are, and what I'm hoping to have done before crowdfunding closes, and then between then and ordering boards, and then between then and boards coming back, and then between then and shipping to Mouser.  I still plan to write that post, but over the weekend, I put together something that I'm super stoked about and I hope you will be too.

    I shot and edited this together, and it'll go out in a Crowd Supply update in the next day or so.  But I'm posting it here first because I think it looks insanely good and I can't wait to show it off :)

    Since the Crowd Supply post is going to be a little broader in audience, I won't get to say much in terms of command line details there.  But for the Hackaday audience, for those curious, here's what I did:

    • I hooked up my a6600 to the Expander, and set it to 1/4s exposure at ISO 1000, put a 55mm lens on the front, and stopped the lens down to f/9.  I focused right on the bed where the part was going to print.
    • I then set an X1Plus Action on layer change to pause for a second, pull the shutter GPIO for a half a second, pause for a second again, and then release the G-code interpreter.  The pause was important because the card table I have in my filming space is kind of rickety, and I needed to give the vibrations time to settle down!
    • After printing, I had 300 JPEGs or so, each 24MP.  I fed them to FFMPEG to get something I could bring into DaVinci Resolve.  I couldn't use my Mac's hardware codec for this, because it didn't seem to be able to deal with 6000x4000 images!  But x264 did just fine: ffmpeg -framerate 10 -start_number 1394 -i /Volumes/Untitled/DCIM/100MSDCF/DSC%05d.jpg -vf format=yuv420p -r 10 -crf 27 -y timelapse.mp4
    • There was still a handful of shake from frame to frame, since the camera's image stabilization was working pretty hard to correct for the table wandering around.  I loaded the timelapse.mp4 into Resolve, and had Resolve do a perspective stabilization on it, which got it pretty solidly decent.
    • Finally, I keyframed in Resolve set zoom and crop windows.  Since I had the time lapse set to 10fps, and I had a timeline frame rate of 30fps, I had Resolve interpolate linearly between frames.  Resolve also had optical flow that it could use for this, and it made even smoother looking video, but I felt like it was cheating for this particular case.

    I think this came out super duper rad, but I also sort of feel like this is just scratching the surface of what's possible.  I imagine that people who actually know things about video editing are going to have an absolute field day showing off their parts with these time lapses, and when I finally get a chance to breathe, I kind of want to try to put together a turntable to spin a camera around a part as it prints.

    Anyway, here's the part where I'm supposed to, like, do marketing, and stuff.  Have you remembered to place your order yet?  How about for the shutter release module?  Do it now!

  • We are live!

    Joshua Wise11/04/2024 at 03:19 0 comments

    Whoah!  I'm on the plane on the way home from Supercon, and man, I am exhausted.  This weekend, I talked about X1Plus as a whole at the conference, and more interestingly to you, I (and my amazing Crowd Supply project manager!) got X1Plus Expander launched, and you can give me money now!  (Also, we changed the name from "X1Plus Expansion Board" to "X1Plus Expander").

    So, ok, first thing first: you should definitely give me money and buy this thing!  Here's the Crowd Supply page, if you forgot.  It's $125 for Expander, $25 for a nice pre-printed SLS case, and a few bucks more for varying add-in modules.  I'll write more about the economics of it... much later, but I promise that I will.

    But also you might be interested in watching the video that I alluded to.  I'm really proud of how it came out!  Here's 9 hours of filming and editing for a 90 second product video:

    All this socialization really makes me more ready than I have ever been before to sit down and write a UI for the Expander configuration.  Which I guess is a good thing, because we need one of those soon...

    I've got a checklist of other things to take care of in the near future, basically, in categories of "before crowdfunding completes", and "before units arrive on my desk".  I'll write that up soon!  But for now I'm going to go home and sleep, and hope that my half-ass job of masking saved me at least a little bit from the nearly-certain con crud.

  • Come see X1Plus at Supercon!

    Joshua Wise11/02/2024 at 03:48 0 comments

    Are you at Supercon this weekend?

    If so, come say hi.  Below, an X1Plus Andon Board hacked up as a SAO for the Supercon 8 badge:

  • Air monitoring with the Expander

    Joshua Wise10/21/2024 at 20:18 0 comments

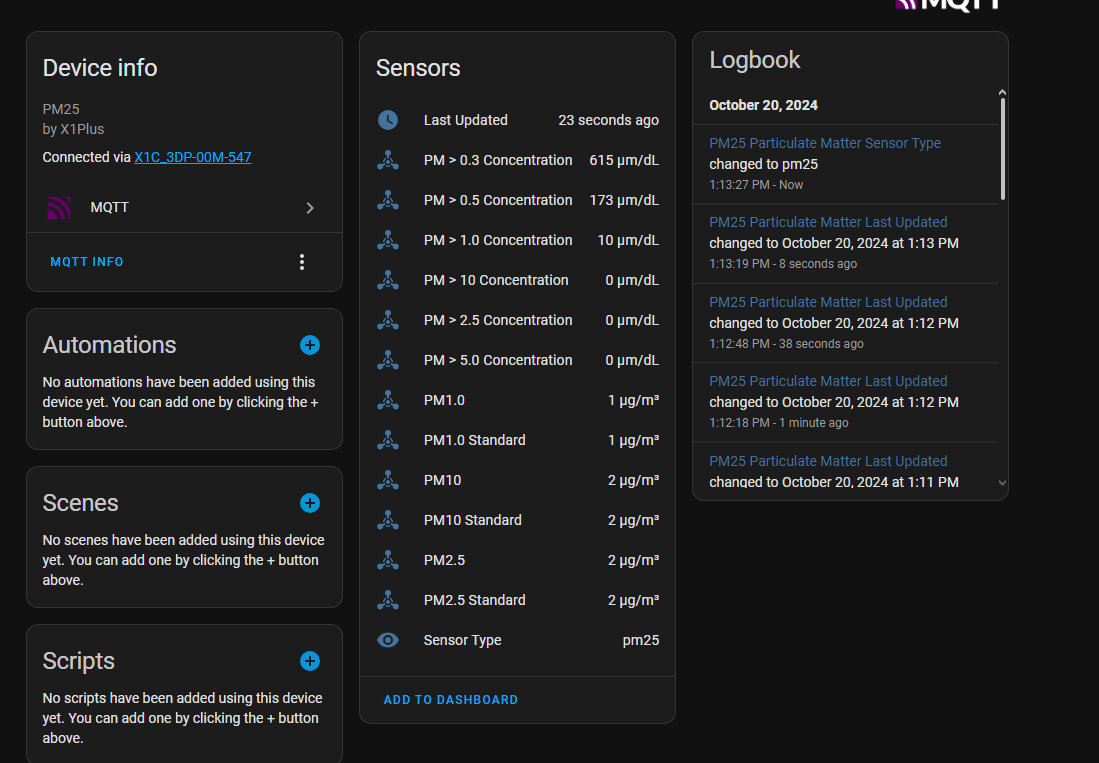
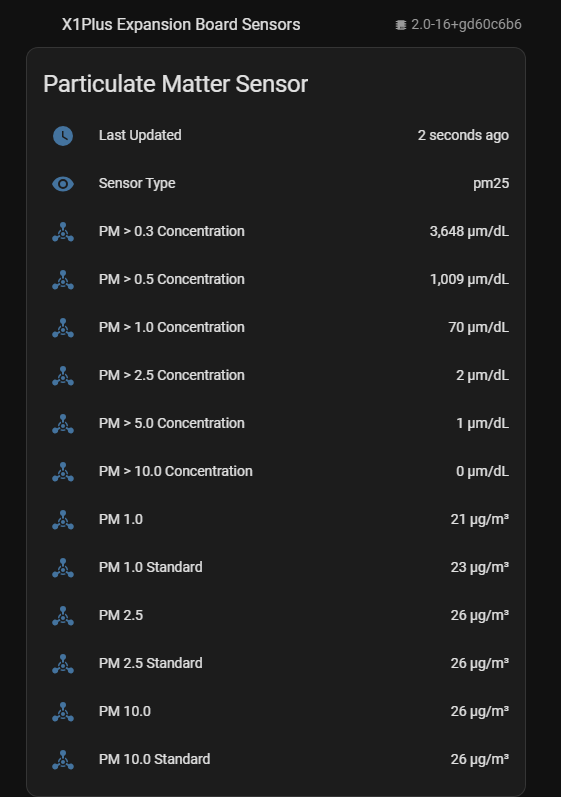
    So we've been sending some Expanders out to folks who have been involved with X1Plus since the very beginning.  It's validating to hear that they're exciting enough for someone else to bother to write a plugin for an I2C module they have lying around!  WolfwithSword, who was responsible for a lot of the MQTT Home Assistant integration work for Bambu printers in general, just submitted this patch to support the PMSA003I air quality sensor.  The data WwS has gotten out of it is very cool so far, showing very reasonable levels when printing with PETG:https://joshuawise.com/resources/x1plus/pm25-petg.png

    And some truly unpleasant results with ASA:

    https://joshuawise.com/resources/x1plus/pm25-asa.pngVery cool.  What other sensors do you think are worth adding support for?  How would you render these data on screen?
  • Hey, what's taking so long?

    Joshua Wise10/16/2024 at 06:55 0 comments

    One of the things I had promised [1] to talk about is not just the fun technical bits of this whole project, but also the boring logistical bits.  This is a good opportunity to talk about where this is, and what's between here and launching the campaign and taking your money!  A user, as far as I can tell, joined the Bambu Lab forums explicitly to say they wanted my thing, and then posted nowhere else other than to complain that it's taking too long, which definitely feels like quite a compliment to me, and some solid market validation.  I gave a short overview there, but here's the longer answer.

    Read more »

  • X1P-002-C01 looks like it works

    Joshua Wise10/05/2024 at 05:38 0 comments

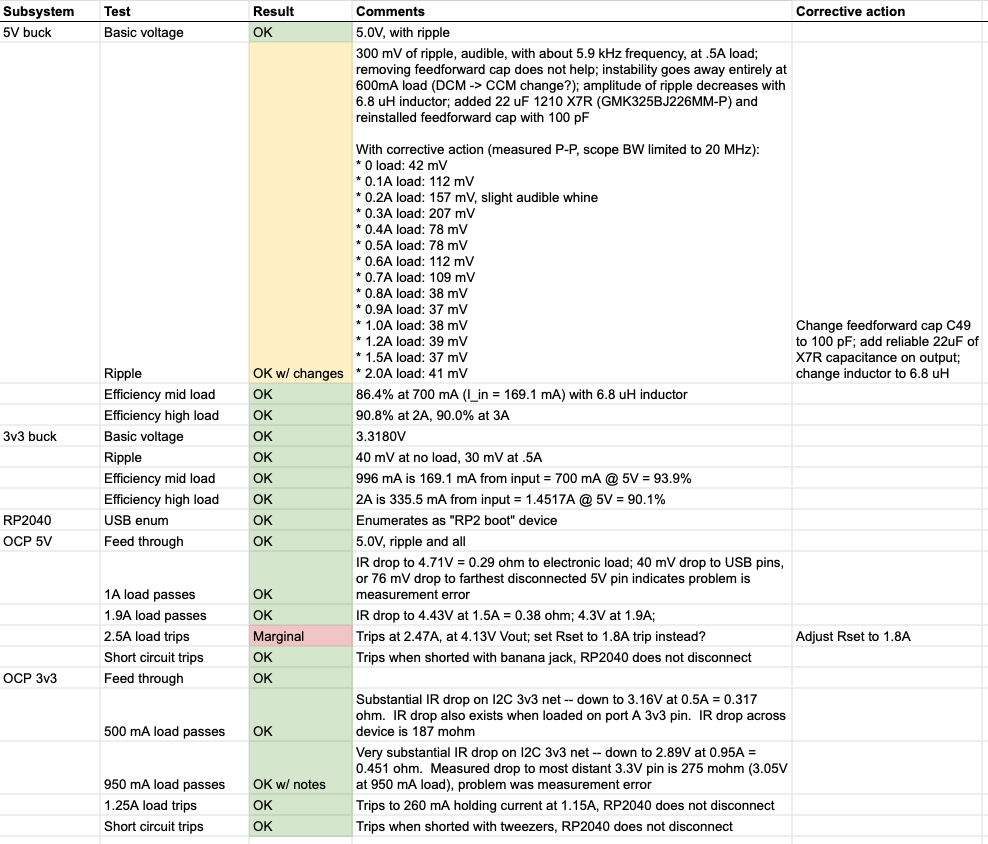
    The march to having something we're ready to productize continue.  X1P-002-C01 (that's the third revision of the mainboard, which I talked about in the previous update), with the new buck converters and the RP2040, came back on my desk last week, and it seems to basically have worked on the first go.  It looks like there will be a few changes to passives -- it turns out that these Silergy regulators are really finicky -- but everything seems to work fine other than that.  Below, a "half-build" of an X1P-002-C01 (no LAN9514, yes all the new power supplies, yes RP2040) happily blinks an Andon Board:

    One of my tricks of the trade for making sure that I actually make it through all the things that I needed to check out on a board is that I do a checkout spreadsheet, with all the tests I care about.  That way, when I think of more tests, there's an obvious place to write them down so I don't forget, and I can also take notes on a debug if things aren't going the way I wanted.  Here's the final tally for the X1P-002-C01 checkout:

    There's been kind of exciting software work recently too, but that's food for another post.  Maybe later this weekend...

  • Goodbye, FTDI

    Joshua Wise09/20/2024 at 07:26 0 comments

    Well, that was a fun adventure.  Over the last week or so, Dan and I were putting together some changes to prepare for the next rev of the board, and one of the things I had on my list to check out was to replace the FT2232 on my board with a FT4232, and make sure that everything was OK.  The problem that I was trying to solve was that we had two of these lovely FTDI high-speed I/O engines on the '2232, but the other two ports on the top shared USB interfaces, and couldn't really be commanded independently -- and I really wanted four homogeneous ports on the thing.

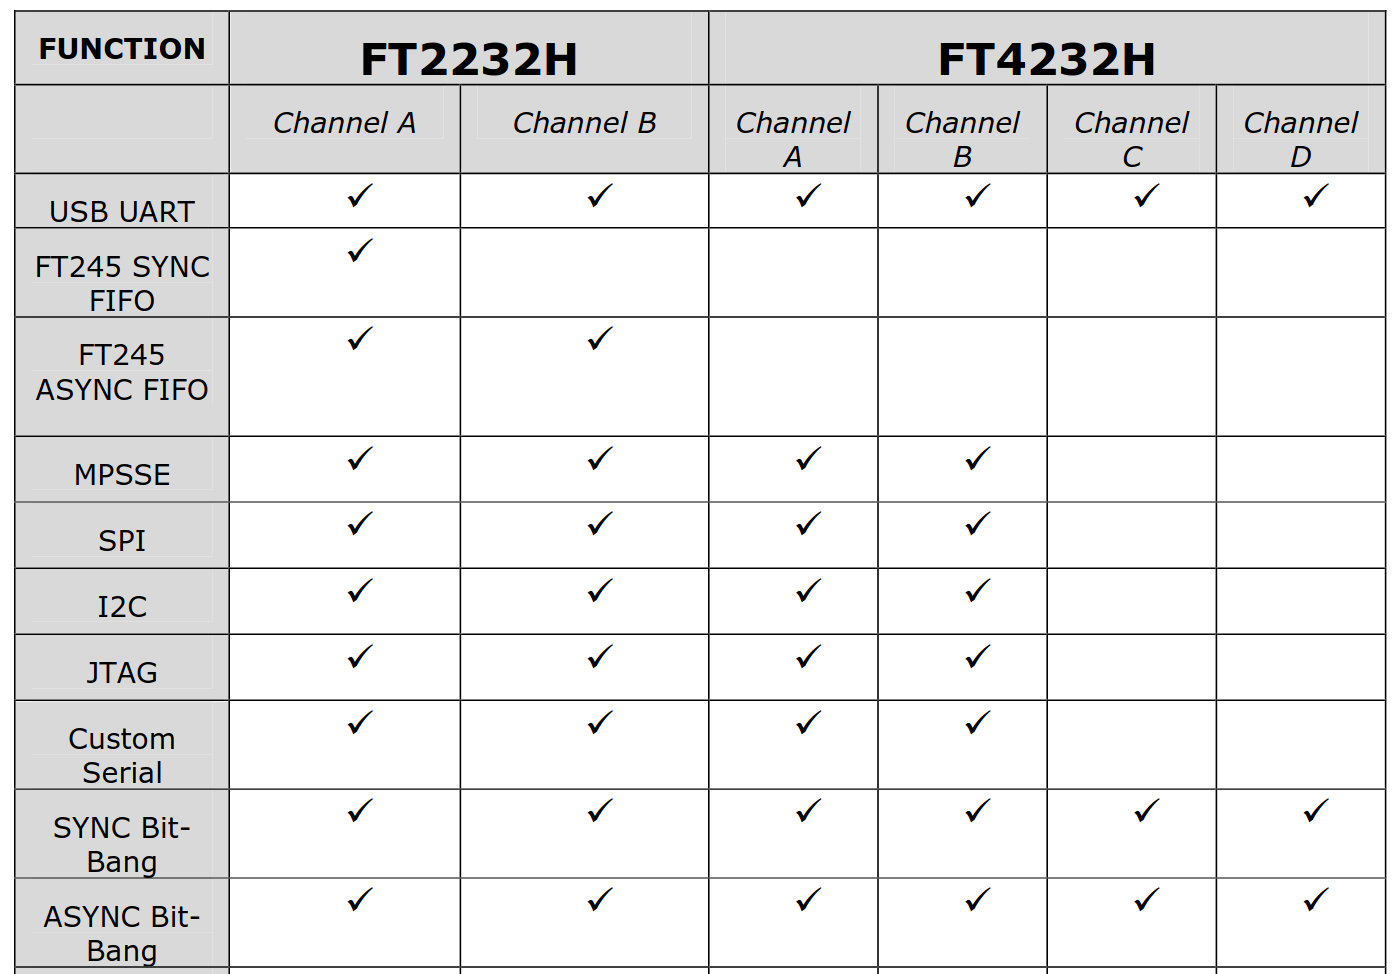
    I depopped the '2232 on a test board that I had, and soldered down a '4232.  Clearly I had done a poor job of soldering it, but while I was flipping through the datasheet for indications as to why the '4232 wouldn't work in the '2232's place, I came across the following distressing table:

    Hey, what gives?  The FT4232, despite having a 4 in the name, doesn't have four homogeneous channels either!

    Well, I'm glad we figured that out now, rather than after having manufactured a bunch of these.  That would be really annoying software to write.  But truth be told, I had been getting pretty frustrated with the FTDI's limitations already -- most notably, the fact that it drives some of its I/Os push-pull on startup until initialized.  So, after plenty of trying to avoid it, I did what I probably should have done from the beginning: I kicked out the accursed FTDI, and designed in an RP2040 ("only moderately less buggy, but, hey, at least it's cheap!").

    I am only vaguely looking forward to writing some firmware for that thing to implement a cheesy pair of USB endpoints that can permute some GPIOs -- and do some high-speed serial things -- on demand... and very much not looking forward to rewriting all the FTDI code that lives in x1plusd is going to be even more annoying.  But it's going to be easier than making the FTDI work long term.

    A cut-down version of X1P-002-C01 with the RP2040 and some higher efficiency switchers, and better overcurrent protection, is out to fab... I guess we'll see whether I got it right in a week or two!  If so, this should be pretty close to the last rev before I'm ready to go to production.  Fingers crossed.

  • The shutter release module is alive!

    Joshua Wise09/10/2024 at 07:49 0 comments

    One of the goals of this project has been to support plugins to the rectangular GPIO headers on the top.  Early prototypes of the X1Plus Expansion Board have FT2232H, but sooner or later I'll be changing to FT4232H to make all four ports homogeneous.  We have three plugin boards that we're working on right now:

    • X1P-004: a WS2812B-style LED strip level shifter board
    • X1P-005: a compact light stack, beeper, and button board
    • X1P-006: a camera shutter release trigger board

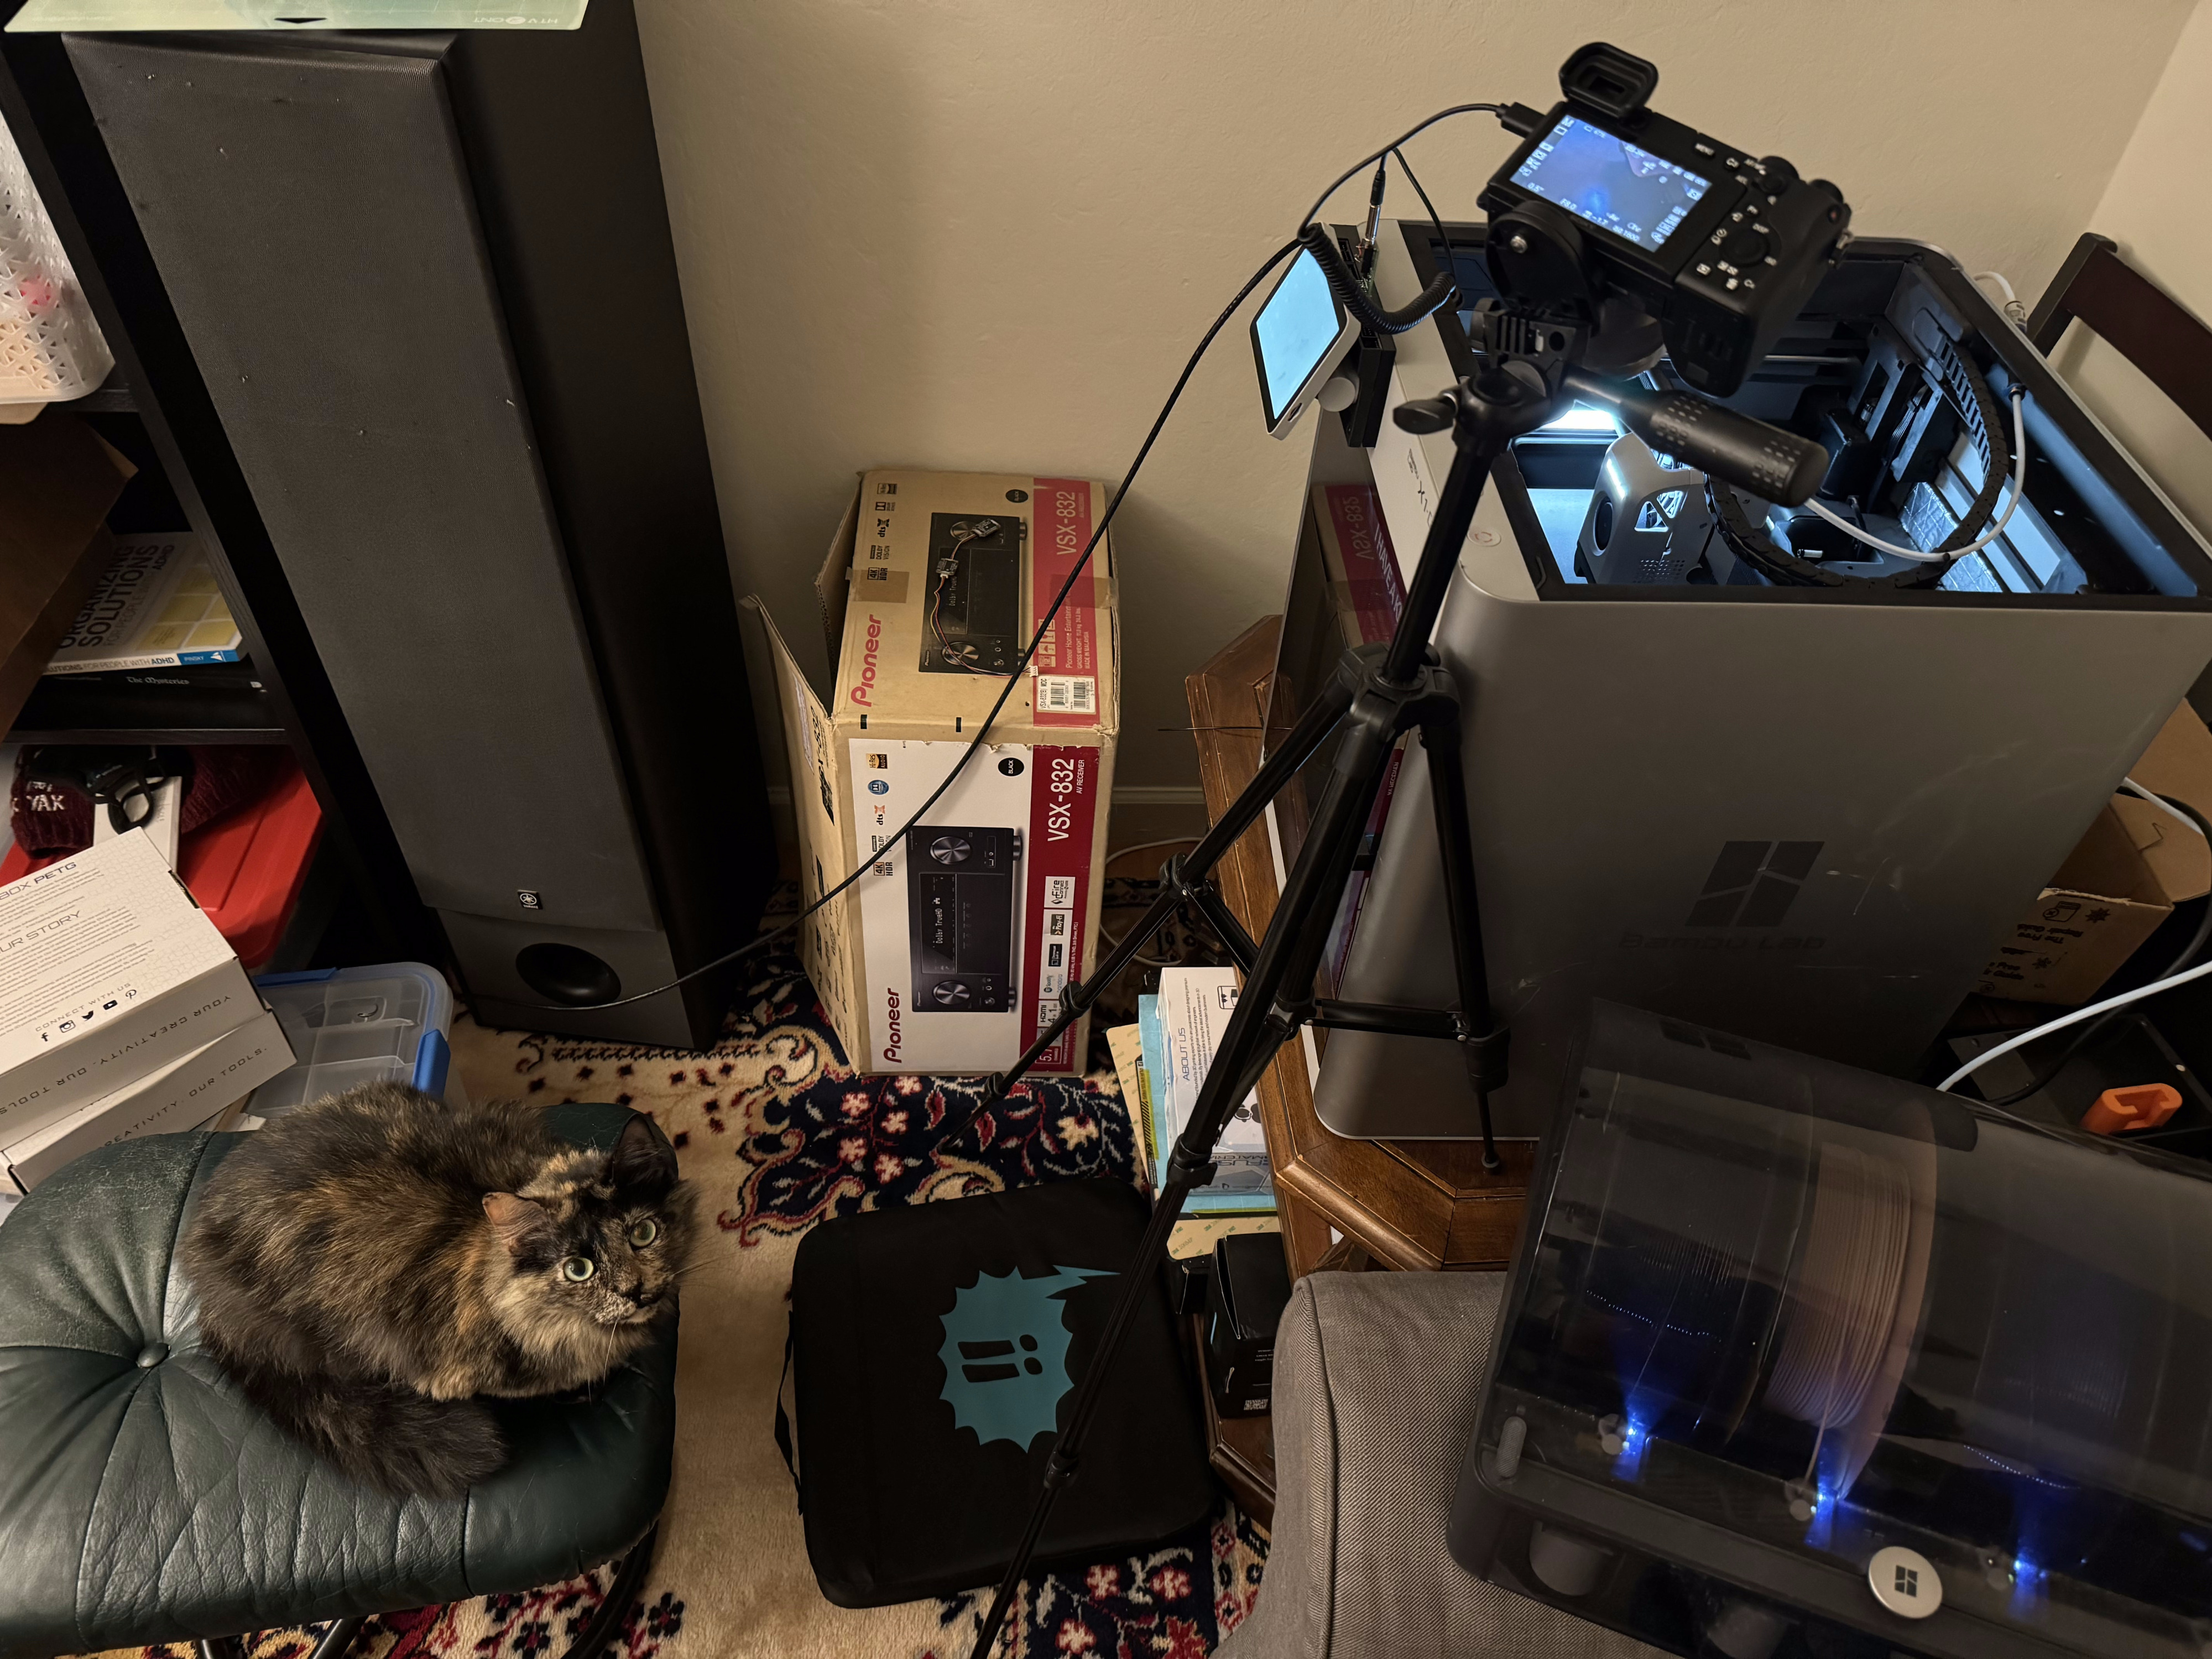
    X1P-006-A01 (the first rev) came back a few weeks ago, and we identified some changes needed: new 2.5mm connectors that had *all* the pins connected (d'oh!), pinout changes for safe initialization state on the FTDI, etcetera.  To validate the changes before we fab out X1P-006-B01, I hacked up an X1P-006-A01 to match the new specification, and bit the bullet and upgraded my ancient Sony NEX-C3 to a fancy new-to-me used a6600.  Of course, the first thing I did with an $800 camera was to connect it to a piece of experimental electronics dangling off of a 3D printer!

    (Peanut is the official First Layer Inspector of the X1Plus project.)

    I spent a long while writing some software to glue G-code actions to GPIO outputs on the FTDI -- like, a week -- and took two time lapses: one with the printer's built-in chamber monitoring camera, and one with my a6600, using the X1Plus Expansion Board.  You can compare them for yourself, if you like:

    I'm pretty excited about how this came out so far.  This is the sort of validating experiment that tells me that this might be worth doing!


    Here's the bit where I'm supposed to tell you that if you think you might want one of these, you need to click the subscribe button on Crowd Supply.  The launch of this project depends on enough of you showing that you actually would buy one!

View all 9 project logs

Enjoy this project?

Share

Discussions

Similar Projects

Does this project spark your interest?

Become a member to follow this project and never miss any updates