 Stephen Willcock
Z80 Breadboard Computer
My first computer was a 1981 Sharp MZ-80B which had a Zilog Z80A CPU. I was a fan of the Z80 and in the early 1980s had been absorbed by homebrew circuit designs using this CPU, but despite a passion for electronics I hadn't actually attempted building anything with the chip.
During COVID-19 lockdown I reacquired my interest in DIY electronics, and at the tail end of 2023 was delighted to discover that Zilog was still producing the CPU, so I ordered a couple and in the first few months of 2024 I experimented with the device on a breadboard.
In April 2024 Zilog announced they would stop production of the CPU.
I set out to build a breadboard computer.
Approach
Starting from scratch, it seemed obvious to evolve the design on breadboard, where it is quick and easy to correct mistakes. I also found Arduino boards invaluable during the process. I used Arduinos to provide "scaffolding" while the design took shape. Initially I used an Arduino to provide a clock to the Z80, and soon after to monitor the outputs of the chip and provide surrogate memory and I/O. Then when I added in other components to the design, I could progressively rely less and less on the Arduino until finally it could be unplugged altogether. Although I used several different boards, using a Mega 2560 was ideal, given the generous number of I/Os.
As an aside, it's worth saying that being able to use an Arduino to manipulate the CPU is possible due to the static design of the chip - it doesn't have a minimum clock speed - you can single step the processor if necessary.
High level design
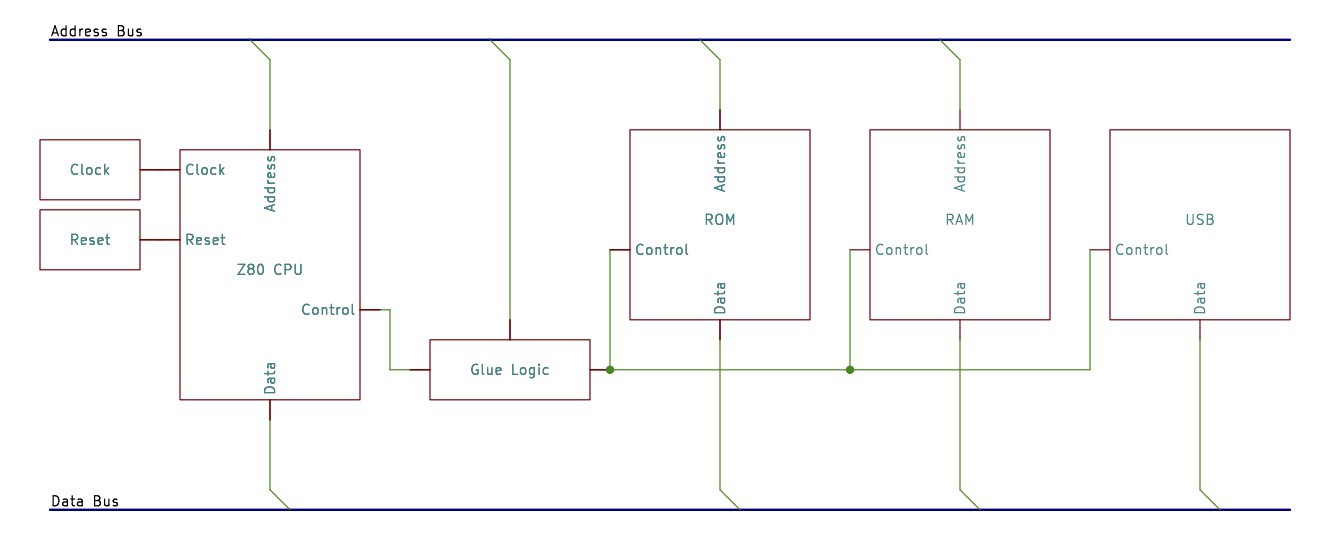
I wanted for the design to be as consistent as possible with the technology of the early 1980s, but also keeping it very simple, and using readily available components. So, there were compromises - such as use of modern memory devices.
Another consideration was to make it usable - so that it could at least demonstrate to a non-technical person that it was a functioning computer. There were two parts to this. First was to plan to connect it to a modern computer in order to interact with it via a terminal emulator. Second, I remembered vividly how 1980s computers would be ready to use instantly with monitor programs and BASIC interpreters persistently stored in ROM. So I wanted to use a ROM - I thought it would also be satisfying to see a startup message on my Mac via the terminal emulator.
Build
Before describing the logical design in more detail, a few thoughts on putting together the circuit - physical and electrical aspects.
It may seem odd, but what didn't occur to me at the start of this project was the electrical aspect. I was drawn to digital electronics because of its logical, binary nature, and as somewone working in software development, I took a narrow perspective on the circuit paying little attention to the electrical characteristics.
At one point I spend a long time trying to work out why the final circuit almost worked; it worked for short periods of time, but was very unreliable, with a lot of seemingly random behaviour mixed in. I checked the logical design, and looked for poor connections on the breadboard without finding the fault. From my earliest experimentation I had been using a bunch of LEDs directly on the address outputs of the CPU. I finally realised that these were drawing too much current which was causing the processor to misbehave. Disconnecting the LEDs solved the issue instantly. For the first time studying the data-sheet for the electrical properties of the CPU, and doing a quick calculation of current through the LEDs and series resistors made sense of the problem.
There are other electrical topics which are well worth exploration, particularly around the power supply: use of decoupling capacitors and avoiding daisy-chaining the power supply across multiple breadboards. I won't attempt to go into "the whys", but will describe what I did:
- I constructed...
 David Robinson
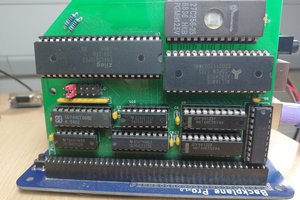
 EtchedPixels
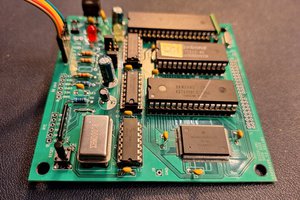
 Keith
Keith