Close
0%
0%

ScanOne

A DIY handheld ALDL scantool for the Fiero and other Mid-80s cars

Similar projects worth following
As these mid 80's cars get older and older, I felt the need to have a handheld scantool ready to diagnose problems as they arise. The result of this is a compact Scantool I have developed for the Pontiac Fiero, but since the protocols were used on many, many cars of the era, hopes are that it will be useful for many more vehicles!

This project is based on many years of development of scantools for the Fiero. I felt the urge to build the ultimate handheld scantool, also as a playground to develop some aesthetically pleasing software with a slick GUI. When I found the Bopla BS400 series handheld enclosure I wanted to build a scantool with a small color TFT screen.

I chose a 1.8" with 128x160 pixels resolution and four switches for navigation: Up, Down, OK and Back/Menu. Initially, a rotary encoder was supported as an alternative, but the large knob made the device clunky. Software was updateable through USB, so any standard PC or Mac with a serial terminal program can be used to update the firmware using a built-in bootloader. I tried to keep the component cost low, so there is minimal hardware on the printed circuit board and everything was powered with 3 AAA batteries.

Key features are:

  • Small single circuit board with interface for 160 Baud ALDL and 8192 Baud UART protocols, optionally single wire CAN is supported.
  • Color TFT screen with intuitive GUI using icons, text and graphs for diagnosis
  • Support for possibly many vehicles
  • Simple navigation using a few buttons
  • USB for software updates (and recently charging the battery)
  • Can be powered through OBD connector
  • Quick-disconnect Industry Standard 9-pin DB connector for diagnostic cable.

However, when I build the first prototypes for friends, a few things quickly became clear:

  • The cost for the final device is much more than the circuit board with processor and TFT, which would have cost maybe $20. The enclose with battery compartment was another $20, plus having the enclosure milled and drilled, the plexiglass silkscreened, plus the ALDL-Cable plus the rubber bumper, not to mention labor for soldering let alone a dime for software or warranty repairs or shipping cost from the various parts sources made this project financially unattractive. We're talking close to $100 for the parts alone. Solution: it ended up here for you to build it yourself. Then you're spending your time and you see the real cost of the parts. And building it is fun!
  • Navigation with the four keys was confusing for people, because the buttons are not silkscreened (see cost). Solution: I went for a navigation "joystick" with up-down-left-right and OK silkscreened to it. This has its price: the MEC switches are pricy, especially the backlit ones. But it looks nice and is intuitive.
  • The AAA batteries are drained after a few weeks. There is no power button, the unit just goes to sleep and draws a few Microamps, yet, enough to drain the AAA batteries over weeks. Solution: Use LiIon rechargeable battery charged through USB. Adds another $10-$15 to the tab for battery and charging circuitry, but well worth it.
  • The screen is a little small when it comes to drawing graphs, and 16 characters per line and 20 lines is not a whole lot of text either. Solution: Use a 2.4" display with 240x320 resolution. Using a two font sizes either a lot of information can fit on the screen or the font looks a lot nicer than the 8x8 Font on the small screen.
  • The bigger screen also meant using the "bigger brother" of the BS400 series enclosure, the BS500. But it is not significantly more expensive, and I think it's a really neat solution.

I don't know if I should name the new, bigger version "ScanTwo". Being lazy, I kept the name the same. And the two units run off the same software base with very few differences. So, the choice is yours: you can build either version, small and compact or slightly larger and slightly more expensive. With or without the rubber bumper. Which is even available in different colors. The component cost is pretty much the same for both versions, except for the enclosure and larger TFT. You will find everything that you need to build it right here.

TFT28-Frame.stl

A little frame to hold the TFT in place, because the glue it comes with doesn't hold up well. Melt the studs when the frame is in place.

Standard Tesselated Geometry - 39.14 kB - 05/27/2025 at 13:09

Download

BS500 Bezel.stl

The little Bezel for use around the navigation buttons. Print it yourself. Ready to slice.

Standard Tesselated Geometry - 113.46 kB - 05/27/2025 at 13:08

Download

ScanOne.bmp

Main schematics

Bitmap Image File - 3.99 MB - 05/15/2025 at 06:49

Preview

USB-Supply.bmp

USB interface and power supply/charging circuit schematics

Bitmap Image File - 3.77 MB - 05/14/2025 at 08:21

Preview

Display.bmp

TFT display level shifter and power supply schematics

Bitmap Image File - 3.76 MB - 05/14/2025 at 08:19

Preview

View all 10 files

  • Final release version working!

    Oliver Scholz05/29/2025 at 16:08 0 comments

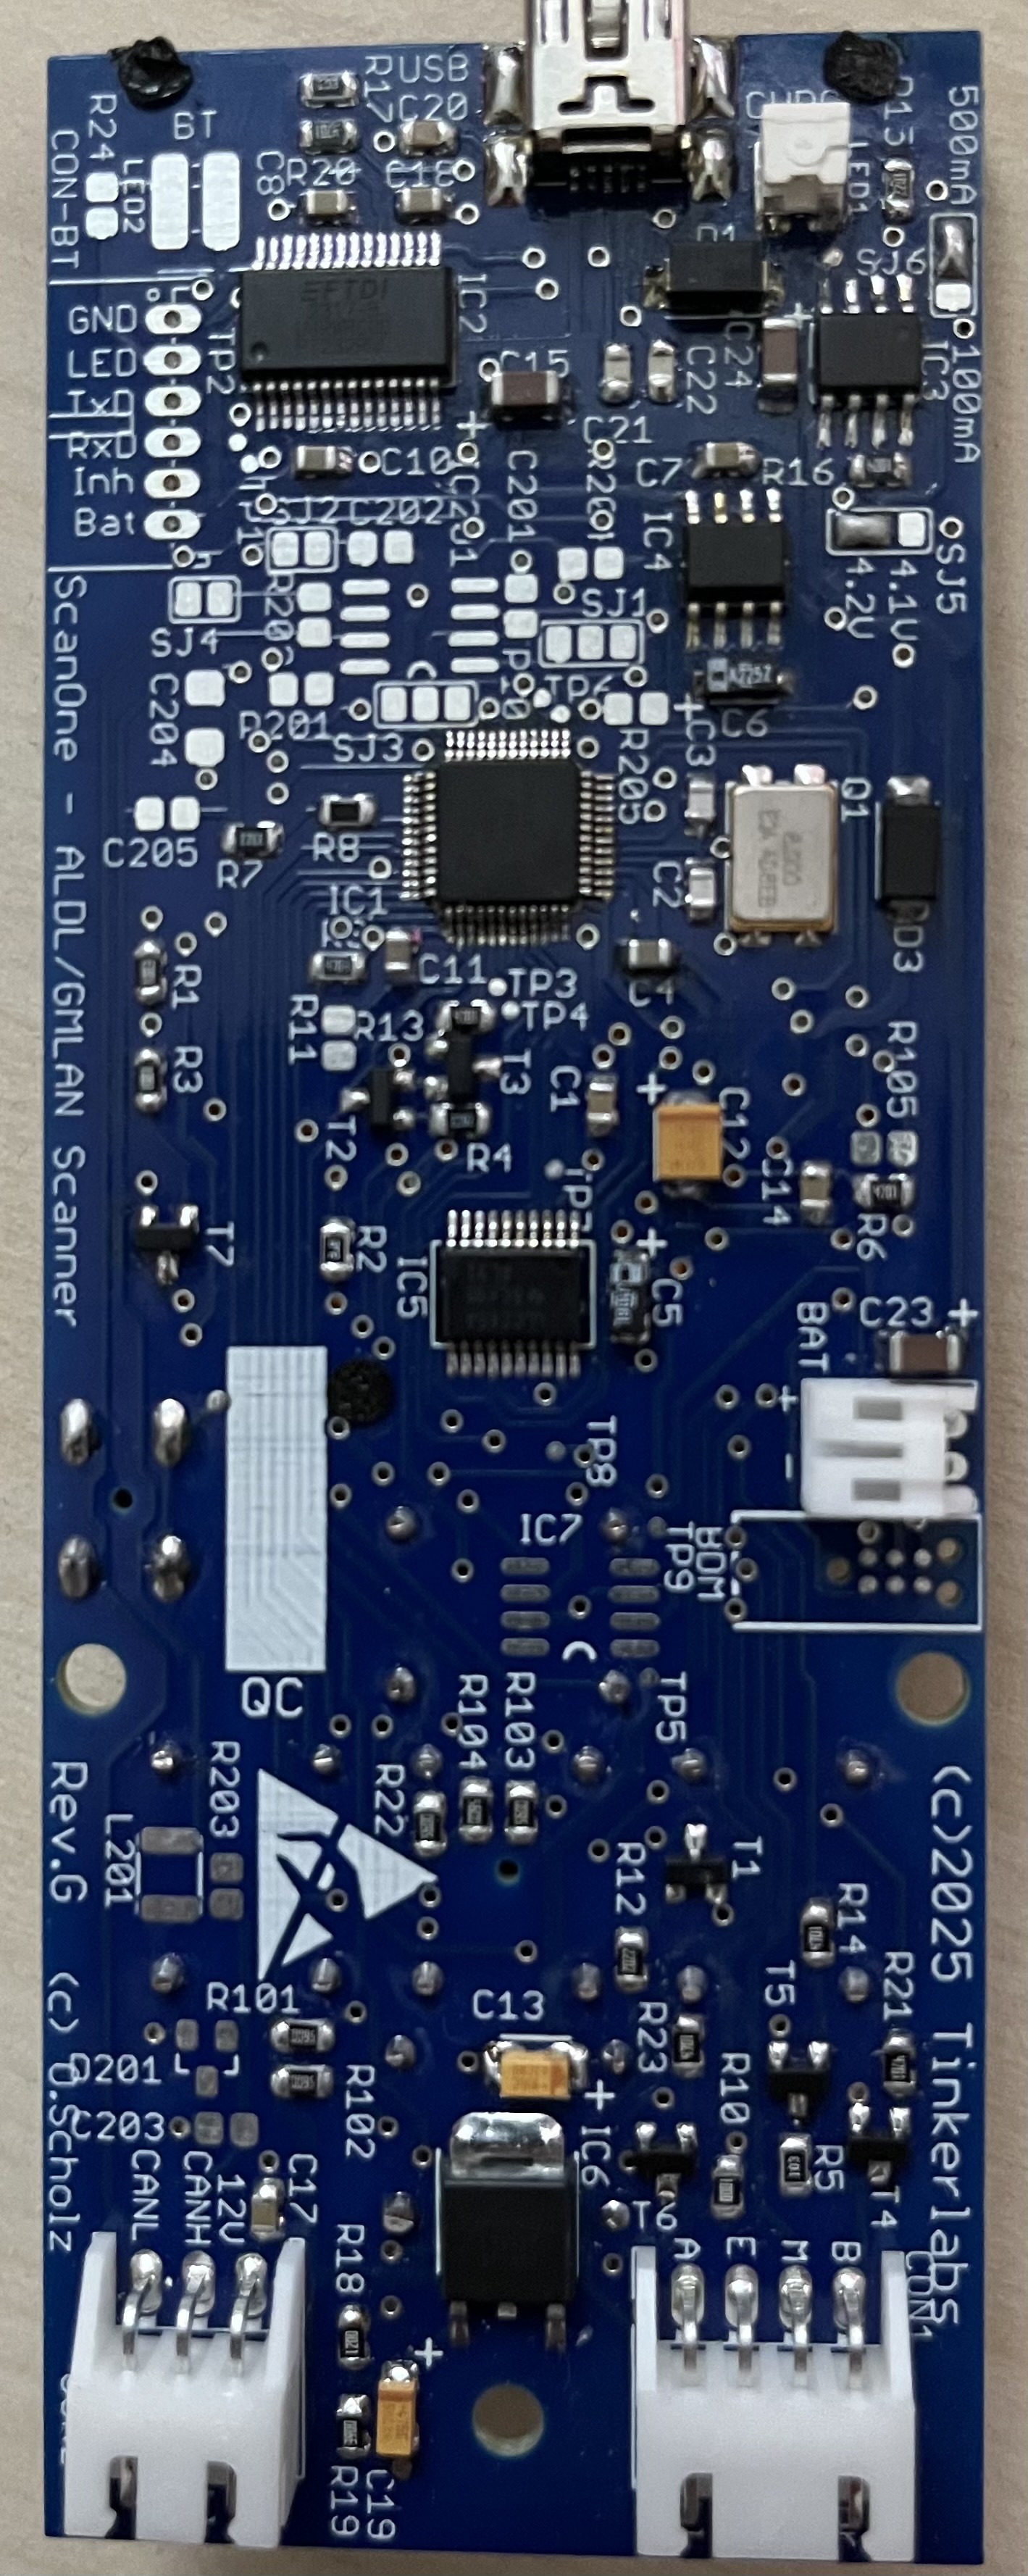
    Just finished soldering the Rev.G of the circuit board, and it’s working. I only added a few bells and whistles, like a beauty bezel for the TFT complete with mounting holes for melt rivets or a connector for a BT module and LED instead of serial USB. For now, I’m happy!

  • Circuit boards are here!

    Oliver Scholz05/19/2025 at 17:40 0 comments

    The complimentary PCBs have arrived, thank you PCBway! They’re beautiful and not even a week between uploading the files and delivery at my doorstep! I’m now in the process of soldering what will hopefully become the „final“ prototype, and once verified, I’ll greenlight production and make the boards available at PCBway through their community program!

  • ScanOne - Captain's Log

    Oliver Scholz05/09/2025 at 15:27 0 comments

    Okay, the project is about to go public. It's about time. Speaking of: I have too little.

    The STL files for the enclosure have been posted today, as well as the guide "How to put everything together". Oh, and also the bootloader and API documentation. Although I doubt anyone but me will write apps for this scantool anytime soon.

    I have not published the Gerber files yet, as I still have to have the (hopefully) final PCB version made and a prototype built. I want to do that before I unleash the files on the public with potentially a bug in them (OMG!).

    The major change with the "final" version will be support of a (drumroll please) touchscreen! The display is available with a touchscreen even cheaper than without, so I thought "why not support it?".

    Also thinking about adding a spare connector for bluetooth instead of USB. One can always leave out the USB-chip and then connect a little BT board - there is plenty of space in the enclosure. Well, enough for today! Stay tuned!

    Update 5/12/2025: PCBs ordered courtesy of the nice people at PCBWay! Once the boards are verified to be working I'll upload the Gerber files here!

View all 3 project logs

  • 1
    Download all documentation and files

    This should be your first step. Download everything. Have a coffee. Read everything. Have donut. If you like it, buy me a donut. :-D

    If you've read everything you'll see you have a few choices here and there. Different enclosures, optional stuff, you name it. If you've read carefully, you know now. And I know you know. And now you know that I know that you know! We're like Friends now.

    You can also go ahead and print the 3D printed parts - for motivation. YMMV, on my printer (vintage Prusa) everything fits snugly, but it wouldn't be DIY if you didn't have to grind off a tiny bit here or there to make it perfect.

  • 2
    Have the circuit board made

    Now that you have all files, you also have the gerber files for the PCB. So you can have the circuit board made. Depending on where you order, you may get more than one board, so maybe time to gift an extra to someone special? Nothing says "I love you" more than gifting your SO a blank circuit board of a scantool! The perfect Valentine's gift. Well, at least for makers. But don't gift one to your girlfriend if you're on a break!

  • 3
    Order the components

    Order the electrical components. The BOM (Bill of Materials) file contains all the electronic components to be soldered to the circuit board (which you should already have by now). Some things are optional. You can save a little, but it's not actually worth it. Do you want backlighting of the navigation buttons? If so, which color? Do I want it powered by OBD2? Or only USB? Do I want a bigger or smaller battery? Or no battery at all (also possible!)? Single Wire CAN (GMLAN) or regular CAN? Or no CAN? Your choice.

    Also take a look at the BOM in the "How to put everything together" file, they are mostly mechanical components, but also some stuff like the battery that are not soldered to the PCB! Also: be aware that you have to make a custom cable depending on which connector your car has. Or what you want to end up doing with the scantool - it can be used for a crapload of other things with the interfaces, screen and UI. Use the bootloader for loading a different app. Tetris, Pacman, the possibilities are endless!

View all 5 instructions

Enjoy this project?

Share

Discussions

Does this project spark your interest?

Become a member to follow this project and never miss any updates