Session 4 - Exploring Drone Reprogramming / Making The Clamp
We spoke with Vladimir Hermand, who guided us toward using the already existing drone. We also looked into whether we could reprogram some of the remote's commands but it might be simpler to use a different remote control for the clamp.
We have started designing a four-hook clamp in SolidWorks, which we’ll 3D print later, and we’re testing the AI from the previous session using QR codes.
Session 3 - FPV Drone Assembly Research
During our third session, we continued our research and found the video “Building a 5-inch FPV drone from €250 - Part 2/4: Full Assembly | Affordable FPV Drone,” which is a four-part guide on assembling a drone. This could serve as a base for adding functionalities.
However, we are still debating whether to build a drone from scratch or modify an existing one. To help us decide, we created a pros and cons list:
Using the Workshop Drone
Pros:
- Time-saving – No need to design the entire system or deal with fundamental issues (stabilization, control).
- Reliability – The base drone already works properly.
- Less complexity – We can focus on necessary modifications (adding sensors, software).
- Potentially lower cost – Buying a commercial drone and modifying it could be cheaper than purchasing all components separately.
- Technical support – Some drones have documentation and active communities for troubleshooting.
Cons:
- Less flexibility – The base drone imposes limitations (weight support, connectivity, compatibility with new sensors).
- Limited modification possibilities.
- Dependence on the existing model.
Building a Drone from Scratch
Pros:
- Complete customization – We can select components tailored to our specific needs (motor power, sensor types, communication system).
- Better technical understanding – Designing the drone from the ground up helps us gain a deeper understanding of its workings.
- Scalability – Easier to modify or add components later on.
Cons:
- High complexity – We need to manage mechanics, electronics, programming, communication, stability, and additional functions.
- Longer development time – Risk of not finishing on time.
- Higher cost – Purchasing all components separately could be more expensive than modifying a commercial drone.
- Risk of failure – If stabilization or assembly is poorly handled, the drone might not work.
This test aims to explore the use of YOLO for detecting specific objects, such as a QR code, allowing the drone to land automatically on it. Additionally, we tested the drone’s ability to stabilize when detecting human gestures, like when someone is about to retrieve the drone. The Arduino-controlled traffic light system was used to utilize the output data between YOLO, Python, and Arduino, simulating the drone’s actions based on the recognition confidence percentage. This test is designed to assess whether this approach can be used for an autonomous drone to interact with its environment.
We also worked on an AI-powered detection system for the drone.
Project Overview:
How It Works:
- A webcam scans the environment, detecting objects like QR codes or humans.
- Based on the detection confidence score, the system controls a traffic light to indicate the drone’s behavior:
- QR Code Detected:
- Confidence < 60% → RED 🔴 (Hold Position)
- Confidence between 60-80% → YELLOW 🟡 (Slow Descent)
- Confidence > 80% → GREEN 🟢 (Land)
- Key Functionalities:
- QR Code Detected:
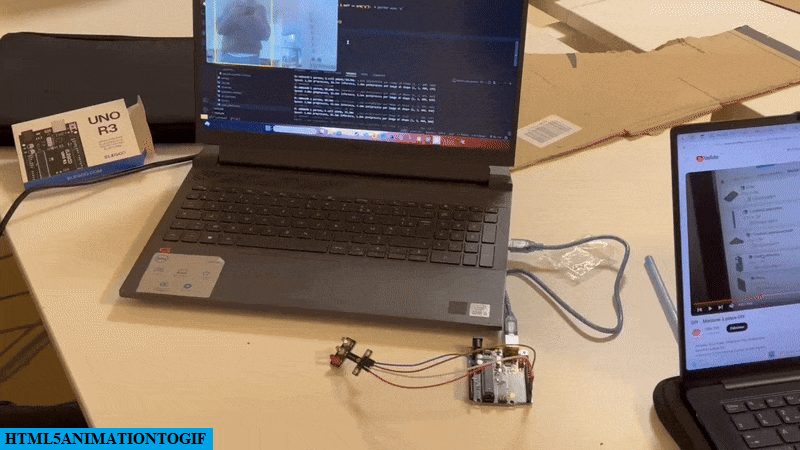
- Autonomous Landing: The drone adjusts its descent based on the accuracy of the QR code recognition.
- Obstacle Avoidance & Stabilization: If a human is detected nearby, the drone adapts its position to maintain safety and ensure smooth delivery.
Session 2 - Drone Component Research
During our second session, we researched the necessary components for building a drone. We aim to design a drone capable of lifting a tennis ball and placing it in a specific location, or a drone that can recognize an image and land on it. To proceed, we watched videos such as this one and conducted further online research.
We then consulted with Nicola to get an external opinion on what we could do. He mentioned that our project was ambitious, and we might run out of time to build the drone and implement all the desired features. He suggested starting with an existing drone and modifying it to achieve our goals. This way, the most challenging aspects would be handled, and we could focus on adding new functionalities, especially if we ran out of time or encountered issues like stabilization.
Stabilization is a crucial feature for keeping a drone steady in flight. It relies on a gyroscope and accelerometer to measure movements and adjust the motor power to maintain balance. A PID algorithm is used to correct any deviations, preventing the drone from losing control. Some drones also use GPS or additional sensors to improve stability and achieve more precise landings.
Nicola also allowed us to test a drone in the workshop to get a better understanding of how it works, especially the stabilization aspect.
Session 1 - Exploring Sensors and Brainstorming Drone Project Idea
Description:
In the first session, we started by training ourselves to use various sensors and adapt them with Arduino. This hands-on work helped us better understand sensor integration and the potential for automation. Toward the end of the session, we shifted our focus to brainstorming ideas for our project. After some discussion, we decided to pursue the idea of building a drone as our main project, which we believed would allow us to explore new technologies and challenges in the field of automation.