 Arnov Sharma
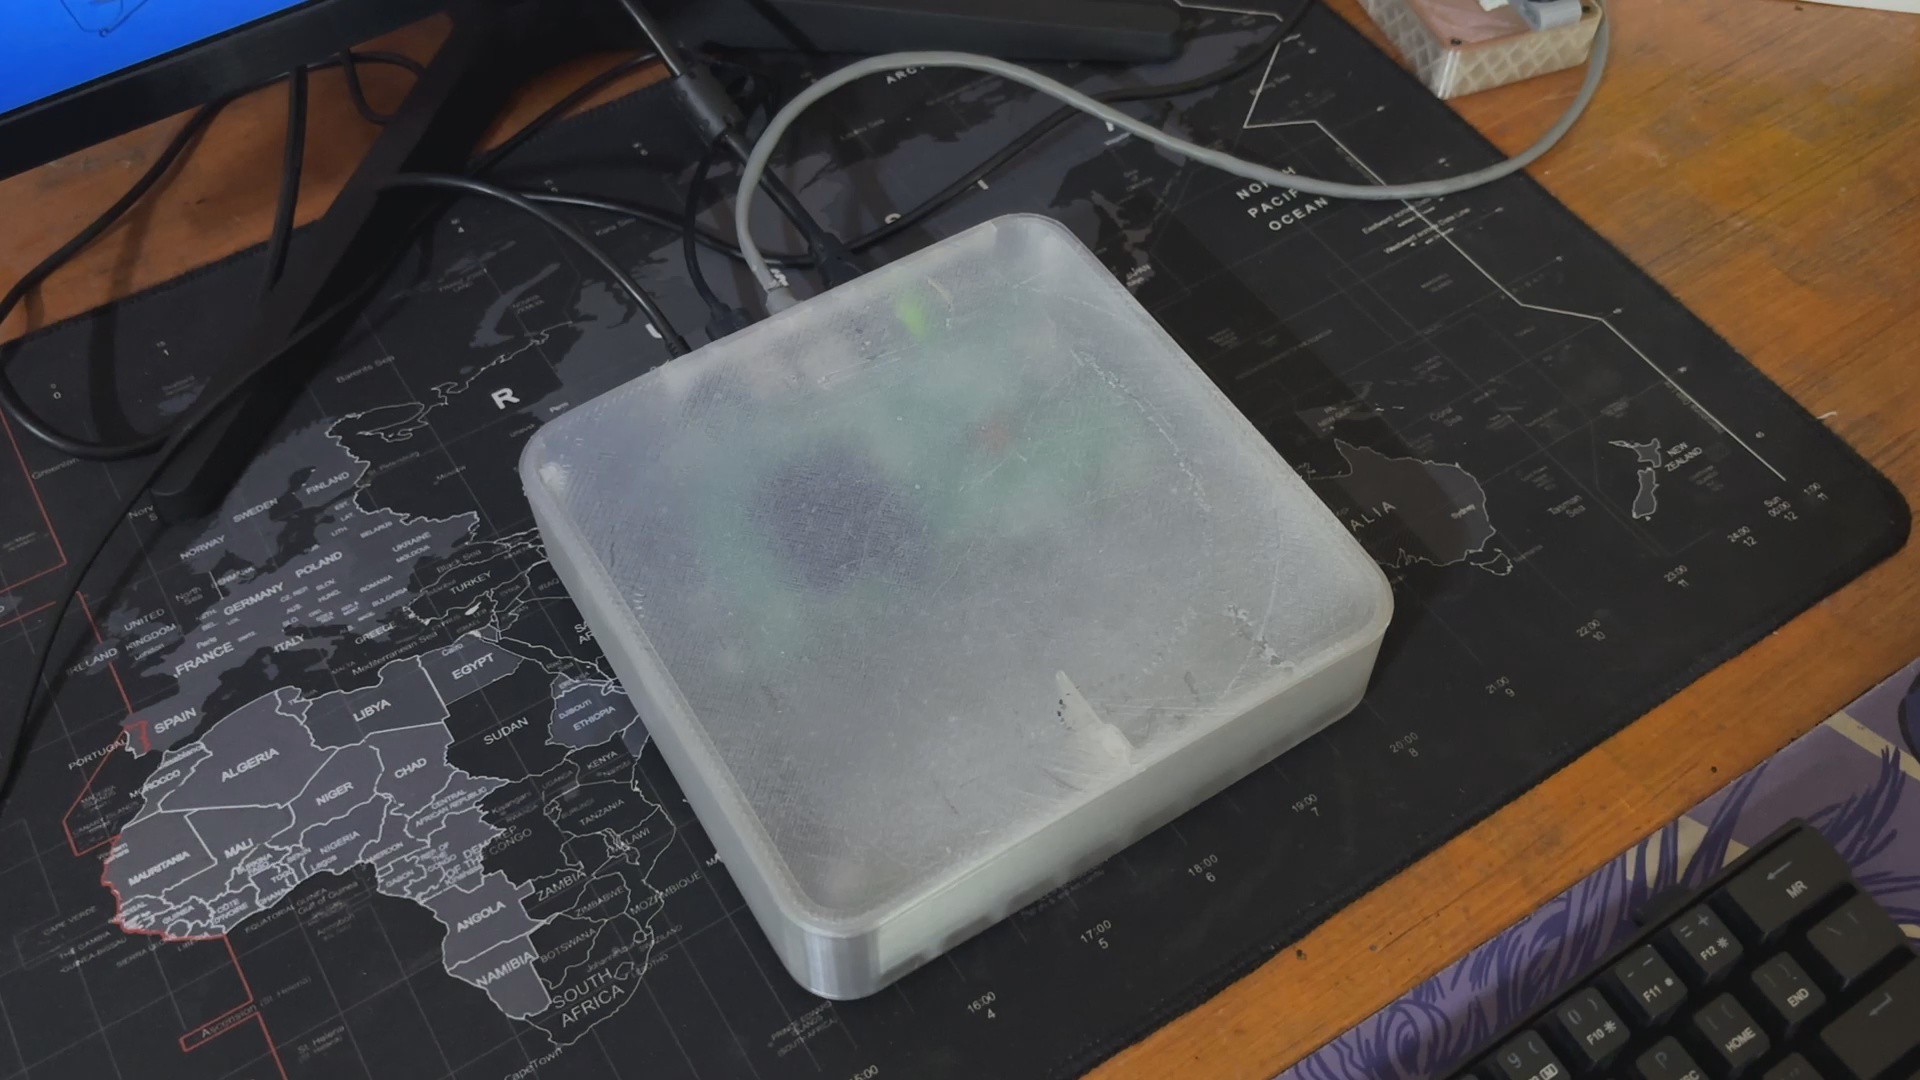


The entire design was created in Fusion 360 and then 3D printed using an Ender 3 printer with a 0.4mm nozzle for finer printing, like the IO Cover and a 1mm nozzle for the base, cover, and holder body.
In regarding testing, we performed a few tests on our new Compute module 5, such as Steam Link, as well as benchmarks and other things that will be detailed later in this post.
COMPUTE MODULE 5
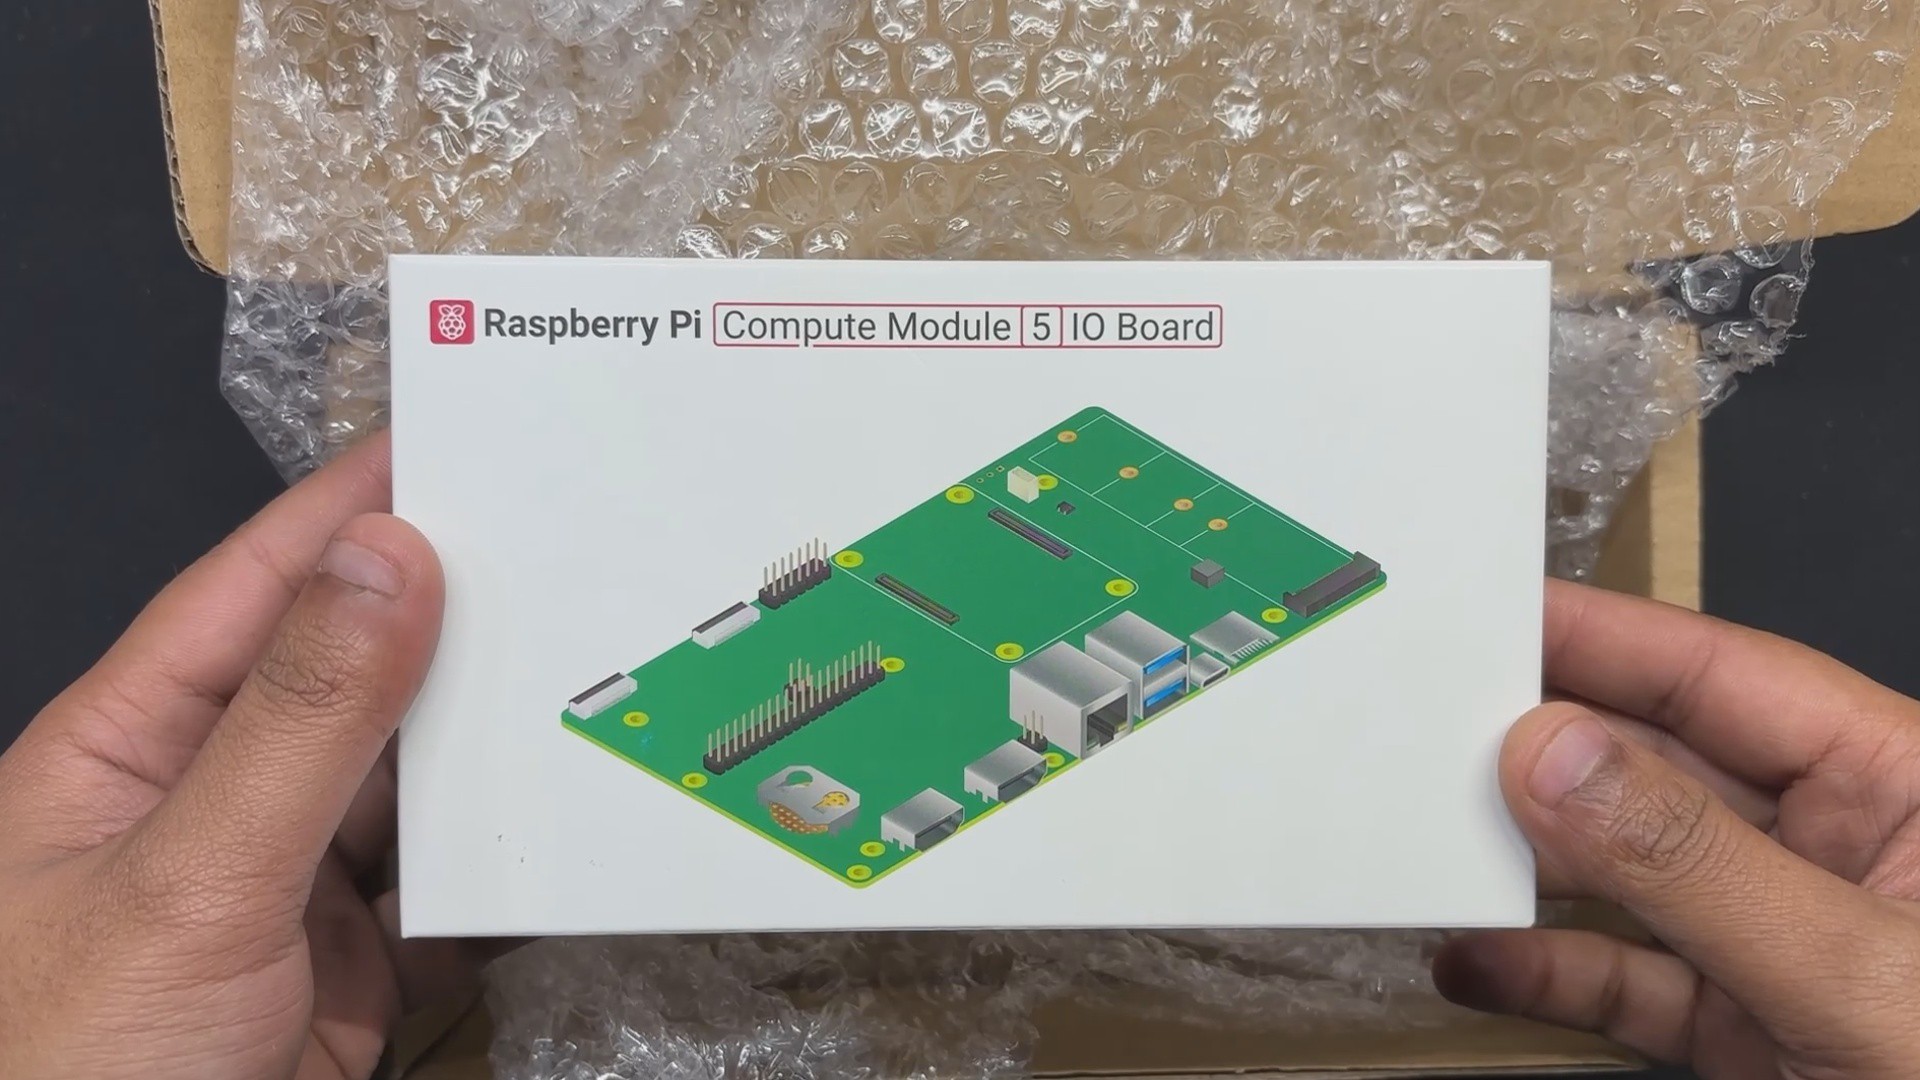
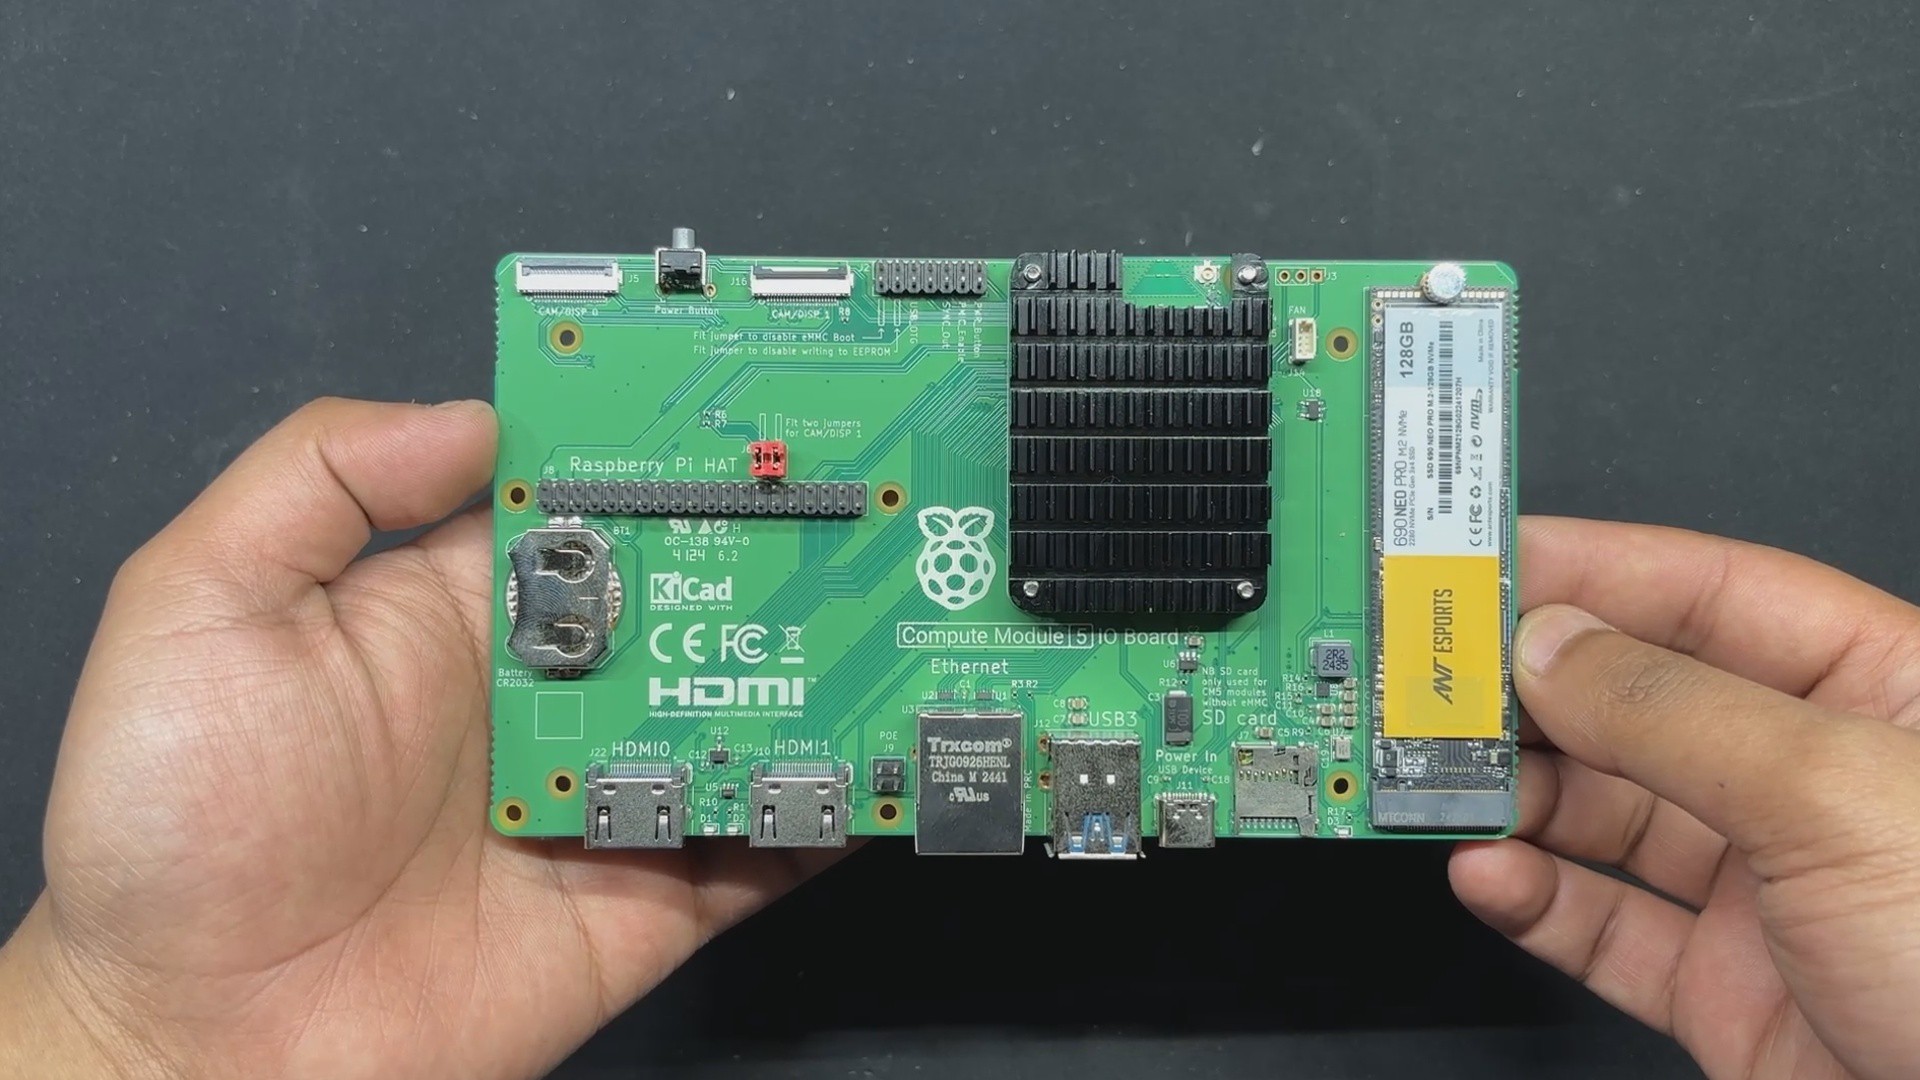
We're using the new Raspberry Pi COMPUTE MODULE 5, a small yet powerful system-on-module (SoM) built for embedded applications, in combination with its official I/O board.
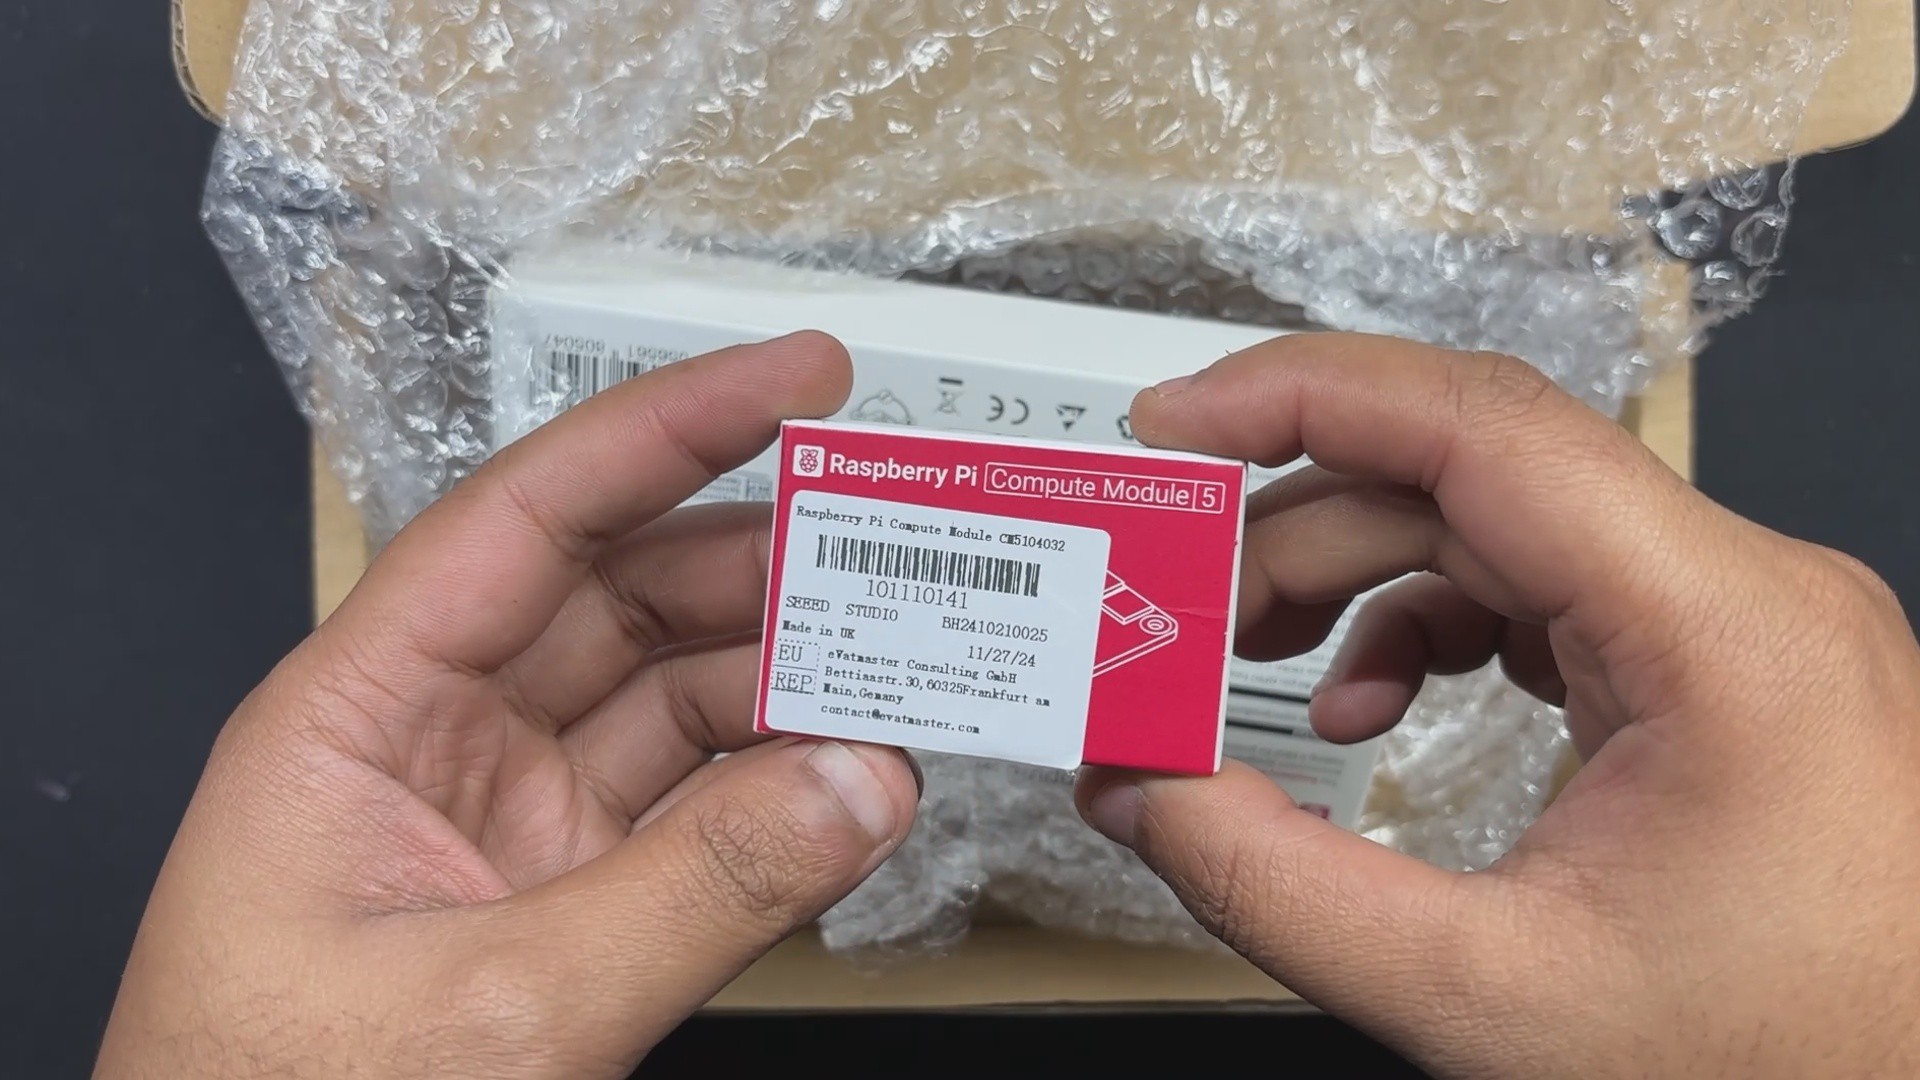
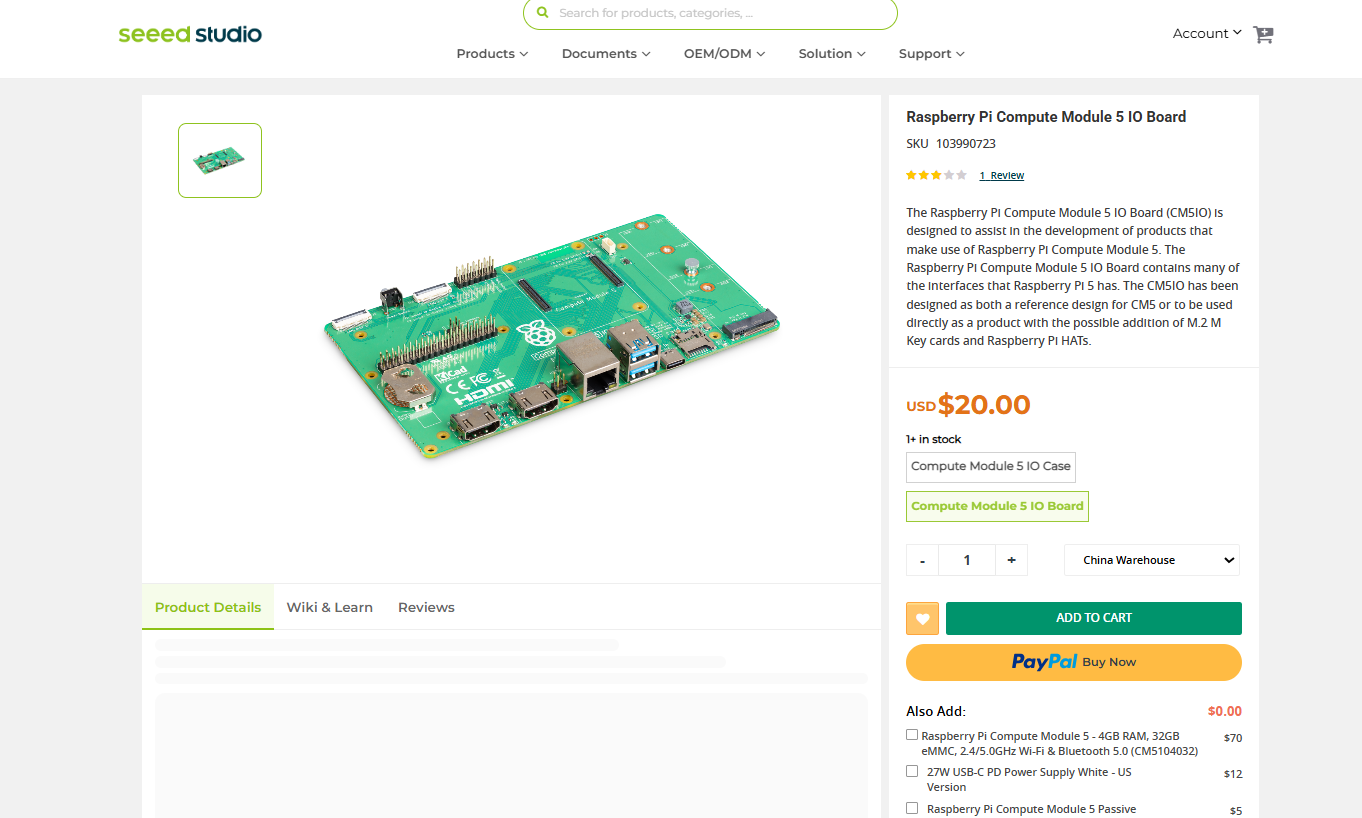
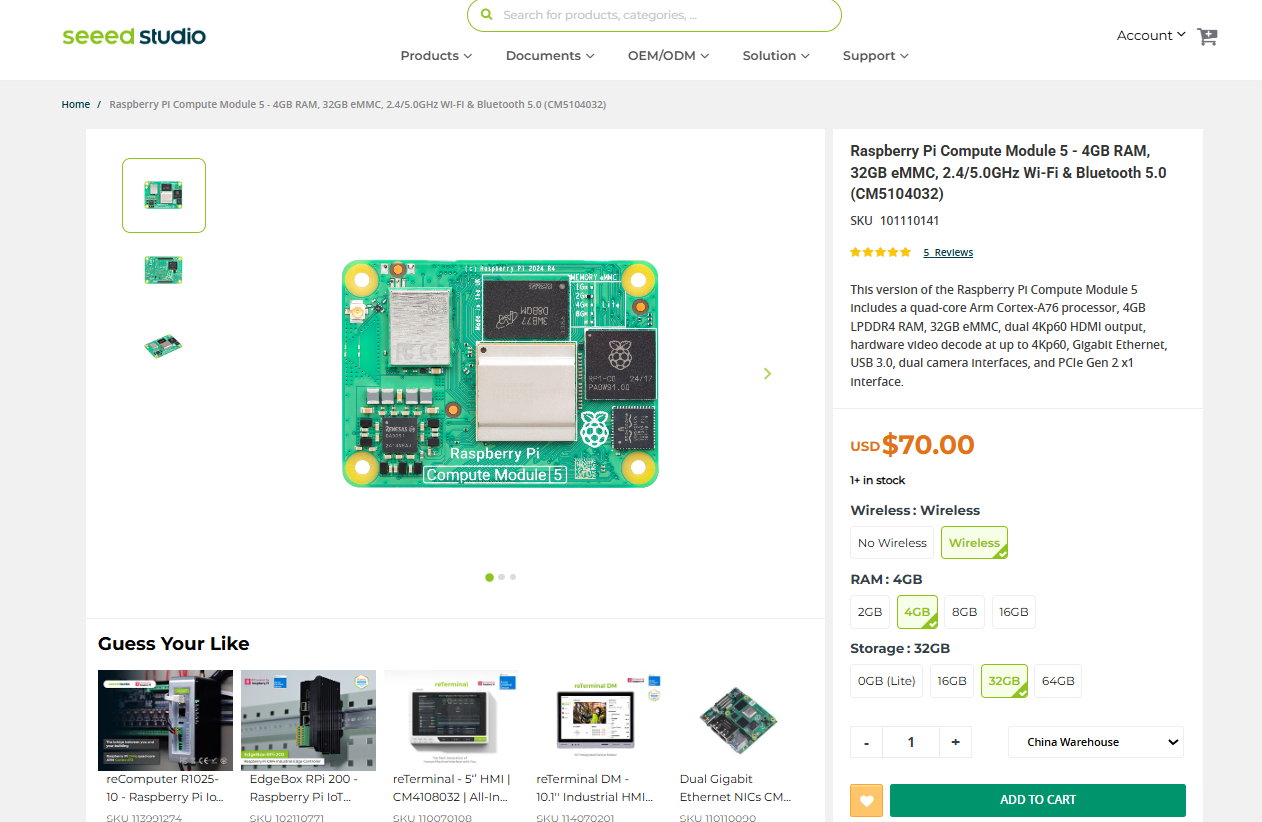
We sourced both the Compute Module 5 and the Official I/O Board from Seeed Studio.
https://www.seeedstudio.com/Raspberry-Pi-Compute-Module-CM5104032-p-6268.html
https://www.seeedstudio.com/Raspberry-Pi-Compute-Module-5-IO-Board-p-6303.html
It features the Broadcom BCM2712 quad-core 64-bit Arm Cortex-A76 processor running at 2.4 GHz, which provides substantial performance increases over its predecessors. The module includes LPDDR4-4267 SDRAM with error correcting capabilities, which is offered in 2GB, 4GB, 8GB, and 16GB capacities to meet a wide range of computing requirements. It has a variety of eMMC storage options, ranging from 0GB for the Lite to 16GB, 32GB, and 64GB.
Connectivity choices include dual-band Wi-Fi (2.4 GHz / 5.0 GHz) with IEEE 802.11 b/g/n/ac, Bluetooth 5.0 with BLE, and Gigabit Ethernet PHY with IEEE 1588 compatibility. Expansion connections offer flexible integration with PCIe Gen 2 (1 × x1 root complex at 5 Gbps), USB 3.0 and 2.0 connectors, and up to 30 customizable GPIO pins running at 1.8 V or 3.3 V. The module also includes UART, I2C, SPI, SDIO, DPI (RGB display), I2S, PWM, and GPCLK interfaces, making it extremely adaptable for a variety of applications.
In terms of multimedia capabilities, the Compute Module 5 has two HDMI 2.0 connectors, both of which can output 4Kp60. It also has two 4-lane MIPI connectors for attaching monitors and cameras, a 4Kp60 HEVC decoder, and OpenGL ES 3.1, Vulkan 1.2 graphics capabilities. Power is supplied by a single +5V input, which supports USB Power Delivery and can draw up to 5A at 5V. With a wide operational temperature range of -20°C to +85°C, the module is ideal for industrial applications and long-term deployments.
Unlike conventional Raspberry Pi boards, the CM5 does not include built-in interfaces such as USB ports, HDMI, or Ethernet. Instead, it has specialized edge connections that expose its interfaces, allowing it to be linked to either an evaluation board or a custom carrier board.
The Compute Module 5 IO Board functions as an official breakout board, allowing access to all of the module's connecting options. It has conventional 40-pin GPIO, two full-size HDMI 2.0 connectors, two USB 3.0 ports, Gigabit Ethernet with PoE compatibility, and an M.2 PCIe slot for expansion. Additionally, it contains two 4-lane MIPI DSI/CSI-2 connectors, enabling direct connection to cameras and displays. The board is powered by USB-C, which ensures reliable power delivery for high-performance applications.
This modular approach allows developers to integrate the CM5 into custom hardware designs, making it ideal for industrial automation, robotics, and embedded systems.
Seeed Studio is a well-known provider of embedded electronics, with a diverse product line that includes the Raspberry Pi Compute Module 5, the XIAO microcontroller family, and Grove sensors. Their store sells a variety of microcontrollers, development boards, and IoT solutions designed specifically for makers, engineers, and industrial applications.
Seeed Studio Fusion
Seeed Fusion PCB Service offers one-stop prototyping for PCB manufacture and PCB assembly, and as a result, they produce superior-quality PCBs and fast turnkey PCBAs within 7 working days.
Seeed Studio Fusion PCB Assembly Service takes care of the entire fabrication process, from Seeed Studio Fusion Agile manufacturing and hardware customization to parts sourcing, assembly, and testing services, so you can be sure that they are getting a quality product.
After gauging market interest and verifying a working prototype, Seeed Propagate Service can help you bring the product to market with professional guidance and a strong network of connections.
HEATSINK
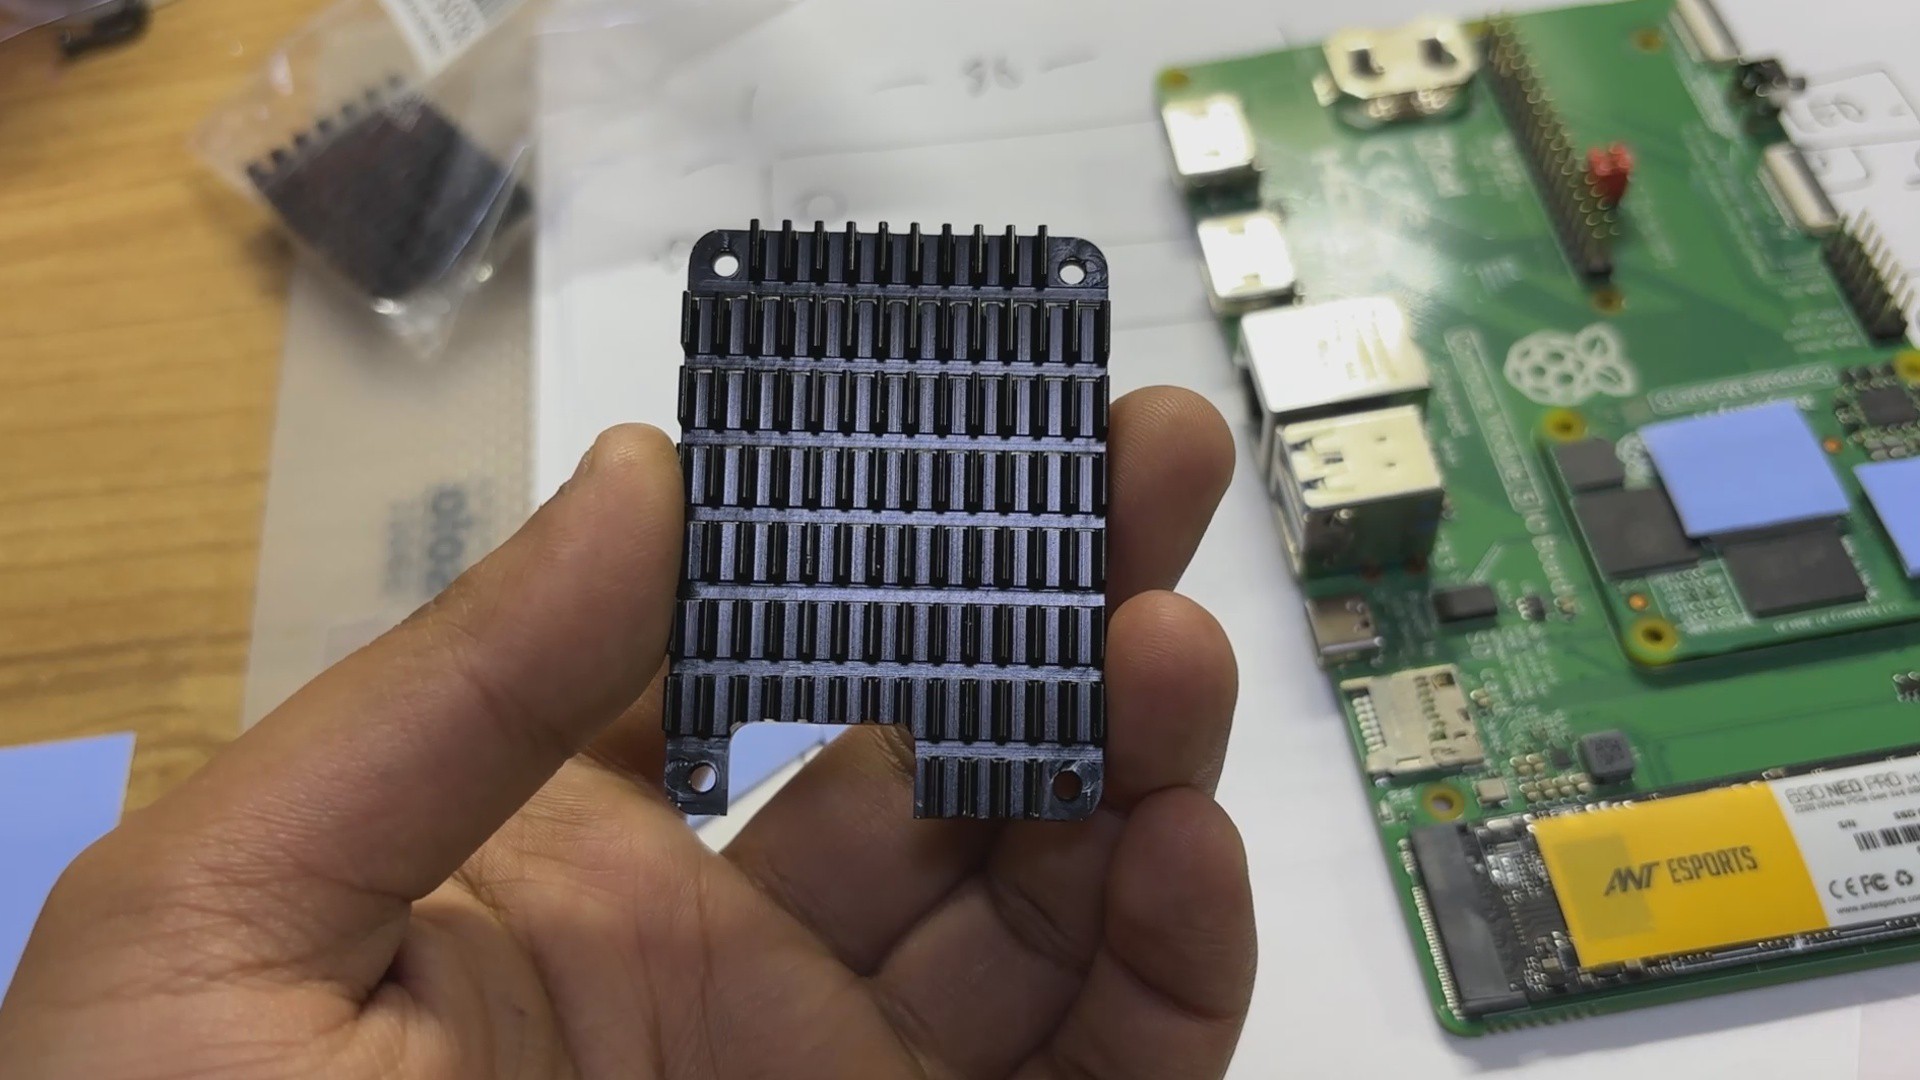
The Raspberry Pi Compute Module 5 runs hot, exactly like its predecessors. Without sufficient cooling, the module may experience thermal throttling, which decreases performance to prevent overheating. We tackled the heating issue by adding our previous CM4's heatsink to our CM5. The layout of both CM4 and CM5 is almost identical, so we added thermally conductive silicone pads to all the ICs and silicone controllers. Some of the controller's heights are not equal to one another, so we had to stack two or three extra thermal pads on one IC to make sure all thermal pads are aligned in one single line, so when we add a heatsink over the pads, all pads should be connected to the heatsink.
We ensure adequate contact between the heatsink surface and the thermal pads before using four M2 nuts and bolts to attach the heatsink in place using the CM5 Evaluation kit mounting holes.
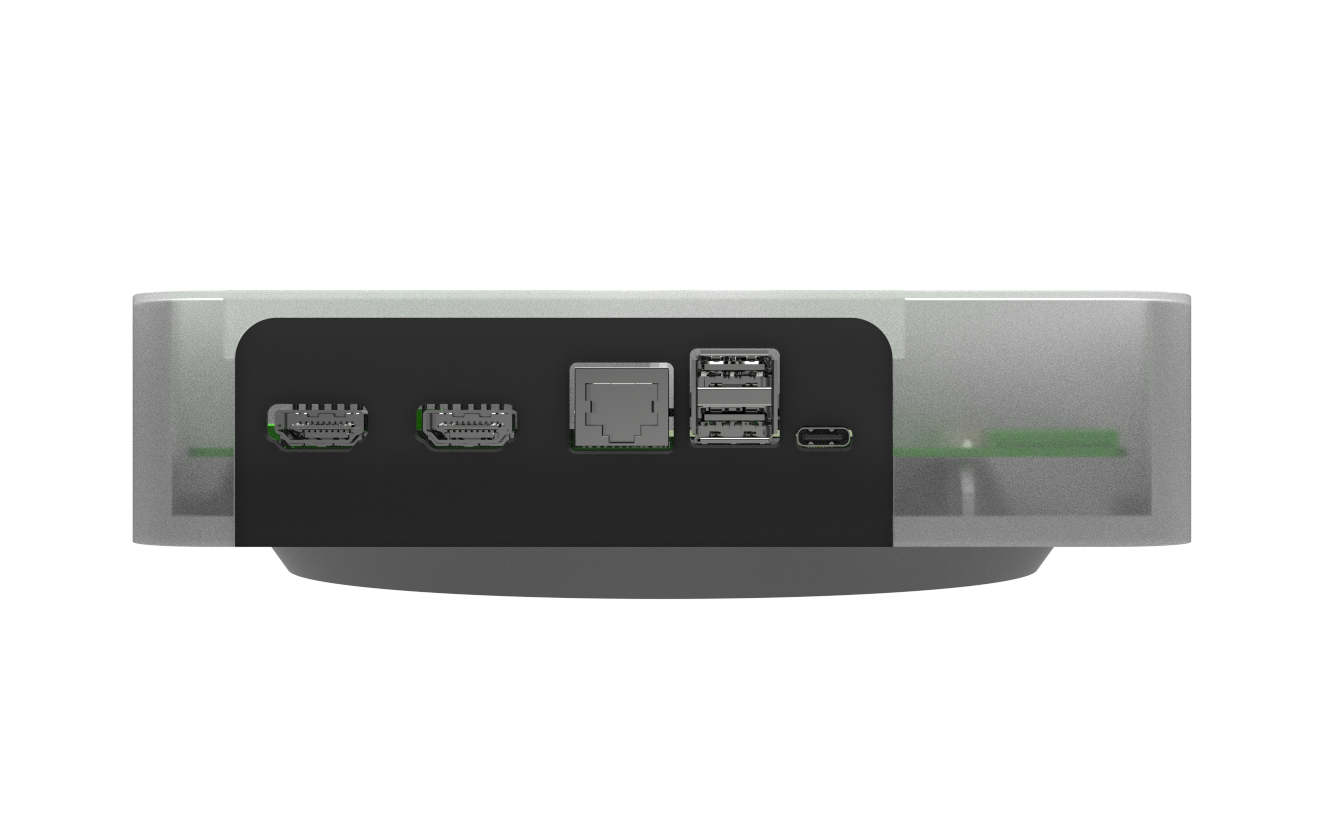
Enclosure Design

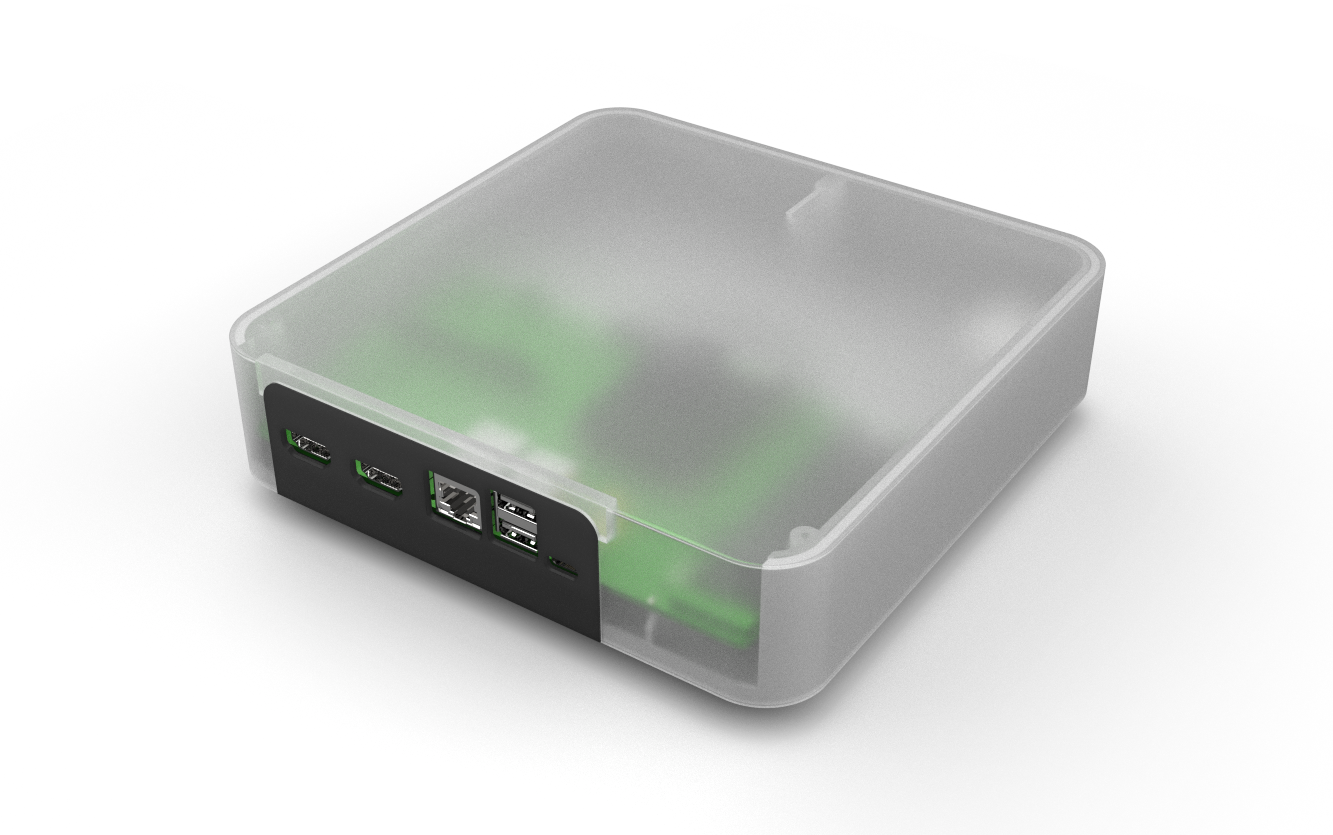
We begin this project by importing the model for the Compute module 5 together with its Evaluation board, which we got online in Fusion 360, and then aligning it so that we can create a Box-like Body around it. The goal was to create a design based on the Mac Mini, where the aluminum top is all that is visible and the I/O ports are all accessible from the back and covered by a black section. We divided our design into four parts: the main body, which holds the Compute module 5, and the I/O Cover, which is printed in black PLA and connected to the main body with two M2 screws.
To make the design more like a Mac Mini, we also created a Lifting part that lifts the whole model off the ground; this element is secured to the main body with three M2-sized screws.
On the main body, we have also included a circular opening where we will place the ON/OFF Push Switch, which will be used to restart the Compute Module 5.
Then we have the Top Lid Part, which is put above the main body and covers the main body within it; we designed it so that it acts as a cover for the main body and the rest of the model. The only visible components are the I/O Cover, which is located on the back side of the design.
My original idea for this project was to electroplate the top lid with zinc powder using the copper paint method; however, I was unable to do so due to materials not arriving on time. I also attempted painting the cover, but it turned out awful, so I printed the top lid with transparent PLA, which looks sleek and professional. If you use an SLA printer to print the Top Lid part, it will look exactly like an actual production part because of the support ribs and screw bosses.
After finishing the model, we exported all of the component mesh files and 3D printed them on our Ender 3 printer. The main body and lifting part were both painted with gray PLA, the top lid was printed with transparent PLA, and the I/O cover was built with black PLA.
OS: Raspberry Pi OS 64 Bit
Raspberry Pi OS was installed on the NVME by following the wonderful getting started guide by Jeff Geerling, which you can check out at the below link.
https://www.jeffgeerling.com/blog/2023/nvme-ssd-boot-raspberry-pi-5
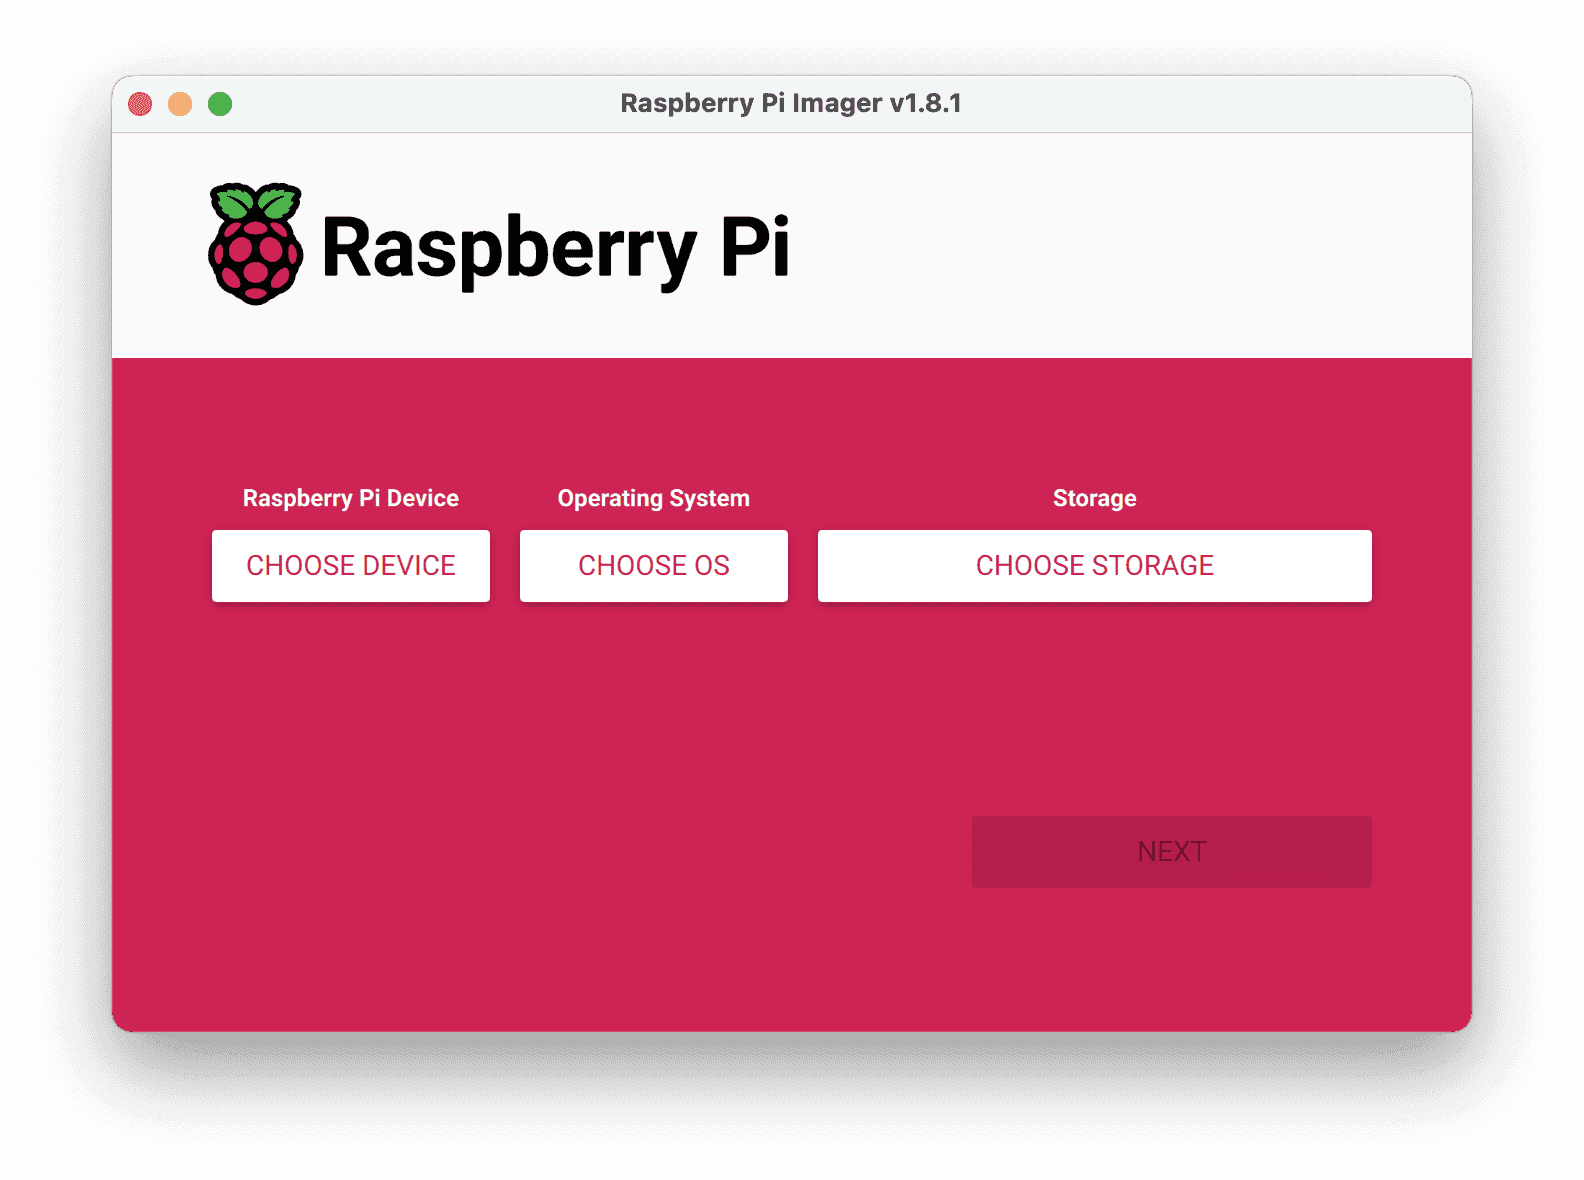
The simplest method is to use an SSD adapter to connect the SSD to the PC so that we can use a Raspberry Pi imager to burn the operating system directly onto the SSD. Alternatively, we may use the SD card to store the operating system first and then clone it onto the SSD.
In our case, we use the clone method, as we first need to enable the external PCIe port on the Raspberry Pi 5, which can be done by editing the config.txt file and adding the below lines at the bottom of the config file.
# Add to bottom of /boot/firmware/config.txtdtparam=pciex1# Note: You could also just add the following (it is an alias to the above line)# dtparam=nvme# Optionally, you can control the PCIe lane speed using this parameter# dtparam=pciex1_gen=3
To clone the SD Card into the SSD, we first check if the Raspberry Pi is reading the SSD, which can be done by running lsblk
Next, we run rpi-clone, which is a shell script for cloning a Raspberry Pi booted source disk developed by Jeff Geerling.
# Install rpi-clone.git clone https://github.com/geerlingguy/rpi-clone.gitcd rpi-clonesudo cp rpi-clone rpi-clone-setup /usr/local/sbin# Clone to the NVMe drive (usually nvme0n1, but check with `lsblk`).sudo rpi-clone nvme0n1
BENCHMARK Geekbench 6

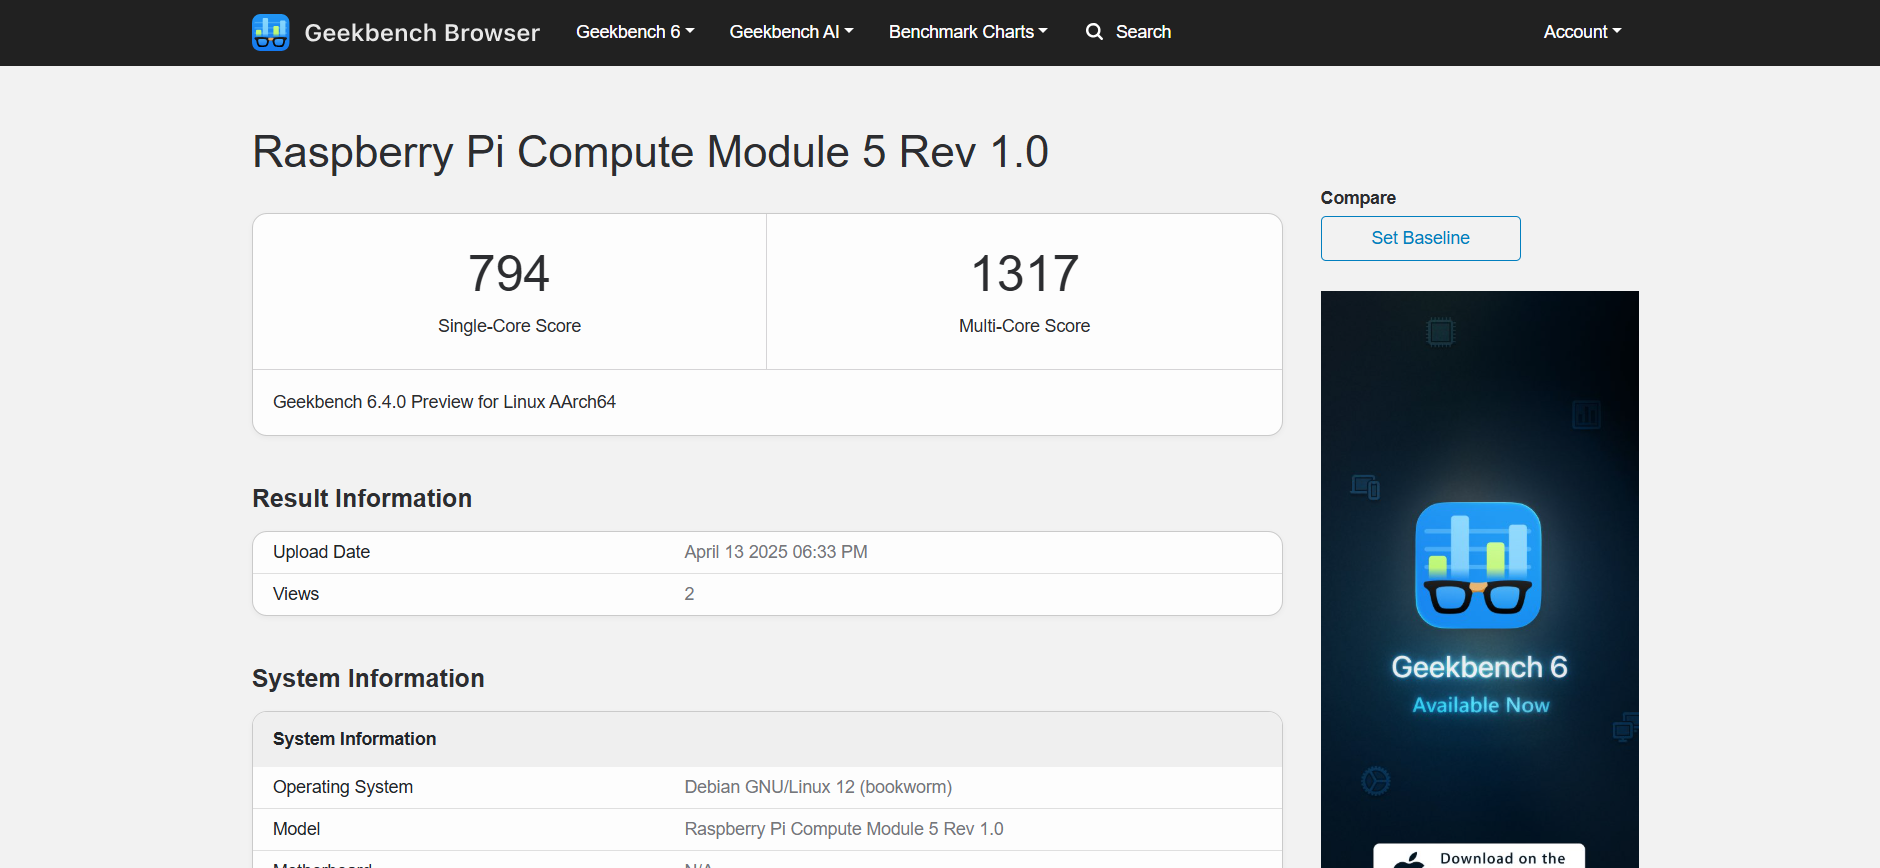
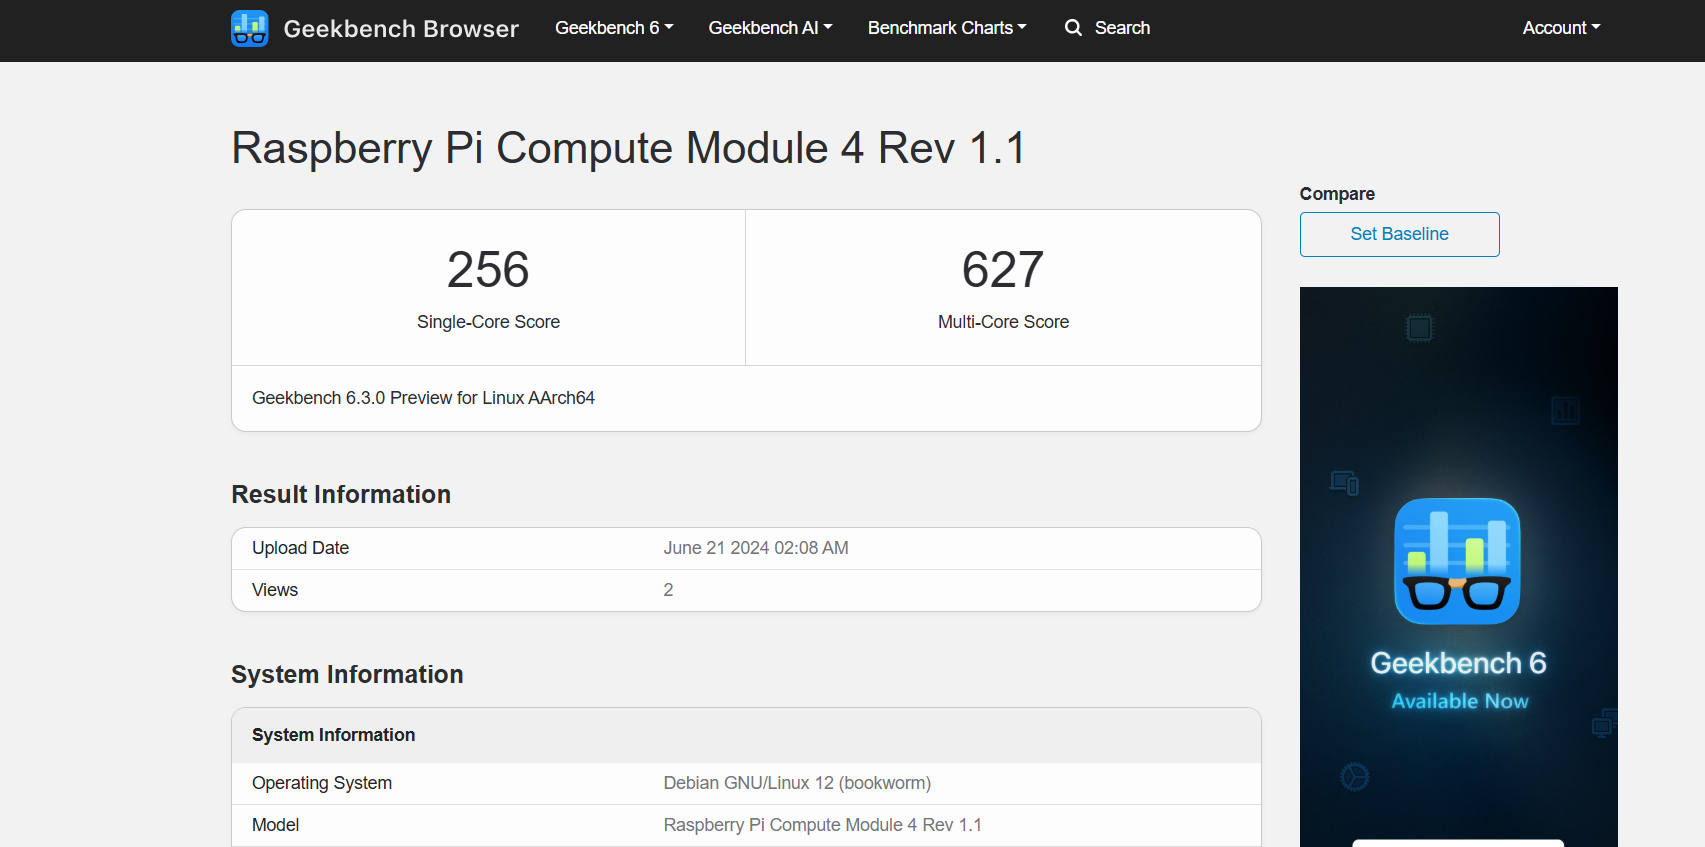
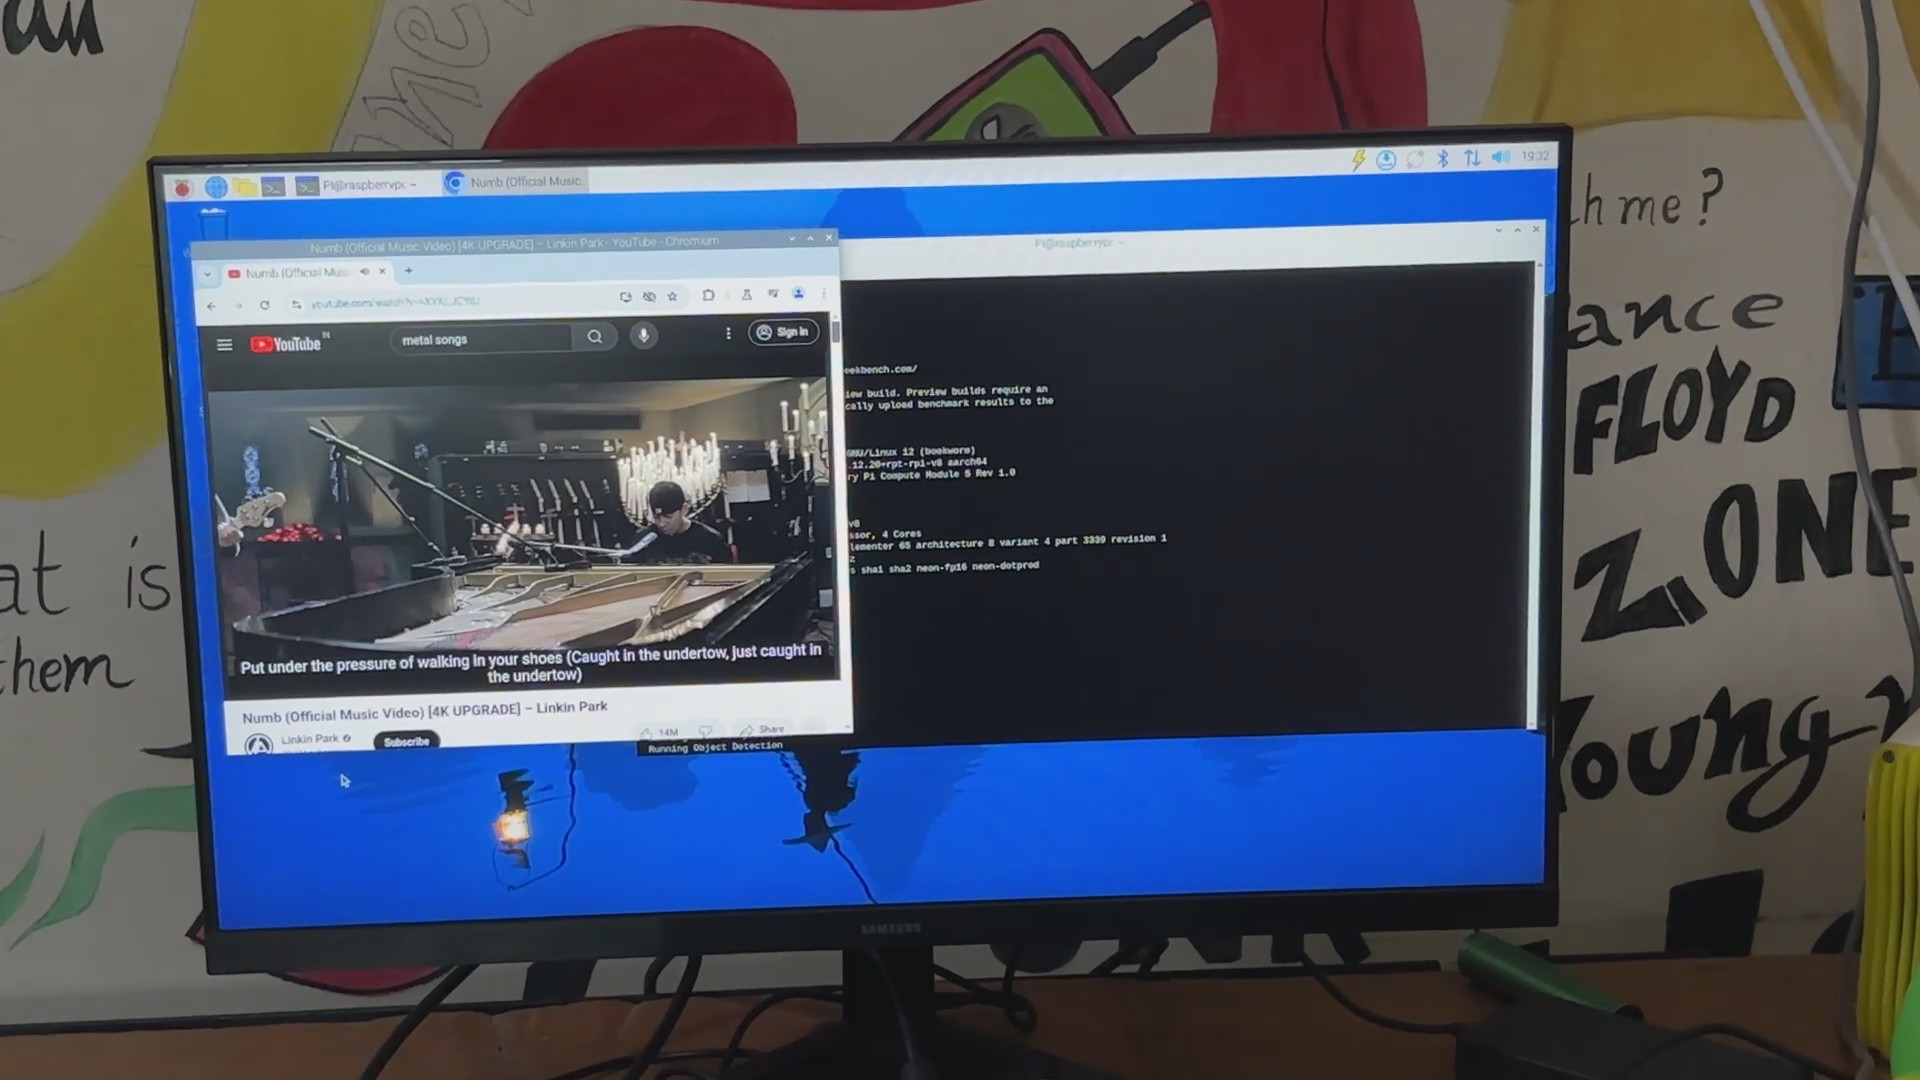
After installing our operating system, we downloaded and installed Geekbench 6 from Pi apps and ran a benchmark test. We obtain a single-core score of 794 and a multicore score of 1317. We're using the 4GB variant of CM5, with the OS installed on a GEN 3 NVME SSD. There are a few scores on Geekbench 6 where individuals have used the 8GB variant of CM5 and obtained a multicore score of 2000 or higher, which is fascinating. For comparison, we found a test score for the Compute Module 4 on Geekbench 6, in which someone utilized CM4 with 8GB of RAM and received a single score of 256 with a multi-level score of 627.
The CM5's improved CPU, RAM, and storage interface contribute to its 3x higher single-core performance and 2x higher multi-core performance than the CM4.
The Cortex-A76 cores in CM5 are substantially more powerful than the Cortex-A72 cores in CM4, resulting in increased IPC (instructions per cycle) and efficiency.
RAM upgrading is also a factor; LPDDR5 RAM in CM5 is quicker and more power-efficient than LPDDR4-3200 RAM in CM4.
In addition, CM5 has the PCIE option, which is much faster than the eMMC or standard SD card options in CM4.
In terms of hardware upgrades, the CM5 is a significant step forward over its predecessor, the CM4.
Conclusion


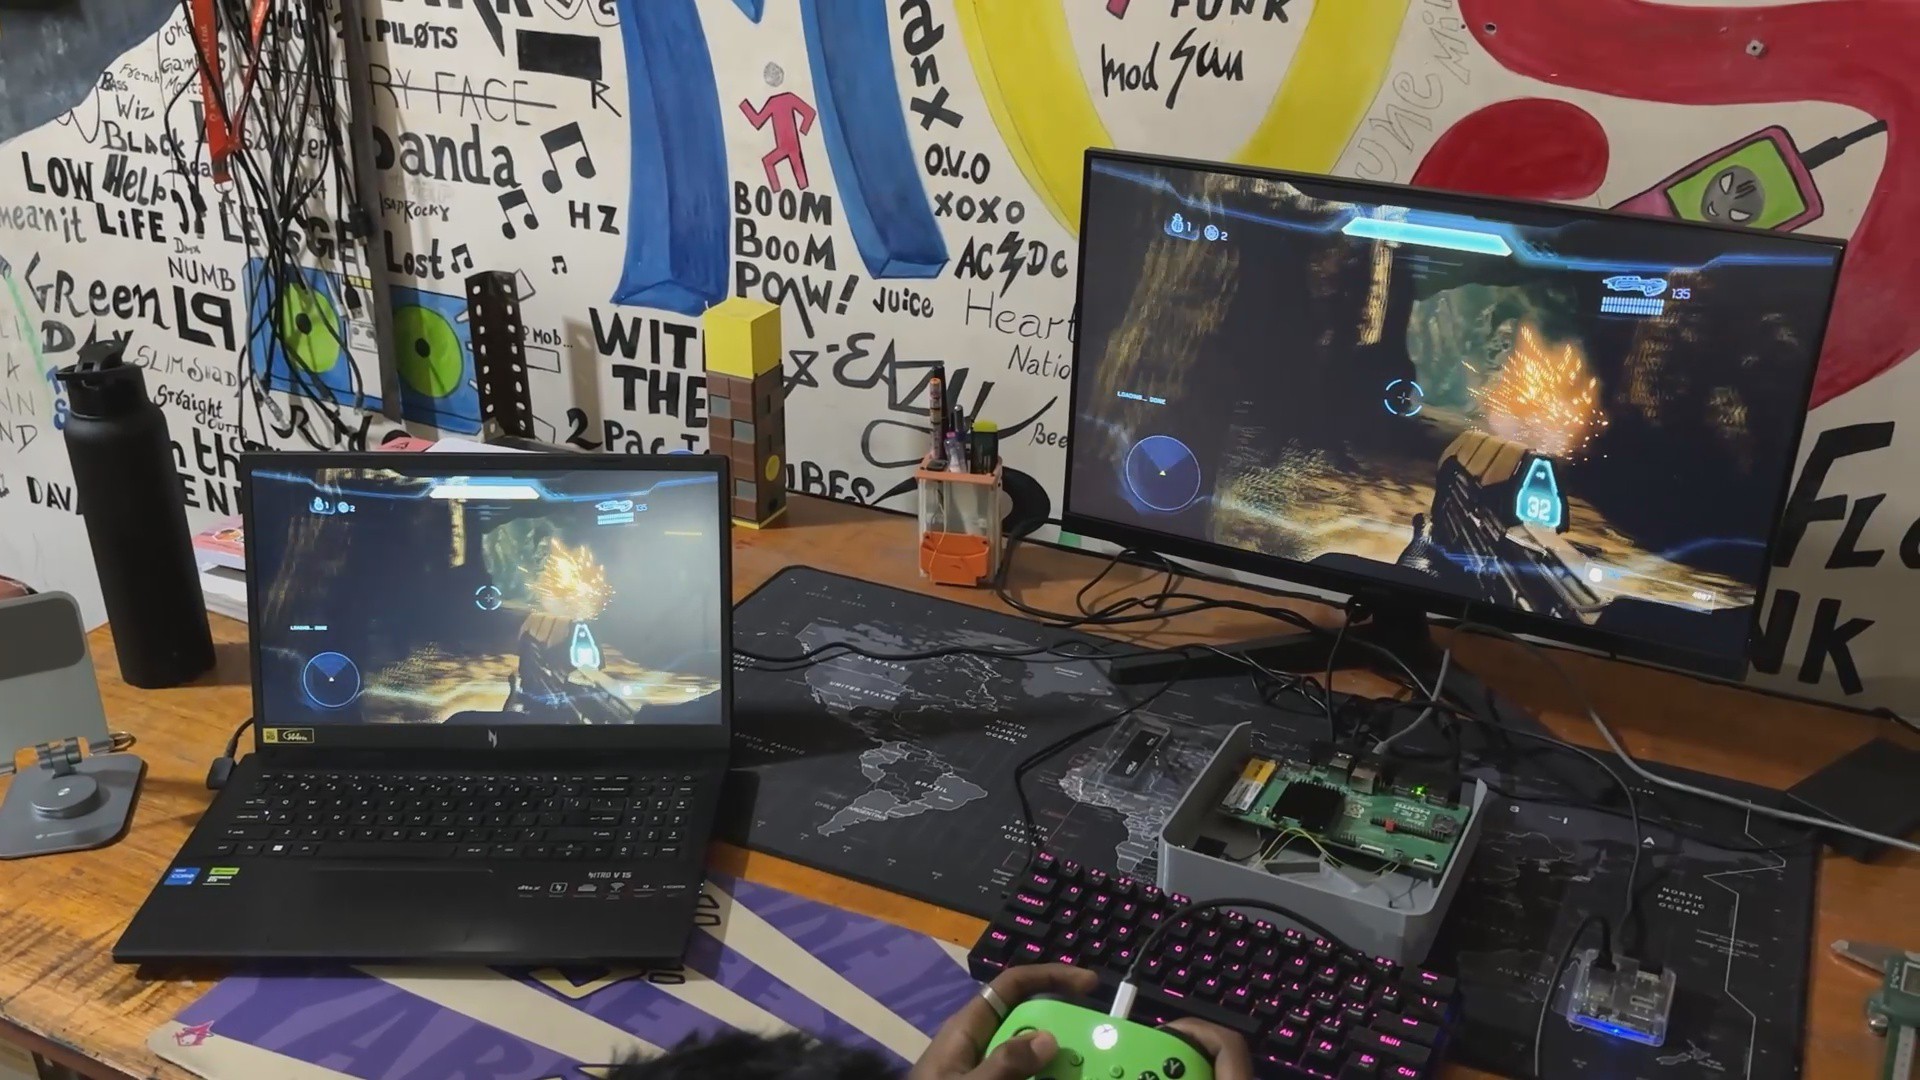
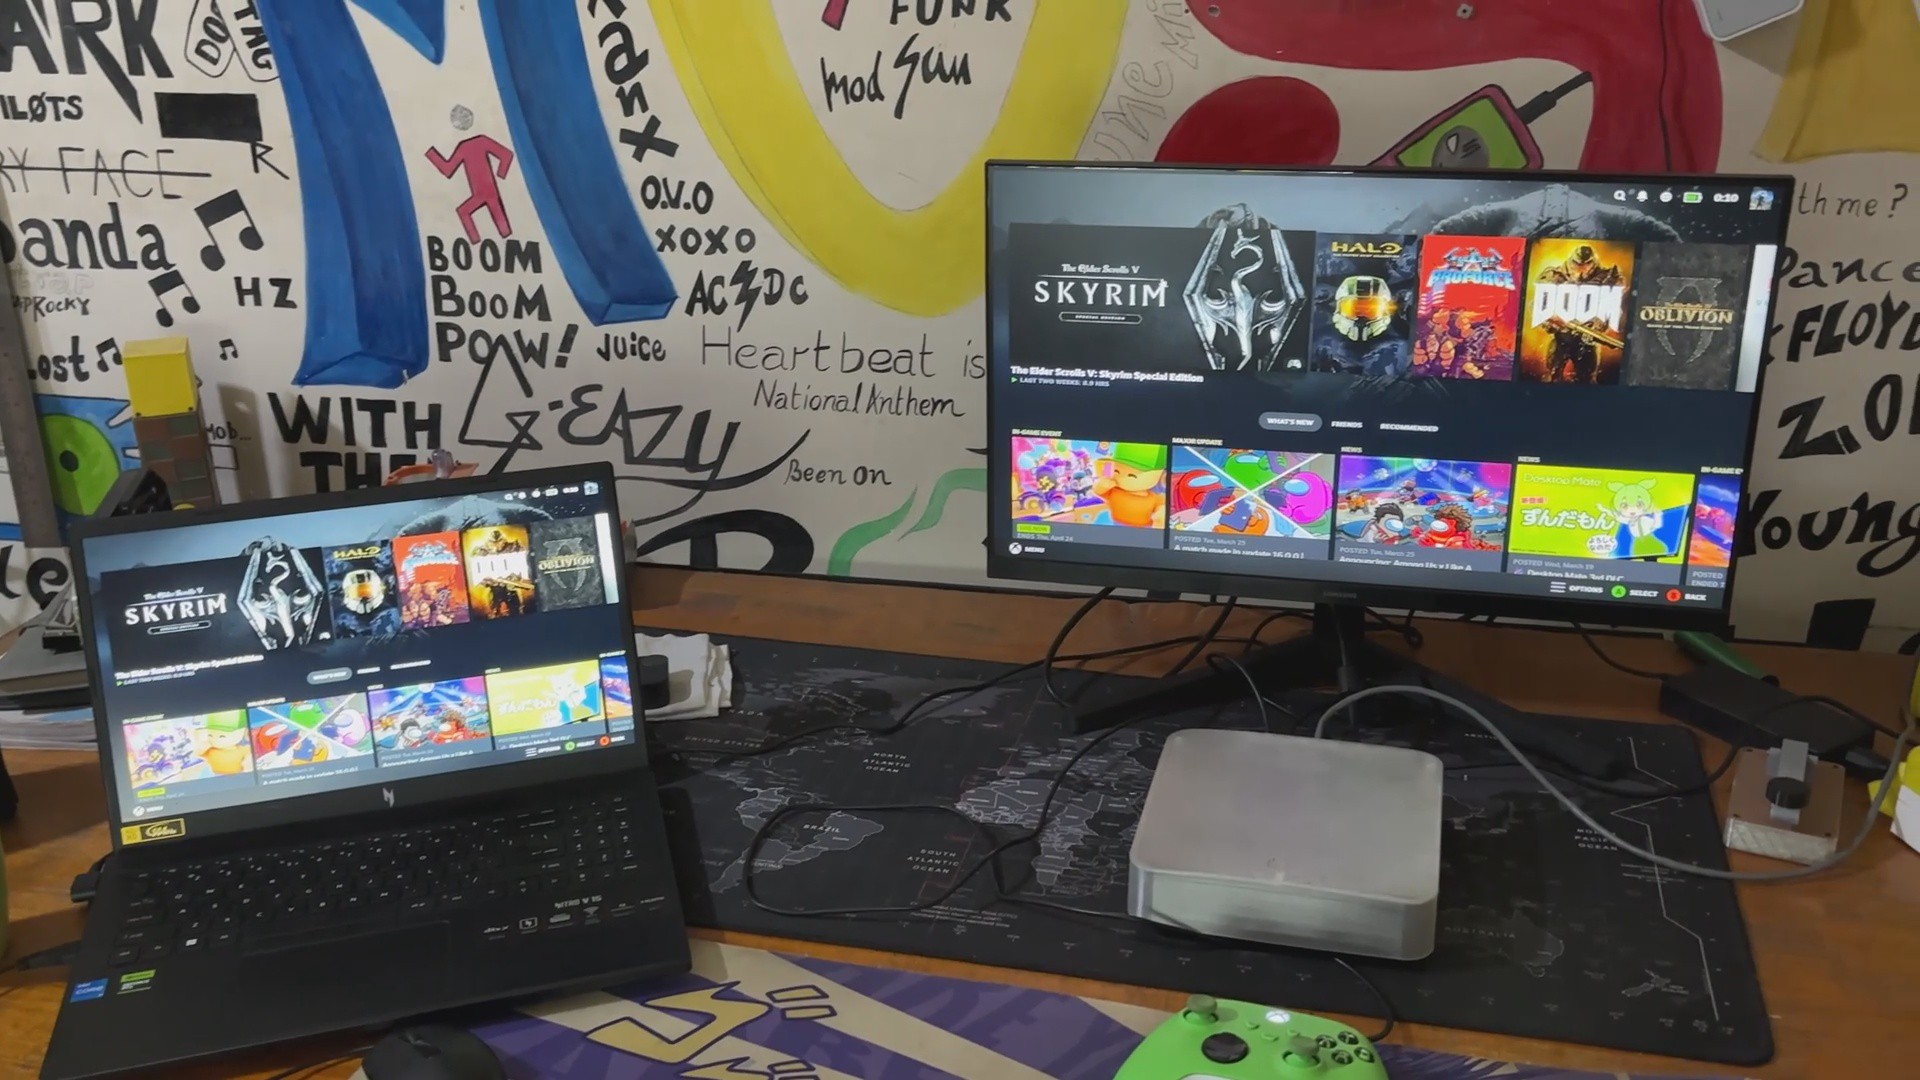
For the final phase in this small project, we installed Steamlink using Pi Apps, connected our laptop to Steam, and ran a few games, including HALO4, Silent Hill 2 Remake, and even OG SKYRIM.
The Pi CM5 handled everything we threw at it. Games are not running directly on CM5, but on our PC, Steam is streaming them via Compute Module 5, and they are working well, as demonstrated by the Gifs and linked youtube short.
HD video playback is also extremely smooth thanks to the CM5's VideoCore VII GPU, which includes hardware-accelerated decoding for H.264, H.265 (HEVC), VP9, and other modern video codecs, ensuring that high-resolution content plays smoothly.
The increased processing capacity of CM5 makes things a lot more enjoyable, and I will be experimenting further in depth with this board owing to the enclosure we prepared for this project.
Leave a comment if you need any help regarding this project. This is it for today, folks.
Special thanks to Seeed Studio Fusion for supporting this project.
You guys can check them out if you need great PCB and stencil service for less cost and great quality.
And I'll be back with a new project pretty soon!