 Deng MingXi
The purpose of this test is to investigate the feasibility of developing a UI interface based on the AI Camera product platform, which will be built based on the LVGL framework, and compatibility issues will lead to problems that directly affect the user experience, such as face recognition results not being rendered normally, and object detection boxes being displayed abnormally.
The real-time visualization of AI analysis results (such as dynamic tracking frames, confidence value display, etc.) is highly dependent on the graphics rendering performance of LVGL, and compatibility defects may lead to delayed display or even loss of key information, greatly reducing the value of AI functions.
In summary, verifying whether the RV1126 development board is compatible with the LVGL tool library is crucial to the product function design of AI Recamera.
Specific tutorials:
1. Run the routine
1.1 Grab the source code first
git clone https://github.com/lvgl/lvgl.git
git clone https://github.com/lvgl/lv_drivers.git
git clone https://github.com/lvgl/lv_demos.git
git clone https://github.com/lvgl/lv_port_linux_frame_buffer.git
1.2 Switch branch(necessary)
cd lvgl
git checkout release/v8.1
cd ../lv_drivers
git checkout release/v8.1
cd ../lv_demos
git checkout release/v8.1
cd ../lv_port_linux_frame_buffer
git checkout release/v8.2
git branch -a
1.3 Create our project folder, copy the document and paste it inside(edit the address)
cp lvgl/lv_conf_template.h pro/milkv/lv_conf.h
cp -r lvgl pro/milkv
cp lv_drivers/lv_drv_conf_template.h  pro/milkv/lv_drv_conf.h
cp -r lv_drivers pro/milkv
cp lv_demos/lv_demo_conf_template.h pro/milkv/lv_demo_conf.h
cp -r lv_demos pro/milkv
cp lv_port_linux_frame_buffer/main.c pro/milkv
cp lv_port_linux_frame_buffer/Makefile pro/milkv
The following figure shows the distribution of files after completion
1.4 Next, make changes to the configuration file
Lv_conf.h
Changed to #if 1 to enable the content of the header file
Modify the memory size to increase it appropriately
Modify the refresh cycle, adjust it according to the performance of its own processor, I set it to 30ms
Set the Tick timer configuration function
Enable the font that can be used, otherwise the compilation will prompt that it is not defined
Lv_drv_conf.h
Change to #if 1 to enable the contents of the header file:
Enable the on-screen display: USE_FBDEV enable, set the path to /dev/fb0, which is set according to the actual situation of the board
Enable touchscreen inputs:
Lv_demo_conf.h
Changed to #if 1 to enable the content of the header file
To enable the demo to be ported, the LV_USE_DEMO_WIDGETS is enabled here
Main.c
Set the correct path to the lv_demo.h header file
Modify the screen buffer parameters according to the LCD pixel size, the screen I use is 320*210 pixels
There is currently no mouse used, comment out the relevant code
lv_demo_widgets() is the entry point to the ported demo
Makefile
Configure the cross-compiler
Incorporated into lv_demo
mouse didn't work, comment out
Run the compiled code in the root directory of the project file
Make clean

make
After compilation, the executable demo file is generated in the current directory
1.5 Mount a shared folder
Install the NFS server on the host
sudo apt install nfs-kernel-server
Open the /etc/exports file and add the following to the last line:
/nfs_root *(rw,sync,no_root_squash,no_subtree_check)
Run the following command to restart the NFS server for the configuration file to take effect:
sudo /etc/init.d/rpcbind restart
sudo /etc/init.d/nfs-kernel-server restart
Execute on the development board
mount -o nolock 192.168.0.6:/nfs_root /mnt
192.168.0.6: IP address of the virtual machine
/nfs_root: the shared directory set for the NFS server
/mnt: After specifying this directory, Ubuntu files placed in the /nfs_root directory can be found in the /mnt directory of the board
Unmount the mount
umount /mnt
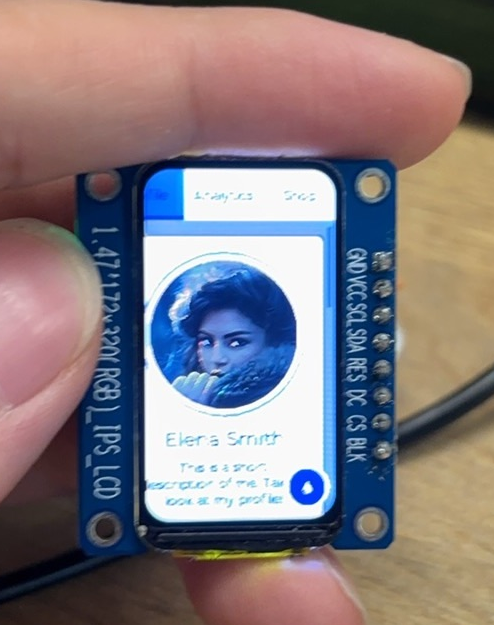
1.6 Effect Display
Open the development board, log in to the adb shell connection, enter the shared folder, run the executable program, and get the following screen, the picture is clear and can be displayed normally, which proves that the development board based on the RV1126 chip fully supports the LVGL image library
./demo
Discussions
Become a Hackaday.io Member
Create an account to leave a comment. Already have an account? Log In.