Close
0%
0%

Basement Wood Drying Kiln

From wet wood to furniture grade lumber

Similar projects worth following
I'm a woodworker. As with all woodworkers, I'm constantly in search of inexpensive wood. My investment in tools is a single event, but purchasing wood is an ongoing cost. As it turns out, I met a guy who runs a tree business, and who is also a woodworker. The deal we made was if he would provide the sawn wet wood, then I would dry it and then we would split the results. My efforts to dry the wood are the topic of this project.

First - this project is totally open source, and is available for usage by anyone who cares to do so in the manner of their choosing.  I'll be posting the code when I get it written, and that will also be open source.

OK, a few details. There are a few parts to this puzzle. The first is the physical side - i.e. the structure of the kiln. The second is the electrical side - i.e. the controls. The final part is running/operating the kiln. I'll devote a section to each.

**STRUCTURE**

If you go to Home Depot, Costco, or any other 'Big Box', chances are you've seen pallet rack. It's made up of vertical standards with long beams in between and wire racks between the beams to put things on. What I discovered is that there is a healthy market for this stuff; used or new, buying or selling. In many cases, a pallet rack merchant will buy the racks from an entire warehouse that is being cleared out, and chances are, there are a few standards that aren't as pristine as they'd like them to be. If you can get one to answer the phone (not as easy as you'd think), a vendor will probably sell you a few standards for cheap if you're not stuck on looks. I was able to pick up two standards that had been twisted at the top as well as some new beams and a few wire racks. I drove them home, and promptly set to work. I cut the standards apart entirely with my sawzall and removed the cross braces. I also cut off the tops (I didn't need that part) so the standards were the height I wanted them to be. My end goal for this kiln was to have the wood drying underneath, and have a work bench on the top. I then shortened the cross braces (they were set for 42" deep and I wanted 30" based on my shop size) and bolted them back to the standards. Putting it all together (the wire racks had to be cut as well), and I had the structure in place.

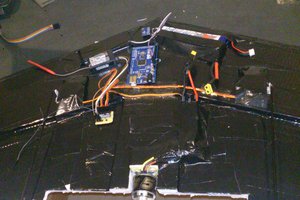
In the pictures, you'll see that I then cut 1/2" insulation boards to contain the space. I used several rolls of aluminum tape to seal gaps in the insulation. This is the structure - modified pallet rack for the exoskeleton and insulation board for the skin. I'll also add some sheet metal to protect the insulation from getting banged up on the front and sides.

**ELECTRICAL/CONTROL**

I am not ashamed to admit that I leaned heavily on the Arduino ecosystem to make this work. I am in no way an electrical engineer, and using an Arduino is stretching my capabilities as it is. Apology (or lack thereof) aside, my objectives for the kiln control system were:

1 - control of a dehumidifier (on/off)

2 - control of a fan (on/off)

3 - reading temperature and humidity inside the kiln

4 - logging data for temp and humidity

5 - displaying status on an LCD

6 – setting a target humidity level inside the kiln

7 - ideally posting status to the web

Based on these requirements, I utilized the following:

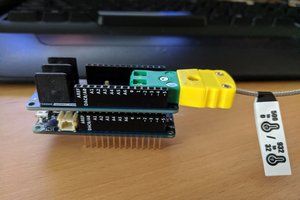
1 – An Arduino Duemilanove

2 – An Ethernet shield

3 – An LCD shield

4 – A DHT22 temp/humidity sensor

5 – A DS1302 Real Time Clock

6 – A relay board

7 – Three momentary buttons

8 – Jumper wires, some multi-conductor cable, other electronics stuff

The only real challenge associated with this setup was the number of pins required to make it work. Given that I hadn’t ruled out connecting a computer to the Arduino and reading data that way, I was down to 18 pins. If you add up the required number of pins to make things work, you arrive at the fact that I need 21 pins available. To get around that, I wired up the momentary buttons into a single analog pin and used resistors to make allow the board to differentiate which button was being pushed. Other than that minor improvisation, everything else was connected via jumpers and turned on. You might note that I didn’t stack the Ethernet and LCD shields together. That happened for three reasons. First, I like seeing the blinking lights on each board. Second, both of the boards want to use pin 4; to get around this, I ran one of the jumpers from the Arduino pin 3 into the LCD input on pin 4 and called out pin 3 in the code for the...

Read more »

  • 1 × Arduino Duemilanove
  • 1 × Arduino Ethernet shield
  • 1 × Real Time Clock
  • 1 × Relay Board (4x relays)
  • 3 × Momentary buttons

View all 7 components

  • Where are we now?

    Tim White09/30/2014 at 18:58 0 comments

    Technically, nowhere.  I say that because I can't consider this project to be at a 1.0 state until I'm automatically controlling and monitoring the dehumidifier.  Even without Twitter integration (which I think I've figured out - you can follow the kiln at @SuburbanKiln) and data logging to the SD card and display of the data via a web browser (which I've got partly figured out), I'm still not at a point where I'm leaving the kiln to run 24x7.  So what remains?  Here's the list:

    - My #1 concern, you ask?  Fire.  The fact is, I'm dealing with a dehumidifier that I've modified into a state that it was never intended to be in, I'm controlling mains voltage with a microprocessor, and I'm pulling a heavy current load through the Arduino.  I'm really paranoid about having a massive fuel source (the boards) right next to a highly 'modified' electronics stack.  I'm thinking I'm going to put a smoke alarm in the kiln itself.  Then, at least I'll have a few seconds notice before my house goes up in flames....

    - The code isn't mature.  I've done coding in various languages, but C is not my language of choice.  I'm poking around in forums, on the Arduino.cc site, in some old books I have, and anywhere else I can get my hands on, and the code is slowly getting there.  But it still needs work.  Here are the tasks I need to implement:

      * Integrate the RTC.  I currently have a DS1302 clock running, and I'd really like to use that for timing, rather than the millis() functionality.  

      * SD card data logging.  I've managed to get the kiln on Twitter, which is obviously a function of my success in getting a web connection.  However, I'd really like to do data logging onto the micro SD card that is on the Ethernet board.  I've read all over about how this is possible, I just haven't done it yet.  The thing is, the Arduino environment is really hard to do troubleshooting on.  Ideally, you would change one thing and then make sure it ran.  However, the one change takes a while to implement, as the compilation and upload can take 30 seconds or so.  My tendency is to make many changes, and then see how they work.  When they don't work as planned (a virtual inevitability), I'm not sure which change caused the issue.  I'll get through it, I'm sure.

      * Web server with SD card data.  Once the data is logged into a datafile, I'd like to be able to hit the Ethernet card with a client request and have it dump out the file.  Again, this doesn't appear to be hard to do, but I need to figure it out, and it'll be one slow step at a time.

      * Transition to MEGA.  I was complaining to a friend about the limited programming space on my Duemilanove, and he asked what other options there were.  I mentioned that I have a MEGA 2560 that has many times the space, but that would require me to remap any pins, etc.  He told me to man up and do it.  He's right.  First, I realize that there are likely many, many things that I'm doing in my code that could be optimized; however, in my case, I'm not looking for optimized code.  I'm looking for dry wood.  Long term, maybe I'll work to refine the code, but for now, it's all about velocity.  Anyway, the transition to a MEGA gives me a LOT more flexibility, especially to implement a method to directly measure the water content of the wood.  I'll be working it this weekend.

  • What remains to be done (AKA the hard stuff)

    Tim White08/19/2014 at 19:17 0 comments

    So now that the hardware is apparently working, I have to write the software.  I also have to derive the algorithm on how to move from air temp/humidity to the wood water content.  This (I know) isn't an exact science.  Long term, I plan to read the water content of the wood directly; however, that's not in the cards for this go-round.

    So for now, I'm focused on writing code that will:

    - Keep track of a target air relative humidity level

    - Use a dehumidifier to modify the air humidity level, which should then drive the wood water content

    - Tweet the status of the system (which will also be my data logging functionality)

    - Accept user inputs to modify the target air humidity level, as well as turn a circulating fan on  and off

    The key piece will be learning how fast I can drop the air humidity without causing issues with the wood.  I can see a few loads of ruined lumber in my future as I optimize this thing....

  • Learning new stuff every day

    Tim White08/19/2014 at 19:00 0 comments

    As I mentioned in a previous post, I don't have all my shields stacked up - I'm just running wires from the Arduino to the Ethernet shield, and out from there to the LCD shield, the buttons, and the RTC.  For the life of me, though, using this setup, I couldn't get the Ethernet shield to pick up an IP, and subsequently, nothing else would work in the sketch.  Finally, I figured out that I have to run connections from the Arduino ICSP header to the Ethernet shield, and then everything is good.  I was under the impression that the ICSP connections were just duplicating pins that I had already connected (10-13, power, ground), but apparently not.  One of these days when I have a bunch of time, I'll dig into what's really going on, but for now, it's enough to say that it's working.

  • The Downside of Arduino...

    Tim White08/04/2014 at 02:13 0 comments

    Last night, I hit a wall with the Arduino.  Specifically, I ran out of memory.  Yeah, I know, I've got a lot going on; the real time clock, the SD card, the LCD shield, I'd like to post to Twitter, the temp/humidity sensor, some buttons, etc.  Anyway, this all came crashing down last night when the Arduino IDE delightedly told me that I was out of space.

    A little digging later, and it looks like I'll be losing the SD card functionality, and maybe the RTC.  My thought process is that I can use Twitter for my data logging and repository, and that will include a time stamp on the tweet.  I can use the millis() functionality for my timing, as I don't think I'll be running any given program for more than 48 days.  I was just hoping to have something a little more refined, with time stamps and an SD card file that I could dump to a local device when I hit the IP address of the board.  Yes, I know I could get a Mega up and running (and I even have one laying around), but that would require a lot of rework and rethinking.  For the moment, just eliminating some non-necessary functionality is the way I'm probably going to go.

  • Control 'Enclosure'

    Tim White07/29/2014 at 17:13 0 comments

    Last night, I took the time to set up the 'enclosure'.  I put that in quotes because, as I note in the project details, the sides are open to the air.  Long term, I'l probably have to fix that, but I'm going to keep it as-is for a while.  The enclosure is just two pieces of acrylic.  I cut them to size on my bandsaw and then drilled holes for standoffs, wire ties, bolts and buttons.  I did learn as I proceeded; specifically, a split point drill bit is way better than a brad point drill bit.  If you don't know the difference, you're probably OK using whatever drill bits you have laying around, as most drill bits you'll buy are split point.  However, for the sake of posterity, just know that a brad point drill bit causes acrylic to chip out at the exit hole.  Live and learn :)

View all 5 project logs

Enjoy this project?

Share

Discussions

Electroncatcher wrote 03/04/2020 at 08:17 point

Hello, is this where a longtime project? Is it still going? Or you left this project with not all features that you thought to implement. I'm interested in this project.

  Are you sure? yes | no

TomL wrote 09/29/2014 at 19:53 point
A little late to the project, but for your data logging you could look at ThingSpeak. I've been using it for something similar and it's been pretty good so far. Another one (with nicer visualization than ThingSpeak) is Open.Sen.se.

  Are you sure? yes | no

Tim White wrote 09/30/2014 at 18:59 point
TomL, thanks for the tip. I'll check it out.

  Are you sure? yes | no

Tim White wrote 07/29/2014 at 17:21 point
I suppose I could do that. It sounds like you're talking about what people traditionally call steam bending; that's when they take wood that's already dried and subject it to high temperature and humidity. In that state, the wood is pretty malleable, and you can bend it and let it dry. Once dry and cool, the wood will stay in the shape that it was bent to. For the first few runs, I'm going to be focusing on bringing an entire load of lumber from wet to dry; however, that's a great suggestion that I'll try in the future.

  Are you sure? yes | no

jlbrian7 wrote 07/23/2014 at 22:30 point
That sounds like a good deal you have. Wouldn't that make it easier to curve pieces as well, and then dry them?

  Are you sure? yes | no

Similar Projects

Does this project spark your interest?

Become a member to follow this project and never miss any updates