 Iloke-Alusala
-
11Putting It All Together
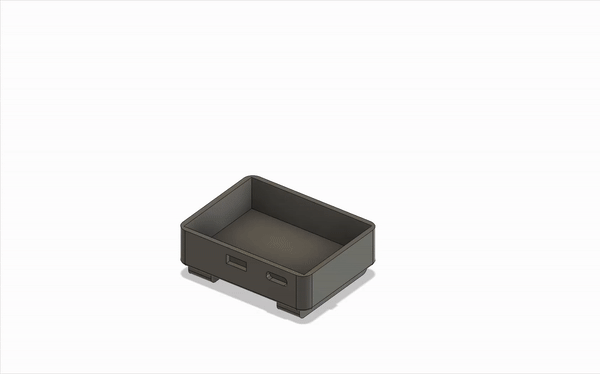
Once all the parts have been printed and soldered, it’s time for final assembly. Here’s how everything is designed to fit neatly inside the frame.
![]()
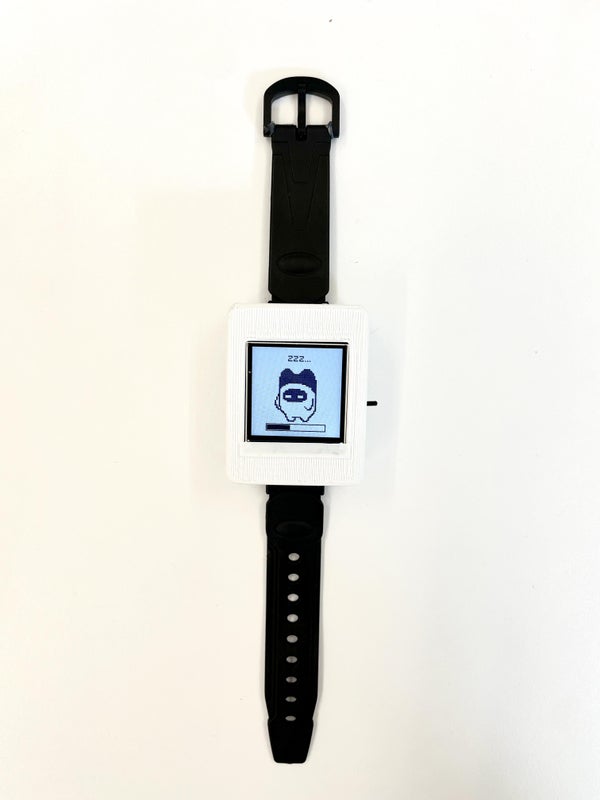
Once everything’s in place, slide the watch strap through the slots on the back of the case — and just like that, you’ve got a fully assembled Piko, ready to wear. I just used a hot glue gun to glue all the parts in place. It's important to do this otherwise the accelerometer may not provide accurate readings and hinder Piko from determining your movements.
![]()
Thanks Piko :)
![]()
-
12Coding Piko's Brain
So at this point, you might be wondering — “Okay, a running tracker sounds cool and all... but how does Piko actually know when I’m moving?”
Let’s take a quick dive into the physics.
When you walk, run, or sprint, you're pushing against the ground to move forward. That push creates a force, which causes a change in your speed — and in physics, a change in speed is known as... you guessed it: acceleration.
Here’s the idea:
- Use an accelerometer to measure changes in acceleration
- Filter and process the raw data to reduce noise
- Compare the data to predefined thresholds for idle, walking, jogging, sprinting, and sleep mode.
- Based on the results, update Piko’s animation and count the steps taken, which is shown on a Progress Bar right below Piko
It's a simple loop, but it makes all the difference, turning your real-world motion into something Piko can understand and respond to.
-
13Let's Get Coding
First, we define a header file which acts as a declaration point for all our bits and pieces. Making it easy for us to know what is and isn’t available:
#ifndef PikoAccelerate_h
#define PikoAccelerate_h
#include <stdint.h>
#include <math.h>
// #include <DFRobot_LIS.h> //used to communicate with the accelerometer
// #include <FiltersFromGit.h> //used for preprocessing of acceleration values
// #include <Wire.h> //used to facilitate I2C communication

//Preprocessor DEFINES
//Here are all the thresholds, where piko decides if they're running or not.
//CHANGE THESE VALUES IF PIKO ISN'T SENSITIVE ENOUGH
#define EXERCISING_THRESHOLD 30
#define WALKING_THRESHOLD 45
#define RUNNING_THRESHOLD 150
#define SPRINTING_THRESHOLD 250
//The below are used for initlisation
#define fc 12
#define WINDOW 3
//This is determined by the switch on the actual accelerometer
//MAKE SURE THE SWITCH CORRESPONDS TO 0x18 not 0x19 or change this value
#define I2C_ACCE_ADDRESS 0x18

//This is a qucik and readable way to define states
enum MotionState {
idling,
walking,
running,
sprinting,
};

float getMagnitude(int32_t x, int32_t y, int32_t z);
void determineMovementType(float ave, float std);
void countSteps(float a, MotionState movementType);
void takeStep(float a, int threshold);

//specifies what variables we can expect to see in our program later
extern int32_t ax, ay, az;
extern float a, afiltered, a_ave, a_std;
extern int steps;
extern bool stepping;
extern MotionState motionType;

#endif
Now we want to actually define these functions and how they work. But to make our code nice and modular, we store these in a c++ file that will be imported later. I really like this because it means our main file doesn’t look as big and scary - to us and others who want to use it. Maybe it’s just me, but if I open someone’s code and it’s 7000 lines I… I…*scared, squeaking sounds*.
//You'll see some of these lines in the final code so best to understand them now :) //These are the libraries we use for acceleration measuring and processing /*Credit to: https://github.com/JonHub/Filters.git for the below. It should be known the library name was changed since it was being overwritten by another Arduino library of the same name. **To change a library name you must find where it is stored, change its name in its library.properties file and only THEN import it via a ZIP into the Arduino IDE*/ #include <FiltersFromGit.h> /*Credit to: DFRobot for builing the accelerometer library below*/ //https://github.com/DFRobot/DFRobot_LIS/tree/master #include <DFRobot_LIS.h> //And of course, you know where this header file came from if you've read the above #include "PikoAccelerate.h" //Function declaration void accelerationJob(void); //This will do all acceleration stuff in the main loop. //Object initilisations DFRobot_LIS331HH_I2C acce(&Wire, I2C_ACCE_ADDRESS); //creates an accelerometer object that communicates via I2C FilterOnePole myAccelerationFilter(LOWPASS, fc); //creates the filter object for accelerometer data RunningStatistics myAccelerationStats;//creates an object that continously monitors acceleration mean and std void accelerationJob(void){ //Read in all the acceleration data from the accelerometer ax = acce.readAccX(); ay = acce.readAccY(); az = acce.readAccZ(); //get the magnitude a = getMagnitude(ax,ay,az)-1000; /*give this acceleration to the lowpass filter. A low pass filter will small vibrations (of high frequency) from coming in and effecting or measurements. Ensuring I only think you're stepping when you're actually stepping*/ myAccelerationFilter.input(a); afiltered = myAccelerationFilter.output(); //get the filtered acceleration //here I find out your statistics of acceleration like the myAccelerationStats.input(afiltered); a_ave = myAccelerationStats.mean(); //your average a_std = myAccelerationStats.sigma(); //your standard deviation (how much you move around the average) // I know you know what these do ;) motionType = determineMovementType(a_ave, a_std); countSteps(afiltered, motionType); } -
14Connecting Brain, Body and Spirit
Now that you’ve understood how I make my decisions, you’re ready to see what my final brain looks like. The main part of my brain looks like this:
#include <FiltersFromGit.h>
#include <DFRobot_LIS.h>
#include "PikoAccelerate.h"
#include <SPI.h>
#include <Adafruit_GFX.h>
#include <Adafruit_ST7789.h>
#include <AnimatedGIF.h>
#include "piko_sleep.h"
#include "piko_idle.h" // Replace with your actual .h gif files
#include "piko_walk.h"
#include "piko_jog.h"
#include "piko_sprint.h"

// Define your MACROS for the LCD
#define TFT_CS 5
#define TFT_RST 6
#define TFT_DC 7
#define SLEEP_THRESHOLD 10000

//Function declarations:
void GIFDraw(GIFDRAW *pDraw); //Displays the GIF on the LCD
void accelerationJob(void); //manages all acceleration absed activities
void drawProgressBar(int steps) ;//manages the loading bar based of steps

//Object initilisations
DFRobot_LIS331HH_I2C acce(&Wire, I2C_ACCE_ADDRESS); //creates an accelerometer object that communicates via I2C
FilterOnePole myAccelerationFilter(LOWPASS, fc); //creates the filter object for accelerometer data
RunningStatistics myAccelerationStats;//creates an object that continously monitors acceleration mean and std
Adafruit_ST7789 tft = Adafruit_ST7789(TFT_CS, TFT_DC, TFT_RST);
AnimatedGIF gif;

//Global vars
char* overlayText = "0";

unsigned long lastSampleTime = 0;
unsigned long sampleRate = 20; //ensures samples every ~20ms
MotionState previousState = NONE; //ensures that the first GIF will run

unsigned long lastFrameTime = 0;
int frameDelay = 0; //DO NOT CHANGE unknowingly. Ensures playfram function that draws GIF is non-blocking
int FPS = 9; //Desired frame rate

unsigned long sleeptimeCounter = 0;
unsigned long lastsleepcheckTime = 0;

bool gifPlaying = false;

// Data arrays (replace with your actual GIF names)
// THESE MUST BE IN THIS ORDER, since indexed by motionType
const uint8_t* gifData[] = { idle_v2, walk_v2, jog_v2, sprint_v2, sleep_v2};
size_t gifSize[] = { sizeof(idle_v2), sizeof(walk_v2), sizeof(jog_v2),sizeof(sprint_v2), sizeof(sleep_v2)};

const int MAX_STEPS = 200; //Number of steps to fill the progress bar

void setup() {
//Serial set
Serial.begin(115200);
while(!Serial){};
while(!acce.begin()){
Serial.println("Initialization failed, please check the connection and I2C address - must be");
}

//take statistics averages/std's set-up
myAccelerationStats.setWindowSecs(WINDOW);
motionType = idling;

//accelerometer set up
Serial.print("chip id : ");
Serial.println(acce.getID(),HEX);
acce.setRange(/*range = */DFRobot_LIS::eLis331hh_12g);
acce.setAcquireRate(/*rate = */DFRobot_LIS::eNormal_50HZ);

// Initialize display
tft.init(240, 240); // Use your screen resolution
tft.setRotation(2); // Adjust rotation if needed
tft.fillScreen(ST77XX_BLACK);
tft.setTextColor(ST77XX_WHITE); // Choose your text color
tft.setTextSize(2); // Adjust as needed
tft.setCursor(10, 10); // X, Y position
tft.invertDisplay(false);

// Initialize GIF decoder
gif.begin(); // No endian flag needed for Adafruit library
}

void loop() {

unsigned long now = millis();

//Update state every 20ms
if (now - lastSampleTime >= sampleRate) {
lastSampleTime = now;
accelerationJob();
}
//Handles if it needs to go into a sleep state.
if(motionType == idling){
sleeptimeCounter = sleeptimeCounter+now-lastsleepcheckTime;
if(sleeptimeCounter>=SLEEP_THRESHOLD){
motionType=sleeping;
}
lastsleepcheckTime = now;
}
else{
sleeptimeCounter=0;
lastsleepcheckTime = now;
}
// If state changed, open new GIF
if (motionType != previousState) {
gif.close(); // Close previous GIF
if (gif.open((uint8_t*)gifData[motionType], gifSize[motionType], GIFDraw)) {
gifPlaying = true;
lastFrameTime = now;
frameDelay = 0;
previousState = motionType;
} else {
Serial.println("Failed to open GIF");
gifPlaying = false;
}
}

// 3. Non-blocking GIF frame playback
if (gifPlaying && now - lastFrameTime >= 1/FPS) {
int result = gif.playFrame(false, &frameDelay);
lastFrameTime = now;
drawProgressBar(steps);
if (result == 0) {
gif.reset(); // Or gifPlaying = false if you don't want to loop
}
}
}


/********************************************************************************************************************/
/************************************************Function Definitions************************************************/
/********************************************************************************************************************/


void accelerationJob(void){

//Acceleration Raw Data
ax = acce.readAccX();
ay = acce.readAccY();
az = acce.readAccZ();

a = getMagnitude(ax,ay,az)-1000;

//Filters through Lowpass to remove noise
myAccelerationFilter.input(a);
afiltered = myAccelerationFilter.output();

//Get running statistics
myAccelerationStats.input(afiltered);
a_ave = myAccelerationStats.mean();
a_std = myAccelerationStats.sigma();

//Acceleration Logic
motionType = determineMovementType(a_ave, a_std);
countSteps(afiltered, motionType);
}

void GIFDraw(GIFDRAW *pDraw) {
if (pDraw->y >= tft.height()-37) return; //-37 ensures gif doesn't overdraw on the loading bar

static uint16_t lineBuffer[320]; // Enough for full width

uint8_t *s = pDraw->pPixels;
uint8_t *pal = (uint8_t *)pDraw->pPalette;

for (int x = 0; x < pDraw->iWidth; x++) {
if (pDraw->ucHasTransparency && *s == pDraw->ucTransparent) {
lineBuffer[x] = tft.color565(0, 0, 0); // Optional: treat as black
s++;
continue;
}
uint8_t index = *s++;
lineBuffer[x] = tft.color565(pal[index * 3], pal[index * 3 + 1], pal[index * 3 + 2]);
}

tft.drawRGBBitmap(pDraw->iX, pDraw->iY + pDraw->y, lineBuffer, pDraw->iWidth, 1);
if (pDraw->y == (pDraw->iHeight - 1)) {
tft.setTextColor(ST77XX_WHITE, ST77XX_WHITE); // Optional: erase previous text background
tft.setTextSize(2);
tft.setCursor(10, 10);
tft.print(String(steps));
}
}

void drawProgressBar(int steps) {
Serial.println("I am in draw bar fn");
static int lastFillWidth = -1; // remember the last fill width (ensure static)

int barWidth = 160;
int barHeight = 18;
int thickness = 2;
int bottomPadding = 15;
int x = (tft.width() - barWidth) / 2;
int y = tft.height() - barHeight - bottomPadding;

uint16_t barColor = tft.color565(216, 217, 217);

int clampedsteps = constrain(steps,0,MAX_STEPS);
int fillInset = thickness;
int fillWidth = map(clampedsteps, 0, MAX_STEPS, 0, barWidth - 2 * fillInset);

// Only redraw if the fill width changed -better speed
if (fillWidth == lastFillWidth) return;
lastFillWidth = fillWidth;

// Draw thicker outline via multiple rectangles
for (int i = 0; i < thickness; i++) {
tft.drawRect(x - i, y - i, barWidth + 2 * i, barHeight + 2 * i, barColor);
}

// Clear previous fill area
tft.fillRect(x + fillInset, y + fillInset, barWidth - 2 * fillInset, barHeight - 2 * fillInset, ST77XX_BLACK);

// Draw current fill
tft.fillRect(x + fillInset, y + fillInset, fillWidth, barHeight - 2 * fillInset, barColor);
}
The main parts of that to be aware of is that my mind and body are deeply intertwined, and it’s important that functions like my displaying don’t interrupt my thinking otherwise I may fall asleep when I shouldn’t or start running ages after you finished your jog.
It’s also important to have all the files in one clean folder like so, so that when you click compile and upload in the Arduino IDE that every part of my brain knows where other parts are.
Additionally, you’ll need to enable USB CDC-On-Boot in your Arduino IDE tools drop down before you can connect my spirit (the firmware) to my brain (the hardware).
Once this is done, and all you’re libraries are installed and downloaded I should be thinking, looking and feeling absolutely fantastic.
(Regarding the software: All GIF based libraries are native to the Arduino IDE and can be found via the library manager, whereas the accelerometer and filter libraries can be found from the GitHub’s in the comments of the acceleration step :) )
Additionally, you are welcome to grab all folders files and code you need by taking a look at the GitHub of my creators: https://github.com/Iloke-Alusala/ESP_Piko_Firmware.git .
After building and coding everything, it's time to test Piko in action. Try shaking him gently or strapping him to your wrist and walking around. If everything's wired and coded correctly, he should switch animation states to reflect your movement.
-
15Time to Shine
-
16Final Reflections
Hi, my name is Lulama☺️
I’m in my 3rd year of Electrical & Computer Engineering. Even though navigating through the degree is tough, working on PIKO has been one of the most creatively fulfilling projects I’ve taken on!
My understanding of pixel art and animation really evolved throughout this process. I didn’t realise just how much a few tiny pixels could shift a character’s mood or expression. Planning out animation cycles before drawing each frame also turned out to be way more important than I expected—it saved a lot of time and made everything feel more intentional.
Animating the initial walk cycle was tough—it was time-consuming and required a lot of tweaking to look natural. There were moments of creative block, or times where a design just didn’t “feel right,” so I had to be willing to pivot and try new ideas. Also… rescaling each frame manually during export was surprisingly tedious. Next time, I’d love to experiment with tools like Aseprite to streamline the animation process and play around with more complex expressions or movement styles.
I honestly didn’t expect to get so attached to Piko. As I added small details, it really felt like he was coming to life. Watching him “exist” on the screen was such a satisfying moment. I hope Piko brings a little spark of joy and motivation to your daily movement. Even something as simple as a blinking buddy reacting to your steps can make activity feel a bit more fun.
Hey, I’m Raf
Your friendly neighborhood nerd - and engineering student (those things are not mutually exclusive). Being a full-time student, life is BUSY. But I also like keeping fit, going on runs and climbing. So when my friends and I had the idea to make a small and likeable fitness tracker I knew it would be awesome, even though I had never done something quite like this before. I instantly knew what I wanted to do: I have a strong interest in signal processing and embedded systems - so I was keen to see how a pedometer works and try to make an “easy-to-implement” pedometer, that when integrated with the rest of Piko would allow for state changes. I dealt with all acceleration based activities and put together the final logic in the main loop. The experience has been rewarding, and if I were to give some parting words to anyone keen in building new things - it is “Get your hands dirty and jump in the deep end with full enthusiasm,” because if you succeed you’ll have something to show off and if you don’t succeed, you’ll be stronger and better prepared for next time.
Hi, I’m Iloke
I'm curretntly a 3rd Year Mechatronics Student and I've been doing instructables and side projects for a while 📝 . Looking back on the Piko project, I’m honestly really happy with how everything turned out. This was the first time I led a team through a project of this nature, and seeing it come together the way it did was incredibly rewarding. It was exciting to take on something so ambitious, and even better to do it alongside a group of people who were equally committed to making it work.
Working with the team was a highlight in itself. Everyone brought something unique to the table, and despite our individual workloads and the usual chaos of student life, we managed to stay aligned and keep pushing forward. There were definitely moments that tested us—especially with time management, but we handled it. It was also really motivating to see how hard everyone else was working. That energy pushed me to keep going even when things got tough.
Leading the team gave me a deeper appreciation for what engineering looks like in a collaborative setting. It’s not just about solving problems on your own; it’s about clear communication, shared accountability, and supporting each other through every stage. This project taught me a lot about how to manage both people and progress, and I feel like it’s a solid stepping stone into even bigger things.
Overall, it was a funny, chaotic, and fulfilling experience, and I think we’re all better for it. I'm proud of what we accomplished, and I’m definitely looking forward to leading or collaborating on more projects like this in the future.
This instructable was done as a joint collaboration between Iloke Alusala, Lulama Lingela, Rafael Cardoso and the Menzies Design Lab (University of Cape Town, South Africa). Thank you to DFRobot for sponsoring us with the parts to bring Piko to Life
~ Hope you enjoyed ⚡️
Piko - Your ESP32 Powered Fitness Buddy
Meet Piko! A wrist-worn pixel fitness buddy powered by ESP32, uses accelerometer to track steps and animates real-time movements

Discussions
Become a Hackaday.io Member
Create an account to leave a comment. Already have an account? Log In.