 Jorisclayton
As the project has progressed, I now feel comfortable sharing the configuration files and drivers required to make everything work. These include files necessary for Linux to properly output to the TFT display, recognize controllers, and send audio through a GPIO pin.
The Raspberry Pi also needs to detect whether the RCA board is connected, so it can automatically choose between HDMI (TFT) or Composite Video Output. This is managed by swapping configuration files during boot based on GPIO states. I’ll describe all the parts below, and I’ve also created a "Backup" file containing the compiled driver for my specific display and the necessary scripts, already placed into the correct folders for plug-and-play use.
In the future, I plan to add a feature to notify the user when the battery is low. The TFT driver already supports this — I just need a GPIO to be pulled LOW when the voltage drops below a threshold. I believe a TL431 could handle this by monitoring the battery voltage.
Remember: this is an ongoing project. Some things have already changed from the first version of the U.B.G., and the current files work with the second prototype I'm testing. I'm confident they’ll work on the older version too — only a few controller pin mappings have changed, which I’ll update ASAP.
All the files described below will be available for download, along with a how_to_do.txt file that explains what needs to be executed for everything to work properly.
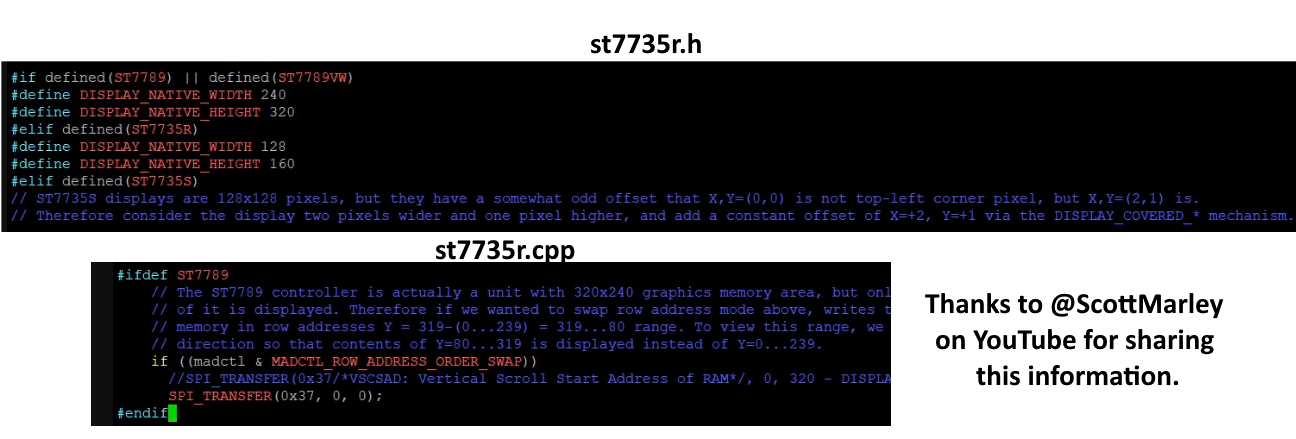
- FBCP-ili9341 Driver: This one is responsible for controlling the TFT display and giving us a good refresh rate, as it works with the SPI protocol with very fast bus rates, close to 50 MHz. The display can act as an HDMI device and worked great for this project. Some parameters need to be configured when compiling the driver, all of them are better described in the driver's main page on Github (https://github.com/juj/fbcp-ili9341), but, if you are using the 320x240 ST7789 display, there are some changes needed to be made for the driver files to fit this specific one. As the ILI9341 doesn't default have this display I edited the st7735r.h and st7735r.cpp modifying the resolution and part of the SPI protocol communication as the images below. With this made, the driver has been compiled with some specific parameters to work well with this one command "cmake -DST7789=ON -DGPIO_TFT_DATA_CONTROL=5 -DGPIO_TFT_RESET_PIN=6 -DSPI_BUS_CLOCK_DIVISOR=6 -DDISPLAY_ROTATE_180_DEGREES=ON -DDISPLAY_INVERT_COLORS=ON -DSTATISTICS=0 .." (DSTATISTICS=0 must be used only if you don't want the FPS, bus speed, bus frequency and etc to be shown, it's really useful for troubleshooting process) and the command "sudo /home/pi/fbcp-ili9341/build/fbcp-ili9341 &" needs to be added to /etc/rc.local file.
It’s important to note that this driver makes use of a partial refresh on the display screen, modifying only the parts that changed between frames and it uses some of the CPU. If your display can handle bigger SPI bus frequencies and accept a really good refresh rate, you can save some CPU by modifying some parts of the config.h file before compiling. I'm using "#define UPDATE_FRAMES_IN_SINGLE_RECTANGULAR_DIFF", this saved me a lot of CPU, turning able to run N64 games much better than before this change. Also, the ILI9341 driver page has a topic describing all the methods to get that CPU saving features. - Config.txt file - swap video modes: As the Raspberry Pi Zero cannot handle HDMI and Composite videos at the same time and I want the console to be able to display on a TV or monitor just by plugging it in, I made a simple script that monitors a GPIO pin to know if the console is running on handheld format or if it's plugged into the RCA cable adapter, so it checks at every boot or shutdown the state of the Brick Game and swaps between two config.txt files. Basically, it copies the content of a config.tft or a config.rca to the config.txt file; if it differs from the actual video output configuration, the script reboots the system now with the correct monitor selected. The scripts are "select-video.sh" and "select-video-shutdown.sh" on /boot directory, they will be executed by "video-switch-shutdown.service" on /etc/systemd/system or by this command "sudo /boot/select-video.sh &" added on /etc/rc.local file. The configurations for each device are simple: for the TFT, the "dtoverlay=fbcp-ili9341" command together with some HDMI configurations need to be done; for the RCA, it's just enable TVout and set the sdtv mode to 2.
- Config.txt file - controller configuration: Also on the boot.txt (understand this as the .rca and .tft files that need to be modified) the controller buttons and equivalent keyboard keys are defined, all of this is done by some commands like this one for the Start button to act as ENTER on GPIO 15: "dtoverlay=gpio-key,gpio=15,active_low=1,gpio_pull=up,label=START,keycode=28 #ST = ENTER". That's important to know, there are some GPIOs that will not work or get conflict with something. In my tests, the GPIOs 1 and 12 need to be skipped, as they make the system not work or disable the audio.
- Config.txt file - audio configuration: As the Raspberry Pi Zero does not have the default analog audio output and I don't want to use any digital audio boards, I came up with just using a PWM pin to generate a sound-like signal that needs to be sent to an RC filter to get the proper audio output. It is done simply by putting these commands in the config.txt files: "dtparam=audio=on", "gpio=13=a0", "dtoverlay=audremap", "enable_jack=on". With this, the GPIO 13 is now a mono audio output via PWM signal.
- SplashScreen modify: It's just adding my own image (thanks to ChatGPT) to the RetroPie directory \RetroPie\splashscreens and configuring it to be used instead of the default one using the RetroPie config program.
- Theme: I chose a theme called something "like TFT" (I just searched for TFT in the theme install program) that makes it easier to see the ROM names when scrolling. It looks better than the default RetroPie theme on a small display like the one I'm using.
Discussions
Become a Hackaday.io Member
Create an account to leave a comment. Already have an account? Log In.