Close
0%
0%

The Clock Project

Create a fully functional LED clock from schematic to PCB using only a web browser and EasyEDA Pro.

Similar projects worth following
I created this clock for everyone who is interested in electronics. Even if you have never designed any electronics before, by following this step-by-step youtube tutorial you will design and manufacture this clock.

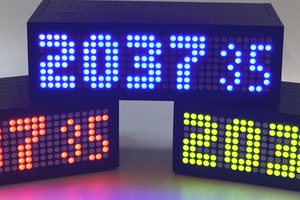
This is a nice clock with big segments and you can set color and intesity of each segment. There are three buttons, buzzer, light sensor and RTC with battery backup. The clock is powered through USB C and has features such current time, timer and stopwatch. Feel free to add your own features!

Why I designed this clock?

  • it's a very simple project, so it was fun
  • I often need a clock with big display and the right color and intensity when checking time in the middle of the night without my glasses on
  • I often need a simple timer or stopwatch for example when cooking

The clock has three modes: Clock, Stopwatch and Timer. To switch between the modes press the buttons. The clock has battery backed RTC to keep the time always accurate. A simple web interface can be used to change default settings. I will write more detialed manual if there is interest.

Video Tutorial

  • 1
    Start With EasyEDA

    No installation is needed. Just open EasyEDA in your browser, register and log in (it's free). Use the Pro edition. Instead of starting from scratch, search for Robert Feranec and open the Custom Keyboard project. Save it under a new name, e.g., "clock".

  • 2
    Clean Up and Rename

    Rename the project and schematic to "clock". Open the schematic page, clean unnecessary parts from the original project, and rename key elements. Keep only what's relevant for the clock project. Save your work often.

  • 3
    Add LED Display Segments

    Use addressable LEDs for the 7-segment display. Add, copy, and paste LEDs into the schematic. Rename net names (e.g., LED11, LED12...) so they are clear in PCB layout later. Add LEDs for dots and AM/PM indicators as well.

View all 17 instructions

Enjoy this project?

Share

Discussions

Similar Projects

Does this project spark your interest?

Become a member to follow this project and never miss any updates