 Rupin Chheda
Motivation
It allows beginners to design a complex display. Its targetted towards learners, who are well past the phase of designing on a breadboard and now want to work on a challenging meaningful project.
What is it?
The idea is to use a cascade system where each module can be configured into either an up or down counter with configurable reset using dip switches.
Say for example, I want the counter to counter from 0 to 5, and then reset.
Essentially a clock will be an input to this module, and every pulse gets counted. a carry is generated which becomes the clock to the next module.
Also, if the user wants they can, make this module a 4 bit decoder, which can then be connected to half adders.
Core Features & Functionality
1) Cascadable Counter Architecture
- Each module acts as a digit (or 4-bit block) and can cascade via carry-out (for counting up) or borrow-out (for counting down); these signals become the clock inputs for the next module.
- Carry/borrow output is asserted when the counter reaches its reset or terminal value, enabling seamless chaining for multi-digit/count applications (e.g., 00–99, 000–9999, etc.).
- DIP switches or jumpers configure the count range (e.g., set upper limit to 5 for a 0–5 counter), and optionally set the operating mode (count up/down, modulo value).
2) Configurable Up/Down Counting
- Support both up and down counting modes selectable via DIP switch or control input.
- Reset/Preset capability: DIP switches or buttons allow setting the reset point or initial value, supporting non-decimal moduli (e.g., counter resets after reaching 5, not just 9 or 15).
- External Clock Input: Count pulses sourced via a dedicated clock line.
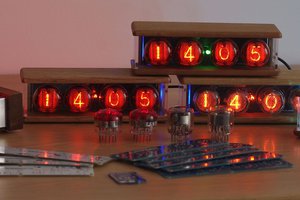
3) Display & Decoding Logic
- Seven-segment display, driven according to a 4-bit counter value.
- Optional mode where the module functions as a simple 4-bit decoder for input from external logic (such as feeding with outputs from a half adder chain or microcontroller).
- DIP or mode jumper selects between autonomous counter or decoder operation.
4) Hardware & User Interface
- DIP Switch Settings
- Set counting range (e.g., max count value).
- Select up/down mode.
- Enable/disable carry/borrow output.
- Switch between counter/decoder modes.
- IN: Clock input.
- OUT: Carry/borrow output.
- Reset: Clear module to initial value, asynchronous
- POWER: Vcc and GND.
- Optionally, bus lines for chaining (power/ground pass-through).
6) Smart or Advanced Features
- Programmable Logic (via CH32V003)
- Allow firmware updates for custom counting logic (odd moduli, gray code, user patterns).
- Optionally support I2C/SPI inputs for configuration or chaining.
- Display Indicators
- Segment-test button: Show all segments lit for test/demo.
- Power/status LED.
- Optional decimal point/extra indicator.
Use Case Example
Suppose you want a two-digit counter that counts from 00 to 55 and then rolls over. Each module would have its max count DIP set to 5. The carry output of the lower module clocks the next upper module when it rolls from 5 back to 0. For a single-step, you send clock pulses; for a two-digit setup, chain the carry as "next clock".
If using the module as a decoder, set mode via DIP, and use the 4 data inputs (for example from a half adder chain or microcontroller GPIO) to select the segment. The display responds to binary input instead of internal counter.
Integration With Adders/External Logic
In decoder mode, binary data lines accept input from logic circuits (e.g., half-adders), displaying their output directly on the seven-segment as specified by the 4-bit value.
This ensures flexibility for integration with arithmetic experiments, learning kits, or as generic display/indicator modules.
 Dave Ehnebuske

 Daniel