 Rohan Barnwal
Introduction
Looking for a simple yet impressive Arduino project that is both beginner-friendly and practical? This Arduino-based Smart Distance Scale uses an HCSR-04 ultrasonic sensor, an OLED 0.96 inch display, and the compact Arduino Nano to measure and visually represent distances with accuracy and style.
But wait - what if you want to turn your hobby project into a market ready prototype or even a polished product? Stick around! We're also featuring JUSTWAY, your go-to partner for rapid prototyping and on-demand manufacturing. Learn how to transform your DIY builds into production-grade hardware.
Let's dive in!
What This Project Does
This project lets you:
- Measure distances in real-time using an HC-SR04 ultrasonic sensor.
- Display the distance in both centimeters and inches on a crisp OLED 0.96" screen.
- Visualize readings with a dynamic horizontal bar graph.
Components Required
- Arduino Nano: A compact, breadboard-friendly microcontroller based on the ATmega328P. It's ideal for small projects, has USB connectivity, and offers 14 digital I/O pins, 8 analog inputs, and built-in serial communication.
- HC-SR04 Ultrasonic Sensor: A popular distance sensor that uses ultrasonic waves to measure the distance between the sensor and an object. It has TRIG and ECHO pins and can detect distances from 2cm to 400cm with good accuracy.
- 0.96" OLED Display (SH110, I2C): A 128x64 pixel monochrome display that communicates over I2C (2 wires only: SDA & SCL). It's perfect for showing text, numbers and simple graphics like bar graphs. Based on the SH1106 driver chip.
- Jumper Wires: Flexible wires with male to female or male to male ends to make quick and easy connections between components on a breadboard or directly to headers.
- USB Cable (for Arduino Nano): Used to upload code from the Arduino IDE and provide power to the Arduino Nano during development or debugging.
Taking You Project Further - with JUSTWAY
So you've built a working prototype. It's functional and cool. But what if you want to:
- Pitch this at a tech fair?
- Start you own product line?
- Or just want an enclosure that doesn't look like a spaghetti mess of wires?
This is where JUSTWAY steps in - your ultimate rapid prototype and on-demand manufacturing partner.
What is JUSTWAY?

JUSTWAY empowers innovators by transforming 3D models and designs into marker-ready prototypes and end-use parts, offering:
Rapid Prototyping Services
Turn you concept into reality - fast!
- 24-hour prototypes
- instant DFM (Design for manufacturability) Feedback
- Production and Shipping Tracking
- Instant Quoting platform
Mass Production Support
When you're ready to scale up!
- Dedicated Sales Reps (24/7)
- DFM Engineers Review Every Order
- Detailed Test Reports
JUSTWAY's Manufacturing Capabilities
- 3D Printing: SLA(Resin), Nylon HP-PA-12 - Transparent, Detailed, and Durable
- CNC Machining: Aluminum 6061, Stainless Steel 304 - Strength, precision & corrosion resistance
- Injection Molding: PC/ABS - ideal for strong, flexible, polished enclosures
- Sheet Metal: Aluminum 5052 - Great for bent, strong components
How To Order from JUSTWAY in 4 Easy Steps
Step1: Upload Your Design
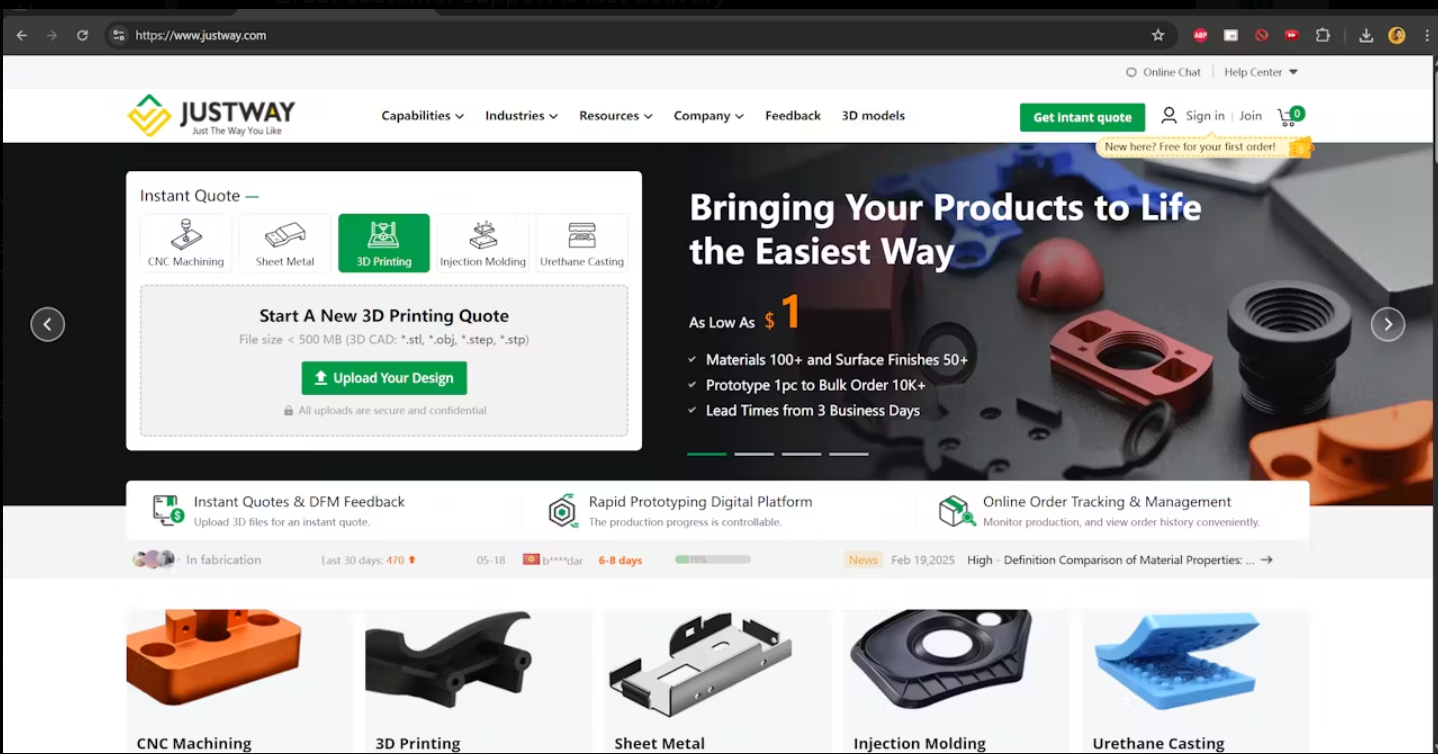
- Go to JUSTWAY.com
- Upload your STL, STEP, or CAD files.
Step2: Select Material & Finish
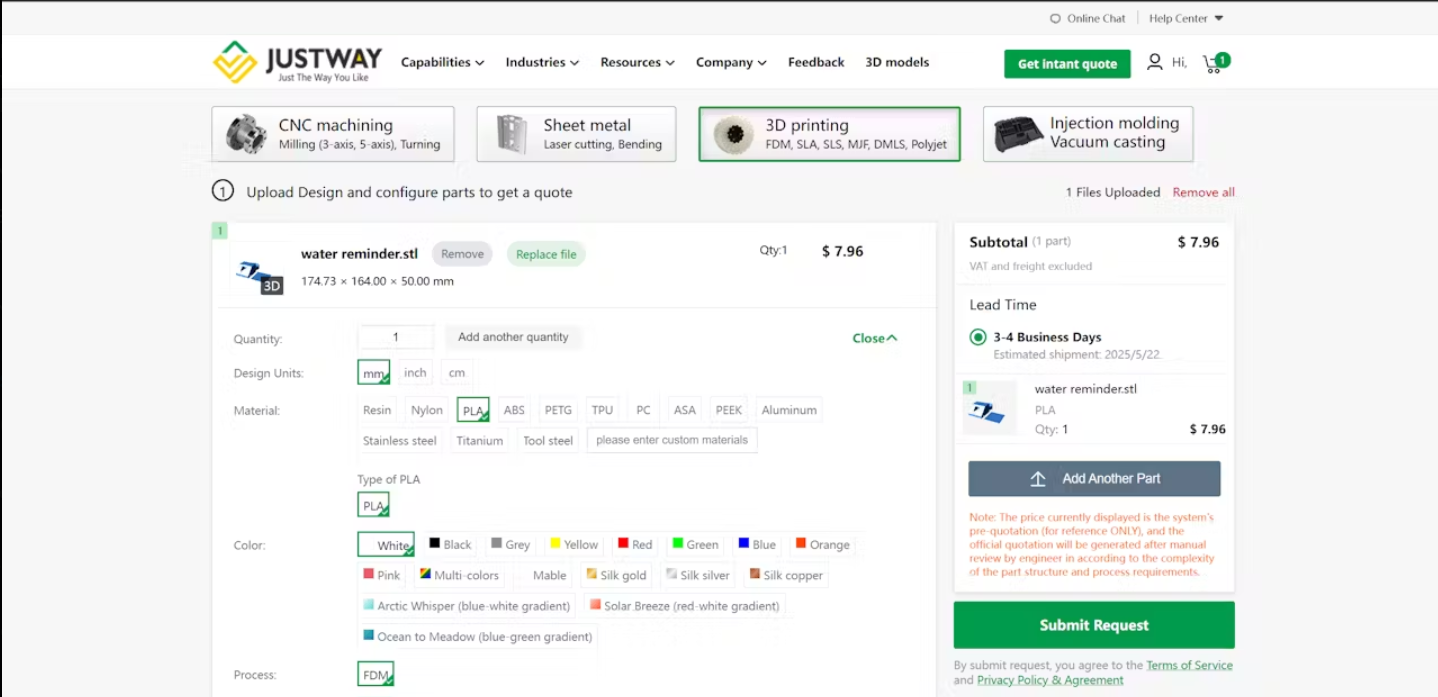
- Choose strong plastic or metal, or use transparent/colored resin for added flair.
Step3: Preview Live Model
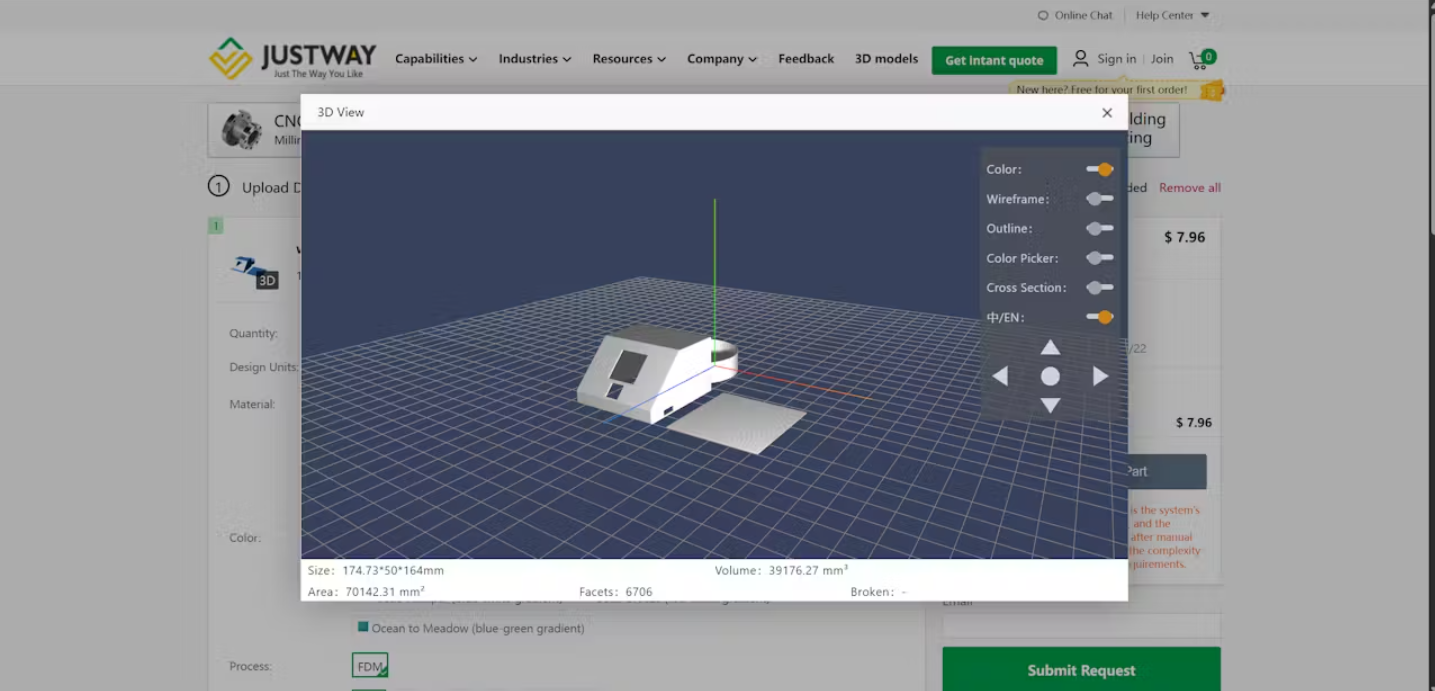
- Check your logo placement, part fit, and dimensions using the live preview.
Step 4: Confirm & Place Your Order
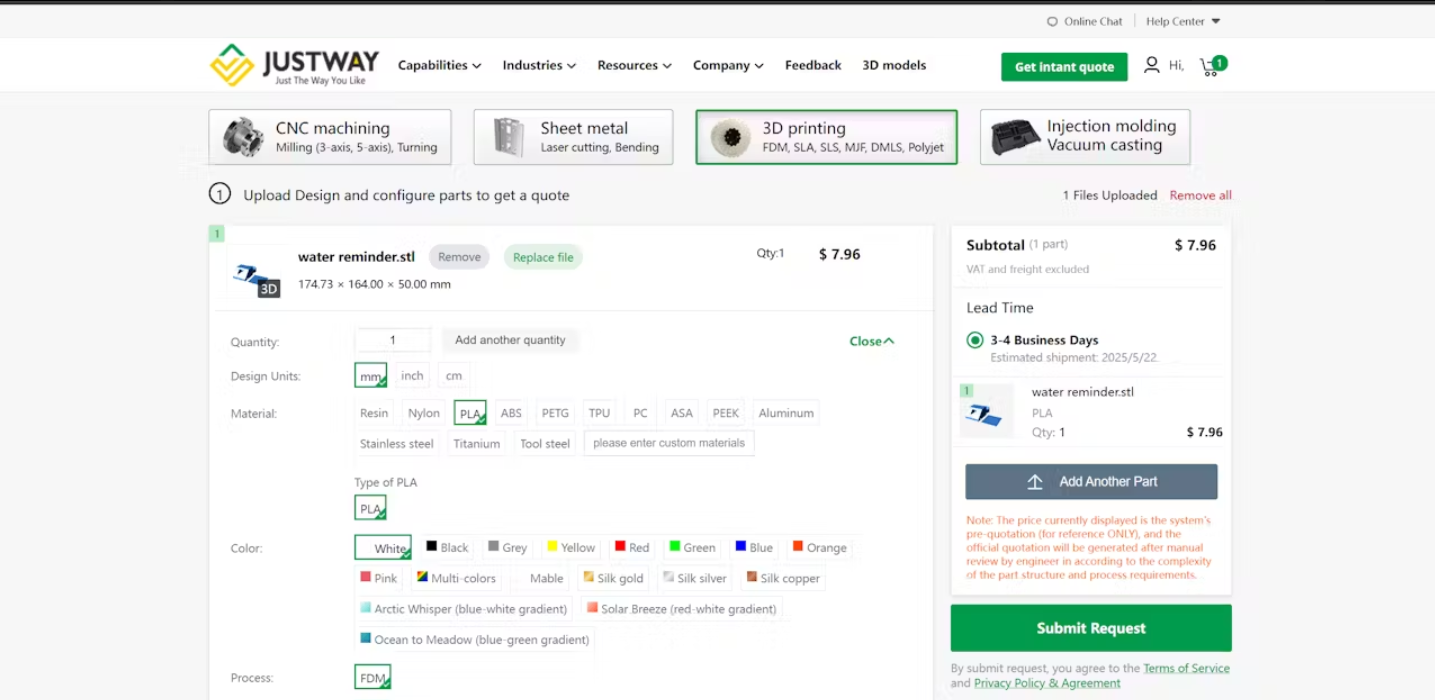
- Know exactly what you're getting - no surprises.
Pro Tip: Want to show off your electronics inside? Choose transparent resin. Want a market ready black matte enclosure? They have that too !
Circuit Diagram & Connections
Ultrasonic Sensor - Arduino Nano
- VCC - 5v
- GND - GND
- TRIG - D9
- ECHO - D10
OLED Display (SH1106) - Arduino Nano
- VCC - 5v
- GND - GND
- SCL - A5
- SDA - A4
Arduino Code Explanation
// Ultrasonic → SH110x OLED (I2C) Demo
// Works with SH1106/SH1107 128x64 modules using Adafruit SH110X + GFX

#include <Adafruit_GFX.h>
#include <Adafruit_SH110X.h>
#include <Wire.h>

// ===== OLED CONFIG =====
#define SCREEN_WIDTH 128
#define SCREEN_HEIGHT 64
#define OLED_ADDR 0x3C          // Common: 0x3C (sometimes 0x3D)

// For SH1106 (most 128x64 I2C modules):
Adafruit_SH1106G display(SCREEN_WIDTH, SCREEN_HEIGHT, &Wire, -1);
// If your panel is SH1107, use:
// Adafruit_SH1107 display(SCREEN_WIDTH, SCREEN_HEIGHT, &Wire);

// ===== ULTRASONIC CONFIG =====
// HC-SR04 pins
const int PIN_TRIG = 9;
const int PIN_ECHO = 10;

// Measurement params
const unsigned long ECHO_TIMEOUT_US = 30000UL;  // ~5m max (sound one-way ~0.0343 cm/us)
const uint8_t SAMPLES = 5;                      // simple moving average

// ===== HELPERS =====
float measureDistanceCm() {
  // Trigger a 10 µs pulse
  digitalWrite(PIN_TRIG, LOW);
  delayMicroseconds(2);
  digitalWrite(PIN_TRIG, HIGH);
  delayMicroseconds(10);
  digitalWrite(PIN_TRIG, LOW);

  // Read echo pulse width
  unsigned long duration = pulseIn(PIN_ECHO, HIGH, ECHO_TIMEOUT_US);
  if (duration == 0) return NAN; // timeout/no object

  // distance = (duration_us * speed_of_sound_cm_per_us) / 2
  // speed of sound ≈ 0.0343 cm/us at ~20°C
  return (duration * 0.0343f) / 2.0f;
}

float cmToIn(float cm) {
  return cm * 0.393700787f;
}

float avgDistanceCm(uint8_t n = SAMPLES) {
  float sum = 0;
  uint8_t good = 0;
  for (uint8_t i = 0; i < n; i++) {
    float d = measureDistanceCm();
    if (!isnan(d)) { sum += d; good++; }
    delay(20);
  }
  if (good == 0) return NAN;
  return sum / good;
}

// Draws a horizontal bar (0–maxVal) across the width
void drawBar(float value, float maxVal) {
  if (isnan(value) || maxVal <= 0) return;
  int w = map((int)(value * 100), 0, (int)(maxVal * 100), 0, SCREEN_WIDTH - 4);
  w = constrain(w, 0, SCREEN_WIDTH - 4);
  // outline
  display.drawRect(2, 48, SCREEN_WIDTH - 4, 12, SH110X_WHITE);
  // fill
  if (w > 0) display.fillRect(3, 49, w, 10, SH110X_WHITE);
}

void setup() {
  pinMode(PIN_TRIG, OUTPUT);
  pinMode(PIN_ECHO, INPUT);

  Wire.begin();
  // For some boards, you may need Wire.setClock(400000);

  display.begin(OLED_ADDR, true);  // true = reset
  display.clearDisplay();

  display.setTextColor(SH110X_WHITE);
  display.setTextSize(1);
  display.setCursor(0, 0);
  display.println(F("SH110x Ultrasonic"));
  display.println(F("Initializing..."));
  display.display();
  delay(800);
}

void loop() {
  float cm = avgDistanceCm();
  float in_ = cmToIn(cm);

  display.clearDisplay();

  // Title
  display.setTextSize(1);
  display.setCursor(0, 0);
  display.print(F("Ultrasonic Distance"));

  if (isnan(cm)) {
    display.setCursor(0, 20);
    display.setTextSize(2);
    display.println(F("No echo"));
    display.setTextSize(1);
    display.setCursor(0, 40);
    display.println(F("Check wiring/aim"));
  } else {
    // Big number (cm)
    display.setTextSize(2);
    display.setCursor(0, 18);
    display.print(cm, 1);
    display.print(F(" cm"));

    // Smaller line (inches)
    display.setTextSize(1);
    display.setCursor(0, 40);
    display.print(in_, 2);
    display.println(F(" in"));

    // Bar graph up to a chosen max (e.g., 200 cm)
    drawBar(cm, 200.0f);
  }

  display.display();
  delay(120);
}
The sketch does the following:
- Measures distance using pulseIn() to time the echo
- Converts raw time to cm and inches.
- Displays results on the OLED using the Adafruit_SH1106 and Adafruit_GFX libraries.
- Uses moving average smoothing to reduce noise in the distance measurements.
- Adds a visual bar graph that grows with distance.
Key Features in the Code:
- measureDistanceCm(): Triggers and reads echo.
- avgDistanceCm(): Averages 5 samples for a stable reading.
- drawBar(): Shows distance as a growing bar on the OLED
Why This Project is Useful
This Arduino Smart scale isn't just a "cool build." It's:
- A proximity sensor prototype for robotics.
- A smart bin distance sensor
- A garage parking assistant.
- A learning tool for distance measurement, microcontroller programming, and display interfacing.
With an enclosure from JUSTWAY, it becomes a polished, presentable product ready for showrooms or startup demos.
Video Demonstration
Conclusion
With just a few components, you've built a real-time smart scale that not only teaches core Arduino concepts but also has real-world applications. And thanks to JUSTWAY, your hobby projects can scale up beautifully - from garage builds to professional products.