Close
0%
0%

Tabletop Weather Station Using Arduino

Build a sleek Arduino-powered Tabletop Weather Station and turn your DIY into a pro-grade IoT device with JUSTWAY!

Similar projects worth following

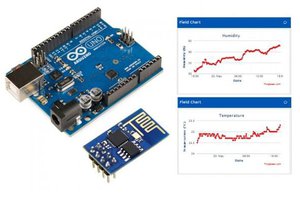
Imagine having a miniature weather station right on your desk - compact, modern, and smart. With this Arduino-based Tabletop Weather Station, you can monitor real-time temperature and humidity using a DHT 11 sensor and display the data on a 0.96-inch OLED screen.

This project is perfect for students, makers, and hobbyists who want to learn about IoT fundamentals, sensor integration, and data visualization.

Whether you're working on a school project or improving your smart home setup, this mini weather station will add a professional touch to your workspace.

  • 1 × Arduino Uno Main controller & humidity
  • 1 × DHT 11 Sensor Measures temperatures & humidity
  • 1 × OLED 0.96 inch 128x64 I2C screen for data display
  • 7 × Jumper Wires For circuit connections

  • 1
    Step 1: Circuit Diagram & Wiring

    Connect your components according to the table below:

    • DHT 11 Signal to Arduino Pin D2
    • DHT 11 GND to Arduino's GND Pin
    • DHT 11 VCC to Arduino's 3.3v Pin


    • OLED VCC to Arduino's 5v Pin
    • OLED GND to Arduino's GND Pin
    • OLED SCL to Arduino's SCL Pin
    • OLED SDA to Arduino's SDA Pin
    Tip: Ensure your OLED I2C address is set to 0x3c. You can use an I2C scanner sketch if unsure.
  • 2
    Step 2: Installing Libraries

    To make your project run smoothly, open your Arduino IDE and install these libraries:

    1. Adafruit SSD1306
    2. Adafruit GFX Library
    3. DHT Sensor Library

    Install them via:

    Sketch -> Include Library -> Manage Libraries...

    Sketch -> Include Library -> Manage Libraries...

    Then search each one by name and click Install.

  • 3
    Step 3: Upload the Code

    Now It's time to program your Arduino.

    here's the full, ready-to-upload code:

    #include <Wire.h>
    #include <Adafruit_GFX.h>
    #include <Adafruit_SSD1306.h>
    #include <DHT.h>
    
    // ==== OLED SETTINGS ====
    #define SCREEN_WIDTH 128
    #define SCREEN_HEIGHT 64
    #define OLED_ADDR 0x3C
    Adafruit_SSD1306 display(SCREEN_WIDTH, SCREEN_HEIGHT, &Wire, -1);
    
    // ==== DHT SETTINGS ====
    #define DHTPIN 2
    #define DHTTYPE DHT11
    DHT dht(DHTPIN, DHTTYPE);
    
    void setup() {
      Serial.begin(115200);
      delay(1000);
      Serial.println("Initializing DHT11 + SSD1306 OLED...");
    
      if (!display.begin(SSD1306_SWITCHCAPVCC, OLED_ADDR)) {
        Serial.println("❌ SSD1306 not found! Check wiring or I2C address.");
        while (1);
      }
    
      display.clearDisplay();
      display.setTextColor(SSD1306_WHITE);
      display.setTextSize(1);
      display.setCursor(20, 25);
      display.println("Initializing...");
      display.display();
    
      dht.begin();
      delay(2000);
    }
    
    void loop() {
      delay(2000);
    
      float humidity = dht.readHumidity();
      float temperature = dht.readTemperature();
    
      if (isnan(humidity) || isnan(temperature)) {
        Serial.println("⚠️ Failed to read from DHT11 sensor!");
        display.clearDisplay();
        display.setTextSize(1);
        display.setCursor(25, 25);
        display.println("Sensor Error!");
        display.display();
        return;
      }
    
      int tempInt = (int)temperature;
      int humInt  = (int)humidity;
    
      Serial.print("Temperature: ");
      Serial.print(tempInt);
      Serial.print(" °C | Humidity: ");
      Serial.print(humInt);
      Serial.println(" %");
    
      display.clearDisplay();
    
      display.setTextSize(1);
      display.setCursor(35, 0);
      display.println("DHT11 DATA");
    
      display.setTextSize(1);
      display.setCursor(0, 20);
      display.print("Temp: ");
      display.print(tempInt);
      display.println(" C");
    
      display.setCursor(0, 40);
      display.print("Hum : ");
      display.print(humInt);
      display.println(" %");
    
      display.display();
    }

    Once uploaded, open the Serial Monitor (115200 baud) to view live readings.

View all 5 instructions

Enjoy this project?

Share

Discussions

Similar Projects

Does this project spark your interest?

Become a member to follow this project and never miss any updates