 Neil K. Sheridan
Here's my first software/hardware build guide for the cat detector (as I promised a while back) to help develop and test the hardware and code required for the entire elephant detection system! First we do the daytime cat-detector, then we do a night-time cat-detector with the IR LED illumination and NoIR camera. Then we can connect them together, and add a light sensor to switch!
Here's the entire series of build instructions I'm going to post:
- -- Building a daytime cat-detector: part 1
- -- Building a daytime cat-detector: part 2 (lessons learned)
- -- Building a night-time cat-detector
- -- Building a day and night cat-detector with light-sensor switching
Ok, so first off, let's start building the daytime cat-detector!
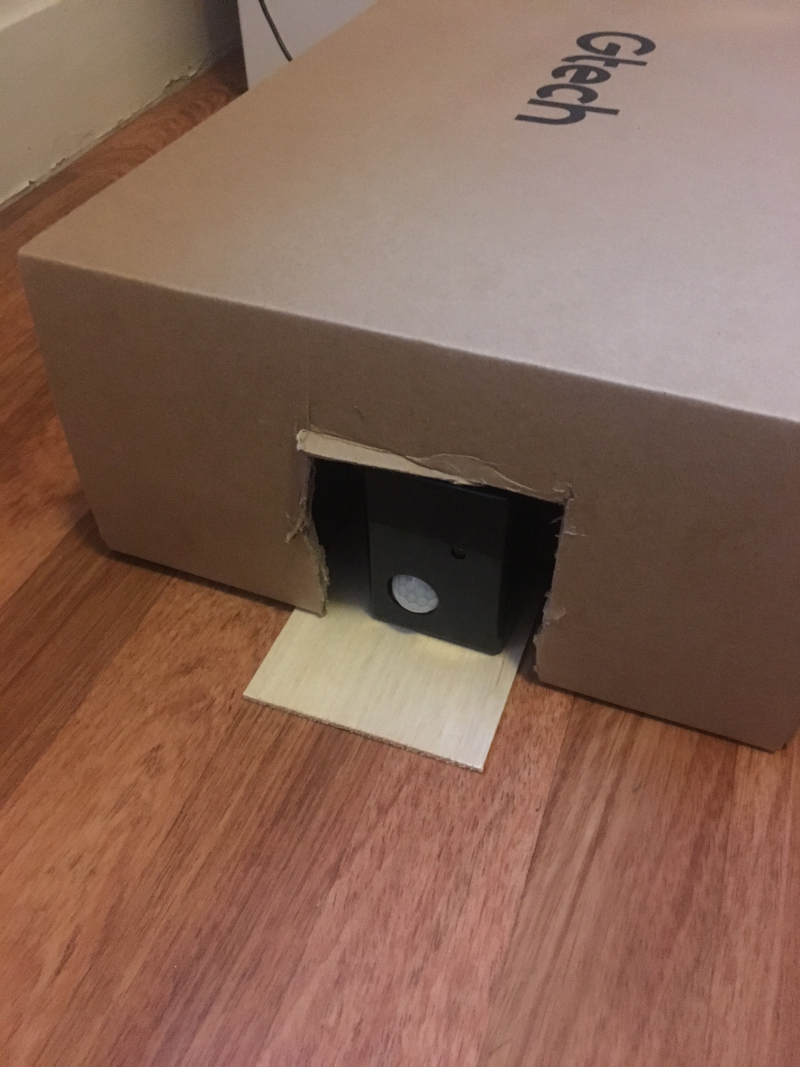
1. First of all let's build the hardware components! So we need the Pi Camera, and we need a PIR. Luckily we covered that earlier https://hackaday.io/project/20448-elephant-ai/log/67655-buildinstructions-for-hardware-pir-and-camera , so you should be familiar with setting those things up! Next, I put them in a small box with holes for PIR and camera. Then I covered it with a cardboard box so that cat's didn't knock it over. Although they still did!
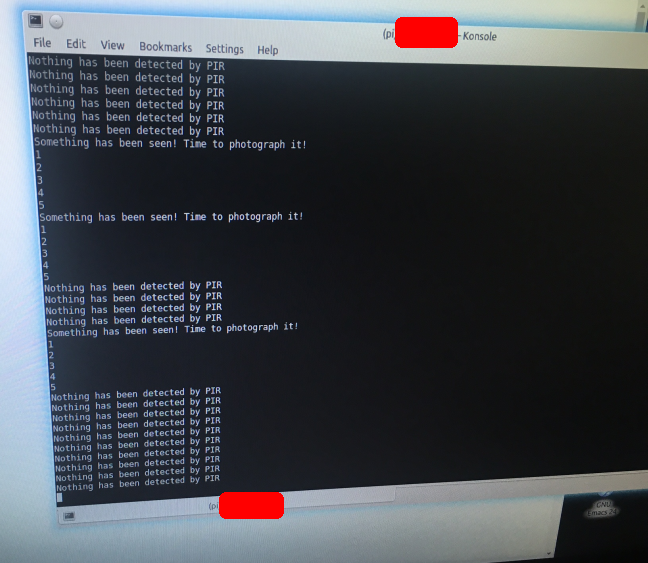
2. Now, let's add our code we need! First we will add some code to test the PIR, and take photos when it detects something. We'll use this code for that:
import time
import picamera
import datetime
import RPi.GPIO as GPIO

def CheckPIR():
    # dependencies are RPi.GPIO and time
    # returns PIR_IS with either 0 or 1 depending if high or low
    time.sleep(1)
    #don't rush the PIR!
    GPIO.setmode(GPIO.BOARD)
    # set numbering system for GPIO PINs are BOARD
    GPIO.setup(7, GPIO.IN)
    # set up number 7 PIN for input from the PIR
    # need to adjust if you connected PIR to another GPIO PIN
    try:
        val = GPIO.input(7)
        if (val == True):
            PIR_IS = 1
            #PIR returned HIGH to GPIO PIN, so something here!
        if (val == False):
            PIR_IS = 0
            #PIR returned LOW to GPIO PIN, so something here!
            GPIO.cleanup()

    except:
        GPIO.cleanup()

    return PIR_IS


PIR = 1
count = 0


while True:
    PIR = 0
    #Now to check the PIR and send what it returns to PIR
    PIR = CheckPIR()
    if PIR == 0:
        print("Nothing has been detected by PIR")
    elif PIR == 1:
        print("Something has been seen! Time to photograph it!")
        i = 0
        with picamera.PiCamera() as camera:
            while i < 5:
                i = i+1
                print(i)
                camera.start_preview()
                time.sleep(1)
                utc_datetime = datetime.datetime.utcnow()
                utc_datetime.strftime("%Y-%m-%d-%H%MZ")
                #get date and time so we can append it to the image filename
                camera.capture('image_'+str(utc_datetime)+'.jpg')
                camera.stop_preview()
                time.sleep(1)
                if i == 5:
                    break
GitHub: https://github.com/nksheridan/elephantAI/blob/master/demo_Take_Photo_when_PIR_high.py
TENSORFLOW: So we went through installing TensorFlow already, and you should have it at this stage on your Pi. But if not, you can follow this guide https://github.com/samjabrahams/tensorflow-on-raspberry-pi to install the pre-built binaries.
Next, you should clone the TensorFlow repository: git clone https://github.com/tensorflow/tensorflow.git .. And then you should download the graph file for InceptionV3 https://storage.googleapis.com/download.tensorflow.org/models/inception_v3_2016_08_28_frozen.pb.tar.gz . This should be unzipped, and placed in the directory: ~/tensorflow/tensorflow/examples/label_image/ along with the labels file that was in the archive.
Subsequently, it would be good to try just using label_image.py (that should be in this directory), to label/classify an image. I did a video of this here https://hackaday.io/project/20448-elephant-ai/log/69744-video-demo-of-elephant-detection-using-a-raspberry-pi .. And next you could label an image acquired from the Pi Camera. I went through this here -> https://hackaday.io/project/20448-elephant-ai/log/69772-simple-demo-code-for-taking-a-photo-with-raspberry-pi-and-classifying-it-using-inceptionv3-graph
3. Now, before we disconnect our Pi and move it to the cat feeding station, to watch for cats, we may as well add our first cat detector code. That's going to take one image when PIR is triggered, and classify/label it using TensorFlow with the InceptionV3 model graph file and labels file, that you have in the ~/tensorflow/tensorflow/examples/label_image/ directory (see above section re TensorFlow).
So the cat detector code, is a bit different in that I've just printed the top result we get back and the label for it. So I've modified label_image.py like this:
 with tf.Session(graph=graph) as sess:
        results = sess.run(output_operation.outputs[0],{input_operation.outputs[0]: t})
        results = np.squeeze(results)

    top_k = results.argsort()[-5:][::-1]
    labels = load_labels(label_file)
    # we are just taking the top result and its label
    first = top_k[0]
    top_label = str(labels[first])
    top_result = str(results[first])
    print(top_label)
    print(top_result)
Then it's easy to work with the top_label and top_result variables. So later on we could do if top_label == cat then tweet image of cat with "This is an image of a: ", top_label" etc. You can go ahead and do second = top_k[1] too if you want top 2 results .. and so on ..
Anyway, so I put it all together like this. I used some of the functions from the TensorFlow team code label_image.py. Note that their code is licensed under http://www.apache.org/licenses/LICENSE-2.0
Here we go. Here's the daytime cat detector code to put on your Pi. Again, it should be put in the ~/tensorflow/tensorflow/examples/label_image/ directory so we can access the dependencies easily.
# Parts of this code have the following license, since they are written
# by TensorFlow authors. Explicitly, load_graph, read_tensor_from_image_file, load_labels
# which I have taken from label_image.py
#
# Copyright 2017 The TensorFlow Authors. All Rights Reserved.
#
# Licensed under the Apache License, Version 2.0 (the "License");
# you may not use this file except in compliance with the License.
# You may obtain a copy of the License at
#
#     http://www.apache.org/licenses/LICENSE-2.0
#
# Unless required by applicable law or agreed to in writing, software
# distributed under the License is distributed on an "AS IS" BASIS,
# WITHOUT WARRANTIES OR CONDITIONS OF ANY KIND, either express or implied.
# See the License for the specific language governing permissions and
# limitations under the License.
# ==============================================================================

from __future__ import absolute_import
from __future__ import division
from __future__ import print_function

import argparse
import sys
import time
import picamera
import RPi.GPIO as GPIO

import numpy as np
import tensorflow as tf

def CheckPIR():
    # dependencies are RPi.GPIO and time
    # returns PIR_IS with either 0 or 1 depending if high or low
    time.sleep(1)
    #don't rush the PIR!
    GPIO.setmode(GPIO.BOARD)
    # set numbering system for GPIO PINs are BOARD
    GPIO.setup(7, GPIO.IN)
    # set up number 7 PIN for input from the PIR
    # need to adjust if you connected PIR to another GPIO PIN
    try:
        val = GPIO.input(7)
        if (val == True):
            PIR_IS = 1
            #PIR returned HIGH to GPIO PIN, so something here!
        if (val == False):
            PIR_IS = 0
            #PIR returned LOW to GPIO PIN, so something here!
            GPIO.cleanup()

    except:
        GPIO.cleanup()

    return PIR_IS


def load_graph(model_file):
  graph = tf.Graph()
  graph_def = tf.GraphDef()

  with open(model_file, "rb") as f:
    graph_def.ParseFromString(f.read())
  with graph.as_default():
    tf.import_graph_def(graph_def)

  return graph

def read_tensor_from_image_file(file_name, input_height=299, input_width=299,
                input_mean=0, input_std=255):
  input_name = "file_reader"
  output_name = "normalized"
  file_reader = tf.read_file(file_name, input_name)
  if file_name.endswith(".png"):
    image_reader = tf.image.decode_png(file_reader, channels = 3,
                                       name='png_reader')
  elif file_name.endswith(".gif"):
    image_reader = tf.squeeze(tf.image.decode_gif(file_reader,
                                                  name='gif_reader'))
  elif file_name.endswith(".bmp"):
    image_reader = tf.image.decode_bmp(file_reader, name='bmp_reader')
  else:
    image_reader = tf.image.decode_jpeg(file_reader, channels = 3,
                                        name='jpeg_reader')
  float_caster = tf.cast(image_reader, tf.float32)
  dims_expander = tf.expand_dims(float_caster, 0);
  resized = tf.image.resize_bilinear(dims_expander, [input_height, input_width])
  normalized = tf.divide(tf.subtract(resized, [input_mean]), [input_std])
  sess = tf.Session()
  result = sess.run(normalized)

  return result

def load_labels(label_file):
  label = []
  proto_as_ascii_lines = tf.gfile.GFile(label_file).readlines()
  for l in proto_as_ascii_lines:
    label.append(l.rstrip())
  return label

if __name__ == "__main__":

    #here we will check PIR first
    while True:
        PIR = CheckPIR()
        if PIR == 0:
            print("Nothing detected by PIR")
        elif PIR == 1:
            print("Something has been detected")
            camera = picamera.PiCamera()
            print("Capture an image")
            camera.start_preview()
            time.sleep(1)
            # ok capture image to image1.jpg
            camera.capture('image1.jpg')
            camera.stop_preview()
            time.sleep(1)
            break
    file_name = "image1.jpg"
    # set the image for classification to image1.jpg as we just captured from pi camera!
    model_file = "inception_v3_2016_08_28_frozen.pb"
    label_file = "labels_incep.txt"
    input_height = 299
    input_width = 299
    input_mean = 0
    input_std = 255
    input_layer = "input"
    output_layer = "InceptionV3/Predictions/Reshape_1"
    graph = load_graph(model_file)
    t = read_tensor_from_image_file(file_name,
                                  input_height=input_height,
                                  input_width=input_width,
                                  input_mean=input_mean,
                                  input_std=input_std)
    input_name = "import/" + input_layer
    output_name = "import/" + output_layer
    input_operation = graph.get_operation_by_name(input_name);
    output_operation = graph.get_operation_by_name(output_name);

    with tf.Session(graph=graph) as sess:
        results = sess.run(output_operation.outputs[0],{input_operation.outputs[0]: t})
        results = np.squeeze(results)

    top_k = results.argsort()[-5:][::-1]
    labels = load_labels(label_file)
    # we are just taking the top result and its label
    first = top_k[0]
    top_label = str(labels[first])
    top_result = str(results[first])
    print(top_label)
    print(top_result)
GitHub: https://github.com/nksheridan/elephantAI/blob/master/take_image_on_PIR_and_classify.py
[to do: work on read_tensor_from_image_file and remove code not required]
4. Great, so let's move the hardware to the cat feeding station! I've set the Pi to boot to command line, since we will now be accessing it via SSH. Power up the Pi, and then go to another computer, and SSH to it. Remember, you needed to activate SSH using sudo raspi-config. Oops if you didn't!
You can just do
ssh pi@<IP>
in linux. Or in windows, you can use https://mremoteng.org/ which I like, and is open-source.
5. So you should have accessed your Pi now via SSH! First let's run the
demo_Take_Photo_when_PIR_high.py code and hopefully the cats will come and eat! Yes, here it is running, and they did come to eat!
Here they are! Well, that's Po anyway.
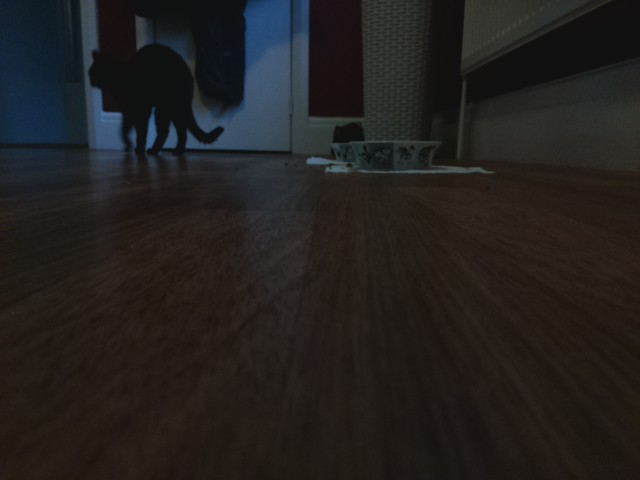

It's a bit dark, because I did it in the evening! Remember, you can SCP the images from the Pi to you computer you're SSHing the Pi with:
scp pi@192.168.1.3:image1.jpg *
6. Great! So we know the PIR and camera are working! Let's now run our cat detector code! So we navigate to the ~/tensorflow/tensorflow/examples/label_image/ directory on the Pi, and we run take_image_on_PIR_and_classify.py code! Hope some cats will arrive to feed again. Here's what we got back:
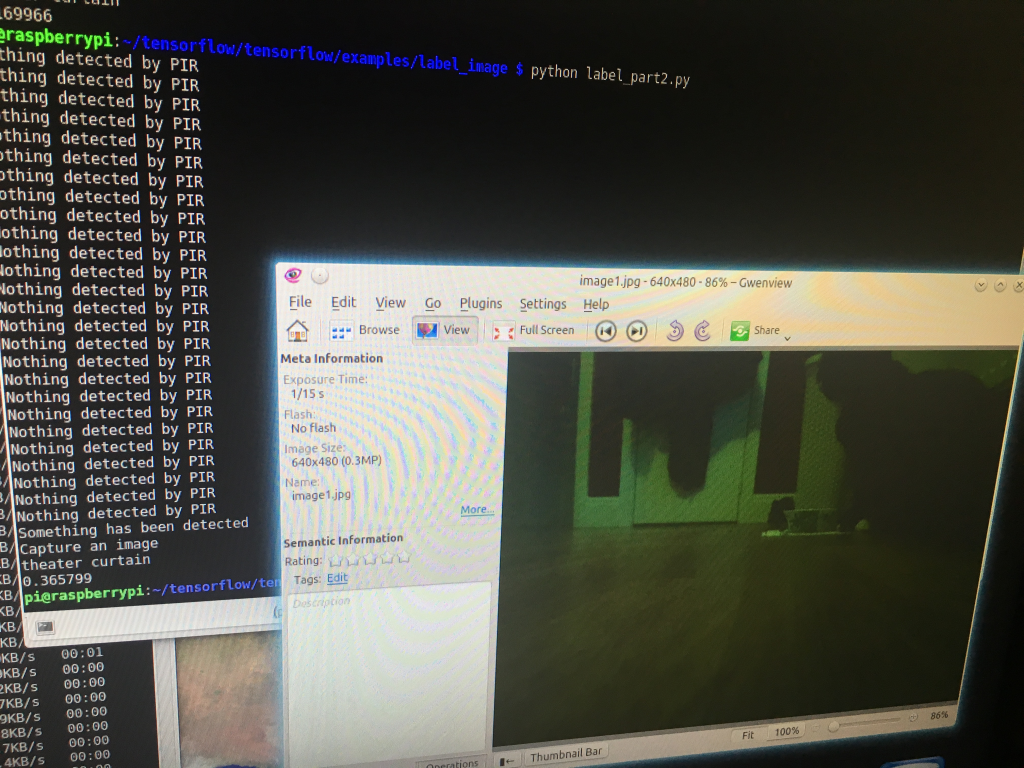
So urgh! That's not very good! It labelled LaLa as a theater curtain (0.365799)!! Actually it did this several times. If you observe the background, it does look a bit like a curtain! Because of the things hanging off door.
7. Let's move forward by trying again in better lighting conditions, and controlling the background. We can control the background for cats by placing a piece of cardboard as the background. And we'll take several images, instead of just one, next time!
Discussions
Become a Hackaday.io Member
Create an account to leave a comment. Already have an account? Log In.