 ElectroScope Archive
Introduction
Adding removable storage to an embedded project unlocks powerful capabilities — from logging sensor data over long periods to storing configuration files and text records. In this project, you’ll learn how to interface an SD card module with the Raspberry Pi Pico using its built-in SPI peripheral, enabling your microcontroller to read and write files on a FAT32-formatted microSD card. This setup is ideal for IoT devices, data loggers, robotic controllers, and any Pico build that needs external storage.
Why This Matters
The Raspberry Pi Pico’s onboard flash storage is limited — but combining it with a standard SD card module provides gigabytes of space for persistent data. Whether you’re storing logged sensor data, configuration settings, messages, or other records, this interfacing solution turns your Pico into a more versatile embedded platform. Using SPI communication ensures reliable data transfer with minimal wiring and compatibility with standard SD card libraries.
Understanding the SD Card Interface
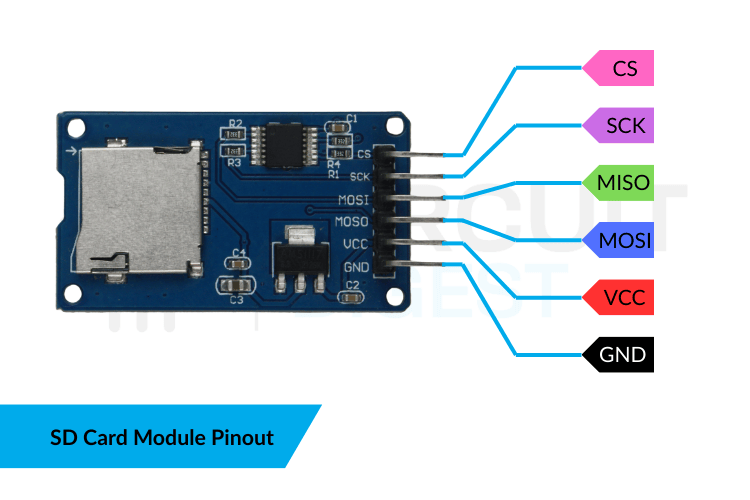
An SD card module typically contains:
-
A microSD card socket for the storage media,
-
A 3.3 V voltage regulator and level-shifters (if powered from 5 V),
-
Pull-up resistors and basic supporting components.
These hardware features protect the SD card and translate logic levels for safe communication with the Pico. Most modules expose six main pins: VCC, GND, MISO, MOSI, SCK, and CS (Chip Select).
Required Components
Here’s everything you need to build the project:
-
Raspberry Pi Pico – RP2040 microcontroller board
-
SD card module – with SPI interface and voltage regulation
-
microSD card – formatted as FAT32
-
Breadboard and jumper wires
-
USB cable – to power and program the Pico
Preparing Your SD Card
To ensure reliable operation:
-
Remove existing partitions and create one primary partition.
-
Format the card as FAT32.
-
If the card is larger than 32 GB, use a tool like Rufus or GUIFormat to format a 4–8 GB FAT32 partition.
-
Insert the card firmly into the SD socket.
FAT32 is required because common Arduino SD libraries do not support exFAT or GPT partitions.
Arduino Code: Interactive SD Operations
Below is a complete sketch that implements an interactive menu system over the Serial Monitor. You can create, write to, read from, and delete files on the SD card.
#include <SPI.h>
#include <SD.h>

const uint8_t CSPIN = 17; // Chip Select pin
const char *FILENAME = "demo.txt"; // File name on SD

void setup() {  Serial.begin(115200);  while (!Serial); // Wait for serial connection
  Serial.println("Initializing SD card...");  if (!SD.begin(CSPIN)) {    Serial.println("SD init FAILED. Check wiring & 3.3V power.");    while (true);  }  Serial.println("SD initialized OK.");  printMenu();
}

void loop() {  if (Serial.available()) {    char choice = Serial.read();    switch (choice) {      case '1': createFile(); break;      case '2': appendToFile(); break;      case '3': readFile(); break;      case '4': deleteFile(); break;      default: Serial.println("Invalid option.");    }    printMenu();  }
}

void printMenu() {  Serial.println("\n=== SD Menu ===");  Serial.println("1: Create file");  Serial.println("2: Write (append)");  Serial.println("3: Read file");  Serial.println("4: Delete file");  Serial.print("> ");
}

void createFile() {  File f = SD.open(FILENAME, FILE_WRITE);  if (f) {    f.println("Hello from Raspberry Pi Pico!");    f.close();    Serial.println("File created!");  }
}

void appendToFile() {  String text = "";  Serial.println("Type text to append:");  while (!Serial.available());  text = Serial.readStringUntil('\n');  File f = SD.open(FILENAME, FILE_WRITE);  f.println(text);  f.close();  Serial.println("Appended to file.");
}

void readFile() {  File f = SD.open(FILENAME, FILE_READ);  if (!f) {    Serial.println("Failed to open file.");    return;  }  while (f.available()) Serial.write(f.read());  f.close();
}

void deleteFile() {  SD.remove(FILENAME);  Serial.println("File deleted.");
}
This interactive system helps you experiment...
Read more »