 b.sverdlyuk
Lilka is an open-source handheld console based on the ESP32, built by the Ukrainian maker community 🇺🇦. One of its nicest features is mJS support — which means programs for Lilka can be written in JavaScript, the same language that powers half of the modern web.
mJS is a tiny JavaScript engine from Cesanta, built specifically for microcontrollers. The syntax is familiar, but standard JS libraries (React, npm modules, and the like) aren't supported — only the basic language and Lilka's own APIs. For simple scripts, that's perfectly fine.
And the coolest part — no compilation, no reflashing. A script is just a .js file on the SD card: pick it in the menu and it runs. Edit the code, save, launch again — the whole cycle takes seconds ⚡ That's what makes Lilka such a great platform for tinkering and learning to code.
A quick note before we dive in: mJS support is a fairly fresh addition to KeiraOS, introduced in v2.6.5 and still actively being developed. Things mostly work, but you might run into the occasional rough edge — for example, an error 2message that pops up every time you exit a script. It's harmless and doesn't affect anything else, just close it and move on. New mJS features and fixes are landing release after release, so the experience keeps getting smoother 🚀
🐱 Cat App
Cat.js Let's walk through a simple program in the style of Bongo Cat — a kitty that smacks its paws on the table when you press buttons 🥁 Press B — the cat claps with its right paw. D — with the left. Both at once — a double slap, just like in the real meme. And if you press C — a quick blink with a muffled "thunk" from the buzzer 💭
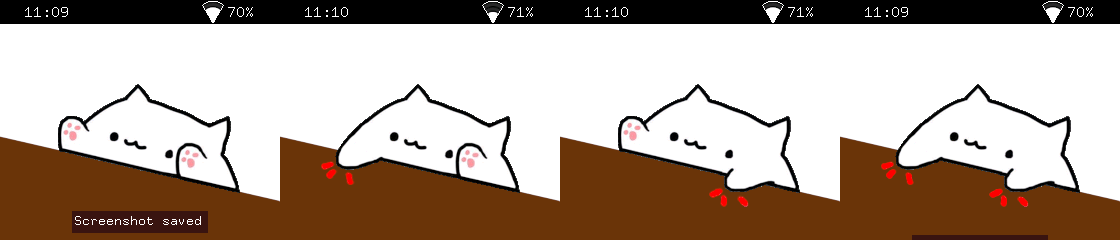
The whole "secret" is four BMP images on the SD card: no.bmp (the calm cat), left.bmp, right.bmp, and both.bmp. We load them once at the start via resources.load_image(), and from there each frame we just decide which picture to draw on top based on the button state 🎨
The logic is so simple it fits into about a dozen lines: first we draw the base image (no), and then on top we overlay the "paw variant" — if the matching button is held. It's a classic layering trick: every frame starts from a clean base, and details get stacked on top ⚙️
One neat detail — buzzer.play(40, 100). 40 Hz is already near the edge of audibility, a deep low "thump". That's exactly why the paw slaps sound not like a beep but like a dull "tap-tap" — perfect for bongos 🔉
// cat.js — Cat with ears controlled by buttons
// Port of LUA/cat/cat.lua
// Required: no.bmp, left.bmp, right.bmp, both.bmp in the same directory

// Load images
let no = resources.load_image("no.bmp");
let left = resources.load_image("left.bmp");
let right = resources.load_image("right.bmp");
let both = resources.load_image("both.bmp");

let running = true;

while (running) {    let state = controller.get_state();
    // Play sound when ear buttons are just pressed    if (state.b.just_pressed || state.d.just_pressed) {        buzzer.play(40, 100);    }
    // Exit on A button    if (state.a.pressed) {        running = false;    }
    // Draw the appropriate image based on button state    display.draw_image(no, 0, 0);    if (state.d.pressed) {        display.draw_image(left, 0, 0);    }    if (state.b.pressed) {        display.draw_image(right, 0, 0);    }    if (state.b.pressed && state.d.pressed) {        display.draw_image(both, 0, 0);    }    if (state.c.pressed) {        util.sleep(0.1);        display.draw_image(both, 0, 0);        buzzer.play(40, 100);        display.queue_draw();        util.sleep(0.1);        display.draw_image(no, 0, 0);    }
    display.queue_draw();    util.sleep(0.016);
}
And the best thing about this example is that it's not really a program — it's a template. Swap the four BMP files for your own, and in 10 minutes you've got your own character: a dog sticking out its tongue; a robot blinking its LEDs; your own photo pulling faces on command 📸 The code structure doesn't change by a single line — just different pictures. That's exactly where mJS wins: no reflashing the device, no building a project. Drop new BMPs onto the SD card — and you're already running a new character ⚡
🌌 Starfield App
Starfield.js Let's recreate that classic "flying through space" effect — stars streaming past the camera, growing brighter as they get close, fading to tiny dots in the distance 🚀 A great example of how a 3D illusion can be built from very simple ingredients.

Each star lives in three numbers: sx, sy, and sz. The first two are its position on the screen, and sz is the distance from the camera — its depth. Every frame we subtract speed from sz, which means the star gets a bit closer. When sz reaches zero, the star has flown past the camera, so we send it back into the distance with fresh random coordinates and a maximum szagain ✨
The whole 3D illusion comes down to a single line of math:
px = sx * 256 / sz + w / 2
This is called perspective projection — the closer the star (smaller sz), the further from the center of the screen it ends up. That outward motion from the middle of the display is exactly what our eyes read as forward flight through space. The same trick scales size and brightness too: nearby stars become bright dots, distant ones fade to a single dim pixel. UP and DOWN change the speed live.
// starfield.js — Classic starfield effect
// Stars fly toward the camera. Press A to exit.

let w = display.width;
let h = display.height;
let numStars = 80;

// Initialize stars as arrays: [x, y, z]
let sx = [];
let sy = [];
let sz = [];

for (let i = 0; i < numStars; i++) {    sx[i] = math.random(-w, w);    sy[i] = math.random(-h, h);    sz[i] = math.random(1, w);
}

let speed = 8;
let running = true;

while (running) {    display.fill_screen(colors.black);    for (let i = 0; i < numStars; i++) {        sz[i] = sz[i] - speed;        if (sz[i] <= 0) {            sx[i] = math.random(-w, w);            sy[i] = math.random(-h, h);            sz[i] = w;        }        let px = math.round(sx[i] * 256 / sz[i] + w / 2);        let py = math.round(sy[i] * 256 / sz[i] + h / 2);        if (px >= 0 && px < w && py >= 0 && py < h) {            let brightness = math.round(255 - sz[i] * 255 / w);            brightness = math.clamp(brightness, 50, 255);            let color = display.color565(brightness, brightness, brightness);            let size = math.round(3 - sz[i] * 3 / w);            if (size < 1) {                size = 1;            }            if (size > 1) {                display.fill_circle(px, py, size, color);            } else {                display.draw_pixel(px, py, color);            }        }    }    display.set_cursor(5, h - 12);    display.set_text_color(colors.white);    display.print("A=exit  U/D=speed");    display.queue_draw();    let state = controller.get_state();    if (state.a.just_pressed) {        running = false;    }    if (state.up.pressed) {        speed = math.clamp(speed + 1, 1, 30);    }    if (state.down.pressed) {        speed = math.clamp(speed - 1, 1, 30);    }    util.sleep(0.016);
}
🔴 Bouncing Ball App
A red ball flies around the screen, bouncing off the walls, with a fiery trail behind it 🔥 A kind of "physics without physics" — the simplest example of how a single arithmetic rule, repeated 60 times a second, creates the feeling of living motion.
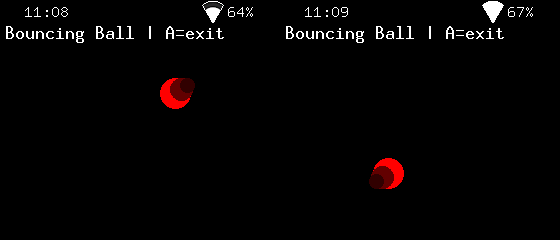
The whole logic boils down to two things. First — movement: every frame we add velocity to position (x = x + vx), and the ball shifts. The bigger the velocity, the more it leaps across the screen — no acceleration formulas, no mass, just two numbers vx and vy. Second — bouncing: when the ball touches a wall, we flip the sign of the corresponding velocity (vx = -vx). Was moving right — now moving left, and vice versa. This trick is the foundation of every game with flying projectiles, from Pong to Breakout.
The trail behind the ball is another simple trick: we draw two more circles slightly behind the main position (x - vx * 2 and x - vx * 4), with smaller radius and darker colors. The faster the ball flies, the longer and brighter the trail becomes, because vx * 4 turns into a bigger offset 💨
The D-pad changes velocity in real time: UP slows down vertical motion, DOWN speeds it up; LEFT and RIGHT do the same horizontally. You can accelerate the ball to a frantic pace, or almost freeze it mid-air, watching the trail collapse into a single dot.
// bouncing_ball.js — A ball bouncing around the screen
// Use D-pad to change ball speed. Press A to exit.

let w = display.width;
let h = display.height;
let r = 15;

let x = w / 2;
let y = h / 2;
let vx = 3;
let vy = 2;

let running = true;

while (running) {    // Update position    x = x + vx;    y = y + vy;
    // Bounce off walls    if (x - r < 0 || x + r > w) {        vx = -vx;        x = math.clamp(x, r, w - r);    }    if (y - r < 0 || y + r > h) {        vy = -vy;        y = math.clamp(y, r, h - r);    }
    // Draw    display.fill_screen(colors.black);    display.fill_circle(math.round(x), math.round(y), r, colors.red);
    // Trail effect: smaller circles behind    display.fill_circle(math.round(x - vx * 2), math.round(y - vy * 2), r - 4, display.color565(100, 0, 0));    display.fill_circle(math.round(x - vx * 4), math.round(y - vy * 4), r - 8, display.color565(50, 0, 0));
    // HUD    display.set_cursor(5, 15);    display.set_text_color(colors.white);    display.print("Bouncing Ball | A=exit");
    display.queue_draw();
    // Input    let state = controller.get_state();    if (state.a.just_pressed) {        running = false;    }    if (state.up.pressed) {        vy = vy - 0.2;    }    if (state.down.pressed) {        vy = vy + 0.2;    }    if (state.left.pressed) {        vx = vx - 0.2;    }    if (state.right.pressed) {        vx = vx + 0.2;    }
    util.sleep(0.016);
}
The same mechanic powers half the games ever made — Pong, Arkanoid, Breakout, even the classic DVD-logo screensaver waiting for that one perfect corner hit 📐 Swap the ball for anything else: a spaceship sprite, an apple, a tennis ball — and you get an entirely different game on the very same skeleton ⚡
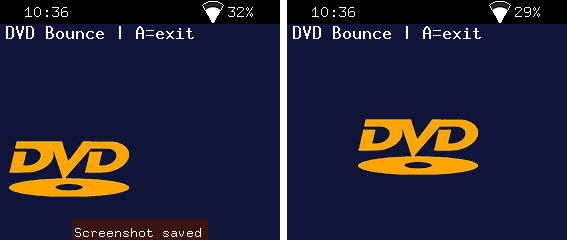
🟠 Bouncing DVD Logo App
Replace the red ball with the legendary DVD logo, and you get that nostalgic 2000s screensaver everyone remembers 📺 The movement and bouncing logic stays exactly the same — but all the interesting stuff hides in working with the image itself.
🖼️ Loading images in mJS. You can add your own images to a Lilka program — photos, logos, game sprites. The code for it is minimal:
let dvd = resources.load_image("dvd-white.bmp", colors.black);
display.draw_image(dvd, x, y);
The dvd-white.bmp file should sit in the same SD-card folder as the .js script. Lilka resolves the relative path automatically.
🎨 BMP format, 24-bit. Lilka works with plain uncompressed BMP — 8 bits per channel for R, G, B. Not 1-bit black-and-white, not 32-bit with alpha — exactly 24-bit RGB. You can verify a file with sips -g all dvd-white.bmp: the output should show bitsPerSample: 8 and samplesPerPixel: 3.
✨ Transparency through color, not an alpha channel. BMP doesn't support transparency directly, so Lilka handles it differently: at load time you specify "this color shouldn't be drawn." The second argument of resources.load_image() is that transparencyColor. In the example above, the black background of the BMP becomes transparent and only the logo itself shows on screen. Pick a transparency color that doesn't appear in the image itself: black background for a white logo, white background for a black one.
📐 Optimal size. The Lilka display is 240×280 pixels. Rough guidelines: 32×32 for small objects, 64×64 for the main character of a game, 128×128 and up for large central elements. For the DVD logo with its 2:1 aspect ratio, 240×108 works beautifully.
🪄 ImageMagick is a universal command-line tool for image processing, available on macOS (brew install imagemagick), Linux (apt install imagemagick), and Windows. A single command can crop, invert, resize, and convert into the right format:
magick dvd.jpg -fuzz 10% -trim +repage -fill black -opaque white \ -resize 240x -type TrueColor BMP3:dvd-white.bmp
-trim strips the white margins around the logo, -opaque white replaces the white background with black (so transparency works), -resize 240x sets the width while preserving aspect ratio, and BMP3: guarantees the exact 24-bit BMP that Lilka expects 🎯
What changed in the code compared to Bouncing Ball:
Instead of a single radius r, there are now two variables — dvdW and dvdH — because the logo has different width and height. The wall bounce check is now computed separately for each axis: dvdW / 2 for the left and right walls, dvdH / 2 for top and bottom. The three fill_circle calls (the ball plus two trail circles) are replaced with a single display.draw_image() that draws the ready-made picture. And one small detail — draw_image takes coordinates of the top-left corner, not the center (unlike fill_circle), so we subtract dvdW / 2 and dvdH / 2 to keep the logo centered at point (x, y).
// dvd_bounce.js — DVD logo bouncing around the screen
// Use D-pad to change logo speed. Press A to exit.
// Required: dvd-white.bmp on the SD card (24-bit BMP, e.g. 240x108).

let w = display.width;
let h = display.height;

// Load DVD logo. Black is treated as transparent.
let dvd = resources.load_image("dvd-white.bmp", colors.black);
let dvdW = 240;
let dvdH = 108;

let x = w / 2;
let y = h / 2;
let vx = 3;
let vy = 2;

let running = true;

while (running) {    // Update position    x = x + vx;    y = y + vy;
    // Bounce off walls    if (x - dvdW / 2 < 0 || x + dvdW / 2 > w) {        vx = -vx;        x = math.clamp(x, dvdW / 2, w - dvdW / 2);    }    if (y - dvdH / 2 < 0 || y + dvdH / 2 > h) {        vy = -vy;        y = math.clamp(y, dvdH / 2, h - dvdH / 2);    }
    // Draw    display.fill_screen(display.color565(20, 20, 60));    display.draw_image(dvd, math.round(x - dvdW / 2), math.round(y - dvdH / 2));
    // HUD    display.set_cursor(5, 15);    display.set_text_color(colors.white);    display.print("DVD Bounce | A=exit");
    display.queue_draw();
    // Input    let state = controller.get_state();    if (state.a.just_pressed) {        running = false;    }    if (state.up.pressed) {        vy = vy - 0.2;    }    if (state.down.pressed) {        vy = vy + 0.2;    }    if (state.left.pressed) {        vx = vx - 0.2;    }    if (state.right.pressed) {        vx = vx + 0.2;    }
    util.sleep(0.016);
}
It's the very same template as cat.js — a simple skeleton you can drop any image into. Swap dvd-white.bmp for the logo of your favorite band, a photo of your pet, your friend's avatar — and in two minutes you've got a personal screensaver ⚡ And there's still that legendary moment to wait for: when the logo finally hits a corner of the screen exactly 📐
🏓 Pong App
Pong.js The game that started the entire video game industry. Atari released Pong back in 1972, and it's the title that turned video games into a mass phenomenon. Two paddles, a ball, a black background, and a white dashed line down the middle — nothing more was needed to hook people for decades 🕹️
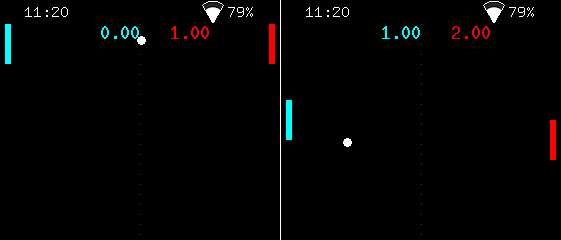
The player controls the left (cyan) paddle with UP/DOWN, and the right (red) one moves on its own. The ball flies between them, bouncing off the paddles and the top and bottom walls. If your opponent doesn't make it in time — you score a point. First to... actually no, the game runs forever, play as long as you can hold out 🏆
Half the code is the familiar mechanic from Bouncing Ball: the ball moves through bx + bvx, bounces off the ceiling and floor by flipping the sign of its velocity. The paddles add everything interesting on top of that base.
🎯 Ball-paddle collision. When the ball touches the left paddle, three conditions are checked at once: did it reach the paddle's x-coordinate (bx - br <= pw + 5), is it at the paddle's height (by >= p1y && by <= p1y + ph), and is it actually flying toward the paddle (bvx < 0). Only if all three are true do we flip bvx and send the ball back. That last check matters more than it looks: without it, the ball would "stick" to the paddle, endlessly flipping direction.
⚡ Speed-up on every hit. After a bounce, bvx gets bumped by an additional 0.3. The longer the rally goes, the faster the ball flies — and the harder it is to keep up. A small detail that turns a sleepy back-and-forth into a real duel.
🤖 The CPU opponent. The right paddle has the simplest AI in the world: every frame it looks at the ball's vertical position and moves toward it at 3 pixels per frame. That's deliberately slower than the player's 4 pixels — otherwise the computer would be unbeatable and the game would lose its fun. The ± 2 pixel "dead zone" stops the paddle from jittering when the ball sits exactly opposite it.
📊 Score counter. If bx < 0 — the ball flew past the left edge, point for the opponent. If bx > w — the other way around, point for the player. Either way, the ball returns to the center of the screen at its starting velocity, and the next rally begins.
🎨 Black background, white center line, colored paddles. Stylistically the program quotes the original 1972 Pong — minimalism that's impossible to ruin. The center line is drawn by a for loop placing one pixel every 10 units of height. Simple and effective ✨
###b class="inline-flex items-center justify-center relative isolate shrink-0 can-focus select-none disabled:pointer-events-none disabled:opacity-50 disabled:shadow-none disabled:drop-shadow-none border-transparent transition font-base duration-300 ease-[cubic-bezier(0.165,0.85,0.45,1)] h-8 w-8 rounded-md backdrop-blur-md _fill_10ocf_9 _ghost_10ocf_96" type="button" aria-label="Copy to clipboard" data-state="closed"###
javascript
// pong.js — Simple Pong game for one player vs CPU
// Left paddle: D-pad UP/DOWN. Press A to exit.

let w = display.width;
let h = display.height;

// Ball
let bx = w / 2;
let by = h / 2;
let bvx = 3;
let bvy = 2;
let br = 4;

// Paddles
let pw = 6;
let ph = 40;
let p1y = h / 2 - ph / 2; // Player (left)
let p2y = h / 2 - ph / 2; // CPU (right)
let pSpeed = 4;

// Score
let score1 = 0;
let score2 = 0;

let running = true;

while (running) {    // --- Input ---    let ctrl = controller.get_state();    if (ctrl.a.just_pressed) {        running = false;    }    if (ctrl.up.pressed) {        p1y = p1y - pSpeed;    }    if (ctrl.down.pressed) {        p1y = p1y + pSpeed;    }    p1y = math.clamp(p1y, 0, h - ph);
    // --- CPU AI ---    let cpuTarget = by - ph / 2;    if (p2y < cpuTarget - 2) {        p2y = p2y + 3;    }    if (p2y > cpuTarget + 2) {        p2y = p2y - 3;    }    p2y = math.clamp(p2y, 0, h - ph);
    // --- Ball physics ---    bx = bx + bvx;    by = by + bvy;
    // Top/bottom bounce    if (by - br < 0 || by + br > h) {        bvy = -bvy;        by = math.clamp(by, br, h - br);    }
    // Left paddle collision    if (bx - br <= pw + 5 && by >= p1y && by <= p1y + ph && bvx < 0) {        bvx = -bvx;        bvx = bvx + 0.3;        bx = pw + 5 + br;    }
    // Right paddle collision    if (bx + br >= w - pw - 5 && by >= p2y && by <= p2y + ph && bvx > 0) {        bvx = -bvx;        bvx = bvx - 0.3;        bx = w - pw - 5 - br;    }
    // Score    if (bx < 0) {        score2 = score2 + 1;        bx = w / 2;        by = h / 2;        bvx = 3;        bvy = 2;    }    if (bx > w) {        score1 = score1 + 1;        bx = w / 2;        by = h / 2;        bvx = -3;        bvy = -2;    }
    // --- Draw ---    display.fill_screen(colors.black);
    // Center line    for (let dy = 0; dy < h; dy = dy + 10) {        display.draw_pixel(w / 2, dy, display.color565(60, 60, 60));    }
    // Paddles    display.fill_rect(5, math.round(p1y), pw, ph, colors.cyan);    display.fill_rect(w - pw - 5, math.round(p2y), pw, ph, colors.red);
    // Ball    display.fill_circle(math.round(bx), math.round(by), br, colors.white);
    // Score    display.set_cursor(w / 2 - 40, 15);    display.set_text_color(colors.cyan);    display.print(score1);    display.set_cursor(w / 2 + 30, 15);    display.set_text_color(colors.red);    display.print(score2);
    display.queue_draw();    util.sleep(0.016);
}
Pong is the perfect starting point for any kind of game experiment. Want Arkanoid? Replace the right paddle with a wall of bricks, and each ball hit knocks one out. Want Air Hockey for two players? Strip out the right paddle's AI and wire up the second player's controls to other buttons. Want soccer? Add another "paddle" and a goal 🥅 The skeleton is already there — the rest is just imagination ⚡
Discussions
Become a Hackaday.io Member
Create an account to leave a comment. Already have an account? Log In.