Close
0%
0%

Framework Missing Keys

The Framework Laptop 16 is missing four vital keys: PgUp, PgDn, Home, End. I want to fix that.

Similar projects worth following
The Framework 16 is the hacker's laptop, right? So if there are missing keys, we can add them, right?

The Problem

When I got my Framework Laptop 16, I loved it. All apart from one, tiny, miniscule thing:

ThinkpadDellFramework

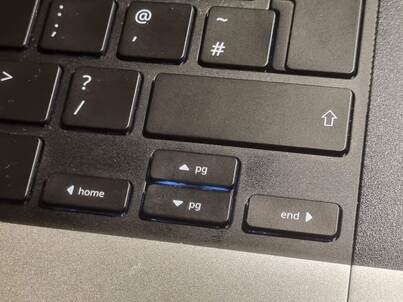
The problem was immediately, glaringly, obvious. I use those keys. All the time, especially when reading articles. Page Up and Page Down are well, if not my most used keys, then surely very often used. And now I have to use the Fn key, clumsily, to access them.

Why couldn't they have done this:

The spaces are right there, sitting empty, doing nothing! Why, Framework, why?!

The Dream

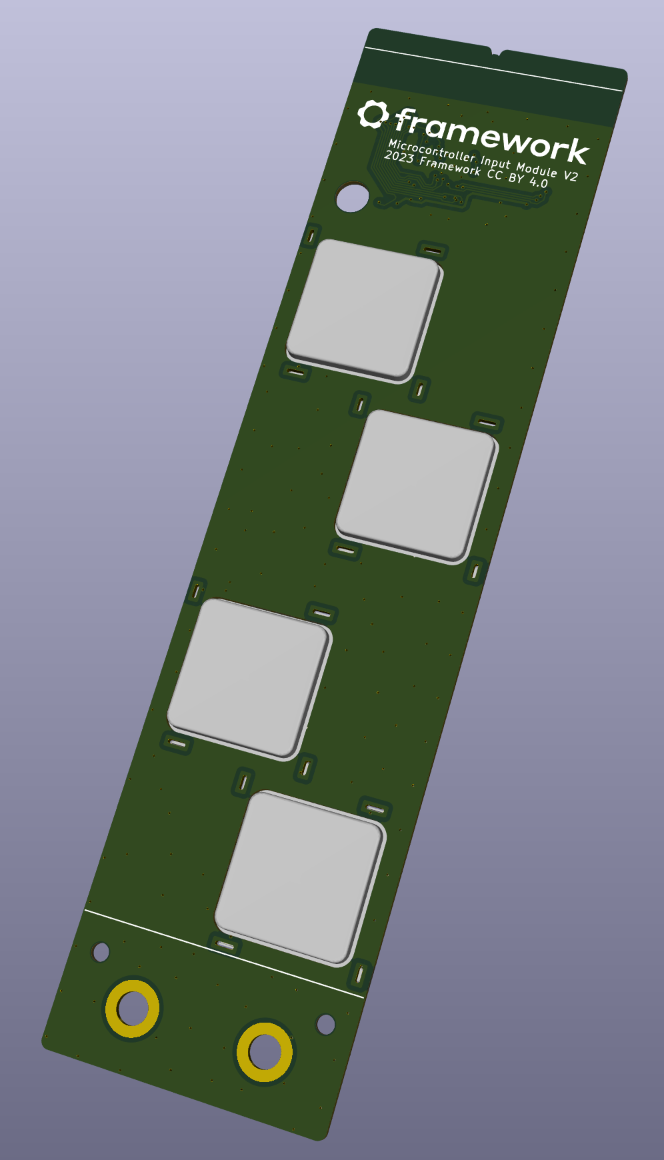
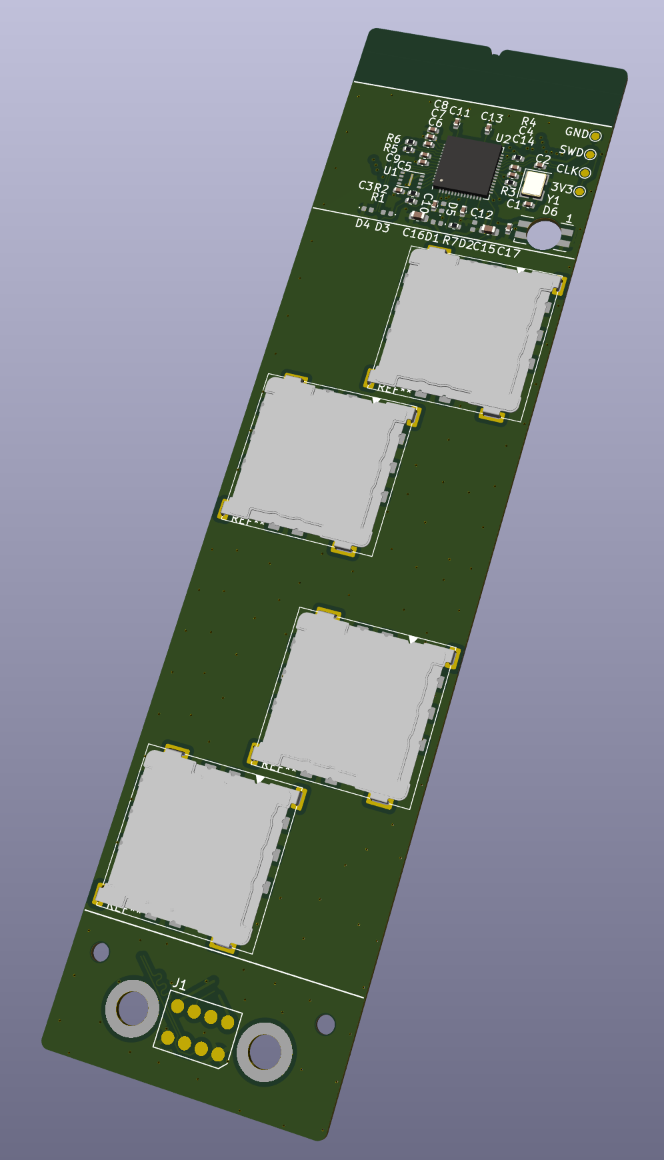
But wait. This is the hackers' laptop. The one where everything can be modified. The one where they want you to mod it. The one where all the firmware and specs and CAD models are published. Then, surely, surely, I can do this:

Disclaimer: May not reflect reality

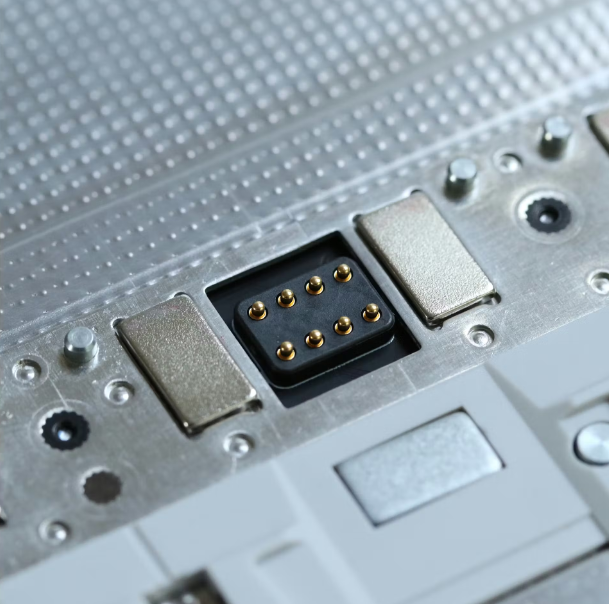
If those keyboard spacers can have grids of RGBleds on them, then they can have keys, right?

Dream Shattered

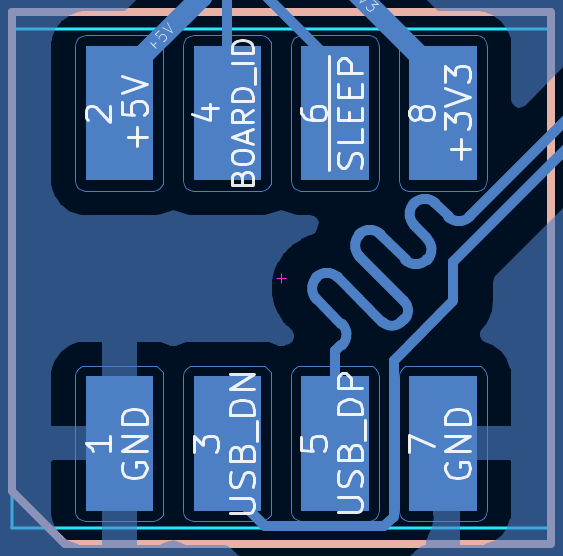
So, all I should need is some laptop keyboard switches and a microcontroller. I began reading up on the input modules, and quickly ran into a showstopper: the height requirement is 3.7mm. All the low-profile keyboard switches I found were way above that. I started thinking some of the smallest ones might be ok if they touched the screen, but that risks scratching the screen and pressing the keyswitches when the lid is closed. For example, cherry ULP (ultra-low-profile) switches are 3.5mm high. Without the keycap. Or the PCB.

And so I gave up for a while until....

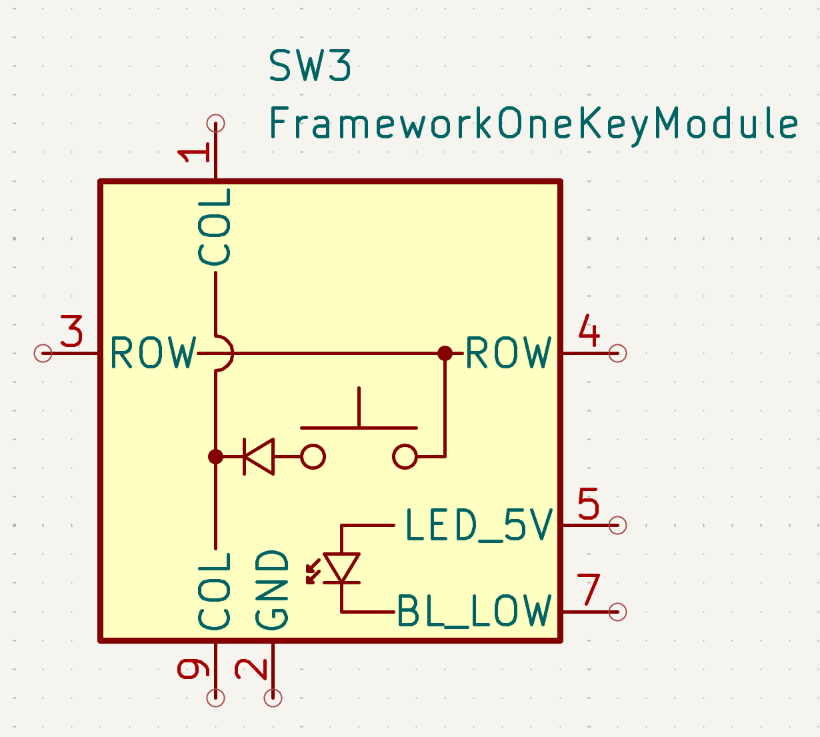
Framework to the rescue

Until I stumbled across Framework's One-Key Module - which is perfect for what I want to make, and the project was back on. As it was just released, I found they had a developer program, so I fired off a quick description of my plan to add the missing keys, and expected not to hear anything back for such a simple idea.

But to my surprise, a week or so later, I got a reply from Framework saying they liked the idea and could they send me some keys. And they did! So now I'd better actually produce something...

  • Schematic Symbol

    Matthew03/02/2026 at 21:51 0 comments

    I realised that Framework have provided a KiCad PCB footprint for the one-key module, but I don't think there's a matching schematic symbol, so i created one. Of course, now I'll discover that there was one all along and I'd just missed it...

  • Trying PCB layouts

    Matthew03/02/2026 at 19:28 0 comments

    I've started adapting Framework's "Microcontroller Input Module" reference design to try out potential PCB layouts. Because I want the keys near the bottom of the module as much as possible, next to the arrow keys, I've moved the microcontroller to the top. And I've staggered the keys left and right instead of making a vertical column of them, partly for ease of recognising them by touch, and partly so that I can get PCB tracks between them. There's not much space because the one-key-modules mount to the bottom of the PCB so there needs to be a huge cutout for the keycap to poke through to the top. So I need to make sure I've left enough space for that. It's complicated more by the locating lugs which also eat into space around the modules. This is what I've got so far:

    I'm not sure yet if it might be possible to fit in a fifth key. It depends how much the space "below the line" with the contacts needs to be left clear, and whether I can squeeze the MCU in one of the gaps next to the keys (with all its tracks and supporting components...)

  • Reference PCB

    Matthew02/17/2026 at 16:20 0 comments

    Well, Framework are determined to make my life easier for me. Turns out that:

    a) It's possible to make an input module as a single PCB - I was thinking I'd need some combination of overlapping PCBs and/or some 3D-printed parts. Maybe that will yield a better aesthetic result in future, but as a first cut, that's ideal.

    b) The "magnetic attachment" is a solved problem - there are solderable threaded inserts which are ferromagnetic, and will stick to the magnets in the laptop. Framework have even provided a part number: Keystone 24929, and they're available from Mouser.

    c) Framework have produced a reference design, in Kicad (which is my preferred PCB CAD tool), with an RP2040 included. So I can use this as a starting point for my design.

    d) Someone has already created a Kicad PCB footprint for the one-key module

    This will give me a great head-start. Next step: modify the reference PCB.

  • Electrical plan

    Matthew02/17/2026 at 15:50 0 comments

    So, I've got mechanical hardware that will fit: The framework one-key modules are designed to mount to a PCB, and I can design and fabricate PCBs. So I next gave some thought to the electrical planning.

    I know the Framework keyboard uses an RP2040 microcontroller - from the Raspberry Pi Pico. I've never used those (my standard choice is STM32 chips) but I figure it makes sense to use the RP2040 for consistency with the other Framework hardware.

    The electrical connection to the input modules is USB via a pogo-pin connector and they're held in place by magnets:

    The pogo pins provide +5V power and ground, USB and a board ID resistor:

    I can create the connector as pads on a PCB, so I'll need to find a way of making the PCB magnetic so it holds in place.

View all 4 project logs

Enjoy this project?

Share

Discussions

Similar Projects

Does this project spark your interest?

Become a member to follow this project and never miss any updates