 ElectroScope Archive
Project Overview
Turn a Raspberry Pi Pico W into a talking microcontroller! This project connects your Pico to an online AI text-to-speech (TTS) service (Wit.ai) and streams the resulting audio back to a small speaker using an I2S amplifier. Because the Pico can’t run large speech models locally, the heavy lifting happens in the cloud — your board just sends text and plays audio.
🛠️ Parts You’ll Need
| Component | Notes |
|---|---|
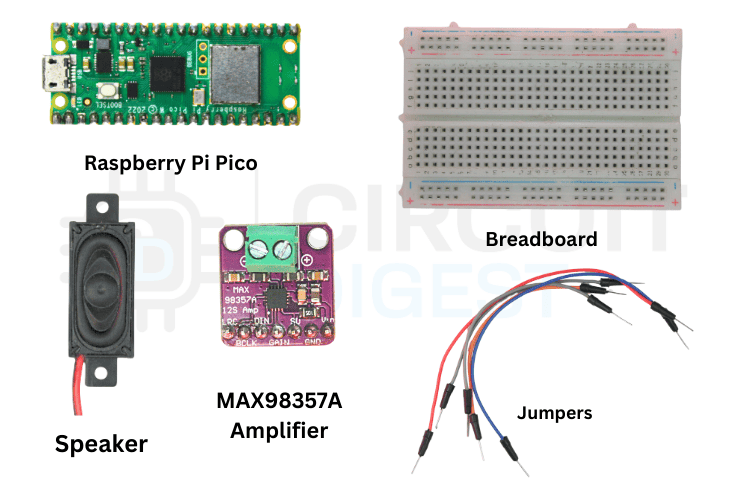
| Raspberry Pi Pico W | Wi-Fi enabled microcontroller |
| MAX98357A I²S amplifier | Drives speaker from Pico audio data |
| Speaker (4Ω–8Ω) | Produces speech output |
| Breadboard & jumpers | For prototyping |
| USB cable | Power & programming |
This setup uses the Pico’s I²S interface to output audio via the amplifier and speaker.
🔌 Hardware Connections
Connect the Pico W to the audio amp like this:
-
GP18 → BCLK (bit clock)
-
GP19 → LRC (left/right clock)
-
GP20 → DIN (audio data)
-
5V → VIN (power)
-
GND → GND
Double-check wiring before powering up to avoid shorts.

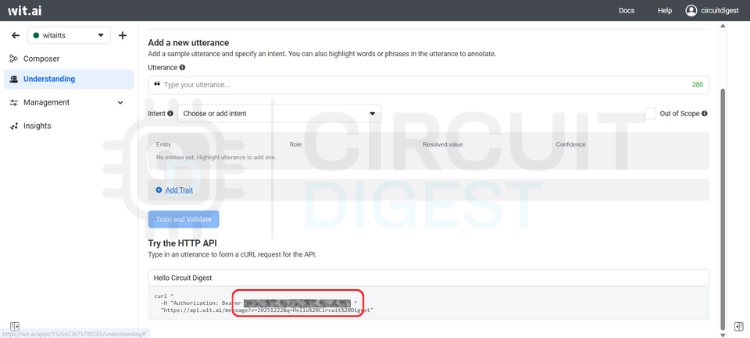
☁️ Set Up a TTS Service
This project uses Wit.ai (a free AI speech service by Meta) to generate audio from text:
-
Create a free account at the Wit.ai website and log in.
-
Create a new application for your Raspberry Pi Pico Text to Speech using AI.
-
Find the Server Access Token (Bearer token) in the app settings.
-
Save this token securely — you’ll need it in your code.
🧰 Install the Library
In the Arduino IDE:
-
Open Library Manager.
-
Search for WitAITTS and install it.
-
Load the PicoW_Basic example sketch.
-
Enter your Wi-Fi SSID, password, and Wit.ai token.
This library wraps Wi-Fi, HTTPS, audio decoding, and I²S output into a simple API.
📜 How It Works
Here’s the core flow in your sketch:
-
tts.begin(...)— connects to Wi-Fi and authenticates with Wit.ai. -
tts.setVoice(...)— selects which AI voice to use. -
tts.setSpeed(...)&tts.setPitch(...)— adjust speech characteristics. -
tts.speak(text)— sends text to Wit.ai, receives a streamed audio response, and plays it.
Audio playback is blocked by default — it waits until the spoken audio finishes before continuing.

🔄 Uploading & Testing
-
Verify and upload the sketch from Arduino IDE.
-
Open the Serial Monitor.
-
Type any text and press Enter.
-
The Pico W will request TTS audio and play it — you’ll see status messages in the monitor.
🧠 Troubleshooting Tips
No sound?
✔ Check wiring and amplifier power
✔ Confirm speaker is working and connections are solid
Wi-Fi or HTTP errors?
✔ Verify SSID, password, and token
✔ Look out for network instability
Distorted audio?
✔ Use a good-quality power supply
✔ Match speaker impedance and avoid noisy power lines
🚀 What You Can Build Next
This framework opens the door to lots of cool ideas:
-
Voice-enabled alarms and alerts
-
Talking about home automation devices
-
Interactive art or robot voices
-
Multilingual or custom voice styles
-
TTS + Speech-to-Text for conversational gadgets
🧩 Notes & Limitations
-
Requires active internet — AI TTS is cloud-based.
-
Playback stops other tasks on the Pico due to the blocking audio.
-
Quality depends on the network, the speaker, and the amplifier.
Explore a comprehensive collection of beginner to advanced Raspberry Pi Pico projects and tutorials with step-by-step guides and downloadable code.