Building an open-source, low-cost 10.5 GHz phased array radar with phased array antenna and Pulse LFM modulation—available in 3km and 20km range versions. For researchers, drone developers, and serious SDR enthusiasts.
The Vision:
Phased array radar is the gold standard for electronic beam steering—enabling instant tracking, weather resilience, and precision sensing. Yet today, even entry-level systems cost more than $250,000, locking this technology away from researchers, students, and independent innovators.
I'm building the “AERIS-10” to change that. An open source “32x16 element X-band phased array radar” with full electronic beam steering, Pulse Linear Frequency Modulation (LFM) at a fraction of traditional cost.
Why This Matters
Today, anyone who needs advanced radar capability faces three flawed options, each with unacceptable tradeoffs.
Military surplus equipment might seem like a bargain at $10,000-50,000, but you're buying decades-old technology. These systems use mechanical scanning only—no electronic beam steering. They're analog, completely obsolete, and come with no API or modern interface. When they break (and they will), there are no spare parts.
Commercial radar systems deliver modern performance but at an astronomical price: $250,000 to over $1 million. Even at that cost, you're getting a closed "black box." The firmware is locked, the beam patterns are fixed, and there's no way to modify or extend the system for your specific research needs. You're renting capability, not owning technology you can build upon.
Building from scratch is the path for well-funded research labs or obsessive hobbyists—but it's a multi-year undertaking requiring a deep team with specialized expertise across RF, FPGA programming, signal processing, and mechanical engineering. Just the test equipment (spectrum analyzers, network analyzers) costs more than $50,000. And building a phased array from discrete components? For a small team, it's nearly impossible to achieve consistent, calibrated performance.
The result: A massive capability gap. There is no affordable, programmable, electronically-scanned radar platform for researchers, educators, and innovators who want to push the boundaries of what's possible with radar.
AERIS-10 changes this. By combining modern SDR technology with an innovative system, we deliver true phased array performance at 90-95% below commercial alternatives—with open APIs that let you build your own applications.
Technical Specifications:
- The AERIS-10 comes in 2 versions:
- AERIS-10N (Nexus) with Range up to 3Km
- AERIS-10X (Extended) with scanning Range up to 20Km
- Frequency: 10.5GHz
- Antenna Type: 8x16 patch antenna array for the Nexus and 32x16 dielectric-filled slotted waveguide antenna array for the Extended version.
- Electronically controlled Elevation and Azimuth Beam steering. (The prototype uses the 16 antenna elements to steer the Azimuth beam and the Elevation is performed using a stepper motor; but the designed system can be hacked to control both Elevation and Azimuth electronically.
- Output: Range & Doppler of Multi-Targets
- Interface: A GUI written in Python
- A Power Management Board that supplies all the necessary voltage levels to the electronics components with proper filtering and sequencing (This late is ensured by the microcontroller)
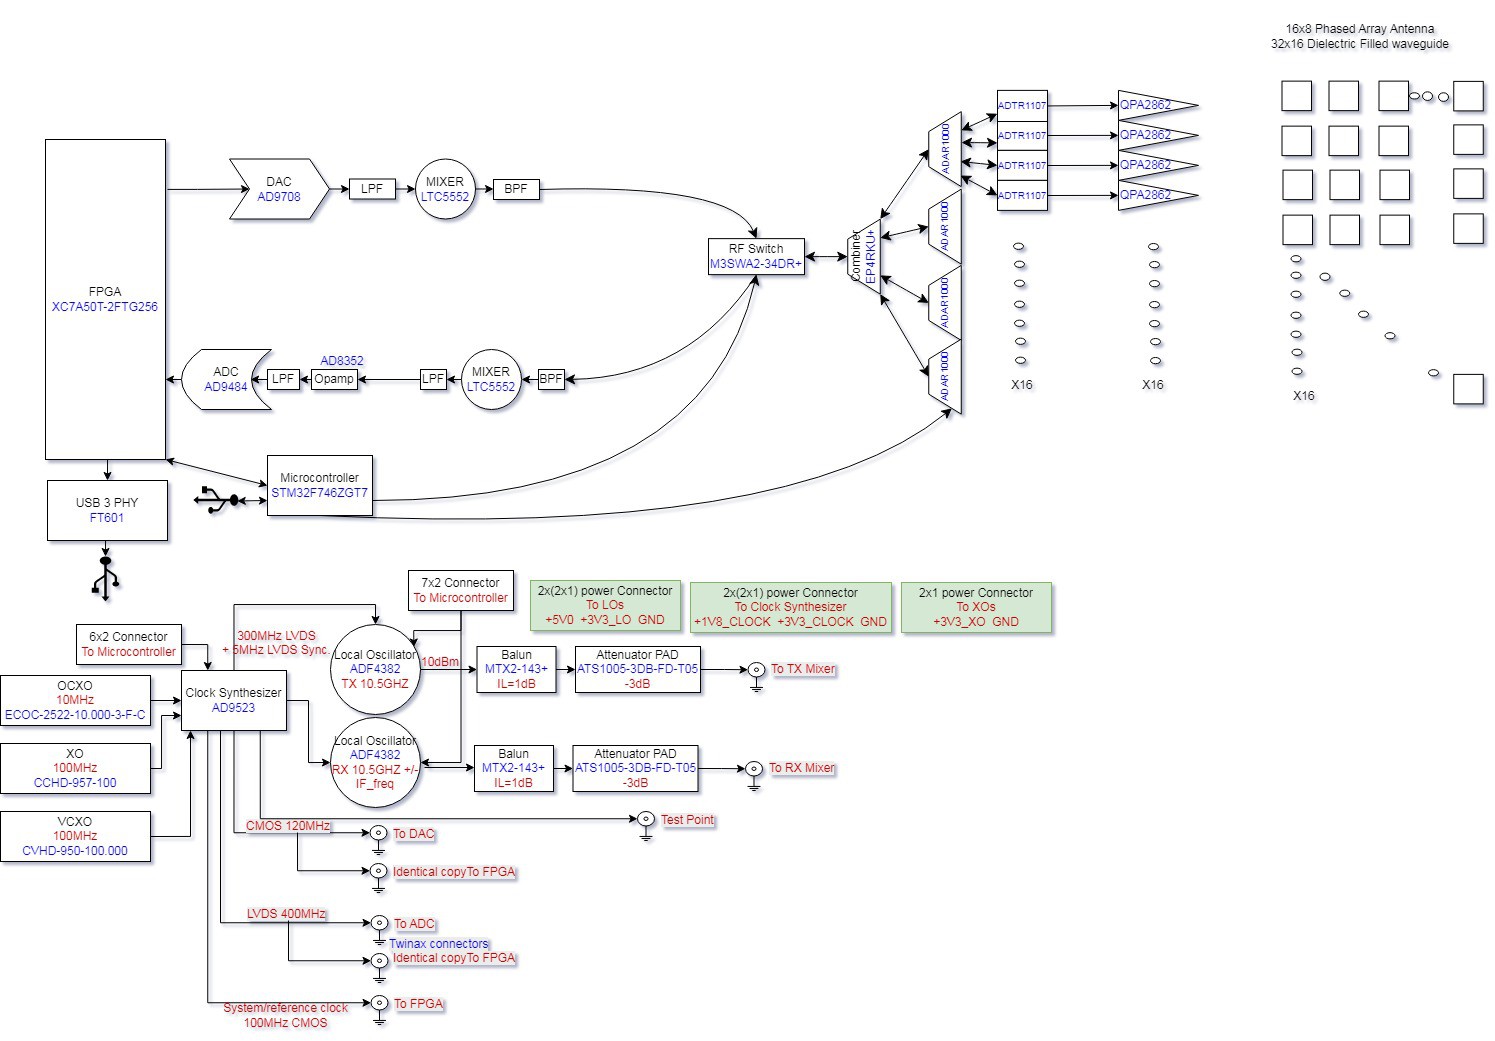
- A Frequency Synthesizer Board using a high performance Low Jitter Clock Generator (AD9523-1) that supplies phased aligned clock references for the:
- RX and TX Frequency Synthesizers (ADF4382)
- DAC
- ADC
- FPGA
- A Main Board containing:
- A DAC to generate the RADAR Chirps
- 2 Microwave Mixers (LT5552) for up-conversion and IF-down-conversion
- 4 4-Channels Phase Shifters (ADAR1000) for the RX and TX chain
- 16 Front End chips (ADTR1107) used for Both Low Noise Amplifying (RX) and Power Amplifying (TX) Stages
- An XC7A100T FPGA used for RADAR Signal Processing:
- PLFM Chirps generation via the DAC
- Raw ADC data read
- AGC
- I/Q Baseband Down-Conversion
- Decimation
- Filtering
- Forward FFT
- Pulse Compression
- Doppler, MTI and CFAR processing
- USB Interface
- An STM32F746xx Microcontroller used to:
- Ensure the proper powering up and down sequencing (Check the Power Management Excel File)
- Communicate with the FPGA
- Setup and Interface with the following components:
- The Clock Generator (AD9523-1)
- The 2 Frequency Synthesizers (ADF4382)
- The 4 4-Channels Phase Shifters (ADAR1000) for proper RADAR pulse sequencing
- The 2 ADS7830 ADCs used on the 16 Power Amplifier Boards to measure Idq
- The 2 DAC5578 used on the 16 Power Amplifier Boards to control Vg
- The GPS used to set the center of the map on the GUI
- The GY_85 IMU to apply pitch and roll correction to the processed target longitude and latitude
- The BMP180 Barometer
- The Stepper Motor
- The 8 ADS7830 Temperature Sensors used to activate the Cooling Fans
- RF switches
Current Status: Alpha Prototype
For sake of testing, validating and optimizing the cost of the prototype, this late has been designed using one PCB for: - The Power supply management - The Digital components - The Analog and mixed signal components - The RF parts
This won’t be the case for the mass production system, where separated modules would be used to reduce EMI and enhance the signals integrity; also a more professional clock source and frequency synthesizer would be used. The new schematics, PCB layout and firmware are already available
Understanding the System Hardware:
The AERIS-10 main sub-systems are:
- 16 Power Amplifier Boards used only for the AERIS-10E where a 10Watt QPA2962 GaN amplifier has been chosen to extend the RADAR Range
- 8x16 patch antenna array board for the Nexus and 32x16 dielectric-filled slotted waveguide antenna array for the Extended version
- Miscellaneous (Slip-Ring, Stepper Motor and its drivers, Cooling Fan, Enclosure…)
Understanding the System Software and Operational Flow:
The AERIS-10 radar system is built around three core processing elements working in concert: an STM32 microcontroller handling system management and peripherals, an FPGA executing real-time signal processing, and a Graphical User Interface (GUI) for user control and data visualization. The following describes the complete boot sequence and operational loop that governs how the system wakes, calibrates, and begins scanning.
System Boot and Initialization
When power is first applied, the STM32 microcontroller begins a carefully sequenced startup routine designed to bring all subsystems online in the correct order, ensuring stable power and clock references before any RF activity begins.
The first critical step is waiting for the OCXO (Oven-Controlled Crystal Oscillator) to reach thermal stability. This high-precision frequency reference requires approximately three minutes to warm up and stabilize—without this wait, the entire radar's frequency accuracy would drift, compromising range resolution and target detection.
Once the OCXO is stable, the STM32 manages voltage sequencing for the system's clock generator, the AD9523. This ensures that power rails reach their correct levels in the proper order before the device is initialized. The STM32 then configures the AD9523, setting up the planned clock distribution that will drive the FPGA and all RF components with precise, phase-aligned timing.
With clocks established, the STM32 sequences power for the FPGA itself, then proceeds to initialize the remaining peripheral systems:
- The GPS module begins acquiring satellite locks
- The IMU (Inertial Measurement Unit) and barometer are initialized for attitude and altitude sensing
- Two ADF4382 frequency synthesizers (one for transmit, one for receive) are configured
- Four ADAR1000 beamforming chips are initialized to control the 16 phased array elements
At this point, all hardware is ready and the system enters a waiting state, listening for the start command from the GUI.
GUI Connection and System Arming
The operator interacts with the system through a custom Graphical User Interface running on a connected computer. When the user is ready to begin operation, they press the Start button on the GUI.
The GUI immediately transmits a specific start flag packet to the STM32—a predefined sequence of bytes {23, 46, 158, 237} that serves as a handshake to confirm communication is established. Following this flag, the GUI sends the full operational settings for the upcoming radar scan (waveform parameters, scan pattern, range settings, etc.).
The STM32 acknowledges these settings and begins actively monitoring the GPS data stream. It waits for a valid data lock, then begins sending modulated position streams back to the GUI containing longitude, latitude, and altitude information. The GUI receives these streams and uses the coordinates to center its map display on the radar's current location—giving the operator immediate spatial context for any detected targets.
Attitude Determination and Mechanical Alignment
While maintaining GPS position updates, the STM32 continuously reads raw data from the IMU and barometer. It processes the IMU data to calculate pitch, roll, and yaw angles, while the barometer provides a secondary altitude reference.
With yaw (heading) known, the STM32 commands the stepper motor to rotate the antenna assembly to align with yaw = 0° (typically true north or a defined reference). This mechanical alignment ensures that all subsequent electronically-steered beams are referenced to a consistent absolute direction.
Transmit and Receive Chain Configuration
Before any radar pulses are sent, the RF front-end must be precisely tuned. The STM32 configures the two ADF4382 frequency synthesizers—one set to the transmit frequency, the other to the receive frequency. Critically, it then executes a phase synchronization routine between these two synthesizers, ensuring that transmit and receive local oscillators are phase-coherent. This coherence is essential for Doppler processing and coherent pulse compression.
The Scanning Loop: A Three-Level Nested Structure
The AERIS-10's scanning pattern is organized as a three-level nested loop, controlling:
- Chirp sequence index (m) – Individual frequency ramps within a burst
- Beam steering index (n) – Electronic steering across 32 elevation/azimuth positions
- Mechanical azimuth index (y) – Physical rotation across 50 positions per revolution
This structure allows the system to build a complete volumetric scan through a combination of electronic beam steering (fast, within the pulse repetition interval) and mechanical rotation (slow, covering 360 degrees).
Loop Variables Defined
- m = Chirp number within a burst. Each burst consists of 32 chirps, organized as: *16 chirps at PRF1 (pulse repetition frequency 1) with duration T1, followed by a guard interval of 175.4µs, then 16 chirps at PRF2 with duration T2*
- n = Electronic steering index, ranging from 1 to 32. This corresponds to beam positions in elevation (or azimuth, depending on scan mode), controlled by phase settings on the ADAR1000 beamforming chips.
- y = Mechanical azimuth index, ranging from 1 to 50. The stepper motor moves the antenna to 50 discrete positions per full revolution, providing mechanical scanning in azimuth while electronics handle fast steering in the orthogonal plane.
The Operational Loop
The loop begins with the STM32 commanding the stepper motor to move to the first azimuth position (y=1). Once the mechanical position is settled:
- The STM32 sets the ADAR1000 phase shifters to the values corresponding to beam position n
- It manages voltage sequencing for the ADTR1107s (RF switches) and the RF power amplifiers, ensuring they power up cleanly
- It sends a flag to the FPGA indicating transmit mode and configures the ADAR1000s for transmission
- The FPGA generates the chirp waveform through its DAC, driving the transmit array
- Immediately after transmission, the FPGA signals the STM32 to switch to receive mode
- The STM32 reconfigures the ADAR1000s for reception
- The FPGA captures the returning echoes through its ADCs and begins the signal processing pipeline:
- Down-conversion of the IF signal to baseband
- Filtering
- Extraction of I/Q components (using CIC filters, FIR filters, and NCO)
- Pulse compression
- Per-range Doppler FFT
- Moving Target Indication (MTI)
- Constant False Alarm Rate (CFAR) detection
- Emission of detection reports (including small Range-Doppler thumbnails)
- Processed radar data is sent from the FPGA to the GUI via FTDI interface
- The GUI receives the data and updates its plots in real-time, displaying detected targets overlaid on the map
Loop Iteration and Scan Completion
After completing the processing for chirp m, the system increments m and returns to step 34 (DAC chirp generation). This continues until m exceeds 32, at which point:
- m resets to 1
- n increments (move to next electronic beam position)
- The loop returns to step 29 (set new ADAR1000 phase values)
When n exceeds 32 (all electronic beam positions completed), then:
- n resets to 1
- y increments (move stepper motor to next mechanical azimuth position)
- If y exceeds 50 (full revolution completed), y resets to 1 and the scan continues indefinitely or until stopped by the operator
This continuous loop builds a complete 3D radar picture, with electronic steering providing fast elevation/azimuth coverage and mechanical rotation providing full 360-degree azimuth scanning.
Summary
The AERIS-10's operational flow represents a sophisticated orchestration of multiple subsystems:
- STM32 handles the "conductor" role—sequencing power, configuring peripherals, managing the stepper motor, and coordinating mode switches
- FPGA executes the "orchestra"—generating waveforms, capturing echoes, and running the intense signal processing pipeline
- GUI provides the "audience view"—displaying maps, targets, and enabling operator control
This division of labor allows each processor to focus on what it does best, creating a coherent, high-performance radar system that remains flexible and programmable through its open architecture.
What's Working:
- Beam formation from 16x8 array
- Electronic steering ±45° elevation
- Pulse LFM generation and reception
- Basic target detection to 1km
- Raw data capture and processing via the FPGA:
- FM Chirp generation via the DAC
- Raw ADC data read
- AGC
- I/Q Base Band Down-Conversion
- Decimation
- Filtering
- Forward FFT
- Pulse Compression
- Doppler, MTI and CFAR processing
What's in Progress:
- Performing the RADAR processing using the python GUI rather than the FPGA and benchmarking the 2 approaches.
- Using multiple synchronized RADAR boards to enhance the beam steering resolution and Range.
- Crowd funding campaign launch
Get Involved:
I'm actively seeking:
- Beta testers: (university researchers, drone startups, advanced makers)
- RF engineers to review designs
- FPGA developers for signal processing optimization
- Software developers for the Python/C++ SDK