Close
0%
0%

LumiBand Gen3 - Wireless DMX LED wristband ESP32

A wearable LED fixture that receives wireless DMX512 over WiFi. Because why should the lighting rig stop at the stage edge.

Similar projects worth following
What started as an ATtiny85 with 15 NeoPixels and a bare electret mic has evolved into a proper wireless DMX fixture you happen to wear on your wrist.
The idea
Festival lighting designers already control every moving head, LED bar, and strobe in the venue over DMX. LumiBand puts the wristbands on the same network — the lighting desk operator controls the crowd the same way they control the stage. Every wristband is a DMX fixture. The crowd becomes part of the light show.

I started this as a Kickstarter because I wanted to make a proper wristband and not 3D print them myself. It would really help me a lot if you could follow my project on Kickstarter (it’s free). Just click the link below and then hit “Notify me…” — this helps boost my visibility on Kickstarter so more people can discover the project.

--> Crowdfunding page

How it works 

The ESP32 connects to a WiFi network carrying Art-Net or sACN (DMX over IP). Standard protocol, works with any professional lighting console or software that supports wireless DMX output — grandMA, QLC+, whatever the engineer is already running. No custom transmitter hardware needed on the desk side.

BLE is used purely for initial setup — assigning DMX universe and start address to each wristband without needing a laptop or physical access. Once configured it remembers its address and just waits for WiFi.


What carried over from gen2 

15 WS2812B NeoPixels, single cell LiPo, 6 hour runtime. The bare electret mic ADC input is still there so it can be an eye-catcher everywhere - if there's no DMX network the wristband drops back to autonomous beat detection. Loud venue required, no op-amp, same trick as before.

Where it stands 

PCB is designed, prototype units built and tested at festivals. Moving to injection moulded silicone housing for proper batch production — tooling costs are the bottleneck, which is why there's a Kickstarter pre-launch running right now. Follow the project there if you want to be notified when it goes live.

Schematic, firmware architecture and DMX addressing details in the logs below.

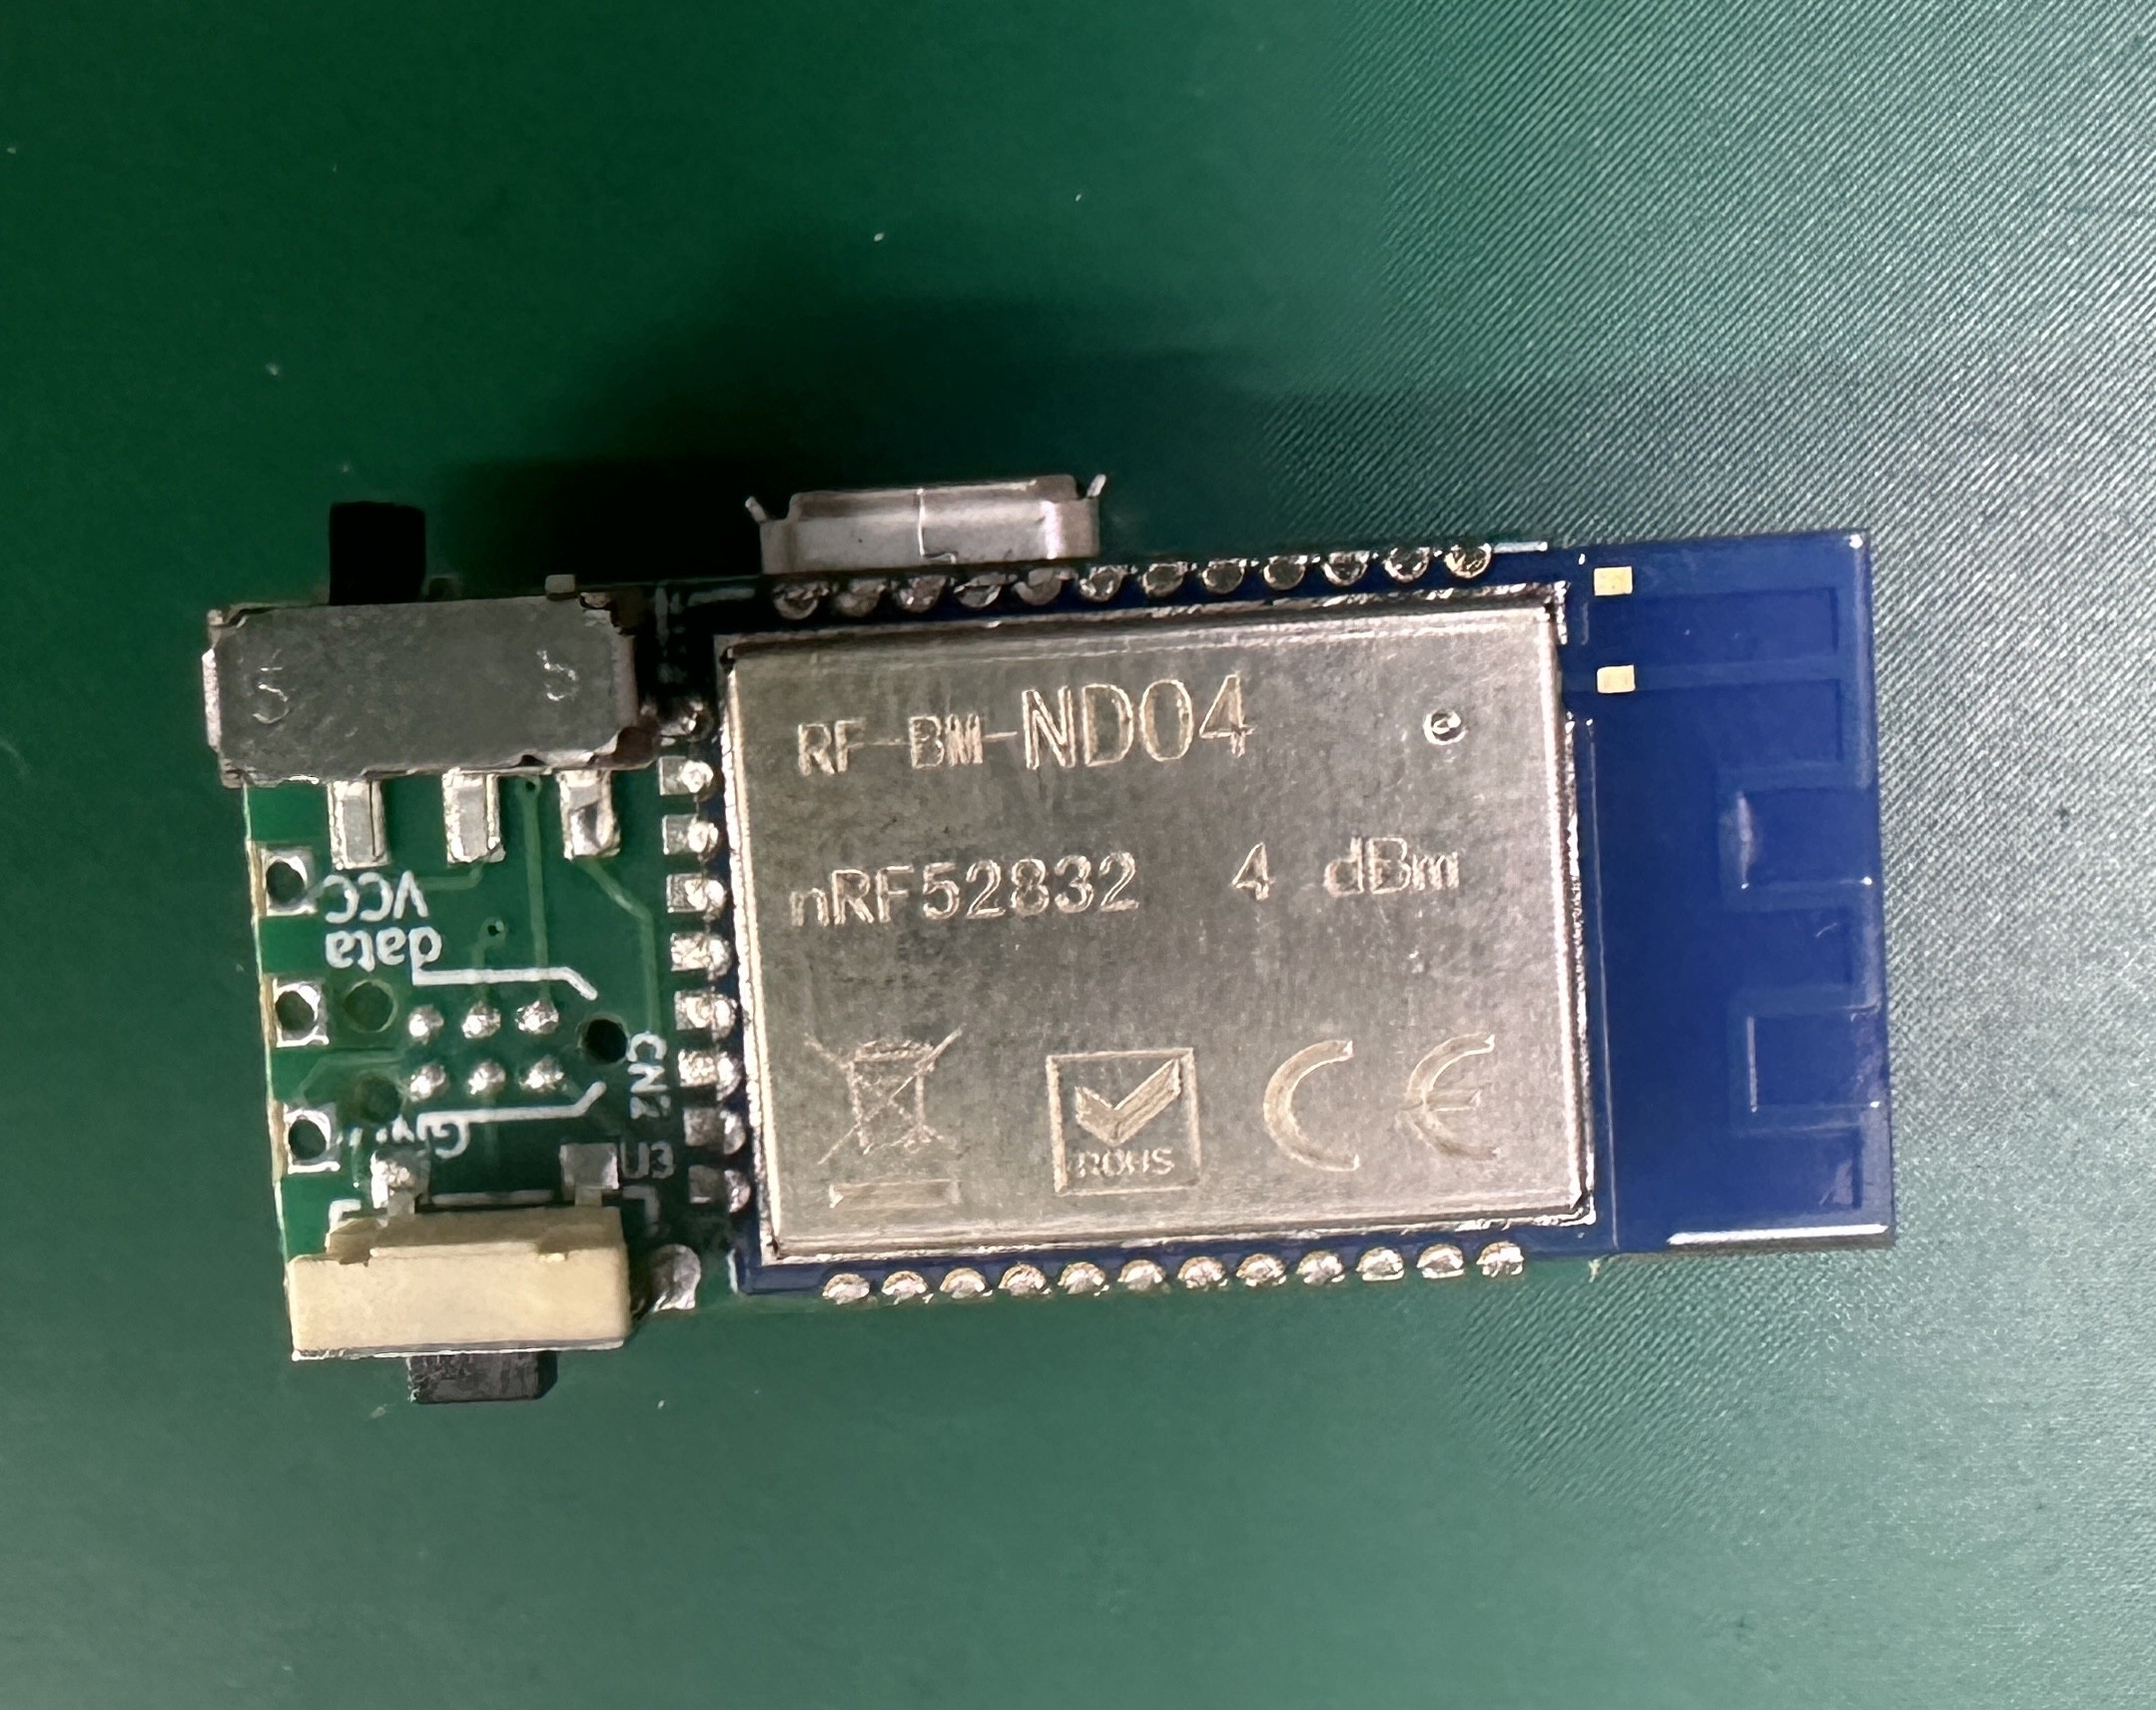
In one of the pics you can see the cpu sandwich of my prototype. I am using some Gen1 PCBs to have a button, power switch and charge controller  :)
-->See Gen2 project on Hackaday

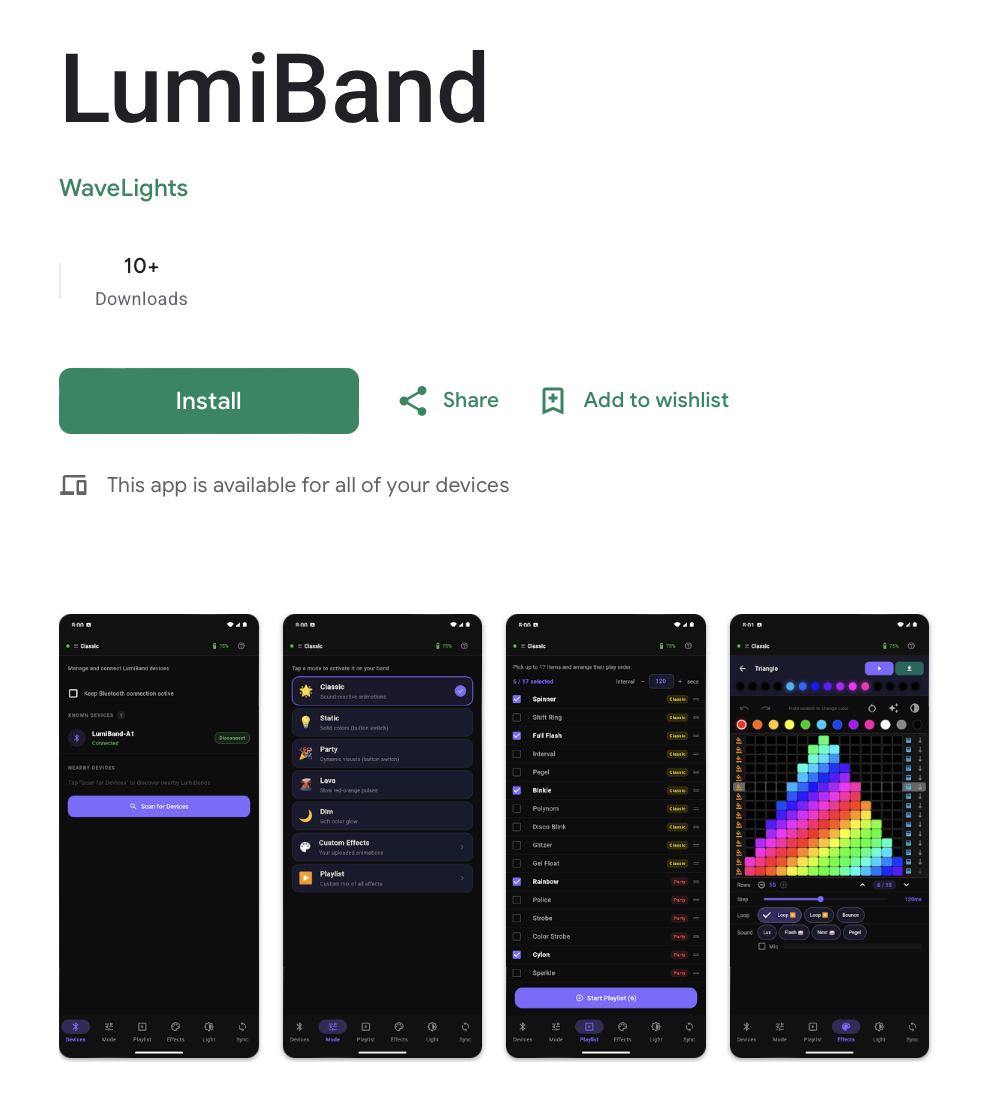
  • LumiBand app now live on Google Play :: both platforms covered

    Markus Loeffler06/12/2026 at 15:17 0 comments

    Following up on the earlier log about Play Store approval requirements - good news. The closed testing period is complete, Google granted production access, and the LumiBand app is now live on the Play Store.

    Combined with the existing App Store release, LumiBand now has full iOS and Android coverage from a single Flutter codebase.

    Thanks to everyone who signed up as a tester during the closed testing period:  your installs and feedback got this over the line. If you're one of them, you'll now get the app updated automatically via the Play Store like normal.

    For anyone hitting the same "more testing required" wall on a hardware companion app:  the process is annoying but entirely doable. 12+ active testers, 14 days, and at least one update during that window based on feedback. Patience and a community willing to help out is really all it takes.

    What's next 

    With the app fully live on both platforms, focus shifts back to the Gen3 hardware - units are still in transit from the factory, expected to arrive in the coming weeks. Once they're here: flashing, BLE pairing tests, and validation with real boards.

    Kickstarter pre-launch is still running --> following is free and helps with the launch algorithm when the campaign goes live.

  • Flashing a custom nRF52832 board via J-Link - sounds easier than it is

    Markus Loeffler06/04/2026 at 20:00 0 comments

    We built the custom PCB around the RF-BM-ND04 nRF52832 BLE module and used an Adafruit nRF52832 Feather BSP to compile our firmware. Getting it to actually run via J-Link took us through every possible wrong turn. Here's the full list

    Mistake 1: Flashing the app-only hex on a blank device

    The Arduino IDE produces a firmware.ino.hex (app only). On a blank chip this does nothing - the nRF52832 needs the SoftDevice S132 in flash before any BLE app can run. Without it the chip just sits there silently.

    Fix: use the firmware.ino.with_bootloader.hex which includes the SoftDevice.

    Mistake 2: The Adafruit bootloader silently enters DFU mode

    with_bootloader.hex includes the Adafruit DFU bootloader. Sounds great: until you learn that the Adafruit bootloader validates the app before launching it by checking for a "DFU settings page" in flash. That page is written by nrfutil settings generate during a normal OTA DFU workflow, but it is never written by a direct J-Link flash. Result: the bootloader silently enters DFU mode, no LEDs, no output, nothing.

    Fix: skip the Adafruit bootloader entirely for factory programming. Extract just the SoftDevice (0x00000–0x25FFF) from the bootloader hex using Python intelhex, merge it with the app hex (starting at 0x26000), and flash that combined file. The SoftDevice's own MBR boots the app directly - no validation step, no DFU mode.

      from intelhex import IntelHex
      bl = IntelHex(); bl.loadhex("with_bootloader.hex")
      sd = IntelHex()
      for addr in range(0x00000, 0x26000):
          if bl[addr] != 0xFF: sd[addr] = bl[addr]
      app = IntelHex(); app.loadhex("app_only.hex")
      sd.merge(app, overlap='error')
      sd.write_hex_file("sd_only.hex")

    Mistake 3: nrfutil is broken on Python 3

    We tried the "proper" way first: nrfutil settings generate to create the DFU settings page. It crashes immediately:

      NameError: name 'xrange' is not defined

      nrfutil 5.2.0 is Python 2 code. It does not run on MacOS Python 3. Don't bother.

    Mistake 4: Putting the hex file path in RTT Viewer's "Script file" field  

    J-Link RTT Viewer has an optional Script file field in its connection dialog. Someone at the factory where they made & test the PCBs assumed this is where you load the firmware. It isn't - it's for .jlink script files. Loading a hex file there produces:

      :020000040000FA ^ Expected pragma identifier

    Fix: leave the Script file field empty. RTT Viewer does not flash firmware.

    Mistake 5: RTT Viewer and nRF Connect Programmer open at the same time  

    The J-Link can only be claimed by one application. If RTT Viewer is connected and you try to use Programmer (or vice versa), one of them will fail silently or error out.

    Fix: close one before opening the other.

    Mistake 6: Not clicking "SELECT DEVICE" in nRF Connect Programmer

    The Programmer UI shows a file loaded in the left panel, but all action buttons stay grayed out until you explicitly click SELECT DEVICE and choose your J-Link. Easy to miss, looks like everything is ready.

    Bonus: UART TX was unconnected on our custom PCB

    Our custom board doesn't connect P0.06 (UART TX). The Adafruit BSP's Serial.begin() happily shifts bytes to nowhere - costs ~500ms on startup and produces nothing. We replaced all Serial logging with SEGGER RTT (SEGGER_RTT_WriteString()), which works over the same SWD cable you're already using for programming. Zero extra wires.

    The working factory flash procedure

    1. Build → produces app.hex
    2. Combine SoftDevice + app into sd_only.hex using intelhex (script above)
    3. Close RTT Viewer
    4. nRF Connect Programmer → Add file → sd_only.hex → SELECT DEVICE → Erase & write
    5. Close Programmer
    6. Open J-Link RTT Viewer → device NRF52832_XXAA, SWD, Auto Detection → connect
    7. See your firmware's log output in Terminal 0

      Hope this saves someone a day of head-scratching.

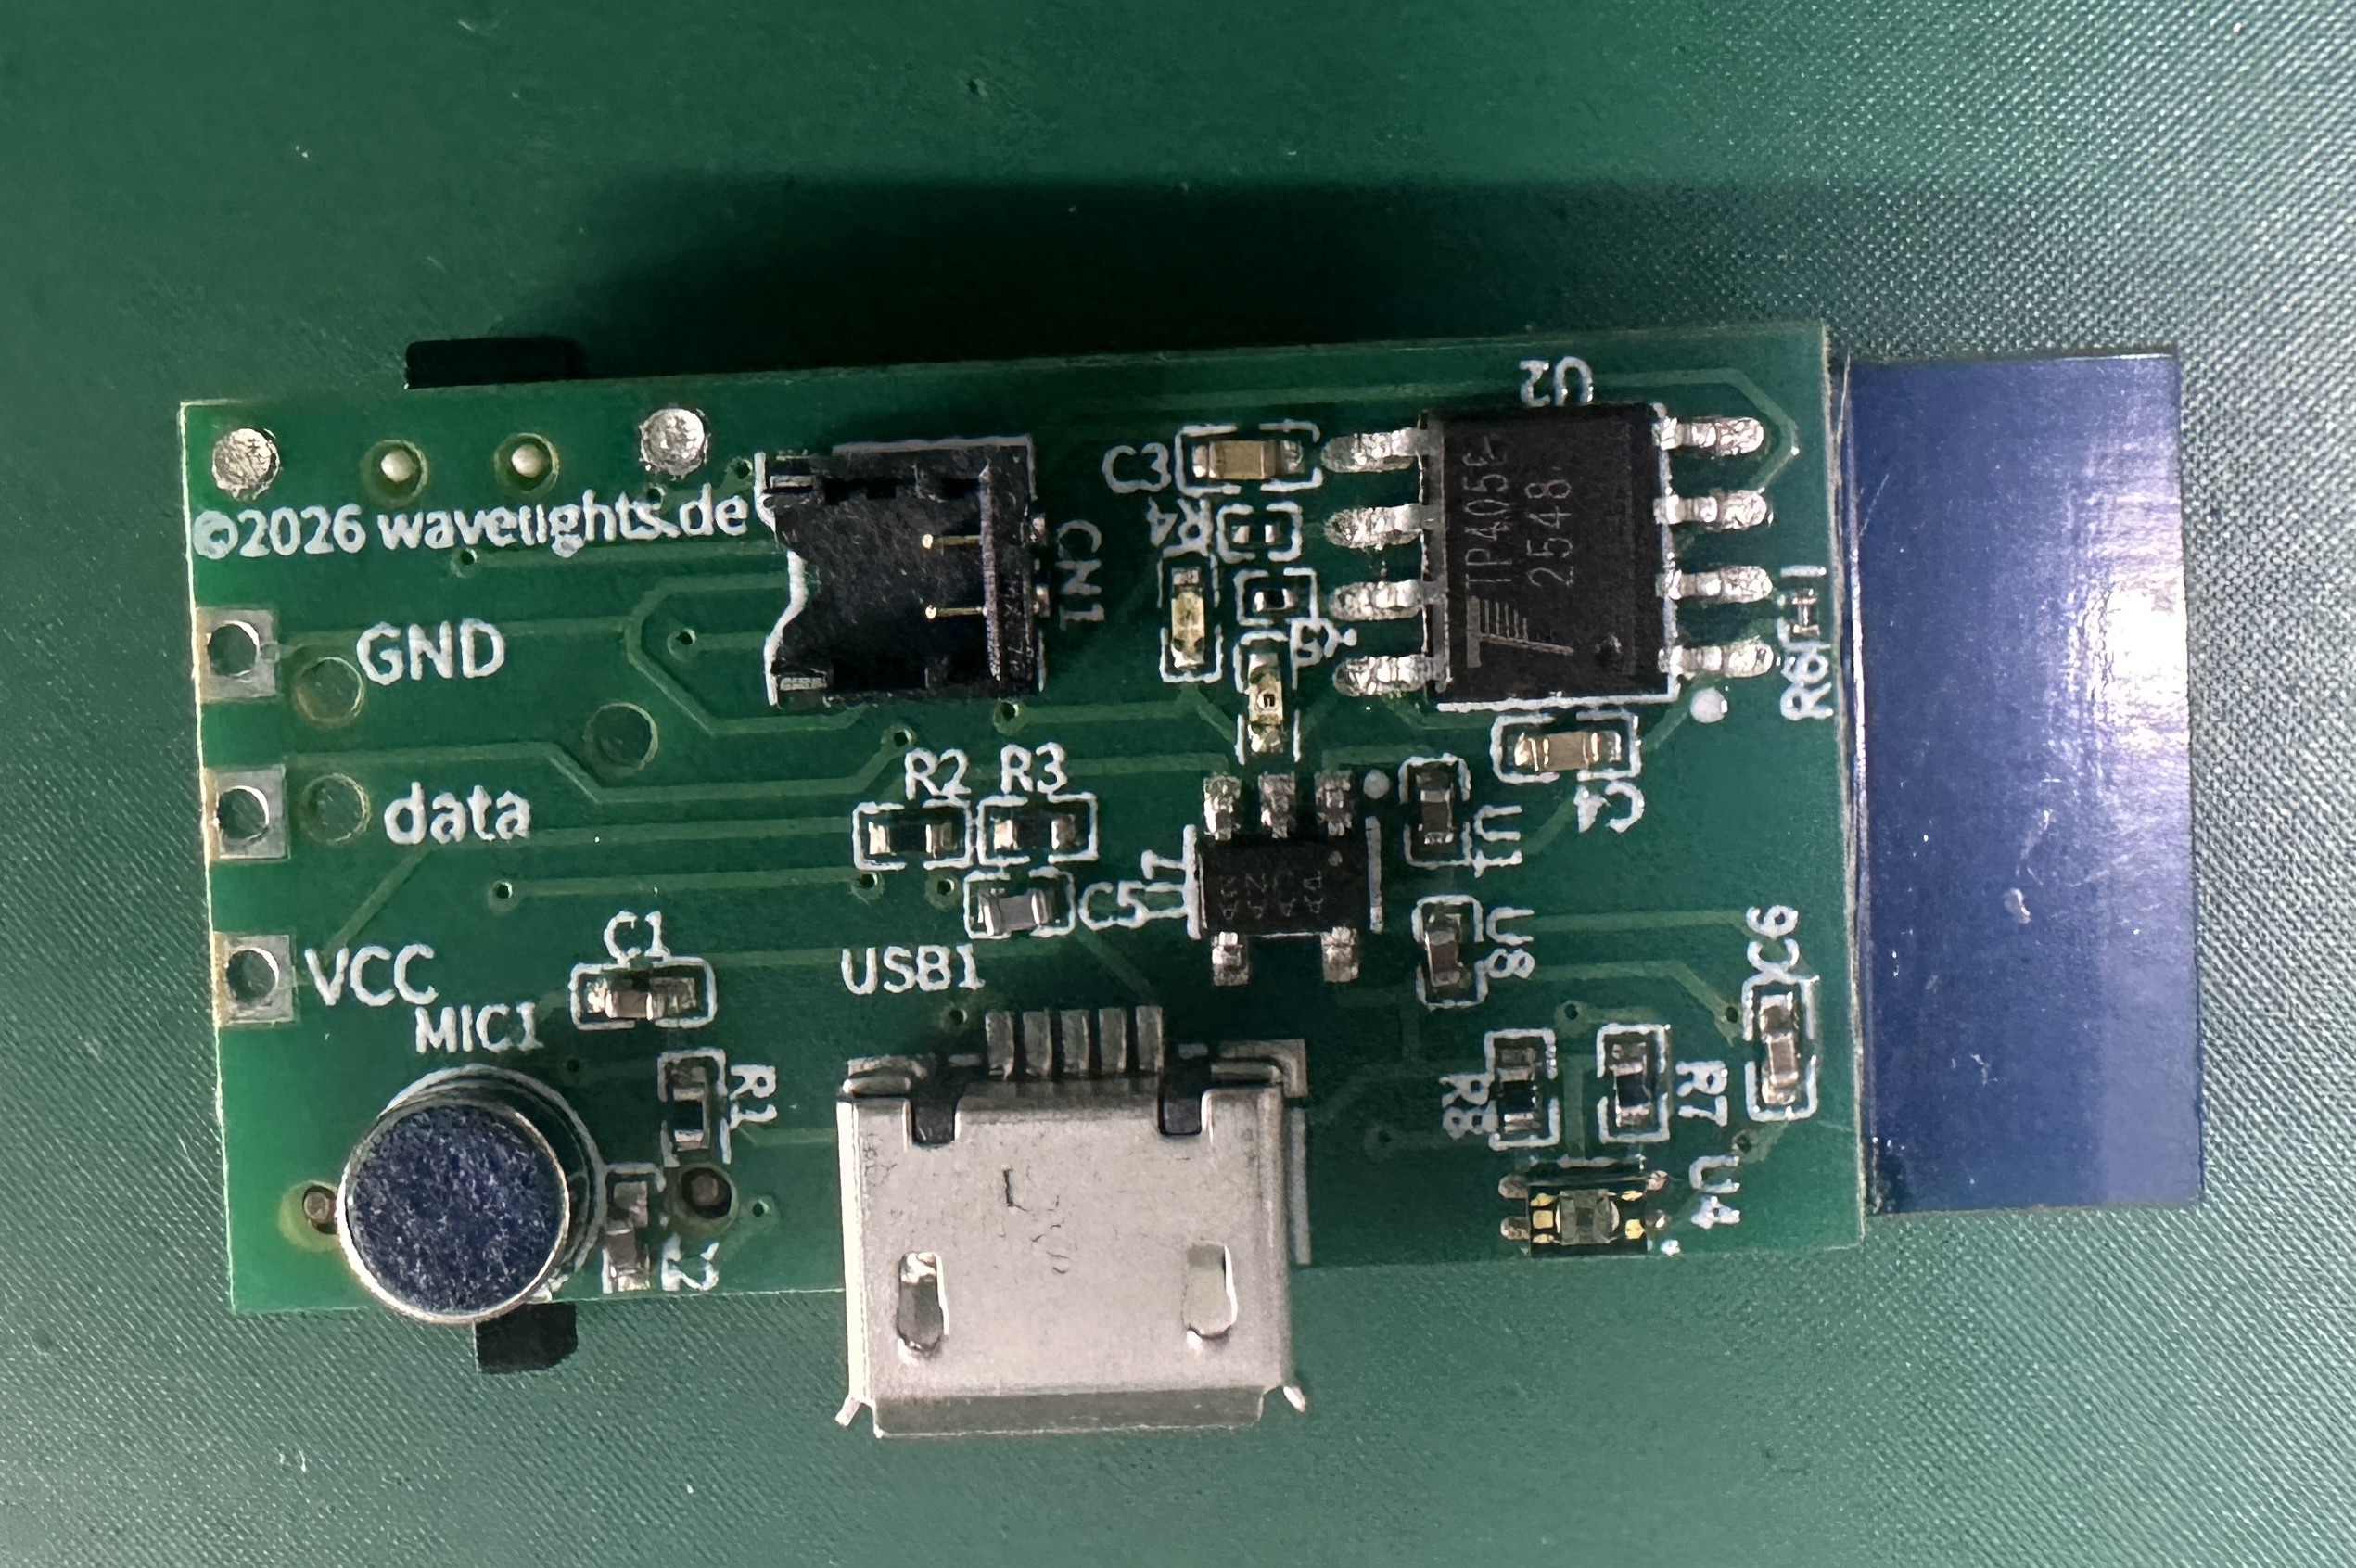
  • First production photos from the factory :: Gen3 PCBs are real

    Markus Loeffler05/22/2026 at 18:28 0 comments

    A milestone worth documenting: the first production photos of the Gen3 LumiBand PCB just arrived from Minewing, our PCB manufacturer and assembly house in China. Twenty units in the first batch.

    Seeing your own design come back from a factory fully populated is a different feeling from holding a prototype. Everything you agonized over in EasyEDA is suddenly real and physical.

    The module: RF-BM-ND04 Production uses the RF-BM-ND04, a compact nRF52832-based BLE module. Prototyping was done on an nRF52840 but the switch back to nRF52832 for production was straightforward: cost. The nRF52832 handles everything LumiBand needs at a significantly lower bill of materials cost per unit, and at festival scale that difference compounds quickly.

    The RF-BM-ND04 is a clean module with good antenna performance and a manageable footprint. Module layout around it was one of the trickier parts of the PCB design.

    Tag-Connect pads Programming is via SWD through a Tag-Connect TC2030 footprint: no header pins, no wasted board space. If you haven't used Tag-Connect before it's worth knowing about for any project where you need SWD access without committing to a permanent connector.

    What's next Units ship from China in approximately 4 weeks. First order of business when they arrive: flash firmware, verify BLE connectivity, and test the app pairing flow end to end.

    Photos in the gallery above show the populated board fresh from the factory.

    Meanwhile The Kickstarter pre-launch is live while we wait for the units to arrive - if you want to be notified when the campaign goes live, following is free and genuinely helps with the launch algorithm: Link here

  • The LumiBand app - BLE control, animations, and the joy of app store approvals

    Markus Loeffler05/13/2026 at 18:10 0 comments

    Every hardware project eventually needs an app. LumiBand is no exception, the Gen3 uses BLE for setup and control, which means someone has to write the software side. That someone was me.

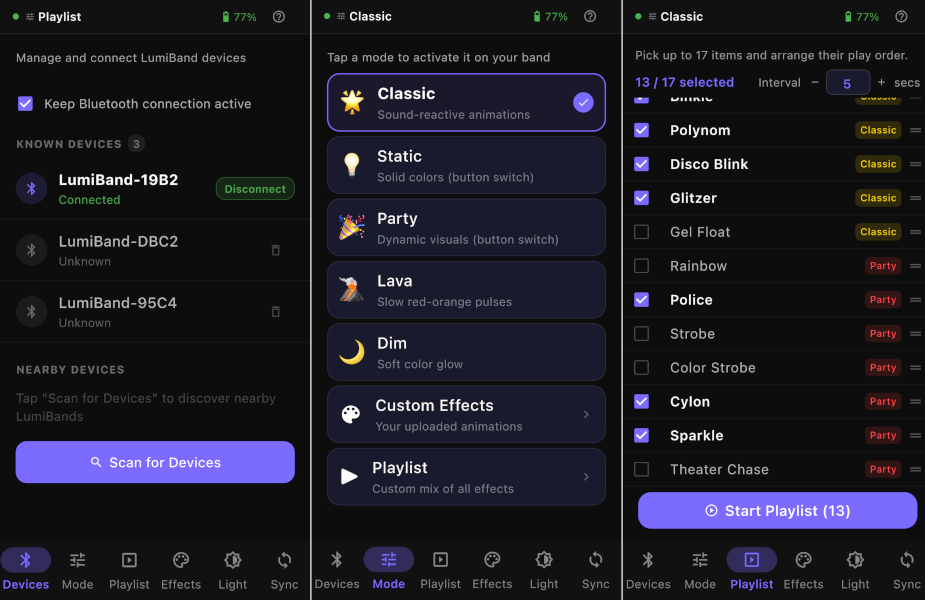
    What the app does The LumiBand app is built in Flutter, which was the right call for a solo developer needing iOS and Android from a single codebase. It handles four main functions:

    • BLE device pairing: scanning for nearby LumiBand wristbands, connecting, and managing multiple devices simultaneously. In a festival environment you might be pairing up to 6 units before a show, so the UX needed to be fast and reliable.
    • DMX addressing: assigning each wristband a DMX universe and start address directly from your phone. No laptop, no physical connector, no pulling wristbands off people's wrists. Ten seconds per unit via BLE. Once set the address persists on the device.
    • Animation control: selecting and triggering pre-built animations that react to sound directly from the app over BLE.
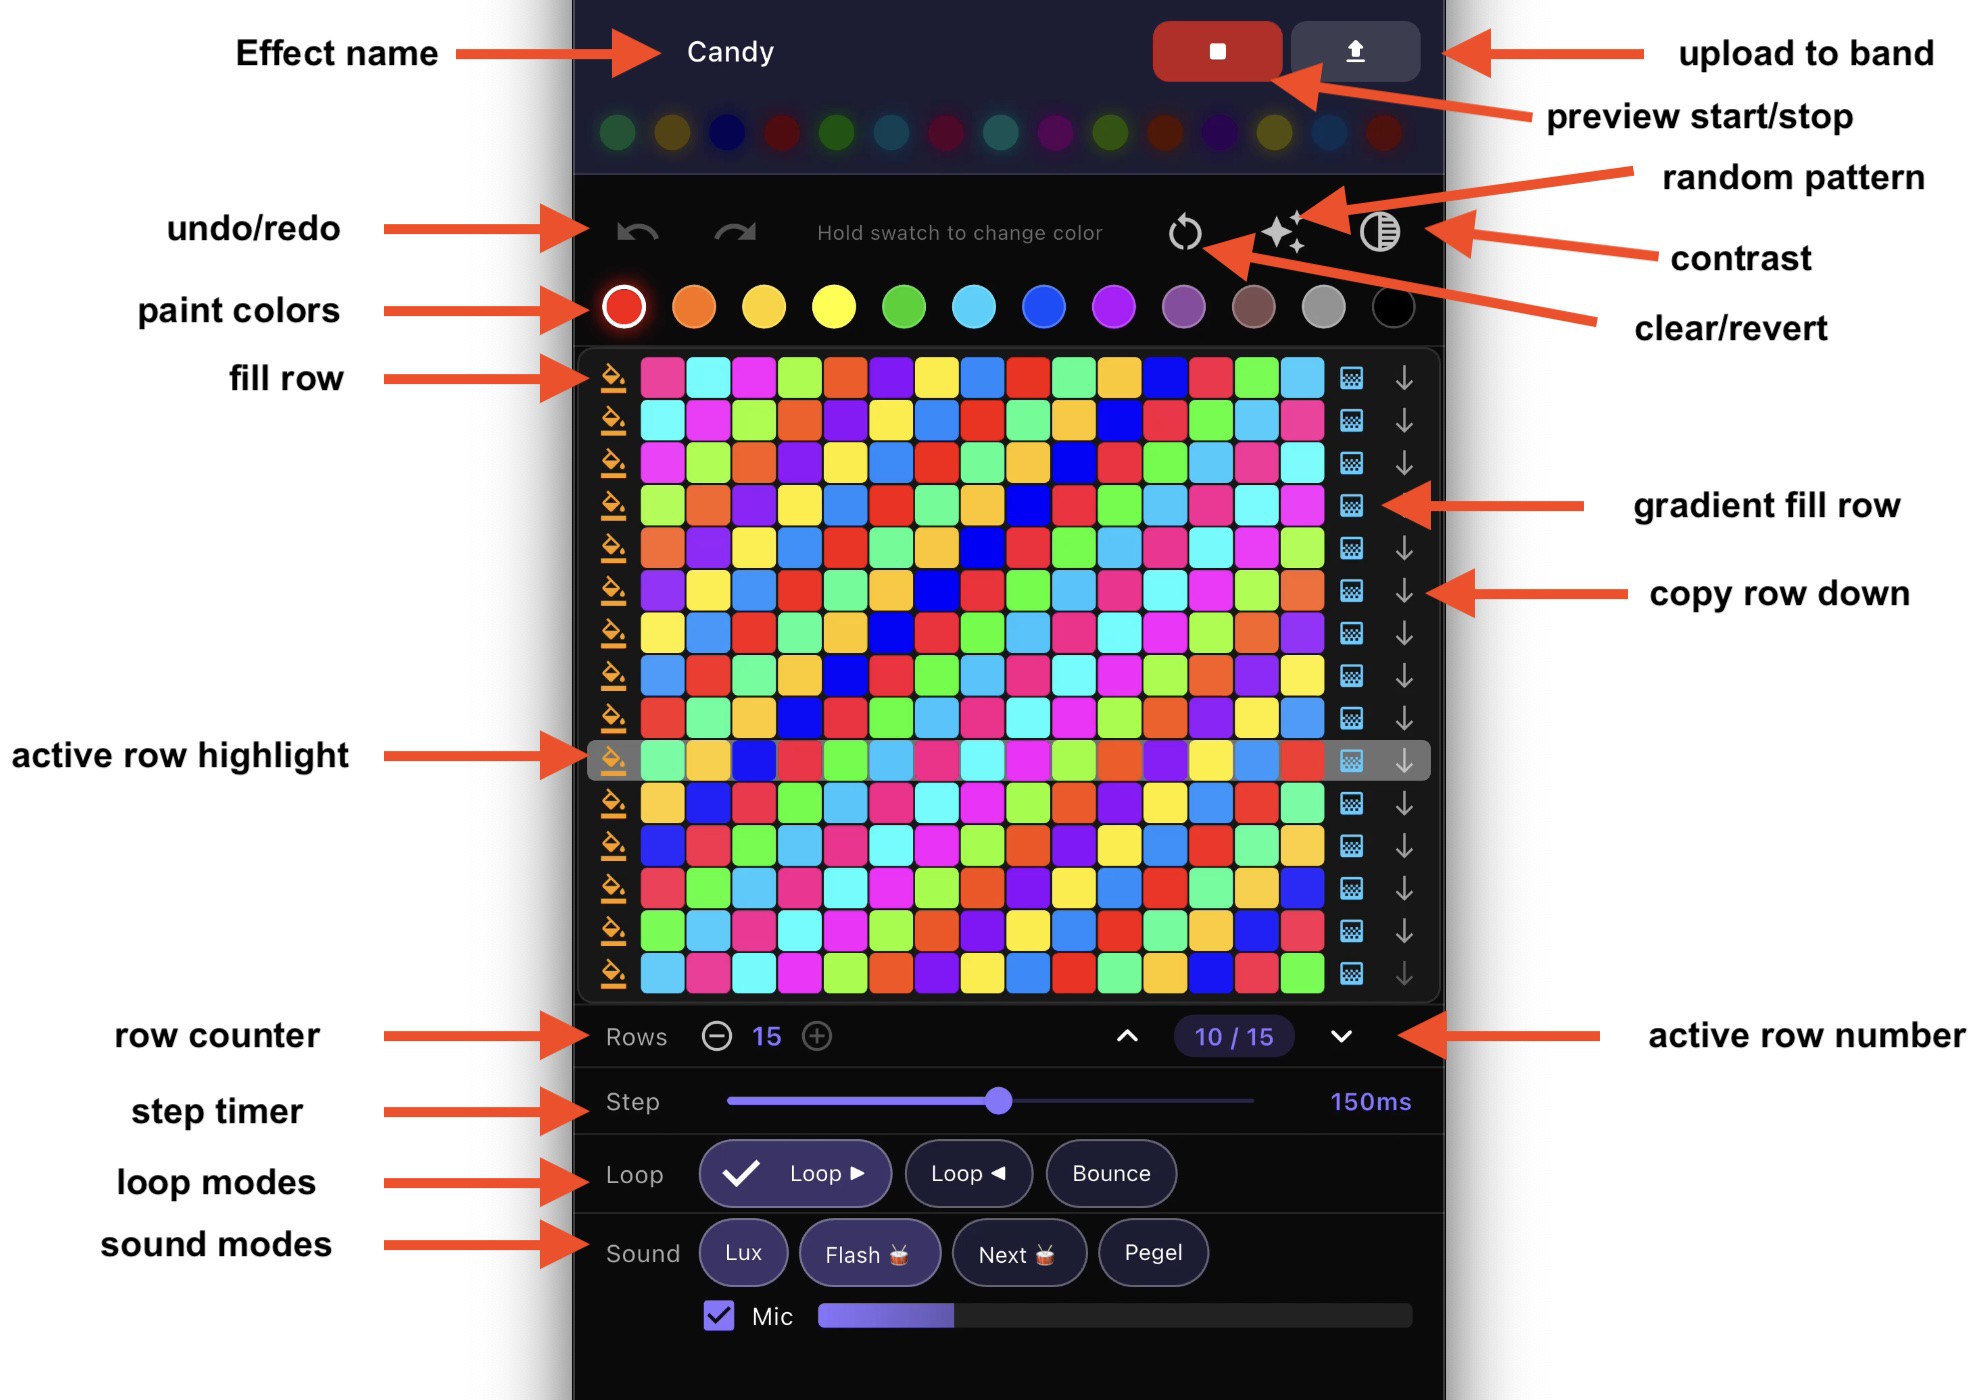
    • Live color and pattern editing: building your own visual style in real time and pushing it to connected wristbands instantly.

    App Store status iOS version is live on the App Store now, Apple's review process was straightforward for a BLE hardware companion app. They came back with an ask to record the app pairing with the actual wristband.

    Android is a different story. Google Play requires a mandatory closed testing period of at least 14 days with a minimum of 12 active testers before granting production access. The app itself passed review - it's purely a process gate. Currently recruiting Android testers to complete the requirement.

    If you have an Android device and want early access to the LumiBand app, drop a comment below :: looking for testers right now.

    Screenshots in the gallery above show the device pairing flow, basic modes, playlist, and animation editor.

  • GATT API — control LumiBand from anything with BLE

    Markus Loeffler05/02/2026 at 10:03 0 comments

    One of the goals from the start was to make LumiBand an open platform. The firmware exposes a single custom BLE service with six characteristics that let you drive the band from any language or tool that speaks BLE. 

    What you can control

    Everything the companion app does is available over GATT:

    • Solid colour + strobe — set R/G/B/brightness in one write, with an optional strobe byte (0 = steady, 1–255 = speed, logarithmic scale)
    • Master brightness — a dedicated single-byte characteristic so you can dim/brighten without touching the current colour
    • Built-in presets — Classic (sound-reactive with beat detection), Static, Party, Lava, Dim — one byte each
    • Custom effects — up to 8 uploadable animation slots, each a grid of up to 8 rows × 15 LEDs with per-effect timing, loop mode, and sound-reactive settings. A chunked upload protocol lets you push new animations over BLE in a few hundred milliseconds
    • Playlist mode — queue any combination of custom slots with a configurable interval; the band cycles through them automatically
    • Super-saver mode — blanks every other LED to halve power draw, useful for long performances
    • Multi-device clock sync — write a shared 32-bit timestamp to all bands simultaneously and they lock to the same animation frame, regardless of when each one connected
    • Status notifications — subscribe once and get pushed updates whenever mode or brightness changes; no polling needed
    • Battery level — standard Bluetooth Battery Service (0x180F), recognised automatically by nRF Connect, LightBlue, and most BLE tools


    OTA firmware update

    The nRF52832 build now also exposes the Nordic DFU service alongside the app service. Point nRF Connect at the band, select the .zip the build produces, and the bootloader handles the rest — no cable, no programmer.

    Open spec

    The full command reference, upload protocol, and working examples in Python, JavaScript, Swift, Kotlin, and QLC+ are in the GIT-repo under tools/lumiband-gatt/. If you build something with it, let us know.

  • Switching from ESP32 to nRF52840 — and why WiFi had to go

    Markus Loeffler04/24/2026 at 06:41 0 comments

    The ESP32 was the obvious choice for wireless DMX reception, native WiFi, Art-Net/sACN support, done. But obvious isn't always right.

    Running WiFi on a wristband is brutal on battery. We measured roughly 10x the power consumption compared to BLE. On a single cell LiPo that's the difference between a 6 hour festival set and a 45 minute demo. Not a trade-off we're willing to make.

    So WiFi is gone from the wristband itself. The nRF52840 handles everything over BLE - it's leaner, better suited for a wearable, and the RF performance is excellent in dense crowd environments where you have hundreds of devices competing for airspace.

    The DMX side is solved with a WiFi-BLE bridge sitting outside the wristband, a small fixed node that receives Art-Net or sACN over WiFi from the lighting console and rebroadcasts to the wristbands over BLE. The wristband stays dumb and power-efficient. The bridge handles the heavy lifting.

    New addition: VEML6040 RGBW color sensor

    Added a VEML6040 ambient light sensor to the board. I have a specific application in mind for live events that I'm not ready to share publicly yet - but if you've ever thought about what a wristband could do if it knew what color light was hitting it from the stage rig, you're probably on the right track.
    More on that when the time is right. Follow the project if you don't want to miss it.
    Next log: nRF52840 RF layout decisions and BLE performance in high-density environments.

    See the PCB below, going to small batch manufacturing now

    Check out the Kickstarter

  • From ATtiny85 + bare mic to ESP32 + wireless DMX — what changed

    Markus Loeffler04/13/2026 at 13:01 0 comments

    Gen2 was intentionally dumb. ATtiny85, 15 NeoPixels, electret mic wired straight into the ADC with no amplifier circuit. It worked because festivals are loud — the venue provides the gain. Aggressive brightness capping got 6 hours out of a single cell LiPo.
    The limitation was autonomy. Every wristband made its own beat detection decision independently. Close enough to look coordinated, but not actually synchronized.

    Gen3 solves this by making the wristband a proper DMX fixture. The ESP32 connects to a WiFi network running Art-Net or sACN and takes its cues from the lighting console. Every wristband fires exactly when the operator says so, in whatever colour and pattern they program. The crowd becomes an extension of the stage rig.
    BLE handles setup. Assigning a DMX universe and start address to a wristband takes about 10 seconds from a phone — no laptop, no physical connector, no pulling units off wrists. Once set it's persistent.
    The mic input stayed. If there's no DMX network available the wristband falls back to autonomous mode. Same 90dB+ threshold tuning as gen2. Belt and suspenders.
    Next log: PCB layout decisions and why RF decoupling on the ESP32 is less forgiving than the datasheet implies.

View all 7 project logs

Enjoy this project?

Share

Discussions

Similar Projects

Does this project spark your interest?

Become a member to follow this project and never miss any updates