 G.Vignesh
Previously I had posted logs indicating the possibility of image processing for adulteration detection using software only. In the upcoming logs I will be posting updates regarding the project using the hardware and software as well.
The hardware setup is so simple that the camera module connected to a Raspberry Pi is placed inside a closed box and a LED strip is placed inside to give suitable lighting conditions such that a perfect image can be captured and could be subjected to image processing.
Raspberry Pi 3 Model B
It is a super cool mini computer that costs only 50$ and I am using this because of its infinite possibilities. It stand out from other development boards as it supports WiFi, BLE, slots for USB, HDMI interface, camera and display ports! Install the required files and software, power up and you are ready to play!

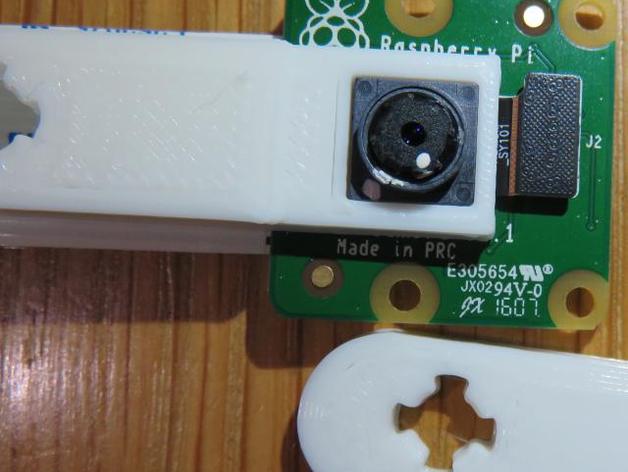
Raspberry Pi camera Version 2.1
The camera module that I have used for the project is a V2-1080p, 8 megapixel camera. I have used a normal camera and not the NoIR camera module. The NoIR effectively captures images using the IR and is mainly used for picturing images during night. On the other the normal camera can take perfect images during day or normal vision. That becomes more suitable for this project as I will be using artificial lighting.

This module comes with an infinite focus which means, objects at farther distance are more clearer than the near objects. The lens of the camera module has to be adjusted to preferred focal length by turning the lens either clockwise/anticlockwise. Since I require an focal length of less than 7cm I need to reduce the focal length by rotating the lens in anti-clockwise direction. I used a pair of pliers to adjust the focal length. One set was used to hold the base of the module tightly and the other was used to rotate the lens. During the process there were some scratches while using pliers but luckily the plastic region was damaged little bit and the lens was unharmed!!!
This is a risky process as one has to be careful with the pliers or they may end up in damaging the module and you may require to buy another module.
For time being I utilized the pliers and I would suggest to use this 3D printed custom made pliers for this process posted in thingiverse for safe usage.
https://www.thingiverse.com/thing:1574661
I rotated the lens in the anti-clockwise direction upto few degrees(upto 240 degrees) until I obtained a clear picture at a focal length of 4cm!
Note: Try not to rotate the lens to maximum extent which may result in unscrewing of the lens from the module and dust may get collected inside preventing us to take perfect images.
Testing
Now plug in the module to the raspberry pi with pre-installed Raspbian jesse OS and power up the Pi. If you are using it for the first time type user name as "pi" and password as "raspberry". Now open system configuration and enable camera. The system will reboot and after rebooting test whether the camera is able to take pictures.
 To install the camera support enter the code in a terminal.
sudo apt-get update
sudo apt-get install python-picamera
Now open a terminal and enter the following simple code to take a picture.
import picamera
camera = picamera.PiCamera()
camera.capture('image.jpg')
Now open the file explorer and check out the image how well it had been pictured.
Check out several features such as adjusting brightness and contrast to your image and even taking images using filters such as gray scale etc.. provided in the raspberry pi documentation.
https://www.raspberrypi.org/documentation/usage/camera/python/README.md
The hardware part is set up and lets place these in a suitable closed environment such that all the components are placed in a compact box and for better lighting conditions....
Discussions
Become a Hackaday.io Member
Create an account to leave a comment. Already have an account? Log In.