 Ken Yap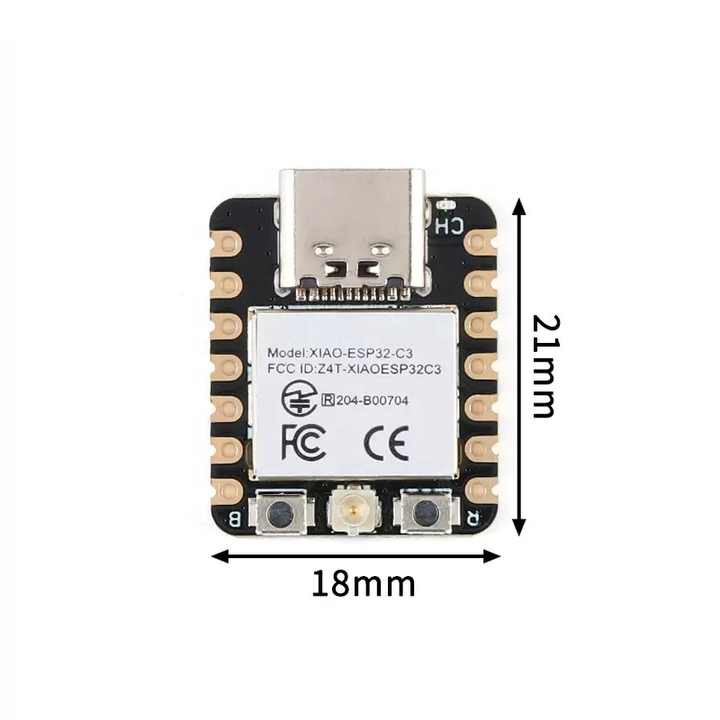
The Seeed Xiao ESP32C3 packs an incredible amount of features on a tiny board. The SOC MCU is an Espressif ESP32C3 running at up to 160 MHz. It comes with 400 kB SRAM and 4 MB flash, plus 2.4 GHz WiFi and BLE 5.0 Bluetooth. I got mine cheap when Seeed was promoting them. So why not try to get this working with Rust/Embassy and get one step closer to being able to build embedded apps for the tiny RISC-V MCU board in the cover picture?
Are you tired of blinky yet? I'm not. Blinky is not the point. If I wanted to flash an LED at 1 Hz, I could do it with any MCU, or even a 555 chip. The goal of all these blinky exercises is to work out how to use the Rust/Embassy toolchains to write async embedded apps.
I thought I had found a good tutorial at https://shanesnover.com/2025/01/28/bootstrap-embassy-esp32c3.html. But on trying out the steps and updating the versions of the crates used, it turns out it's out of date, and it's less than 2 years old. For one thing esp-hal-embassy is no longer maintained. Right at the top of the crate page it says:
🚧 This crate is no longer maintained 🚧

This crates functionality has been merged into esp-rtos, where further development will occur.
So I browse the esp-rtos crate which is maintained by Espressif. From there I find that Espressif has a book on programming with Rust on ESP products. So they are supporting Rust on their products. Under toolchain installation I find that I have to do:
$ rustup target add riscv32imc-unknown-none-elf
for the C3. Under tooling installation I find that I have to do:
$ cargo install esp-generate --locked
$ cargo install espflash --locked
to install 2 auxiliary tools. Great, that should save me a lot of work. So I do:
$ esp-generate --chip=esp32c3 esp32c3-rust-blinky
This brings up a ncurses configuration screen:
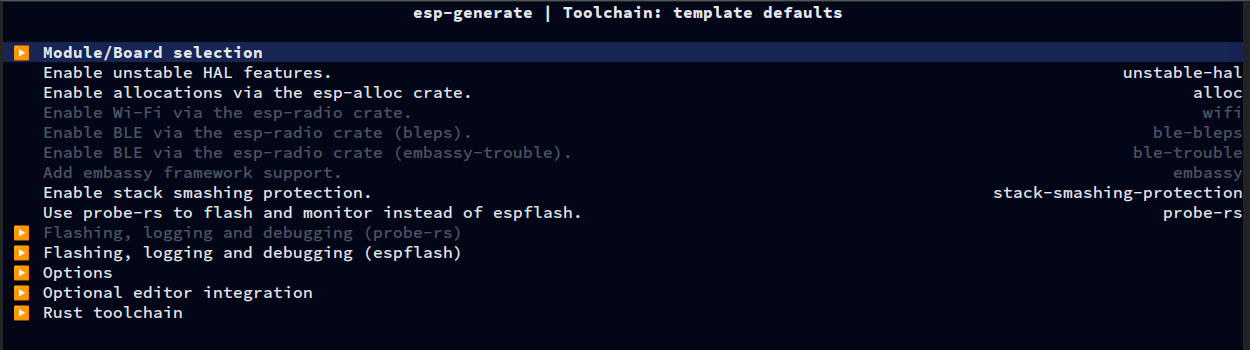
I save the setup with s, and it creates my project crate. Looking at src/bin/main.rs, I see:
#![no_std]
#![no_main]
#![deny(
    clippy::mem_forget,
    reason = "mem::forget is generally not safe to do with esp_hal types, especially those \
    holding buffers for the duration of a data transfer."
)]
#![deny(clippy::large_stack_frames)]

use esp_hal::clock::CpuClock;
use esp_hal::main;
use esp_hal::time::{Duration, Instant};

#[panic_handler]
fn panic(_: &core::panic::PanicInfo) -> ! {
    loop {}
}

// This creates a default app-descriptor required by the esp-idf bootloader.
// For more information see:
esp_bootloader_esp_idf::esp_app_desc!();

#[allow(
    clippy::large_stack_frames,
    reason = "it's not unusual to allocate larger buffers etc. in main"
)]
#[main]
fn main() -> ! {
    // generator version: 1.3.0
    // generator parameters: --chip esp32c3

    let config = esp_hal::Config::default().with_cpu_clock(CpuClock::max());
    let _peripherals = esp_hal::init(config);

    loop {
        let delay_start = Instant::now();
        while delay_start.elapsed() < Duration::from_millis(500) {}
    }

    // for inspiration have a look at the examples at https://github.com/esp-rs/esp-hal/tree/esp-hal-v1.1.0/examples
}
Ah no, this is not an async app. The MCU keeps polling the timer until 500 ms have elapsed. Looking again at the configuration screen, I should Add Embassy framework support. For that to be possible, I have to Enable unstable HAL features. Live dangerously I say. So the configuration screen is this:
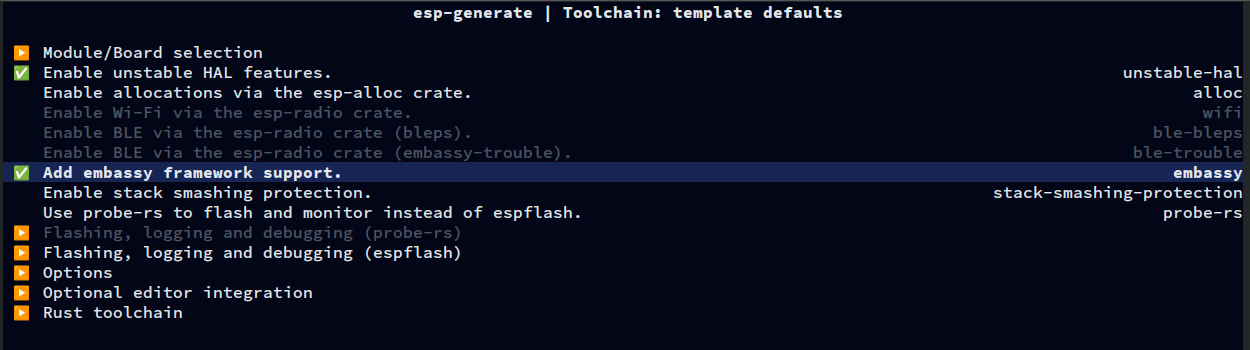
Another esp-generate run and I get this for src/bin/main.rs:
#![no_std]
#![no_main]
#![deny(
    clippy::mem_forget,
    reason = "mem::forget is generally not safe to do with esp_hal types, especially those \
    holding buffers for the duration of a data transfer."
)]
#![deny(clippy::large_stack_frames)]

use embassy_executor::Spawner;
use embassy_time::{Duration, Timer};
use esp_hal::clock::CpuClock;
use esp_hal::timer::timg::TimerGroup;

#[panic_handler]
fn panic(_: &core::panic::PanicInfo) -> ! {
    loop {}
}

// This creates a default app-descriptor required by the esp-idf bootloader.
// For more information see:
esp_bootloader_esp_idf::esp_app_desc!();

#[allow(
    clippy::large_stack_frames,
    reason = "it's not unusual to allocate larger buffers etc. in main"
)]
#[esp_rtos::main]
async fn main(spawner: Spawner) -> ! {
    // generator version: 1.3.0
    // generator parameters: --chip esp32c3 -o unstable-hal -o embassy

    let config = esp_hal::Config::default().with_cpu_clock(CpuClock::max());
    let peripherals = esp_hal::init(config);

    let timg0 = TimerGroup::new(peripherals.TIMG0);
    let sw_interrupt =
        esp_hal::interrupt::software::SoftwareInterruptControl::new(peripherals.SW_INTERRUPT);
    esp_rtos::start(timg0.timer0, sw_interrupt.software_interrupt0);

    // TODO: Spawn some tasks
    let _ = spawner;

    loop {
        Timer::after(Duration::from_secs(1)).await;
    }

    // for inspiration have a look at the examples at https://github.com/esp-rs/esp-hal/tree/esp-hal-v1.1.0/examples
}
Much better, we have the familiar Timer::after().await which triggers task (coroutine) switching.
But this app does nothing. It may be async but it doesn't do any work in between awaits. So I modify the code, and I'll show just the differences. BTW, the TODO shows where you would spawn other tasks (coroutines).
@@ -10,6 +10,7 @@
 use embassy_executor::Spawner;
 use embassy_time::{Duration, Timer};
 use esp_hal::clock::CpuClock;
+use esp_hal::gpio::{Level, Output, OutputConfig};
 use esp_hal::timer::timg::TimerGroup;

 #[panic_handler]
@@ -41,8 +42,12 @@
     // TODO: Spawn some tasks
     let _ = spawner;

+    let mut led = Output::new(peripherals.GPIO10, Level::Low, OutputConfig::default());
     loop {
-        Timer::after(Duration::from_secs(1)).await;
+        led.set_high();
+        Timer::after(Duration::from_millis(500)).await;
+        led.set_low();
+        Timer::after(Duration::from_millis(500)).await;
     }

     // for inspiration have a look at the examples at https://github.com/esp-rs/esp-hal/tree/esp-hal-v1.1.0/examples
Does it work? I plunge ahead and do:
$ cargo run
    Finished `dev` profile [optimized + debuginfo] target(s) in 0.57s
     Running `espflash flash --monitor --chip esp32c3 target/riscv32imc-unknown-none-elf/debug/esp32c3-rust-blinky`
[2026-08-03T09:50:12Z INFO ] Serial port: '/dev/ttyACM0'
[2026-08-03T09:50:12Z INFO ] Connecting...
[2026-08-03T09:50:12Z INFO ] Using flash stub
Chip type:         esp32c3 (revision v0.4)
Crystal frequency: 40 MHz
Flash size:        4MB
Features:          WiFi, BLE
MAC address:       34:85:18:25:c3:20
App/part. size:    102,816/4,128,768 bytes, 2.49%
[00:00:00] [========================================]       1/1       0x0      Verifying... OK!                             [00:00:00] [========================================]       1/1       0x8000   Verifying... OK!                             [00:00:01] [========================================]       2/2       0x10000  Verifying... OK!                             [2026-08-03T09:50:14Z INFO ] Flashing has completed!
Commands:
    CTRL+R    Reset chip
    CTRL+C    Exit

ESP-ROM:esp32c3-api1-20210207
Build:Feb  7 2021
rst:0x15 (USB_UART_CHIP_RESET),boot:0x8 (SPI_FAST_FLASH_BOOT)
Saved PC:0x40380862
SPIWP:0xee
mode:DIO, clock div:2
load:0x3fcd5820,len:0x15c4
load:0x403cbf10,len:0xc84
load:0x403ce710,len:0x2fd0
entry 0x403cbf1a
I (24) boot: ESP-IDF v5.5.1-838-gd66ebb86d2e 2nd stage bootloader
I (25) boot: compile time Nov 26 2025 12:25:17
I (25) boot: chip revision: v0.4
I (26) boot: efuse block revision: v1.2
I (30) boot.esp32c3: SPI Speed      : 40MHz
I (34) boot.esp32c3: SPI Mode       : DIO
I (37) boot.esp32c3: SPI Flash Size : 4MB
I (41) boot: Enabling RNG early entropy source...
I (46) boot: Partition Table:
I (48) boot: ## Label            Usage          Type ST Offset   Length
I (54) boot:  0 nvs              WiFi data        01 02 00009000 00006000
I (61) boot:  1 phy_init         RF data          01 01 0000f000 00001000
I (67) boot:  2 factory          factory app      00 00 00010000 003f0000
I (74) boot: End of partition table
I (77) esp_image: segment 0: paddr=00010020 vaddr=3c000020 size=03b3ch ( 15164) map
I (88) esp_image: segment 1: paddr=00013b64 vaddr=3fc80dd8 size=005a4h (  1444) load
I (92) esp_image: segment 2: paddr=00014110 vaddr=40380000 size=00dd8h (  3544) load
I (100) esp_image: segment 3: paddr=00014ef0 vaddr=00000000 size=0b128h ( 45352)
I (117) esp_image: segment 4: paddr=00020020 vaddr=42010020 size=0915ch ( 37212) map
I (126) boot: Loaded app from partition at offset 0x10000
I (126) boot: Disabling RNG early entropy source...
One thing the Seeed Xiao ESP32C3 doesn't have is a builtin LED. That's probably a good thing. I have been annoyed by dev boards where you have to use the LED pin for another signal, and your resulting gadget flashes the LED, which is often blue and quite bright.
So because I'm lazy, instead of wiring up a LED and current limiting resistor between GPIO10 and GND, I put voltmeter probes on those pins, and it swings between 0 V and 3.3 V at 1 Hz. Success!
This wasn't quite as simple as I thought it would be for the RISC-V MCU. The reason is I'm dealing with a RISC-V based SOC which has quite a lot of features. So I will have to do another blinky, but for the simple CH32V003F4P6 dev board. Then I can summarise what I have learnt after all this blinking.
Discussions
Become a Hackaday.io Member
Create an account to leave a comment. Already have an account? Log In.