Preston Blackburn
This project addresses the challenge of capturing audio from remote nodes while prioritizing privacy. A remote monitor deployed in public capturing raw audio data with no guardrails is functionally a surveillance device. To maximize privacy and offer a lower cost DIY option to record audio, this project implements Lora for audio transfer, which does not have the bandwidth to send high quality raw audio. All of the code and files for the project are open source to further increase transparency, and to others to build their own.
Instructions
These instructions assume you already have a high level understanding of some of the underlying tech. I'll go through some of the key pieces of the setup.
If people are interested I may put together a more in-depth walkthrough.
The microprocessor
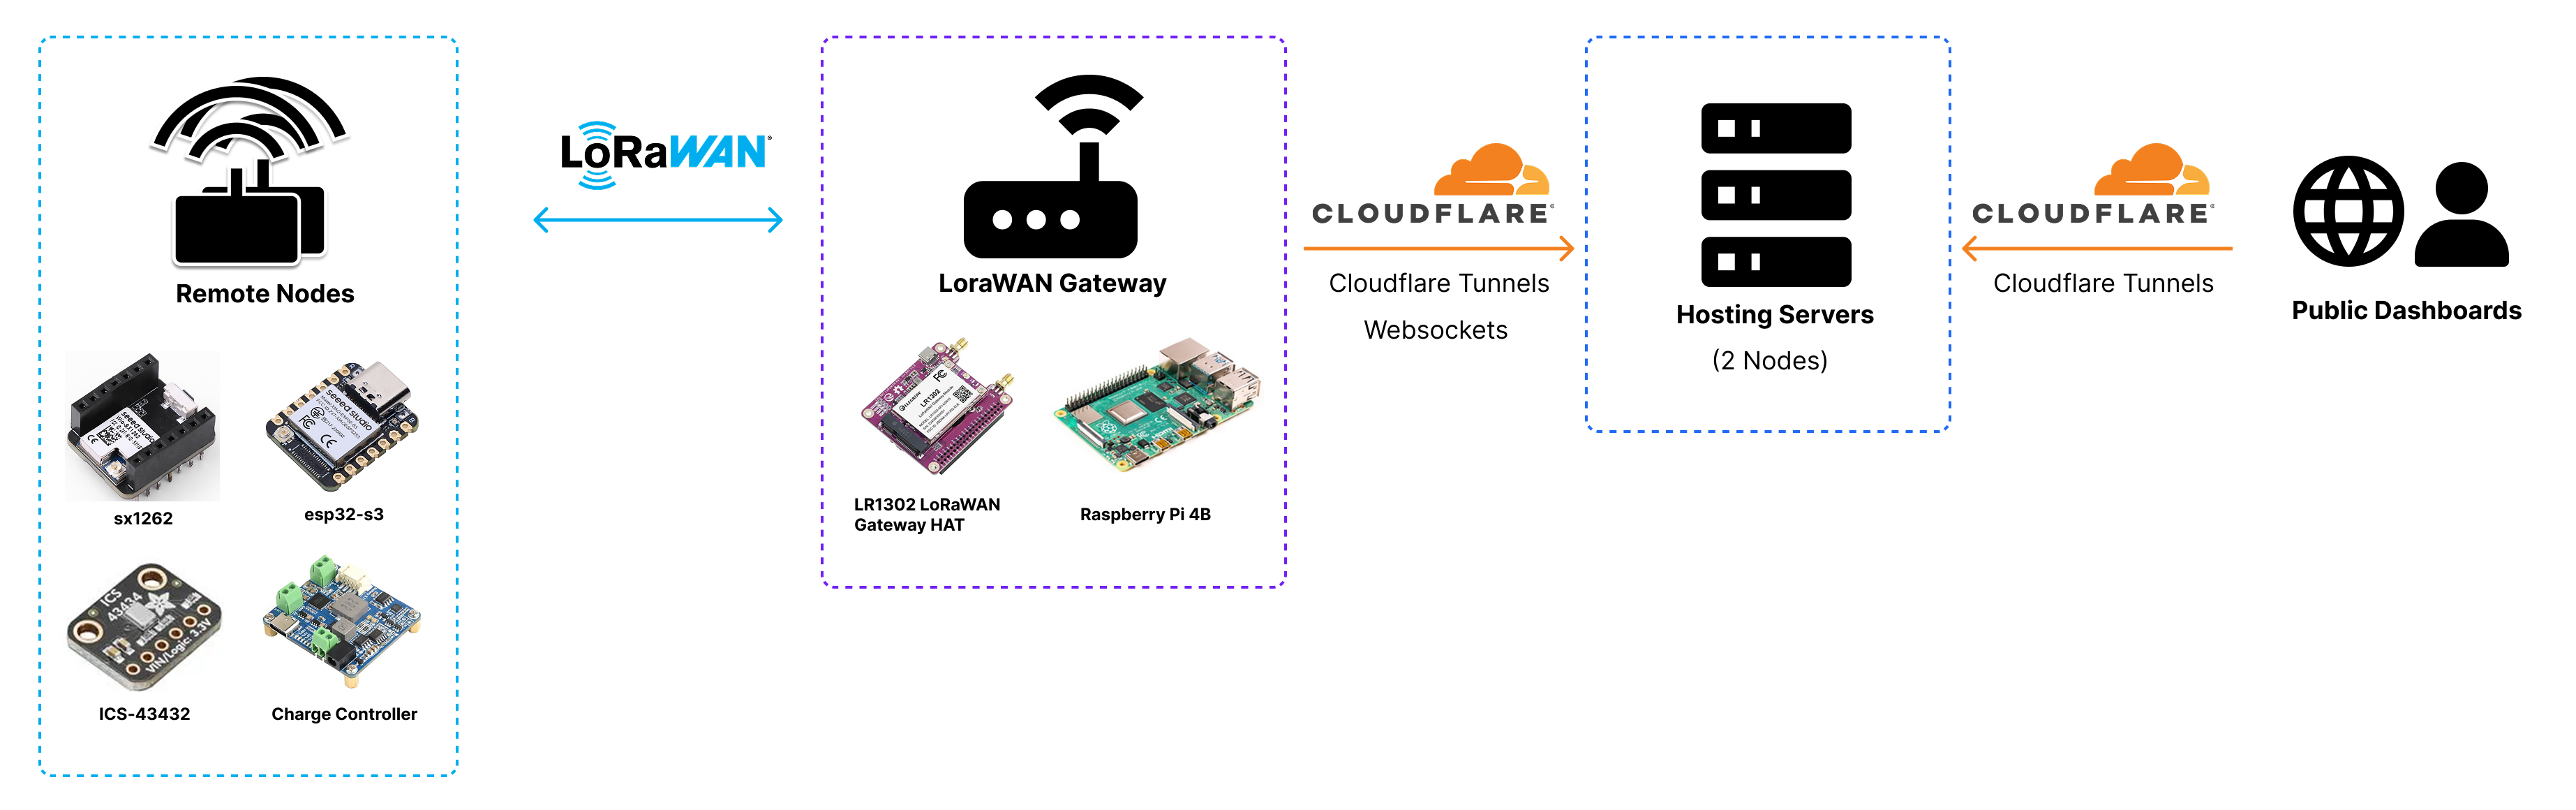
I actually started with the raspberry pi pico for this project, but I quickly found that the ESP32-S3 has much better support for a project like this and the additional processing power is nice to have. We also need some additional GPIO pins, since we are using the SX1262 Lora hat, so ESP32-S3 plus model is recommended.
The ESP-IDF (Espressif IoT Development Framework) has some really nice features for a more complex project like this (at least more complex than past projects I've done). I'd also recommend going through the setup and getting started guide for the ESP-IDF cli - https://docs.espressif.com/projects/esp-idf/en/stable/esp32/get-started/index.html
Capturing Audio Data
We don't just want to capture the total noise levels, but the noise levels at varying frequencies. To capture audio data we'll use the Adafruit ICS-43432 breakout board. We'll capture the audio from the mic using the I2S protocol and the driver from esp-idf. The audio data is pushed to a ring buffer allows us to continuously capture audio samples. A second task processes the data in the ring buffer and applies the Short-Time Fourier Transform (STFT) to decompose the audio into a full frequency spectrum, and those are aggregated into four separate frequency bands.
Using Lora/Lorawan
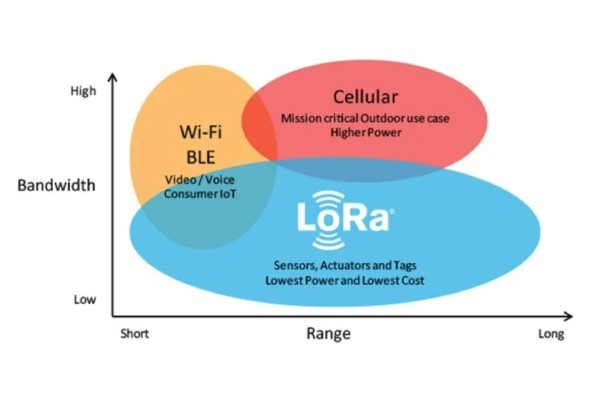
Next we need to get the data back to our servers. To push data from our remote nodes to the centralized gateway we'll use Lora. It is commonly used for off-grid communication in mesh networks like Meshtastic. While it has lower bandwidth than Cellular communication, it can also transmit data tens of miles under favorable conditions.This lower bandwidth is actually a perk for us. Lorawan has around 1000x slower data transfer rate than 5G cellular, which means it can't send high quality audio data like Cellular can.
To equip our ESP32-S3 with lora we can use the SX1262 lora hat and the Radiolib library (https://github.com/jgromes/RadioLib). After processing the audio data we produce an custom 11 byte message with the decibel (dBFS) measurements at four different frequency ranges. The message is in the format: version | type | length | band 0 | band 1 | band 2 | band 3 |.
Gateway + Chirpstack
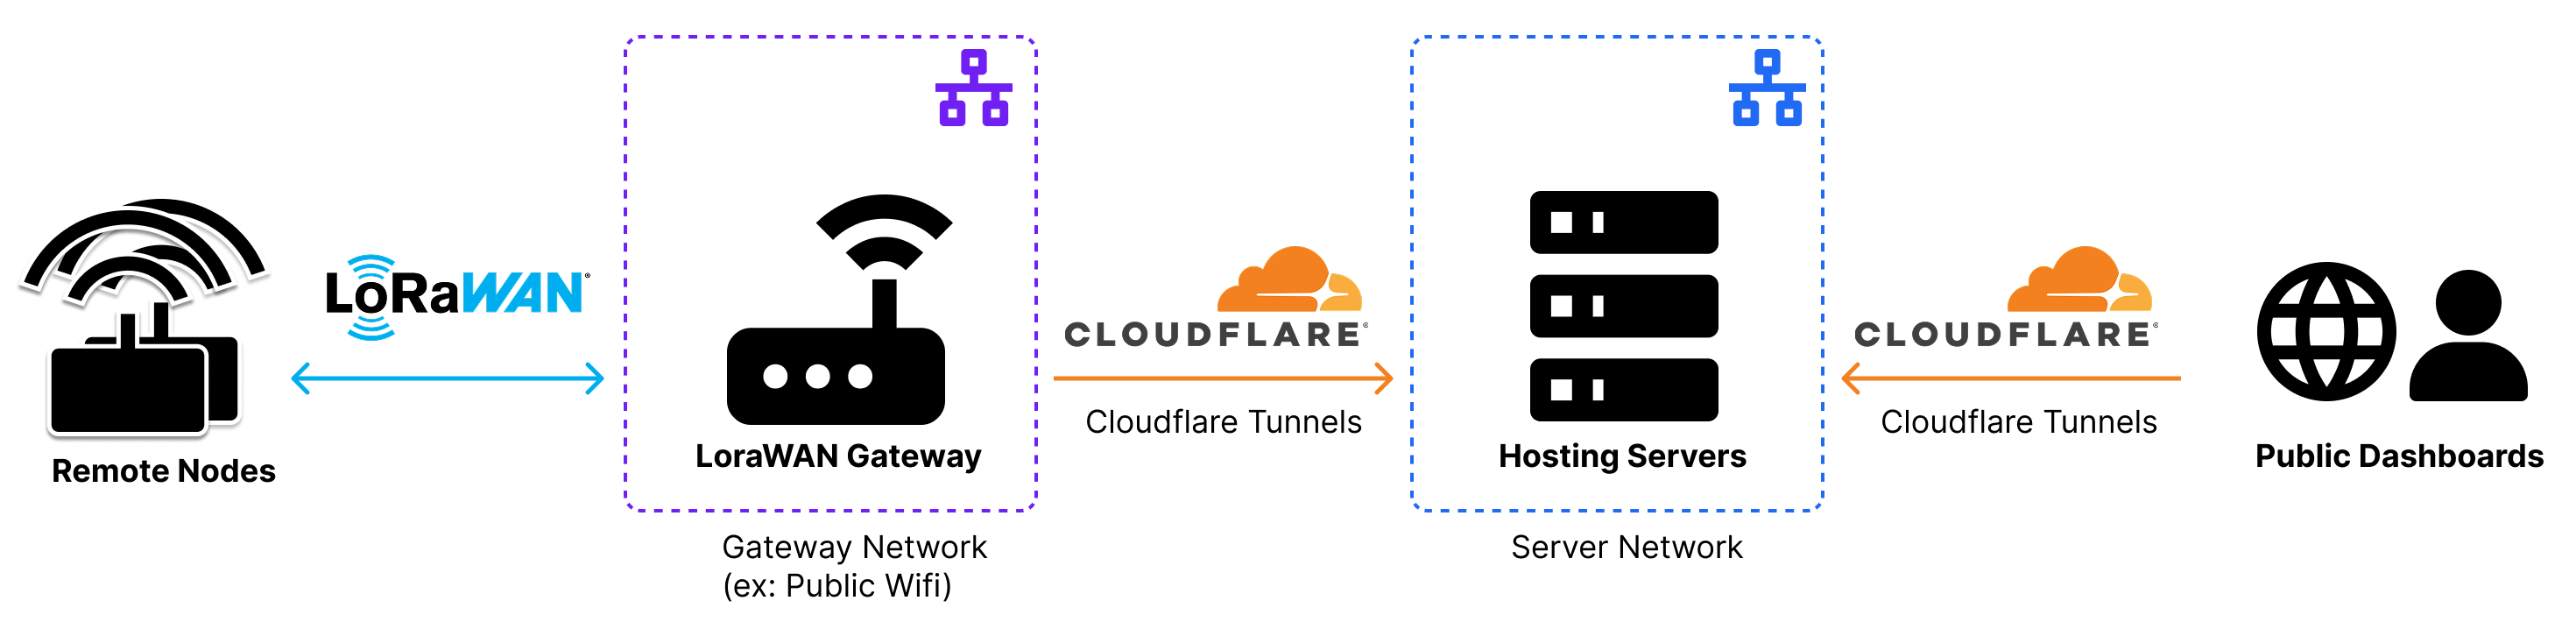
Chirpstack is another awesome open source project that makes all of this cross-device communication possible. It helps facilitate receiving the messages, forwarding them to the server, and decoding the message. It runs on both the LoraWAN gateway and my server. I even made a custom helm chart for Chirpstack so I can manage it more easily through ArgoCD.
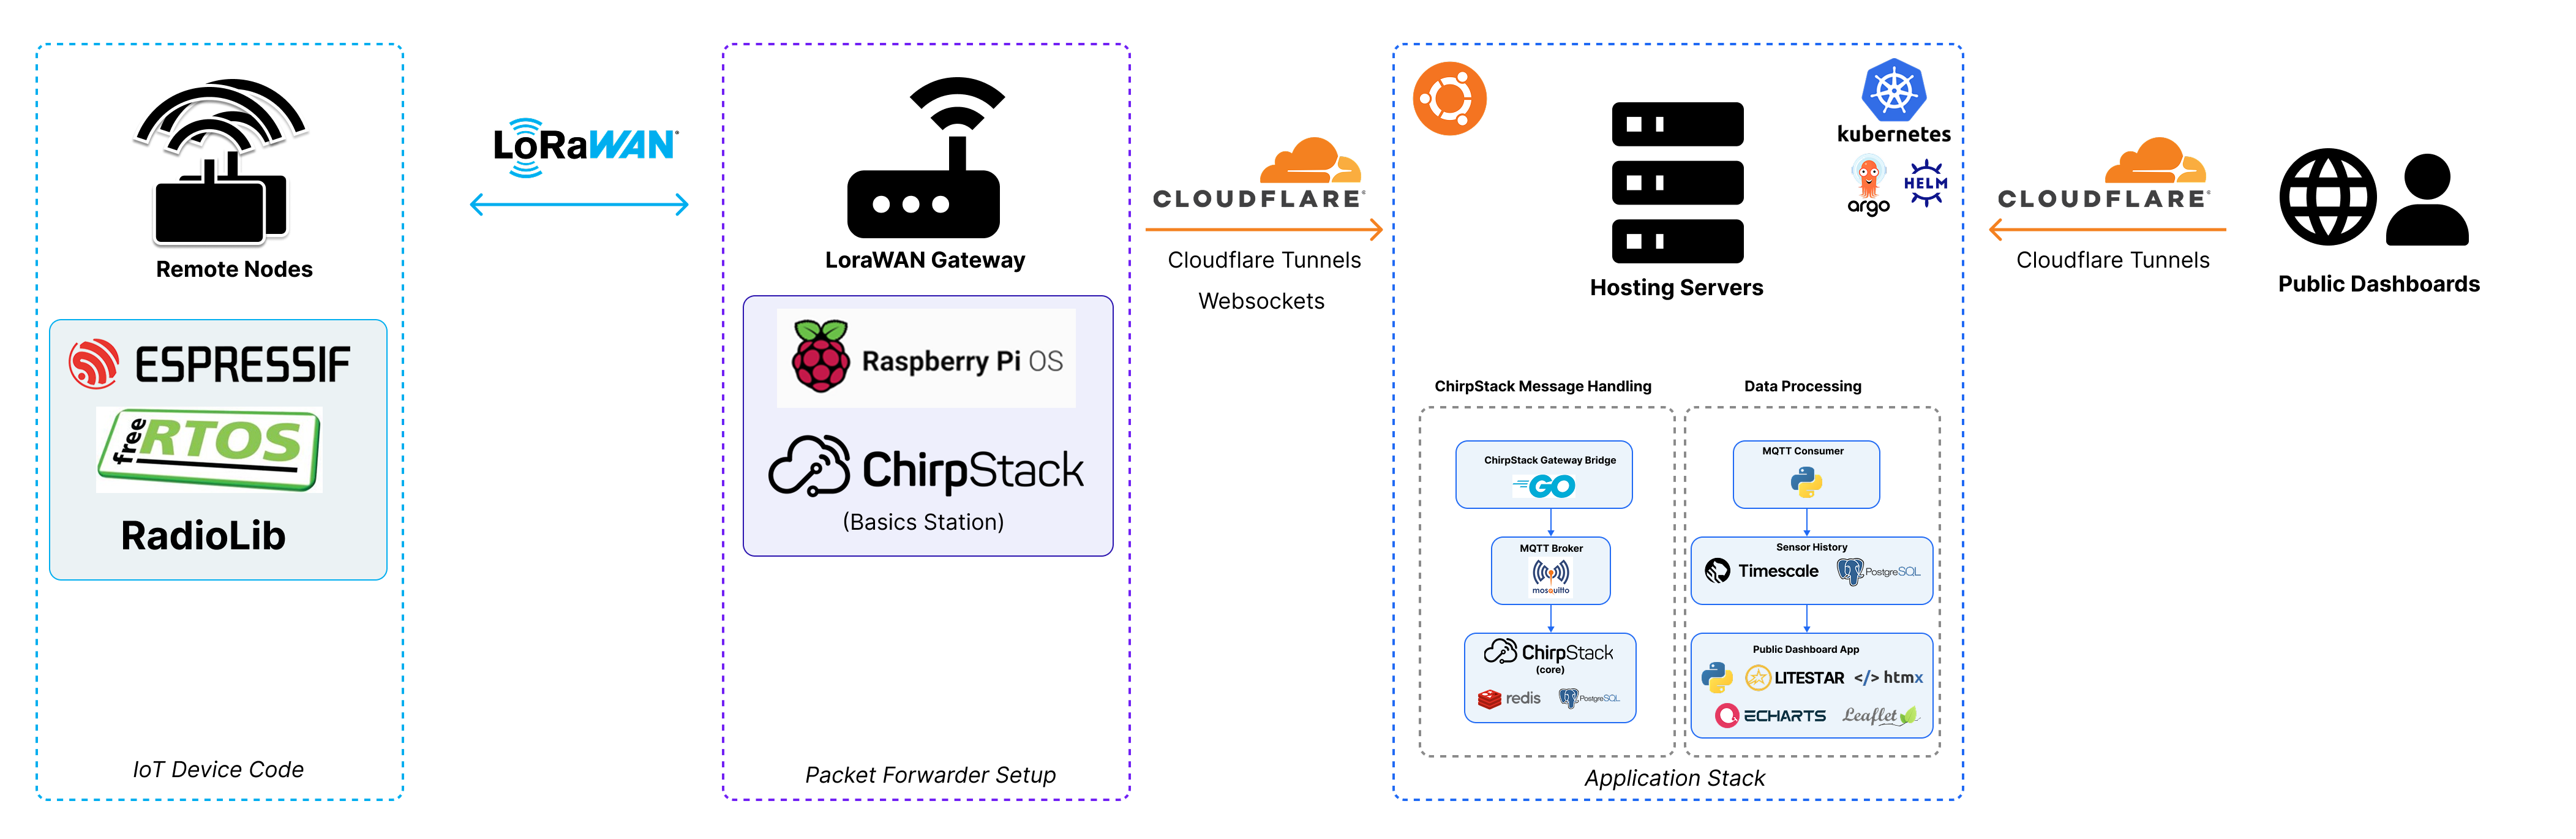
For the gateway hardware I ended using my raspberry pi 4B with a LR1302 LoRaWAN Gateway hat, which has some pretty good docs on Elecrow's site - https://www.elecrow.com/wiki/lr1302-lorawan-gateway-module.html
To run the gateway completely remotely I used a Soracom Onyx Cellular USB modem with a 1nce SIM card. This also assumes that you have a public endpoint that you can with your Chirpstack gateway, which I setup on my homelab. Since Chirpstack basicstation communicates over Websockets, Cloudflare tunnels will work. Note that the UDP packet forwarder in the Elecrow docs will not work because they communicate over layer 4, while cloudflare tunnels work best with layer 7 traffic.
Solar Setup
The solar setup is pretty standard. I use the waveshare solar power manager module with two 18650 batteries and a 10W 12V solar panel. It could potentially use a larger solar panel and more batteries to last a little longer, but I haven't had any issues in the testing I've done so far.
3D Printable Case
The last piece of this project was the 3D printed case. The main goal of the case was to just keep the components dry and provide a standoff for the mic. I think it turned out well for my first real FreeCAD project, but I'm sure there are a lot of improvements that could be made.