 Armin van der Togt
Debugging WCH RISC-V chips with plain CMSIS-DAP: an emulated JTAG DTM
One goal of OpenMUPP (Open Multi-architecture Universal Programmer & Probe) is one probe for many target families. The host must not need a vendor USB protocol, a driver install, or a different dongle for each family.
For ARM Cortex-M, CMSIS-DAP v2 already does this. It uses WinUSB, so Linux, macOS and Windows need no driver. probe-rs, mainline OpenOCD and pyOCD support it.
WCH RISC-V chips are a different case. The range goes from the very cheap CH32V003 to the CH32V20x and CH32V30x.
The problem with WCH tooling
To program and debug a WCH RISC-V chip, you usually need a WCH-LinkE. The WCH-LinkE is cheap, but it uses a WCH-specific USB protocol. The host then needs the WCH fork of OpenOCD, or a tool that knows the protocol: wlink, minichlink, or the wlink driver of probe-rs.
On the target side, WCH does not use JTAG or cJTAG. WCH uses its own serial debug interface (SDI):
- One wire on SWDIO, for the CH32V003 and the CH32V00x.
- Two wires (SWDIO and SWCLK), for the larger chips such as the CH32V20x.
Both variants give access to the standard RISC-V Debug Module through the DMI (Debug Module Interface). The OpenMUPP firmware has personalities: each personality makes the probe act as a different type of probe. A separate wch-link personality makes the probe act as a WCH-LinkE in RISC-V mode, so wlink and minichlink work with it. But that path keeps the WCH USB protocol, the tools that know it, and a Zadig WinUSB driver on Windows. So the cmsis-dap personality also has a bridge from CMSIS-DAP to SDI. With the bridge, the standard tools and the standard driverless USB interface work for WCH chips too.
How the bridge works
The idea
OpenOCD and probe-rs already know how to debug a RISC-V chip over JTAG. The RISC-V Debug Specification 0.13 defines how, and many RISC-V chips use it. The WCH chips only have a different wire.
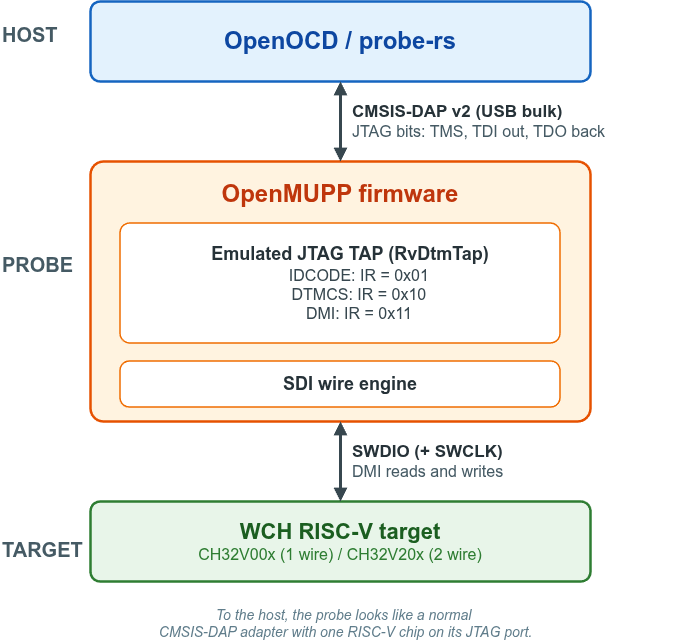
So the probe pretends to be such a chip. To the host, the probe is a normal CMSIS-DAP adapter with one RISC-V chip on its JTAG port. In reality, no JTAG pins move. The firmware reads the JTAG bits from USB, finds the debug accesses in them, and sends each access to the WCH chip over SDI.
JTAG in five minutes
Only a small part of JTAG is used in the bridge. A simple explanation:
- Signals. JTAG has a clock (TCK), a mode signal (TMS), data in (TDI) and data out (TDO). On each clock, the probe sends one TMS bit and one TDI bit, and gets one TDO bit back.
- State machine. The TMS bits move the chip through a fixed state machine of 16 states. The probe uses it to select what happens next. The states in this post are Shift, Capture and Update.
- Registers. The chip has one instruction register (IR) and several data registers (DR). The IR value selects which data register is connected between TDI and TDO.
- A scan. In a DR scan, the chip first copies the selected register into a shift register (Capture-DR). Then the probe clocks the bits through it (Shift-DR): new bits go in on TDI, and the old bits come out on TDO. At the end, the chip takes the new value (Update-DR).
So one scan writes a value and reads a value at the same time. Capture gives the read value, and Update applies the written value.
CMSIS-DAP has commands that send raw TMS and TDI bits and return the TDO bits (DAP_JTAG_Sequence and DAP_SWJ_Sequence). OpenOCD and probe-rs use them for RISC-V. The firmware does not need to know which tool sent the bits. It runs the same state machine as a real chip, bit by bit (cmsisdap::RvDtmTap).
The three registers
The RISC-V spec calls the JTAG part of the chip the Debug Transport Module (DTM). It has three registers that matter. The IR is 5 bits wide, so it holds values from 0x00 to 0x1F. The firmware decodes these three:
IR | Register | Content |
0x01 | IDCODE | 0x15653101. The host reads it first to find the chip. |
0x10 | DTMCS | The DTM version (spec 0.13), the DMI address width (7 bits), and the idle clocks that the host must wait after each access (0). |
0x11 | DMI | 41 bits: a 7-bit address, 32 bits of data, and a 2-bit op. This register carries the debug accesses. |
All other IR values select BYPASS. BYPASS is the 1-bit register that each JTAG chip must have. It does nothing.
The IDCODE needs a short note. An IDCODE contains a JEP106 manufacturer code, and WCH has no such code. The value 0x15653101 uses continuation code 1 with ID 0. JEP106 assigns no ID 0, so no real chip uses this code. probe-rs rejects only the manufacturer fields 0 and 0x7F, so it accepts this value. OpenOCD accepts any IDCODE.
One debug access, step by step
The DMI is the important register. Through it, the host reads and writes the registers of the RISC-V Debug Module. The Debug Module is the part of the chip that halts the core, reads its registers and accesses memory. It is the same on WCH chips as on other RISC-V chips. Only the transport is different.
This is a read of dmstatus (DMI address 0x11):
- The host sets the IR to 0x11 (DMI).
- The host does a DR scan of 41 bits: address 0x11, data 0, op=1 (read).
- At Update-DR, the firmware sees op=1. It sends the read to the WCH chip over SDI at once, and keeps the result.
- The host does the next DMI scan.
- At Capture-DR, the firmware puts the address, the read data and a status into the shift register. The status is op=0 (success) or op=2 (failure).
- The host gets these 41 bits on TDO.
The scan in step 4 also carries the next request. A write works the same way, with op=2 and the data in step 2.
Real hardware can be slow. If an access is not complete at the next scan, the chip returns op=3 (busy), and the host must try again. The bridge never returns busy. The firmware does the SDI access in the Update-DR clock, before it handles the next JTAG bit. So the access is always complete before the next scan. This is also why DTMCS reports 0 idle clocks.
On one wire, a hardware timer with DMA makes each SDI edge, and a DMI frame takes about 50 µs.
Finding the target
The JTAG port of the probe also works with real JTAG chips, so the probe must decide what is connected. In the default auto mode, DAP_Connect to JTAG tests in this order:
- A real JTAG chain.
- An SWD target (DPIDR read). After it, the probe switches an SWJ-DP back to JTAG.
- A WCH target, on one wire and then on two wires.
Only a WCH target selects the emulated TAP. Then probe-rs info --protocol jtag finds the DTM without a vendor command. probe-rs cannot identify the chip from it, so other probe-rs commands need --chip.
Hardware test, and the RV32E problem
I tested on a CH32V003 and a CH32V006 (one wire), and on a CH32V208 (two wires).
- OpenOCD (mainline, a 0.12.0+dev build from git) works with the configs in etc/openocd/, for example ch32v00x-cmsis-dap.cfg. Halt and resume, single step, registers (pc, a0, a1, misa, dcsr), memory read and write, software breakpoints in RAM, and load_image to RAM pass. The configs have no flash driver yet.
- probe-rs (0.32.0) download --verify with its built-in flash algorithm passes on all three chips. On the CH32V208, 16 KB took about 14.5 s, verify included.
- On the CH32V208, probe-rs gdb also works: connect, stepi, all 32 registers, memory, and hardware breakpoints.
probe-rs gdb on RV32E
On the CH32V006 and the CH32V003, probe-rs gdb fails:
A RISC-V specific error occurred: The command execution failed with error 3
RV32E is the embedded RISC-V base with only 16 general registers (x0 to x15). When GDB connects, probe-rs reads all 32 registers. The abstract command for x16 (regno 0x1010) gives cmderr 3 (exception), and probe-rs ends the session. The GDB server of probe-rs does not use the E bit in misa to select the register list.
The bridge only passes on the result of the target. To check this, I used an original WCH-LinkE (firmware 2.19) with the probe-rs wlink driver on the same CH32V006. It fails in the same way. So the bug is in probe-rs, not in the bridge.
I reported this in probe-rs issue #4564. A first fix (#4599) is merged, but my test on git master still fails in the same way. The issue thread has the two causes that I found. The fix is still in progress.
Next steps
- probe-rs: help finish the RV32E fix in #4564, so that probe-rs gdb works on the CH32V003 and the CH32V006.
- OpenOCD: add flash support and upstream the target configs, so that mainline OpenOCD can debug and program WCH targets without WCH binaries. Mainline OpenOCD also ignores op=2 on single DMI accesses. A patch for that is planned.
Discussions
Become a Hackaday.io Member
Create an account to leave a comment. Already have an account? Log In.