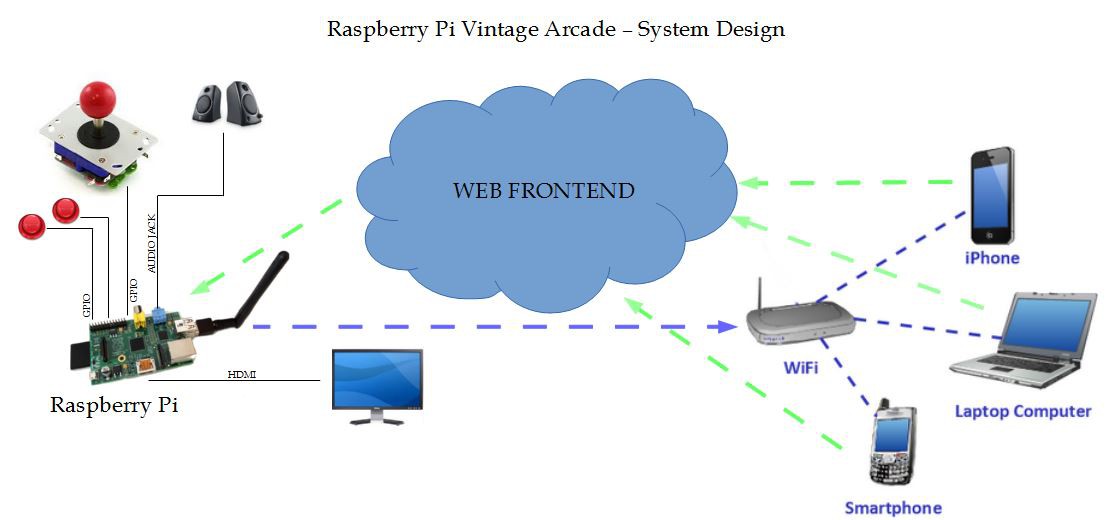
SYSTEM DESIGN OVERVIEW:

GETTING STARTED:
First you're going to want to start up your Raspberry Pi and play around with it. Whats next?
Install PiMame OS onto your Raspberry Pi of course!
---
Installing PiMame- an OS that handles arcade/gaming system emulation.
Open the Terminal and type the following commands.
sudo apt-get install git
(Sign up for GITHUB. Confirm E-Mail.)
git clone https://github.com/ssilverm/pimame_installer
cd pimame_installer
sudo ./install.sh
(Following these instructions will result in the installation of PiMAME, a Web Frontend, FTP server,
and other useful software.
After the installation process has completed, you'll need to restart the Raspberry Pi.)
sudo reboot
(Before installing ROMS onto your Raspberry Pi enter this into your terminal and restart the Pi once again)
sudo chown -R pi:pi emulators/
sudo chown -R pi:pi roms/
(This will fix the permissions, allowing you to drag and drop/FTP Upload ROMS into your Raspberry Pi
All roms will be stored in the following directory of your Raspberry Pi /home/pi/roms/)
Now that you have PiMame installed. Go find yourself some MAME Roms.
I've had the best luck with MAME4ALL as my emulator of choice for this arcade.
NOTE: MAME4ALL USES VERSION 0.35 ROMS
GET CONNECTED!:
- FINDING OUT THE IP ADDRESS OF YOUR RASPBERRY PI:
Open up a LXTerminal window and type the following command:
sudo ifconfig
Next to the wlan0 entry you will see inet addr. This is the IP address of the Raspberry Pi.
Write it down, you will need it for the next step.
- ADDING ROMS/EDITING FILES ON YOUR RASPBERRY PI VINTAGE ARCADE.
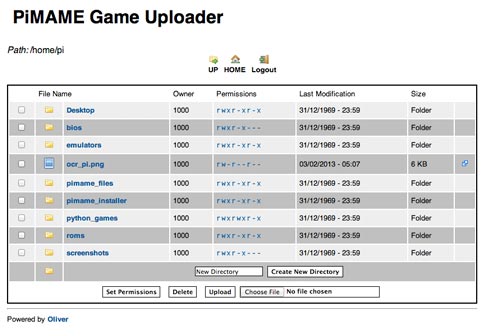
| All ROMs for the systems should be stored in the /home/pi/roms/ directory. PiMAME has a built in FTP server and web uploader that makes adding games easy. There are two ways to add ROMs to your system: | ||
| 1. Web Frontend | ||
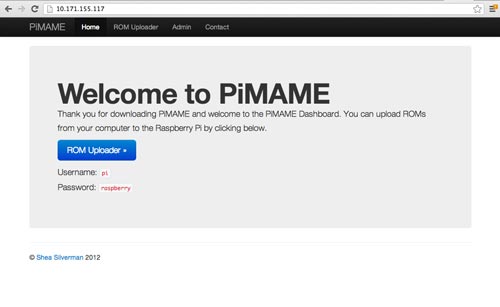
The easiest way is by using the web frontend of PiMAME. This can be done from a remote computer, tablet, smartphone, etc. As long as the Raspberry Pi and your other device are connected to the same WiFi network.
|
INSTRUCTIONS TO BOOT STRAIGHT INTO MAME4ALL:
Modify the .profile file in /pi/home/ by removing the full "python /home/pi/pimame_files/menu.py" line and replacing it with "/home/pi/emulators/mame4all-pi/mame"
To do this, type the following into the terminal.
sudo nano .profile
Once you replace the line, press CTRL+O to save, CTRL+X to exit nano editor.
sudo reboot
Your arcade system will now boot straight into MAME4ALL emulator, eliminating the need for a keyboard.
INSTRUCTIONS TO CUSTOMIZE THE SPLASH SCREEN/GAME CHOOSING SCREEN IN MAME4ALL:
This is where creativity and artistic ability will come into place.
Navigate to "/home/pi/emulators/mame4all/skins" either with your WebFrontend, or Locally on the Pi itself.
You will see 2 files. "rpisplash16.bmp" and "rpimenu16.bmp"
You can edit these files, and overwrite them, you will not have customized artwork on your arcade!
NOTE: Bitmaps have to be 640x480 pixels 65536 colors (16 bit R5G6B5). You can use a free image editing software to achieve this. GIMP works great.
CUSTOM SPLASH SCREEN

CUSTOM GAME CHOOSING MENU
 INCREASING THE OVERALL VOLUME OF YOUR RASPBERRY PI:
After installing the ROMS, I noticed the sound was very quiet.
A quick command into the terminal will fix all of your problems!
amixer sset PCM,0 100%
 Brayden DeVito

