I read about the osmo-fl2k program on the blog last week, and ordered one of the USB-VGA dongles from ebay immediately. Within a few minutes of opening the package I had it spewing RF all over the bands (which is awesome and terrible at the same time). It took a little while to get my original python code in shape, but the whole thing works now.
This project has been smoldering for a year, so it's good to finally see it work!
The output is a bit garbled on certain frequencies because there are licensed broadcasters on there too (the nerve!).
To couple the output to the radio, I just used a random coil I had around. The coil connects to the red VGA channel and ground through a 75-ohm resistor I included just so I didn't have to worry about dissipation in the dongle. I have a design for a decent lowpass filter, and as soon as I can get the footprint done for a male VGA connector, I'll post a PCB for it on OSH Park. I'll give some design consideration to the coupling coil, too.
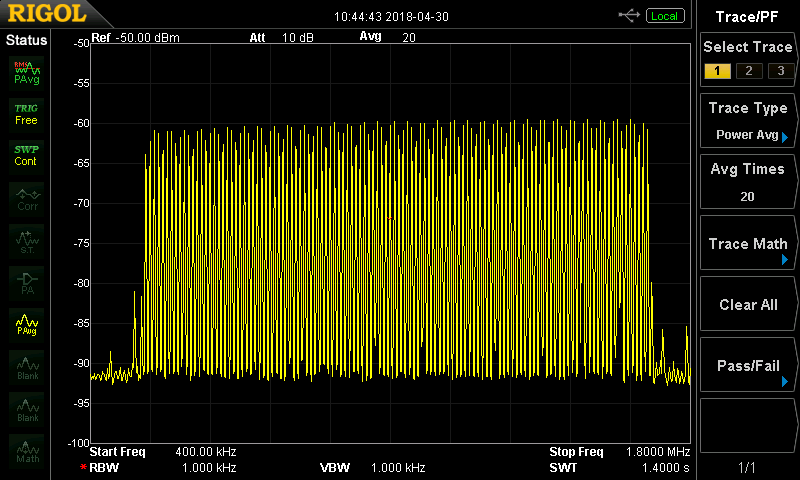
On a spectrum analyzer, you can see the block of 118 stations generated by the program run with defaults (US frequencies):

The amplitude scale is arbitrary, since I connected the dongle to the SA using an oscilloscope probe and an external attenuator. No sense in blowing the first mixer with some unknown signal. A little calculation shows that VGA maximum output is 0.7V into 75 Ohms which is around -1dBm. Nothing to be afraid of, after all.
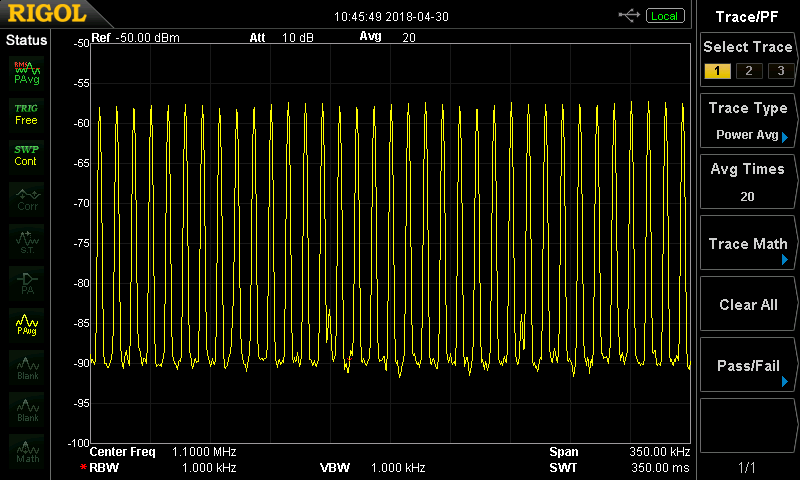
Zooming in the span, you can make out the individual carriers spaced at 10 kHz:

Usage
If you just want to generate the marker output with your USB dongle and osmo-fl2k, grab the pre-made data files: you can choose either the US allocation (10kHz channels) or EU allocation (9kHz channels). Both are sampled at 8192kHz and use an order-0 sigma-delta modulator (nothing more than direct 8-bit output). They're also in GitHub.
There are three pre-requisites, although only the osmo-fl2k code is required if you use the pre-generated files. You need to download and compile the osmo-fl2k code, and install the flite speech synthesizer and cmu_us_ljm.flitevox voice. The osmo-fl2k code can be obtained from the osmocom.org web site. I installed the flite synthesizer on linux with:
sudo apt-get install flite
and finally, you can get the voice I used from this page. Put the cmu_us_ljm.flitevox voice file in the same directory as the python script. You could substitute another voice, too - I really should add a command-line option for that.
You generate the output by running the fl2k_file command (built from the osmo-fl2k code):
fl2k_file -s 8192000 us_order0_8192k.dat
Don't forget the sample rate!
The program substitutes 8196720 Hz, which is 576 ppm off. It doesn't matter.
If you want some other options, you can run the program from the command line. The options look like this:
usage: make_fl2k_file.py [-h] [-b BEGIN_FREQ] [-e END_FREQ] [-s FREQ_STEP]
                         [-o ORDER] [-a SCALE] [-c CARRIER_SAMPLE]
                         [-r OUTPUT_SAMPLE]
                         output

create synthesized AM frequency markers for use with osmo-fl2k

positional arguments:
  output                output file

optional arguments:
  -h, --help            show this help message and exit
  -b BEGIN_FREQ, --begin-frequency BEGIN_FREQ
                        first frequency in kHz (default = 530)
  -e END_FREQ, --end-frequency END_FREQ
                        last frequency in kHz (default = 1700)
  -s FREQ_STEP, --spacing FREQ_STEP
                        frequency spacing in kHz (default = 10)
  -o ORDER, --order ORDER
                        sigma-delta modulator order (default = 0)
  -a SCALE, --amplitude-scale SCALE
                        scaling factor for amplitude (default = 1.47)
  -c CARRIER_SAMPLE, --carrier-sample-rate CARRIER_SAMPLE
                        sample rate for carriers (default = 4096000.)
  -r OUTPUT_SAMPLE, --output-sample-rate OUTPUT_SAMPLE
                        output sample rate (default = 65536000.)
For example, to generate the EU data file mentioned above, you can run it like this:
./make_fl2k_file.py eu_order0_8192k.dat -b 531 -e 1602 -s 9 -o 0 -c 4096000 -r 8192000
The sample files were generated with a 8192kHz sample rate. The speech synthesizer uses a fixed 16kHz sample rate, and the python code runs much faster if all the sampling frequencies are multiples of that. You theoretically could sample as slowly as 3410 kHz to generate the US AM band (1705 kHz maximum frequency), but the FL2000 seems to have a lower limit of 7777 kHz sampling, so I used 8192.
To increase the SNR, you can do two things. First, you can increase the sample rate. This spreads the quantization noise over a larger bandwidth, so the noise in the desired output bandwidth is smaller. I've gone up to 65536kHz (my dongle seems to be limited to around 84MHz, being driven through a USB 3.0 hub).
The program also includes an experimental digital-to-digital sigma-delta converter which can shape the quantization noise, pushing it into higher frequencies and away from the AM band. Use the -o option to select first order (-o 1) or second order (-o 2) modulators. Higher order is also supported, but is *very* experimental at this point.
I have yet to examine the effect of the sigma-delta modulation on the spectrum analyzer.
How it Works
This is really unbelievably simple to do. The heart of the code is two lines:
        # AM modulate onto carrier and add to spectrum
        wc = 2. * np.pi * freq * 1.e3
        R += scale * (0.5 + 0.5 * a_s) * np.cos(wc * t)
Each synthesized voice is AM modulated on the corresponding carrier and the results are summed.
Next Up
This project is close to complete. The thing works.
Next, I'd like to move away from requiring a PC. The dongle will run off USB 2.0 at reduced sampling rates, so I should be able to get it to run from a Raspberry Pi.
I also want to expand the script to accept a list of frequencies and corresponding audio files to generate a spectrum of programs for antique radios. Many classic programs are available on-line, and it would be awesome to be able to tune around the dial on an antique radio and listen to programs from the same era.
 Ted Yapo
Discussions
Become a Hackaday.io Member
Create an account to leave a comment. Already have an account? Log In.