-
And Beyond
10/21/2017 at 09:44 • 0 commentsIn lookng at other developing region projects I ran across the R.A.C.H.E.L. (Remote Area Community Hotspots for Education and Learning) project.
https://www.raspberrypi.org/blog/rachel-pi-delivering-education-worldwide/
Essentially they distribute Raspberry PI cached webservers pre-loaded with education content so no need for Worldwide Web access to get content.
Mesh networks would be a great to extend the reach outside of libraries and classrooms to the community even in isolated regions with no WWW internet.
-
A Pause in the Journey
10/21/2017 at 08:01 • 0 commentsAs with any project it is interesting to see where we started and look at where we actually ended up.
As I post the Technical Specification document that covers all the user and performance assumptions,
an overview of the solution and the instructions and documentation on how to build it, it is strange
to see how this has changed from the simple idea I roughed out on a piece of paper
in the conceptual round of the HackADay prize.
Many of the early assumptions did not prove out to be true. More open source component parts
in terms of software already existed than I knew about. It was also interesting to see the different
approaches people had already tried to bring communications infrastructure to under developed regions.
Some were too grandiose and did not consider the local cultural and social norms. Some made totally
different assumptions on what was needed. Ultimately it was good to build on the "shoulder of giants"
because very little is totally new these days even in technology. Often they are just ideas that society
is now ready to except (who knew people want to share so much of their lives on social networks). In other
case it was a idea that technology finally made practical (CDMA was developed by the screen
actress Hedy Lamarr and pretty much everyone has some of her genius in their pockets).
In light of all the natural disaster recently the importance of communications or the lack of it
is front and center in many peoples mind. So this is not the end of journey but just a pause.
-
Video finally live!
10/21/2017 at 03:52 • 0 commentsThe video of the project is finally live. It is hard to put together an effective video using open source music and images.
It hopefully balance information with humor.
All images in the video are from sources that provide open source license or are the property of the authors.
The attribute of all images and music will come next when there is time for the poor and tired engineers to rest
after the HackADay prize deadline.
It feels like university and it is time to cram for exams.
-
Cantenna: The Poor Mans' Directional Antenna
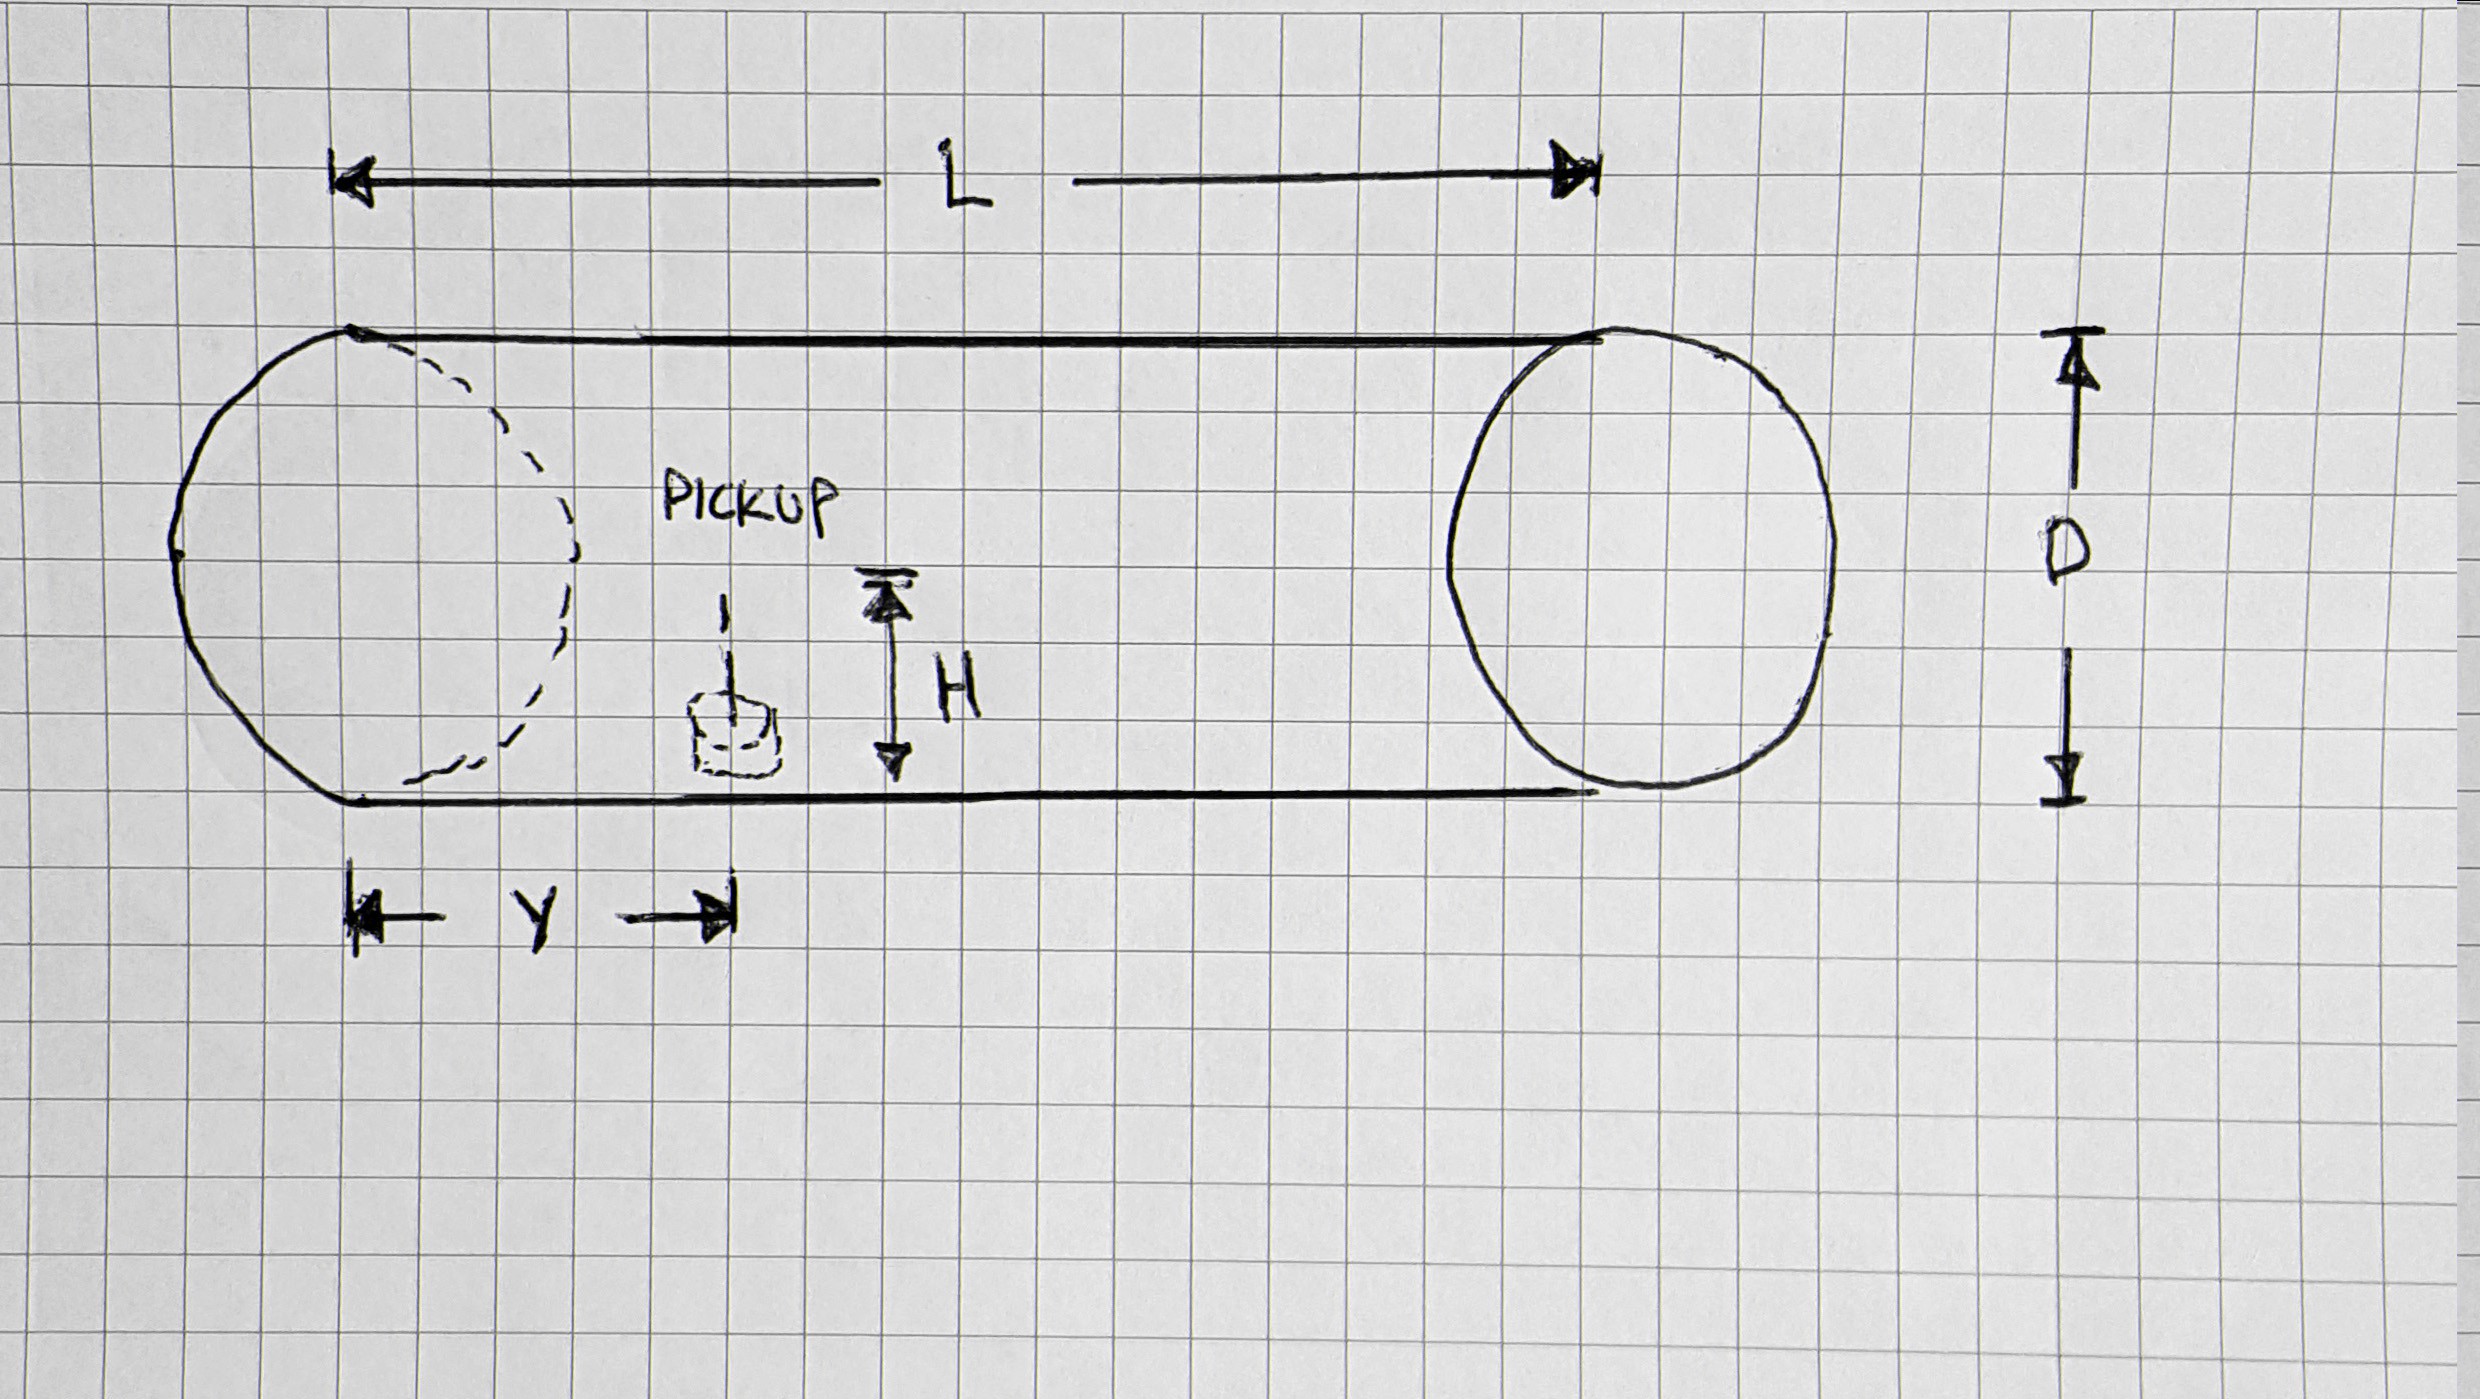
10/20/2017 at 09:58 • 1 commentYagi or parabolic antennaes are the most effective at concentrating the power of the WiFi transmitter in a specific direction but they are complex to design and construct. In order to simplify the construction process and make it easy to construct locally, a cantenna design was chosen. The cantenna is an abbreviation of the word “can” and antenna. In it simplest form it is literally is a can with a pickup mounted a set distance from the closed up of the can.
The most complete information on the optimum parameters to use for a cantenna are covered in the book “Cantenna the Poor Wifi Hackers Choice” by Sven-Erik Zetterström. 1 The important parameters are the diameter of the tube used to form the antenna, distance of the pickup from the end of the tube and the length of the tube
1 Sven-Erik Zetterström. “Cantenna the Poor Wifi Hackers Choice”. https://books.google.ca/books?id=7HNQDQAAQBAJ&pg=PT8&lpg=PT8&dq=large+diameter+cantenna&source=bl&ots=FT2hjm941c&sig=R6-nIGb9FLa6aJeilNkTHRxozvM&hl=en&sa=X&ved=0ahUKEwiI65v09OLWAhVGjFQKHa7fB9AQ6AEIRjAI#v=onepage&q=large%20diameter%20cantenna&f=false .
![]()
There are a range of values each dimension can be for the cantenna but the approximate starting values are:
•The length of the can, (L) should be longer than 3/4 of the wavelength
•The diameter of the can (D) should be longer than 1/2 of the wavelength
•The copper pickup element should be approximately 1/4 of the wavelength
•The position of the copper pickup element (y) away from the back of the cantenna (rear standoff) is based off the overall diameter of the can and can be calculated using this on-line calculator:
http://web.archive.org/web/20080316034408/http://www.pelaginox.com/pc/pc-cancalc.html
As mentioned above the copper pick up elements should be approximately ¼ of the wavelength of the carrier frequency. WiFi typically has 14 overlapping channels with most WiFi units are shipped set to channel 6. Some Wi-Fi channel numbers overlap with each other. Channel 1 uses the lowest frequency band and each subsequent channel increases the frequency slightly. Therefore, the further apart two channel numbers are, the less the degree of overlap and likelihood of interference. The three Wi-Fi channels 1, 6 and 11 have no frequency overlap with each other for 2.5 GHz WiFi
“Newer 802.11n and 802.11ac Wi-Fi networks also support 5 GHz wireless connections. These frequencies are much less likely to suffer from wireless interference issues in homes the way 2.4 GHz does. Additionally, the 5 GHz Wi-Fi channel choices available in most home network equipment have been pre-selected to choose only the non-overlapping ones.
Choices vary by country, but in the United States these non-overlapping 5 GHz channels are most recommended: 36, 40, 44, 48, 149, 153, 157 and 161.
Usable non-overlapping 5 GHz channels also exist between 48 and 149, specifically 52, 56, 60, 64, 100, 104, 108, 112, 116, 132, and 136. These channels fall into a specially regulated category where a Wi-Fi transmitter is required to detect whether other devices are already transmitting on the same channel and automatically changes its channel to avoid conflict.”1
1 https://www.lifewire.com/wifi-channel-number-change-to-avoid-interference-818208
As a run of thumb for 2.54 GHz WiFi cantennae:
“Driven element length never, ever, changes, and is always 31 mm. You will see many instances of online advice that say different; they're wrong. To optimise it for Channel 1, you can make it 0.5 mm longer; to optimise for Channel 11, then 0.5 mm shorter. Otherwise, leave well alone. For practical purposes, it is always left at centre band optimum length, which is around 31mm.” 1
The current design follow this rule of thumb without issues. Implementations should vary the pickup length depending on the needs for their particular system though. In most rural installation it should not be necessary to experiment too much with pick up height as there should be few devices that should interfere with the system.
Though not the optimum diameter 4 inch heater duct is quite common and comes in 5 foot lengths so that cantenna can be made of a customized length easily with tin snips. Based on a 4 inch diameter for the cantenna the following dimensions apply:
1 http://web.archive.org/web/20080316034408/http://www.pelaginox.com/pc/pc-cancalc.html
Dimension
Length
Diameter
4 inches
Length
5.165 inches
Position of pick from back of cantenna
1.712 inches
Height of the pick up
1.22 inches
Though you can get away with a cantenna that is as short as ¾ wave it is suggest that you use at length that is equivalent to two times the ¾ wave length.
The calculations above are for a 2.4 GHz WiFi antenna. The 802.11 workgroup which defines WiFi has documented use in five distinct frequency ranges: 2.4 GHz, 3.6 GHz, 4.9 GHz, 5 GHz, and 5.9 GHz bands. 1 2.4 GHz and 5.0 GHz are the most common consumer bands. The other bands are reserved for special uses such as vehicle and emergency applications . Each range is divided into a multitude of channels. Countries apply their own regulations to the allowable channels, allowed users and maximum power levels within these frequency ranges. The calculations for the cantenna will therefore vary depending on the frequency band used.
1 IEEE 802.11-2007: Wireless LAN Medium Access Control (MAC) and Physical Layer (PHY) specifications". IEEE. 8 March 2007.
The diagram below shows the assembly diagram for the cantenna.
![]()
It is made up of:
Item Number #
Part
Number of Parts
1
13 inch section of 4 inch heater duct
1
2
4 inch heater duct end cap
1
3
Chasis mount Male N-type connector
1
4
M2 bolts
4
5
M2 nuts
4
6
¼”-20 bolt 1 ¼ long
1
7
¼”-20 nut
1
8
2 flat washers
2
9
Male N-type connect to SMA cable
1
The ¼-20 thread bolt chosen as it fits into a threaded mount that can be attached to a camera tripod for test.
Each node can use a single cantenna or it can split the signal between 4 cantennae positioned perpendicular to each other to reach the other nodes around it if the nodes are laid out like a grid. A signal splitter can be used but the power is equally distributed among the 4 antennae reducing the effective distance of each antenna.
-
Solar Charging Circuitry for the Nodes
10/12/2017 at 00:49 • 0 commentsEach node in the mesh network is design to run independent of AC power. Each node has a solar panel that powers a charging circuit that feeds into an array of 6 volt batteries. The problems with solar power is that there will be times when not enough sun hits the panel to supply the current required to power the node. and at night the system needs to run fully off the batteries. The AMP-HOUR capacity of the batteries therefore need to be calculated for a worst case scenario so the system is never shut down due to a lack of power.
In addition to that the charging circuit needs to designed so the that batteries are not overcharged, Overcharging the batteries can damage them and result in a dramatic reduction in the functional life of the batteries The follow schematic applies to lead acid or NiCd batteries. As one of the objectives of this project is to ensure the parts can be sourced in developing countries the charging circuit is designed with discrete components are opposed to using a pre-packaged power module. All the components in this charging circuit have been around for decades and there are many equivalent parts from many manufacturers that can be substituted.
![]()
This circuit is a modified version of the circuit on this website:
http://www.electroschematics.com/4746/solar-charger-circuit
Nominally approximately 12 volts is produced by most large solar panels. The current from the solar panel passes through the diode D1 to the voltage regulator, LM317. The output of the voltage regulator is tuned by the variable resistor (potentiometer) VR to set the proper charging voltage for the battery. D1 prevents the solar cell from drawing power from the battery circuit when it is not actively producing current such as at night or on a very cloudy day. When the voltage on the battery reaches greater than 6.8 volts (fully charged battery), the zener diode (zd) break down and turns on the NPN transistor T1 which will then shunt the current to ground through the resistor R1. The goal is to make sure the battery does not get overcharged. Overcharging the battery dramatically reduces the life of the battery as the elevated temperature due to excess current affects the chemicals in the battery.
The web link above also provides a circuit board which can be used in the design. To save the cost of doing a minimum production run of the boards, a prototype board with soldered connections between components can also be used to implement the circuit. This was the method of fabrication for circuits before the existence of circuit boards. This gives the community implementing the system a more cost effective approach if they only need to add one more node to their network. The other parts of a node do not require that they be manufactured as the other components of a node are off the shelf modules that are connected though off the shelf cables, Our goal was to create a system that could be essentially plugged together as opposed to assembled through a complex process.
-
Poor Man's Directional Antennae
07/24/2017 at 07:36 • 0 commentsFor those that do not want to the effort to create a true Yagi antennae we found this two articles on creating a Cantennae, essentially a tin card cut to the appropriate length. The key is cut the length to 1/4 wave, half wave or full wave of the main carrier frequency of the signal you are trying to detect.
Cantennae construction basic:
https://propakistani.pk/2010/03/19/how-cantenna-works-technically/
Wireless 2.4 GHz Directional Antenna Calculator
http://www.csgnetwork.com/antennawncalc.html
Enter the can diameter and get the length of where to place the pick to detect the peak of the standing wave. from the end of the can.
-
Primer for Yagi Antenna design
07/18/2017 at 06:19 • 0 commentsIt has been a long time since I took electro-magnetics courses in university. It is time to take
a primer on Yagi antenna design. Yagi antenna are very directional but it gives you a better
signal to noise ratio and allows you to send and receive longer distances than other antenna
designs because the directionality focuses all the power in a narrow cone. As with all
antenna it is more effective if there are no obstructions between the sending
and receiving antenna. Rain and other airborne particles can also cause scattering
lessening the effective distance. Unobstructed line of sight is the rule of thumb if
you do not want to do the calculations.
Here is a good reference on how to construct Yagi antenna for a few dollars of materials.
It just requires that you measure accurately.
https://www.ab9il.net/wlan-projects/wifi6.html
-
Open Source Mesh Network Initiatives Compared
06/12/2017 at 08:57 • 0 commentsIt has been interesting to compare the PIC Mesh network architect described in the original specification document for this project with other open mesh network architectures that were designed to have more capability but require a specific operating system (Linux or x86) and a library of drivers to support it.
If anyone knows of other open mesh network initiative that should be on that list let me know.
-
Addendum to Analysis of the Effective Range of Bluetooth Links
06/12/2017 at 08:48 • 0 commentsI forgot to add that the discussion is in a document in the "Files" section for this project.
-
Analysis of the Effective Range of Bluetooth Links
06/12/2017 at 07:28 • 0 commentsTo reduce the complexity of what needs to be implemented to facilitate the actual messaging process on the handsets for the users, we decide to use an existing application call "Firechat". Firechat is interesting in that it can use either Bluetooth or WiFi infrastructure to deliver the message to the intended recipient. It also have the ability to use handsets in it local environment as a relay if it is not close enough to a Bluetooth or WiFi node.
There are limitation on the effective distance a handset can be away from an active node. This update looks at some of the factors affecting the effective distance of a handset from a node for a Bluetooth link. The practical range of Bluetooth enabled handsets from the node determined the node spacing in the original overall specification document.
CEMN - Community Engagement Mesh Network
Under served communities can benefit from the exchange of information through local mesh networks to exchange critical notifications