Close
0%
0%

StatusBot

My approach to an efficient and open-source IoT device monitoring system.

Similar projects worth following
Open source firmware and webapp that allows interfacing with appliances to provide a flexible and secure monitoring and notification system.

Don’t automate human behavior. Improve human behavior.

Problem: Smart appliances are expensive, proprietary, and locked-down for the user. Companies create proprietary devices to fit every need in a complicated, single-purpose, and inflexible way which drives up costs and creates short-lifecycles for products.

Solution: Statusbot is an inexpensive kit you can use to add monitoring and notification to any device. Unlike smart appliances, these kits can be repurposed in the future for your changing needs. It is universal, low-cost, open source appliance monitoring system that is architected so that firmware is easy to maintain once deployed. By focusing this device on monitoring instead of command-and-control, it is more secure from hackers because it presents a less-viable attack surface into your home or business.

Real implementation: I implemented Statusbot for commercial coffee makers at work and called it Coffeebot. Coffeebot restores the “water-cooler effect” by informing employees where and when coffee is fresh so that they can enjoy it together – serendripity.

Vote for StatusBot on hackaday.io!

  • 1 × Microchip ENC28J60
  • 1 × 74HC08 Electronic Components / Misc. Electronic Components
  • 2 × 3mm LED
  • 1 × 5mm LED
  • 1 × 1N4004 Diode

View all 18 components

  • Breadboard-only Prototype

    Lucas Rangit MAGASWERAN08/21/2014 at 05:41 0 comments

    Now that the evaluation board version is ready it's time to try and make a breadboard version. This will allow for a prototype to be deployed and field tested. It will also allow for an estimate on what the final price will be. 

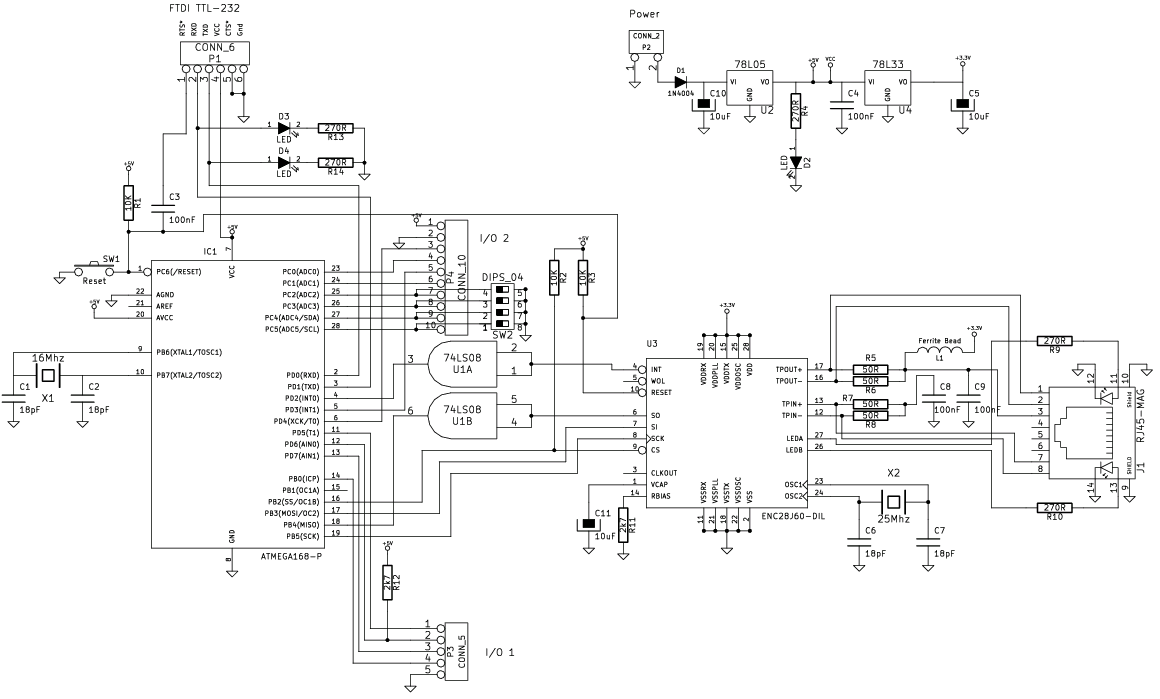
    My local makerspace, Acrobotic, in Pasedena, CA is having classes on how to make a "Breaduino" and how to use a schematic CAD tool. I'm learning a lot more about electronics with their help in building a custom board. An Instructable from drj113 is the inspiration for combining Ethernet as opposed to buying a ready-made shield. drj113 provided the schematic below which I will be modifying to match my board's components.

  • Notification

    Lucas Rangit MAGASWERAN08/21/2014 at 05:29 0 comments

    Once the data was being properly collected I developed the web-server side state machine that would determine what state the device being monitored was in. For example, if ADC pin 1 is low, then the device is idle. However, when the DIO pin 2 and ADC pin 1 is high, then the device is busy. Finally, when DIO pin 2 goes low and ADC pin 1 stays high, the device output is ready. This would trigger an email to be sent using Google App Engine's mail API.,

  • Reporting

    Lucas Rangit MAGASWERAN08/21/2014 at 05:26 0 comments

    Next, I developed the web site code to display the raw values of the sensors.

  • Sensors

    Lucas Rangit MAGASWERAN08/21/2014 at 05:25 0 comments

    Next, I changed the code in the microcontroller to accept general purpose sensor types, analog sensors that vary their resistance or digital sensors that require debounce code.

  • System Prototype

    Lucas Rangit MAGASWERAN08/21/2014 at 05:23 0 comments

    My first step was to assemble all the pieces of the system. For the hardware I used an Arduino Mega microcontroller with an Ethernet shield. For the web site I use Python and Google App Engine. Next, I learned Arduino programming and Python programming and demonstrated I could transmit the status of a push button to a website and display it.

View all 5 project logs

Enjoy this project?

Share

Discussions

Similar Projects

Does this project spark your interest?

Become a member to follow this project and never miss any updates