-
Get the robot to bring me beer
09/07/2021 at 14:37 • 0 commentsOne of the things I want my robot to do is to bring me beer when I'm retired and sitting on the couch. This involves the following actions:
- Drive to the fridge
- Open the fridge
- Locate a bottle of beer
- Fetch the bottle
- Close the fridge
- Drive to me
- Hand me the bottle
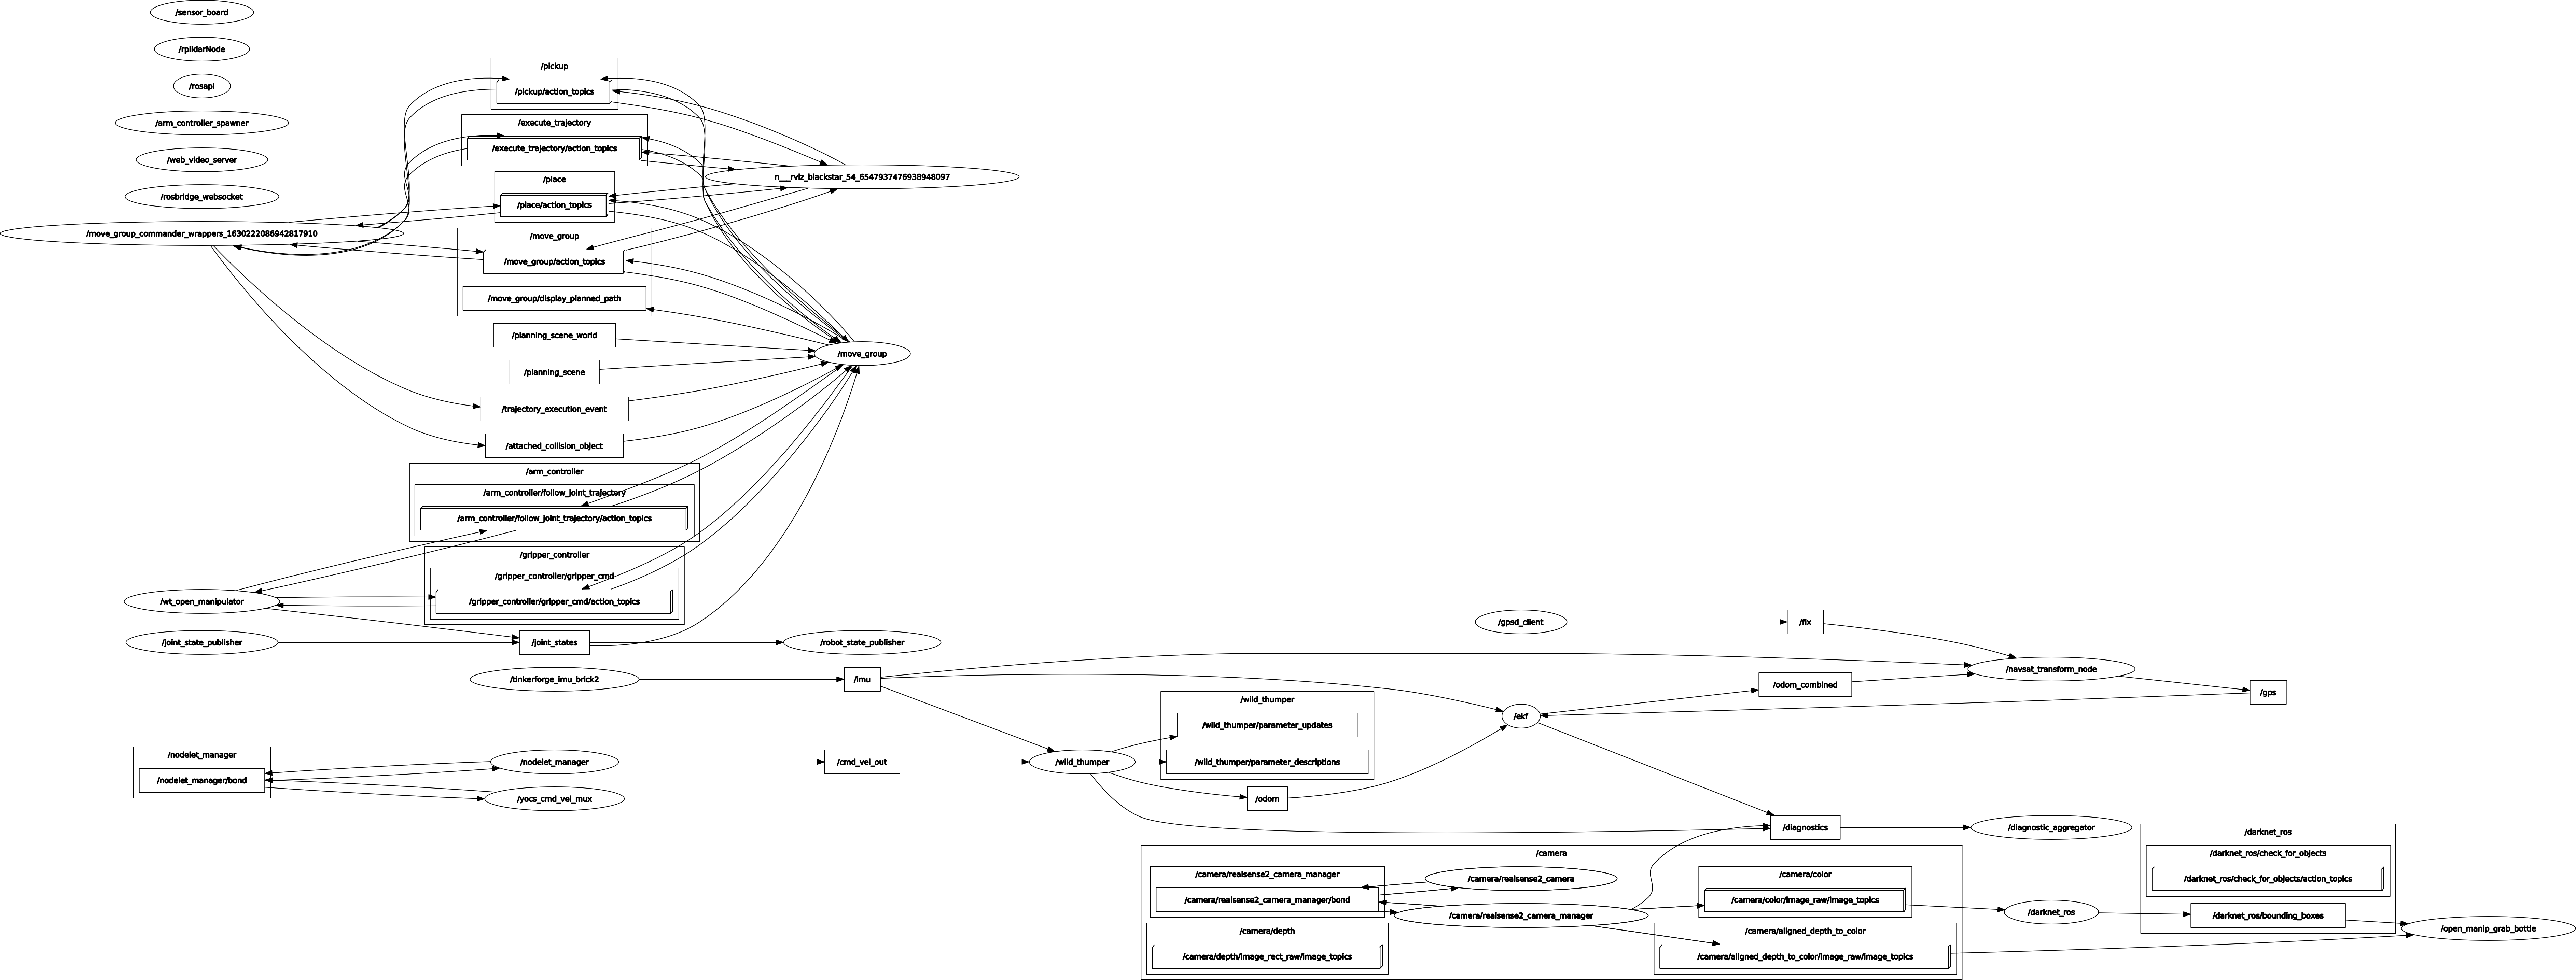
My wild thumper robot can already drive autonomously to any location in the apartment. Also thanks to MoveIt I can position the manipulator to any given x/y/z-position that is physically accessible. The current task is to detect, locate and grab a bottle. The detection is done with a YOLO Real-Time Object Detection neural network, the 3d location is then determined from the distance given by the 3d camera and the grabbing is done with MoveIt. For this the following ROS configuration is used:
![]()
The realization with the Realsense 3d-camera is done in the following steps:
- Use a neural network (NN) to detect a bottle in the RGB-image of the 3d camera. The NN runs on a stationary computer because the robot does not have a NN accelerator. The result is a box with row, column, width and height.
- Calculate the middle pixel coordinate and get its distance from the depth image. For this the depth image needs to be aligned to the RGB-image. The realsense node can do that automatically.
- With the known orientation of the 3d camera use projectPixelTo3dRay() to transform these values in goal coordinates x/y/z, relative to the robot.
- Position the gripper of the manipulator 5cm before the goal
- Open the gripper
- Position the middle of the gripper on the goal
- Close the gripper
- Move the manipulator to a final position.
The resulting MoveIt script is in the Git repository and the video shows what it looks like:
-
Higher accuracy speech recognition in ROS with Vosk
03/20/2021 at 18:15 • 0 commentsFollowing the previous log entry Speech recognition in ROS with PocketSphinx the recognition of speech was okay (~90% of words correctly) but not good. Also PocketSphinx is a little dated and its developers are now working on Vosk instead, which itself uses Kaldi.
With the Vosk server there is an easy to use Websocket API. I use it with the language model vosk-model-small-en-us-0.15 which is optimized for embedded systems:
python3 ./asr_server.py /opt/vosk-model-small-en-usAs with PocketSphinx accuracy can be improved by using a fixed set of words to recognize, so I will whitelist words like "forward, backward, stop, left, right, ...". The API does not allow to set a complete grammar, so sentences like "left right" can theoretically be detected, but in contrast to PocketSphinx the accuracy of detected words with Vosk is good enough so a grammar is not really needed.
Since the Vosk Server is using websockets I skip GStreamer and pipe the 16 bit audio with a sample rate of 16000 Hz from the ReSpeaker Mic Array microphone with SoX directly in my ROS publisher script:
rec -q -t alsa -c 1 -b 16 -r 16000 -t wav - silence -l 1 0.1 0.3% -1 2.0 0.3% | ./asr_vosk.rb -With the silence command SoX is told to filter periods of silences longer then 2 seconds, so the Vosk server does not have to process these.
The ruby script asr_vosk.rb is based on the PocketSphinx one in the previous log, but the GStreamer/PocketSphinx parts are replaced with websockets and Vosk. I use websocket-eventmachine-client library for websocket handling in ruby.
#!/usr/bin/ruby

require 'logger'
require 'websocket-eventmachine-client'
require 'json'
require 'ros'
require 'std_msgs/String'

KEYWORDS = ["wild thumper"]
CONFIG = {
    "config": {
        "phrase_list": ["angle", "backward", "by", "centimeter",
                        "compass", "current", "decrease", "default",
                        "degree", "down", "eight", "eighteen", "eighty",
                        "eleven", "fifteen", "fifty", "five", "forty",
                        "forward", "four", "fourteen", "get", "go",
                        "hundred", "increase", "left", "light", "lights",
                        "meter", "mic", "minus", "motion", "mute",
                        "nine", "nineteen", "ninety", "off", "on", "one",
                        "position", "pressure", "right", "secure", "set",
                        "seven", "seventeen", "seventy", "silence",
                        "six", "sixteen", "sixty", "speed", "stop",
                        "temp", "temperature", "ten", "thirteen",
                        "thirty", "three", "to", "turn", "twelve",
                        "twenty", "two", "up", "velocity", "voltage",
                        "volume", "wild thumper", "zero"],
        "sample_rate": 16000.0
    }
}

class Speak
    def initialize(node)
        @logger = Logger.new(STDOUT)
        @commands_enabled = false
        @publisher = node.advertise('asr_result', Std_msgs::String)

        # Websocket handling
        EM.run do
            Signal.trap("INT") { send_eof }
            @ws = WebSocket::EventMachine::Client.connect(:uri => 'ws://192.168.36.4:2700')

            def send_eof
                @ws.send '{"eof" : 1}'
            end

            # Loop over all input data
            def run
                while true do
                    data = ARGF.read(16000)
                    if data
                        @ws.send data, :type => :binary
                    else
                        send_eof
                        break
                    end
                end
            end

            @ws.onopen do
                @logger.info "Running.."
                @ws.send CONFIG.to_json

                Thread.new {
                    run
                }
            end

            @ws.onmessage do |msg, type|
                d = JSON.parse(msg)
                handle_result(d)
            end

            @ws.onclose do |code, reason|
                puts "Disconnected with status code: #{code}"
                exit
            end
        end
    end

    def handle_result(msg)
        if msg.has_key? "result"
            msg["result"].each do |result|
                @logger.debug "word=" + result["word"]
            end

            # check for keywords first
            text = msg["text"]
            @logger.debug "text=" + msg["text"]
            KEYWORDS.each do |keyword|
                if text.include? keyword
                    keyword_detected(keyword)
                    text = text.gsub(keyword, "").strip
                end
            end

            # not a keyword, handle command if enabled
            if @commands_enabled and text.length > 0
                final_result(text)
            end
        end
    end

    # Enables/Disables the speech command
    def enable_commands(bEnable)
        @commands_enabled = bEnable
    end

    # Resulting speech command
    def final_result(hyp)
        @logger.info "final: " + hyp
        enable_commands(false)

        # Publish vosk result as ros message
        msg = Std_msgs::String.new
        msg.data = hyp
        @publisher.publish(msg)
    end

    def keyword_detected(hyp)
        @logger.debug "Got keyword: " + hyp
        enable_commands(true)
    end
end

if __FILE__ == $0
    node = ROS::Node.new('asr_vosk')
    app = Speak.new(node)
    begin
        node.spin
    rescue Interrupt
    ensure
        node.shutdown
    end
end
It basically works like the GStreamer/PocketSphinx script. The command recognition needs to be enabled with the "wild thumper" keyword (enable_commands()), so only "wild thumper stop" is accepted, not just "stop". This has the advantage that the robot does not react when e.g. a movie is running in the background where someone just says "stop".
The result of the speech recognition is published to the ROS topic "asr_result" as message type string.
-
Adding a Manipulator
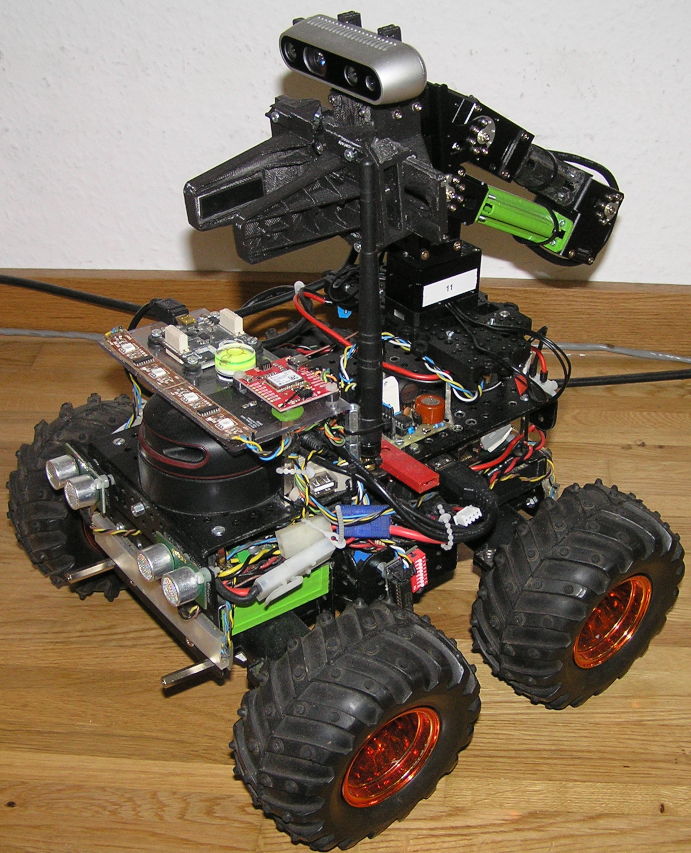
06/04/2020 at 14:10 • 0 commentsThe WIld Thumper robot now has a 4 degrees of freedom (DOF) Open Manipulator with a RealSense D435 depth camera attached:
The manipulator can be extended to 6 or more DOF if necessary. Communication with the Dynamixel servos is done with the AVR half-duplex software UART library by Ralph Doncaster on an Attiny85 that translates the commands from the I2C bus. The inverse kinematic of the Open Manipulator is calculated with IKFast and is controlled with MoveIt:
![]()
-
Path Coverage/Cleaning Algorithm
04/04/2020 at 09:03 • 0 commentsI wanted to get my Wild Thumper to clean the floor so I attached a microfoam brush to the front:
![]()
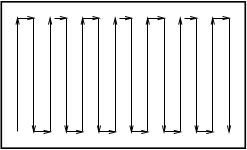
So the robot should clean the floor by fully covering a given area with simple back-and-forth boustrophedic motions. Boustrophedon means "the way of the ox", like a plow that is dragged by an ox in the field:
The area to clean has to be broken down into cells where each cell can be covered by these simple motions. Applications include cleaning and mowing. One algorithm for this is the Boustrophedon Cellular Decomposition which is explained in the linked paper:
To execute this algorithm with a robot I have created a ROS node which resembles the output of the Boustrophedon Cellular Decomposition on a given global costmap and executes the path coverage using the ROS navigation stack:
![]()
-
Improving Wild Thumper suspension
03/22/2020 at 15:06 • 0 commentsIn a previous log I mentioned that the wheel suspension of my Wild Thumper was too weak to handle a 1.5l bottle as load. Indeed the suspension can be strengthened but this requires to disassemble the full chassis. Since I was not very happy with this situation I replaced the default springs with some tuneable damper from RC-cars. The ones I bought are labeled "Dual Spring 80 mm Scale Black Shocks":
![]()
I replaced their default springs with some stronger ones and assembled them into the chassis. Now the suspension can be adjusted a bit easier:
![]()
-
Generating a Wi-Fi heatmap
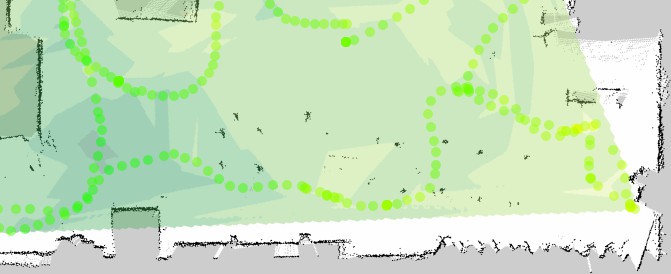
12/26/2018 at 16:19 • 0 commentsSomething useful for my robot to do: Having troubles with the Wi-Fi at my parents house I decided to create a heatmap of the W-Lan signal strength with the inspiration of this ROSCon 2018 talk. Since I did not understand QGIS in a few minutes and because my use case was rather limited I created the map based on OpenLayers instead. An example can be seen in the following image created for my small place:
![]()
Given an already created floor plan with SLAM I drove my robot around and took a measurement of the Wi-Fi signal strength every 0.5 second. The signal strength ranges from green (very good) to red (very poor). Since I do not have any problems with my Wi-Fi all dots are more or less green for my place. From these discrete measurements a contour plot is generated. In this contour plot it can be easily seen that the access point is in the lower left corner (darkest green).
The steps to reproduce are the following:
1. Drive around the apartment and take a measurement twice a second. The measurements are saved in a JSON file. This is done with the following quick & dirty python script:
#!/usr/bin/env python
# -*- coding: iso-8859-15 -*-

import os
import re
import rospy
import tf
import tf2_ros
from time import sleep

rospy.init_node('wifi_strength')

tfBuffer = tf2_ros.Buffer()
listener = tf2_ros.TransformListener(tfBuffer)
regex_lq = re.compile("Link Quality=(\d*)/(\d*)")
while not rospy.is_shutdown():
    f = os.popen("export LANG=C; /sbin/iwconfig wlan0")
    for line in f:
        line = line.strip()
        match_lq = regex_lq.match(line)
        if match_lq is not None:
            lq = float(match_lq.group(1)) / float(match_lq.group(2))
            pos = tfBuffer.lookup_transform("map", 'base_link', rospy.Time(0), rospy.Duration(1.0))
            print '{"x":%.2f, "y":%.2f, "link":%.2f},' % (pos.transform.translation.x, pos.transform.translation.y, lq)
            sleep(0.5)
The python script does the following
- Retrieve the current position with ros/tf
- Read the signal strength of the connected access point with a regular expression from iwconfig (value: Link Quality)
- Append position (x,y) and Link Quality to a JSON array, example:
[
{"x":0.32, "y":-0.15, "link":0.69},
{"x":0.34, "y":-0.12, "link":0.73},
{"x":0.38, "y":-0.05, "link":0.74}
]
2. Generate a heatmap with matplotlib contourf
The data is first interpolated from the measurements with 300 steps in each direction from minimum to maximum with linspace and griddata, the heatmap is generated with contourf. The size of 10x10 meter easily covers my whole apartment.
#!/usr/bin/env python
# -*- coding: iso-8859-15 -*-

import json
import matplotlib.pyplot as plt
import numpy as np
from scipy.interpolate import griddata

# settings
size = (10, 10) # meter x meter
contour_steps = 300
resolution= 0.025 # m/px

# ----------

lx = []
ly = []
llink = []
dpi=100.0/(resolution*100)*2.54 # scale 100dpi to our resolution in m/px
with open("wifi_strength.json", "r") as read_file:
    data = json.load(read_file)
    for line in data:
        lx.append(line['x'])
        ly.append(line['y'])
        llink.append(line['link'])

    # for a square image both sizes must be equal
    minimum = min(lx) if min(lx) < min(ly) else min(ly)
    maximum = max(lx) if max(lx) > max(ly) else max(ly)
    if abs(minimum) > abs(maximum):
        maximum = -abs(minimum)
    else:
        minimum = -abs(maximum)

    # figure without margin
    fig=plt.figure(num=None, figsize=size, dpi=dpi)
    ax=fig.add_axes((0,0,1,1))
    ax.set_axis_off()
    ax.set_xlim(-size[0]/2, size[0]/2)
    ax.set_ylim(-size[1]/2, size[1]/2)

    # map generation
    xi = np.linspace(minimum, maximum, contour_steps);
    yi = np.linspace(minimum, maximum, contour_steps);
    zi = griddata((lx, ly), llink, (xi[None,:], yi[:,None]), method='linear')
    ax.contourf(xi, yi, zi, cmap="RdYlGn", vmin=0, vmax=1)

    plt.savefig('heatmap.png', transparent=True)
One of the trickiest parts of the generation with matplotlib was to remove the margins from the figure...
3. Display everything in the browser with OpenLayers
The required libraries are read from a CDN (again: Quick & Dirty). The size, resolution and origin od the floor plan are read from the corresponding yaml file:
<!doctype html> <html lang="en"> <head> <meta name="viewport" content="initial-scale=1.0, user-scalable=no, width=device-width"> <meta http-equiv="Cache-Control" content="no-cache, no-store, must-revalidate"/> <meta http-equiv="Pragma" content="no-cache"/> <meta http-equiv="Expires" content="0"/> <link rel="stylesheet" href="https://stackpath.bootstrapcdn.com/bootstrap/4.1.3/css/bootstrap.min.css" integrity="sha384-MCw98/SFnGE8fJT3GXwEOngsV7Zt27NXFoaoApmYm81iuXoPkFOJwJ8ERdknLPMO" crossorigin="anonymous"> <link rel="stylesheet" href="https://cdn.rawgit.com/openlayers/openlayers.github.io/master/en/v5.2.0/css/ol.css" type="text/css"> <link rel="stylesheet" href="https://cdn.jsdelivr.net/npm/ol-layerswitcher@3.1.0/src/ol-layerswitcher.css" type="text/css"> <style> .map { height: 100%; width: 100%; } .marker { width: 10px; height: 10px; border: 0px solid #ffffff; border-radius: 5px; opacity: 0.5; } </style> <script src="https://code.jquery.com/jquery-3.3.1.min.js" integrity="sha256-FgpCb/KJQlLNfOu91ta32o/NMZxltwRo8QtmkMRdAu8=" crossorigin="anonymous"></script> <script src="https://cdnjs.cloudflare.com/ajax/libs/popper.js/1.14.3/umd/popper.min.js" integrity="sha384-ZMP7rVo3mIykV+2+9J3UJ46jBk0WLaUAdn689aCwoqbBJiSnjAK/l8WvCWPIPm49" crossorigin="anonymous"></script> <script src="https://stackpath.bootstrapcdn.com/bootstrap/4.1.3/js/bootstrap.min.js" integrity="sha384-ChfqqxuZUCnJSK3+MXmPNIyE6ZbWh2IMqE241rYiqJxyMiZ6OW/JmZQ5stwEULTy" crossorigin="anonymous"></script> <script src="https://cdn.rawgit.com/openlayers/openlayers.github.io/master/en/v5.2.0/build/ol.js" crossorigin="anonymous"></script> <script src="https://cdn.jsdelivr.net/npm/ol-layerswitcher@3.1.0/dist/ol-layerswitcher.min.js" crossorigin="anonymous"></script> <title>Wifi Heatmap</title> </head> <body> <div id="map" class="map"></div> <script type="text/javascript"> $(function () { $('[data-toggle="popover"]').popover() $('[data-toggle="tooltip"]').tooltip() }) // SLAM generated floor plan, values from its .yaml var imgUrl = 'map.png'; var imgSize = [992, 2080]; var imgResolution = 0.010000; var imgOrigin = [-5.000000, -5.000000, 0.000000]; function meterToPixel(m) { return m/imgResolution; } // Map views always need a projection. Here we just want to map image // coordinates directly to map coordinates, so we create a projection that uses // the image extent in pixels. var origin = [meterToPixel(imgOrigin[0]), meterToPixel(imgOrigin[1])]; var extent = [origin[0], origin[1], imgSize[0]-Math.abs(origin[0]), imgSize[1]-Math.abs(origin[1])]; var projection = new ol.proj.Projection({ units: 'pixels', extent: extent, metersPerUnit: imgResolution }); $.ajax({ url: "wifi_strength.json", // the measurements dataType: 'json', async: false, success: function(json) { wifi_strength = json; } }); map = new ol.Map({ interactions: ol.interaction.defaults().extend([ new ol.interaction.DragRotateAndZoom() ]), layers: [ new ol.layer.Image({ source: new ol.source.ImageStatic({ url: imgUrl, imageExtent: extent }) }), new ol.layer.Image({ title: 'Heatmap', source: new ol.source.ImageStatic({ url: "heatmap.png", imageExtent: [-508, -508, 508, 508] }), opacity: 0.4 }), ], target: 'map', view: new ol.View({ projection: projection, center: [0, 200], rotation: -123 * Math.PI / 180, // horizontal alignment of the floor plan zoom: 3, maxZoom: 8 }) }); map.addControl(new ol.control.LayerSwitcher()); // Javascript color scale from 0% to 100%, rendering it from red to yellow to green // https://gist.github.com/mlocati/7210513 function perc2color(perc) { var r, g, b = 0; if(perc < 50) { r = 255; g = Math.round(5.1 * perc); } else { g = 255; r = Math.round(510 - 5.10 * perc); } var h = r * 0x10000 + g * 0x100 + b * 0x1; return '#' + ('000000' + h.toString(16)).slice(-6); } function addMarker(map, pos, data) { var color = perc2color(data * 100); element = document.createElement("div"); element.setAttribute("class", "marker"); element.setAttribute("data-toggle", "tooltip"); element.setAttribute("data-placement", "top"); element.setAttribute("title", data); element.setAttribute("style", "background-color: "+color+";"); var marker = new ol.Overlay({ position: [meterToPixel(pos[0]), meterToPixel(pos[1])], positioning: 'center-center', element: element, }); map.addOverlay(marker); } wifi_strength.forEach(function(val) { addMarker(map, [val.x, val.y], val.link); }); </script> </body> </html> -
Speech recognition in ROS with PocketSphinx
12/08/2018 at 18:12 • 0 commentsCurrent goal is to issue voice commands to the Wild Thumper robot. The speech recognition engine PocketSphinx was chosen for this task because it works with little CPU and memory. Since there does not seem to be an up to date ROS node for Pocketsphinx I decided to write a simple one. Pocketsphinx includes a GStreamer element, so the modular GStreamer Framework can help with the audio processing.
In GStreamer complex tasks like playing a multimedia file is performed by chaining multiple elements to a pipeline. Each element executes a single task, e.g. read a file, decompress data or output data to a monitor.
Pocketsphinx requires the audio to be 16 bit little endian mono at a rate of 16000Hz. The ALSA plughw interface can provide the input from the USB microphone in this format, so "plughw:1,0" is used as input device.
Pocketsphinx is used in two voice recognition modes:
1. Keyword detection
The speech recognition should only react to commands when addressed by name, for example "wild thumper stop", not just "stop" because the robot should not react when e.g. a movie is running in the background where someone says "stop". Also the robot shall only react to its exact name, not something sounding similar. Pocketsphinx provides a keyword spotting mode for this use case. Input to this mode is the file keywords.kws with a threshold for each keyword:
wild thumper /1e-11/
2. Fixed grammar
After spotting the keyword, Pocketsphinx shall recognize a command like "stop", "go forward one meter", "backward", "turn left" or "get voltage". Pocketsphinx is run with a given grammar in the Java Speech Grammar Format (JSGF) format to avoid a spoken "go forward" accidentally getting recognized as "go four" (yes, this happens a lot). Since "go four" is not allowed in the grammar it is discarded. This increases the recognition accuracy from ~40% to ~80%. As of today the jsgf option of the Pocketsphinx GStreamer element is only supported in unreleased git, so it needs to be compiled from source. The robot.jsgf looks like this:
#JSGF V1.0;

grammar robot;

<bool> = (on | off);
<number> = minus* (zero | one | two | three | four | five | six | seven | eight | nine | ten | eleven | twelve | thirteen | fourteen | fifteen | sixteen | seventeen | eighteen | nineteen | twenty | thirty | forty | fifty | sixty | seventy | eighty  | ninety | hundred | thousand | million);

<misc_command> = (light | lights) [<bool>];
<engine> = (stop | forward | backward | increase speed | decrease speed);
<get> = get (temp | temperature | light | voltage | current | pressure | mute | mic | silence | speed | velocity | position | angle | compass | motion | secure | engine | odom | humidity);
<go> = go (forward | backward) <number>+ (meter | meters | centimeter | centimeters);
<turn> = turn (left | right | (to | by) <number>+ [(degree | degrees)]);
<speed> = set+ speed <number>+ | set default speed;

public <rules> = <misc_command> | <engine> | <get> | <go> | <turn> | <speed>;
As acoustic model the default U.S. English continuous model of Pocketsphinx is used together with a MLLR adaption for my specific accent and microphone. According to tests with word_align.pl this improved the recognition accuracy to over 90%.
Pocketsphinx ROS node
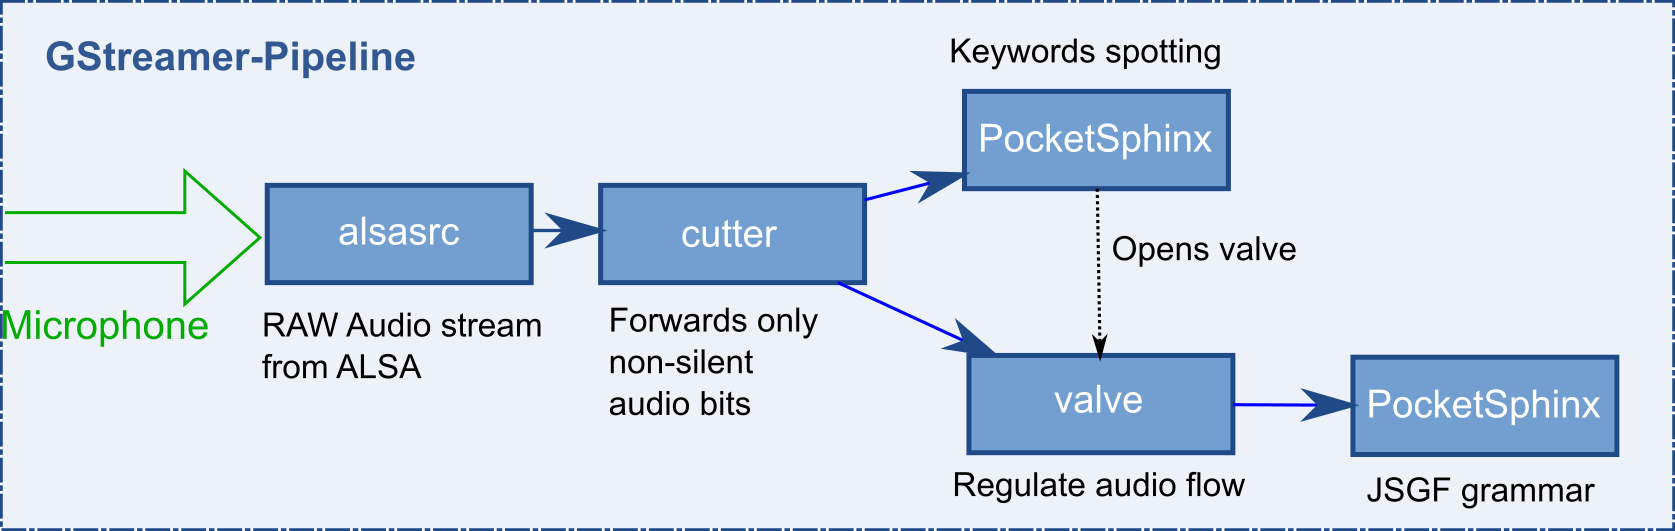
The GStreamer pipeline in the ROS node uses two Pocketsphinx elements, one for the keyword spotting mode, one for the JSGF grammar mode. A preceding "cutter" element suppresses low background noise. The valve before the JSGF grammar node is usually closed and only opened on keyword match. After command detection the valve is closed again. This enables the JSGF grammar node only after a spoken keyword.
![]()
In GStreamer notation the pipeline looks like this:
alsasrc device="plughw:1,0" ! audio/x-raw,format=S16LE,channels=1,rate=16000
 ! cutter
 ! tee name=jsgf ! queue ! valve drop=true ! pocketsphinx ! fakesink jsgf.
 ! pocketsphinx ! fakesink
The audio is split into the two branches by the "tee"-element. The "queue" element starts a separate thread for the second branch so both branches of the pipeline are independent of each other. The output of the two Pocketsphinx elements is not used and discarded by the fakesinks, the result of the speech detection is read from the message bus instead and published to the ROS topic "asr_result" as message type string. The complete code follows:
#!/usr/bin/ruby require 'gst' require 'pry' require 'logger' require 'ros' require 'std_msgs/String' class Speak def initialize(node) @logger = Logger.new(STDOUT) @publisher = node.advertise('asr_result', Std_msgs::String) @pipeline = Gst.parse_launch('alsasrc device="plughw:1,0" ! audio/x-raw,format=S16LE,channels=1,rate=16000 ! cutter leaky=true name=cutter'\ ' ! tee name=jsgf ! queue leaky=downstream ! valve name=valve_jsgf drop=true ! pocketsphinx name=asr_jsgf ! fakesink async=false jsgf.'\ ' ! pocketsphinx name=asr_kws ! fakesink async=false'\ ) # Ignore everything below the configured volume cutter = @pipeline.get_by_name('cutter') cutter.set_property('threshold-dB', -20) cutter.set_property('pre-length', 100000000) # pocketsphinx needs about 0.1s before start cutter.set_property('run-length', 1300000000) asr_jsgf = @pipeline.get_by_name('asr_jsgf') asr_jsgf.set_property('hmm', 'pocketsphinx/adapt/cmusphinx-en-us-5.2') asr_jsgf.set_property('mllr', 'pocketsphinx/adapt/mllr_matrix') asr_jsgf.set_property('jsgf', 'data/robot.jsgf') asr_kws = @pipeline.get_by_name('asr_kws') asr_kws.set_property('hmm', 'pocketsphinx/adapt/cmusphinx-en-us-5.2') asr_kws.set_property('mllr', 'pocketsphinx/adapt/mllr_matrix') asr_kws.set_property('kws', 'data/keywords.kws') bus = @pipeline.bus() bus.add_watch do |bus, message| case message.type when Gst::MessageType::EOS loop.quit when Gst::MessageType::ERROR p message.parse_error binding.pry # open console loop.quit when Gst::MessageType::ELEMENT if message.src.name == "asr_kws" if message.structure.get_value(:final).value keyword_detect(message.structure.get_value(:hypothesis).value, message.structure.get_value(:confidence).value) end elsif message.src.name == "asr_jsgf" if message.structure.get_value(:final).value final_result(message.structure.get_value(:hypothesis).value, message.structure.get_value(:confidence).value) end elsif message.src.name == "cutter" if message.structure.get_value(:above).value @logger.debug "Start recording.." else @logger.debug "Stop recording" end end end true end @pipeline.play end # Enables/Disables the jsgf pipeline branch def enable_jsgf(bEnable) valve = @pipeline.get_by_name('valve_jsgf') valve.set_property("drop", !bEnable) end # Result of jsgf pipeline branch def final_result(hyp, confidence) @logger.info "final: " + hyp + " " + confidence.to_s enable_jsgf(false) # Publish pocketsphinx result as ros message msg = Std_msgs::String.new msg.data = hyp @publisher.publish(msg) end def keyword_detect(hyp, confidence) @logger.debug "Got keyword: " + hyp enable_jsgf(true) end def stop @pipeline.stop end end if __FILE__ == $0 node = ROS::Node.new('pocketsphinx') app = Speak.new(node) loop = GLib::MainLoop.new(nil, false) begin Thread.new { loop.run } node.spin rescue Interrupt ensure app.stop node.shutdown loop.quit end end -
serving beverages etc
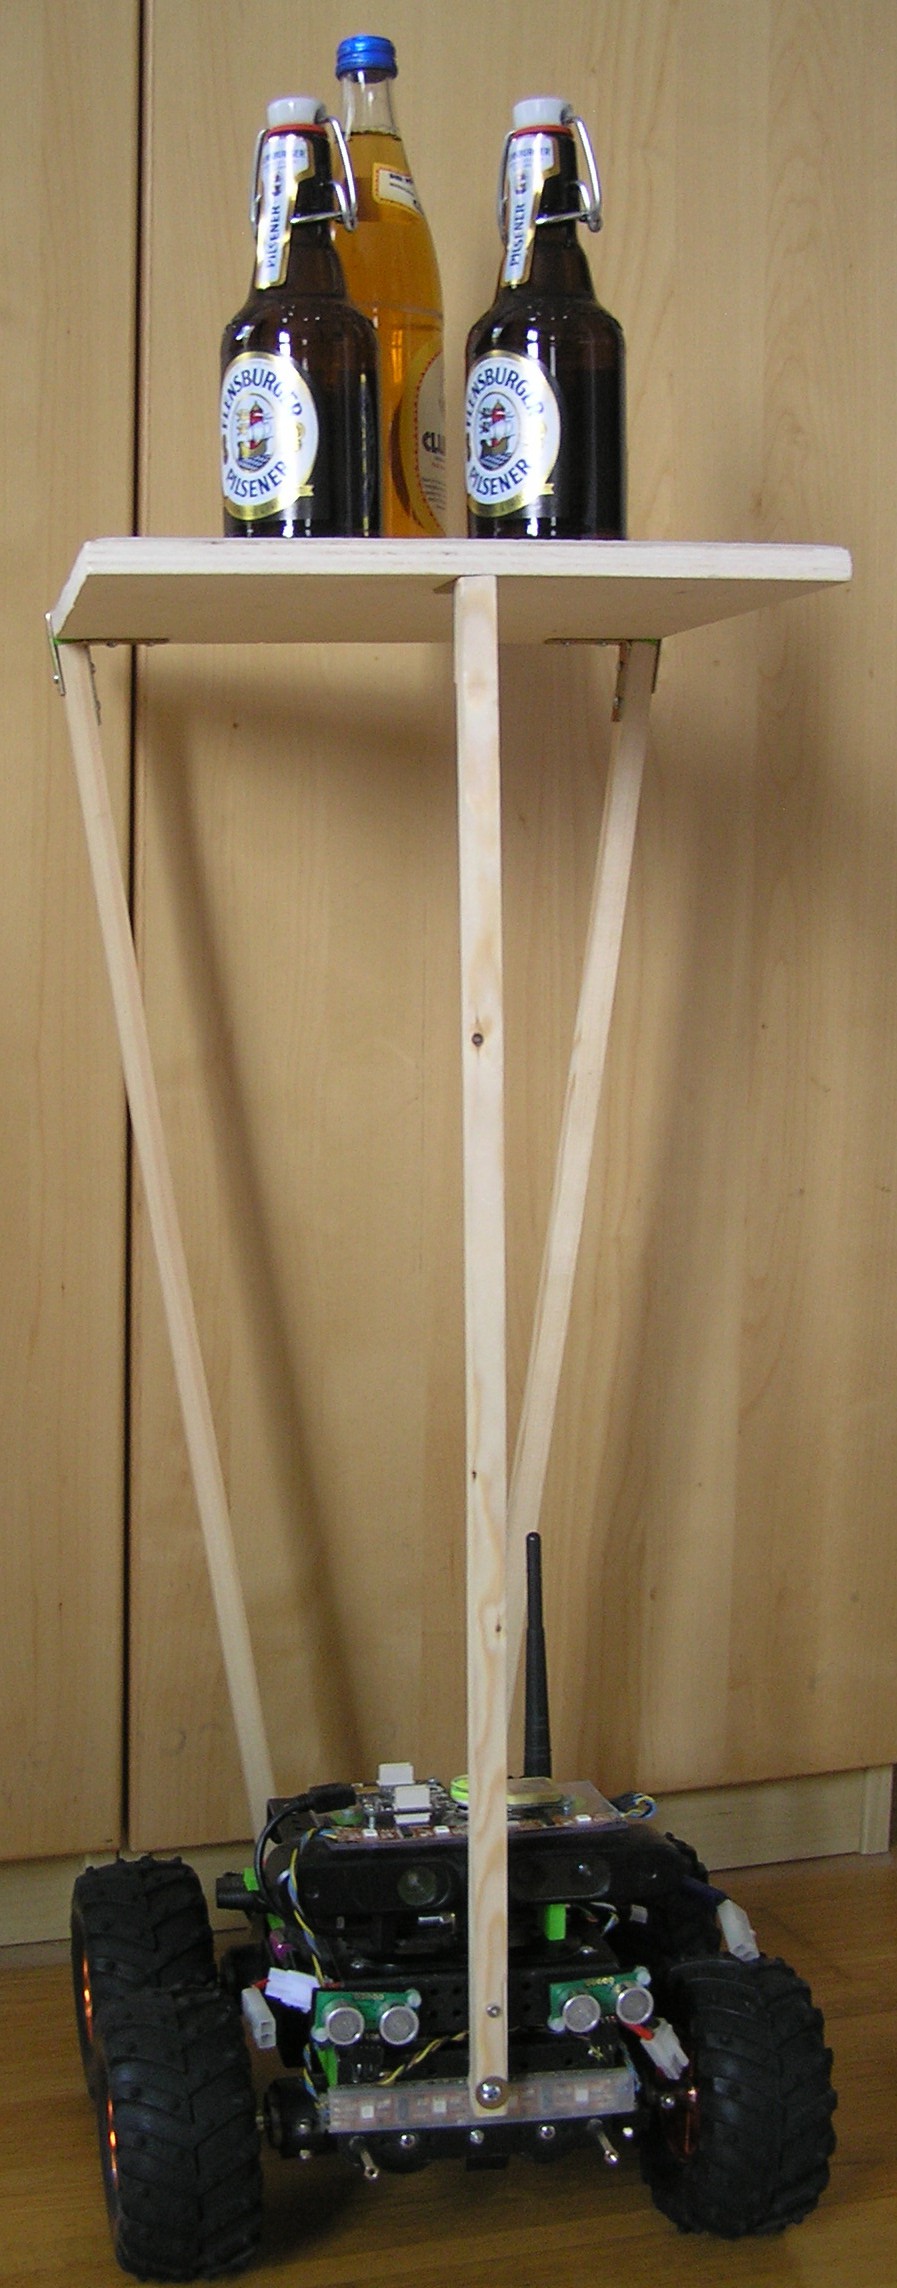
10/28/2018 at 08:26 • 4 commentsThe robot can also serve beverages :)
![]()
For details see comments:
In the following video the robot was driving on manual with a linear speed of 20cm/s and an angular speed of 0.5 rad/s.
Possible enhancements include:- Add weight sensors to measure the load
- Add an accelerometer to the serving plate and linear actuators to its leg to keep the load horizontal.
-
Honoring limits
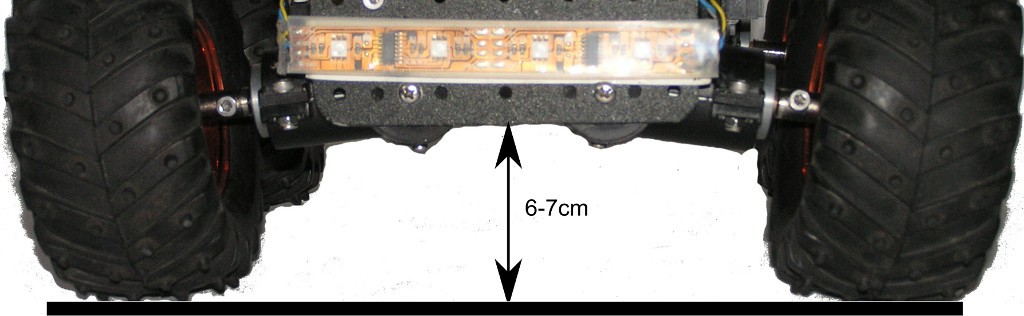
10/20/2018 at 12:09 • 0 commentsWhen the Wild Thumper Robot is driving around my home there are some areas where it shouldn't go because of e.g. cables lying around which are too thin for the sensors to spot. Same for my Neato Botvac robot vacuum. The Neato people solved that by the use of a magnetic strip. The vacuum is not allowed to driver over it. I want my Wild Thumper to honor the same limits. Problem is the relative high distance of 6-7cm between the sensor position and the ground:
![]()
The distance is too high for usual magnetic sensors like reed switches or Hall effect sensors, but not high enough for a magnetometer since they need to be sensitive enough to measure the earth magnetic field for their use as compass sensors. Luckily I still had an old CMPS10 IMU lying around which does the job perfectly. From now on the Wild Thumper can stop at the same areas as the vacuum cleaner.
-
Checking I2C pull-ups
10/03/2018 at 08:06 • 0 commentsTL;DR: Always check your signals with an oscilloscope!
Long version:
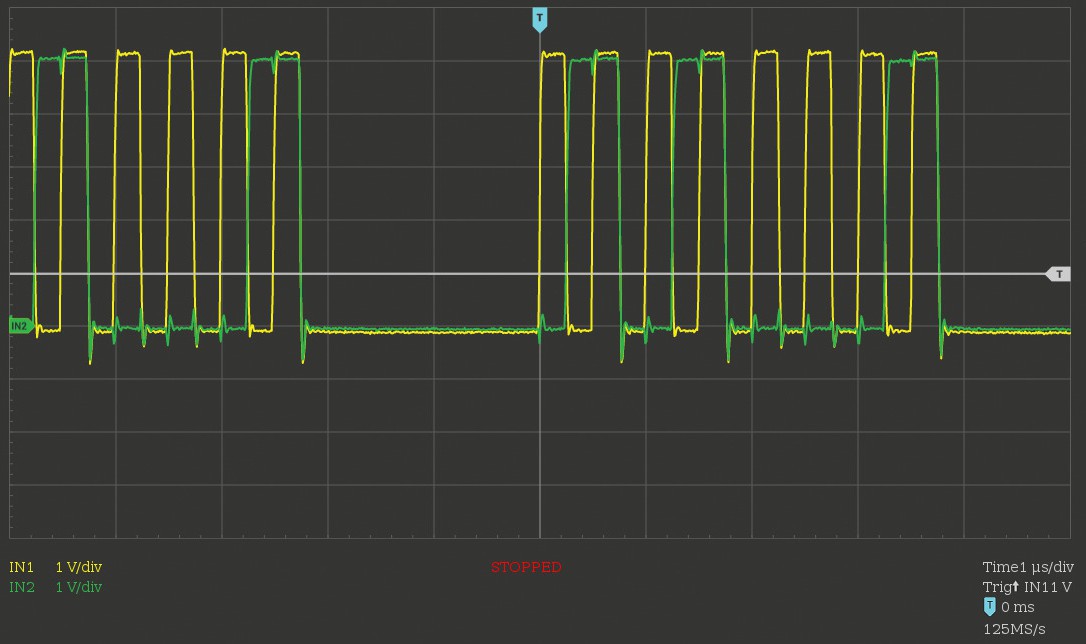
I wanted to try out rosruby, a ROS wrapper for the ruby programming language, so I decided to port the ROS node for the LPD8806 LED strip of this robot to it. This strip uses a somewhat crippled SPI with only MOSI and SCK to control the lights. While testing the new node the I2C bus immediately and repeatable fails. Since I2C is used as the connection to e.g. the motor controller, the bus is critical for operation. This has not happened before. After ruling out power issues this smelled like a problem with electromagnetic interference, which is why I checked the SPI signals (yellow: SCK, green: MOSI) with an oscilloscope:
![]()
While there are some spikes in the SPI signal and I'm certainly missing the line impedance matching resistors for termination of the bus I don't consider the signal bad enough to disrupt a healthy I2C.
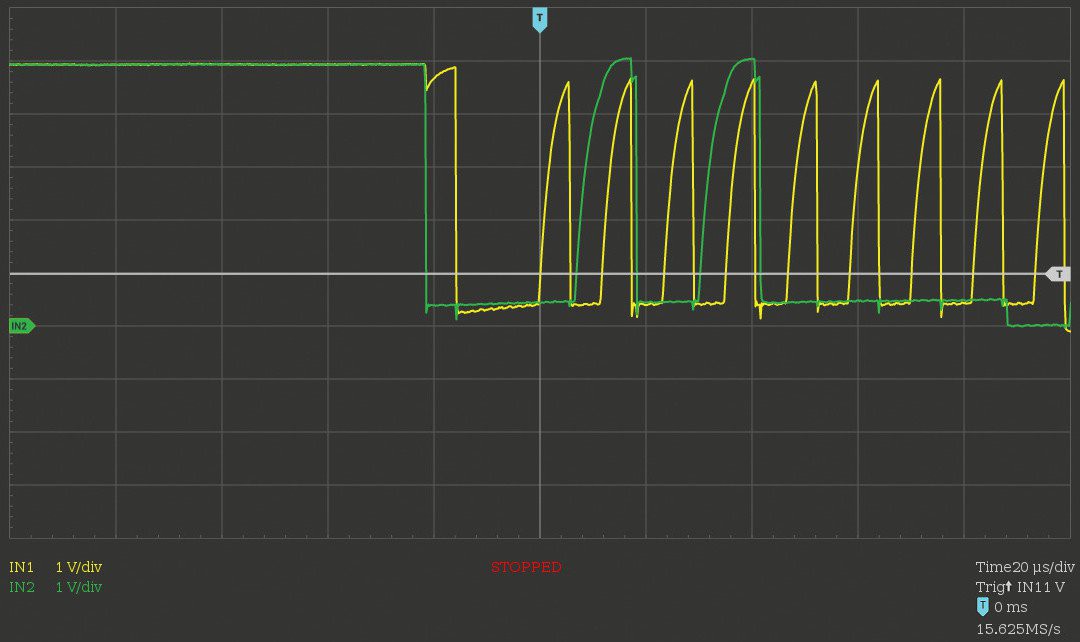
So I looked at the I2C bus instead which resulted in the following horrific picture (yellow: SCL, green: SDA)
![]()
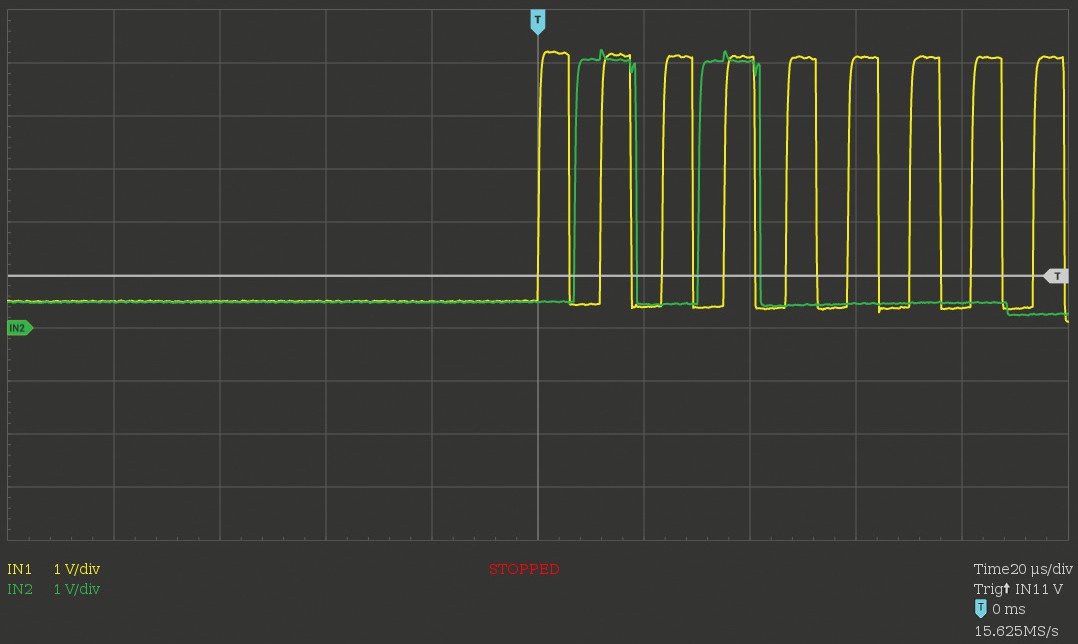
This by any means is matching more a saw tooth then a clean rectangular signal. It is obvious that the value of 5k Ohm for the pull-up is way too high in this robot. After replacing both resistors with 1k ones the signal is now much better (yellow: SCL, green: SDA):
![]()
Also the I2C no longer fails when sending data on the LPD8806 SPI.
Wild Thumper based ROS robot
My ROS (Robot Operating System) indoor & outdoor robot