I joined the FieldKit team six months ago, to work on the software side of things. One of my first questions was, "Why an app, why not conduct station management via a website?" and Jacob explained that working offline, out in the field, was our most common use case. Connecting a phone to a FieldKit station's WiFi access point in order to download data (as well as other tasks) made sense, and allowed access for those who might not carry a laptop into the field.
So how to build this app? We want to support as many people as possible, so both iOS and Android versions need to exist. As a small, budget-conscious company, having both Java and Objective-C/Swift developers on hand to build native apps wasn't an optimal solution. Since we have extensive experience with JavaScript, we opted to try out the open source framework NativeScript, in conjunction with Vue.js. NativeScript features direct access to native APIs, and about 90% code sharing across iOS and Android. It's more of an up-and-coming player in the mobile app field, compared to Facebook's React Native, but we welcomed the chance to step away from the Facebook ecosystem.
NativeScript does have a decent set of contributed plugins - we have gotten a lot of useful features with minimal effort thanks to some great ones, such as nativescript-audio (allowing our users to add audio notes in the field, when typing on the phone might not be easy), nativescript-camera (allowing users to take and save pictures in their deployment notes), nativescript-geolocation and nativescript-mapbox (automatically retrieving and displaying the user's location on a map).
Other plugins have been a bit buggy and are requiring more work. But our biggest NativeScript pain point so far might be around getting automated testing set up. I wrestled with it for a good stretch, trying Jasmine, Mocha, Karma, Appium, and finally Jest, which I liked best. We are using Appium to run some end-to-end tests, but our unit tests are currently using Jest. It's not a solved problem, however. Testing classes that import any NativeScript native code still isn't possible. Jacob had to write a wrapper for SQLite in order for us to write tests around it, as we're using the nativescript-sqlite plugin, and it does import NativeScript native code. For the same reason, we switched to using the Node.js axios module rather than the NativeScript HTTP module. I've got my eye on this pull request that sounds like it might solve some of these issues, and am eagerly awaiting it.
Opinions on this vary across our team members, but I've found NativeScript's built-in support for running on both iOS and Android emulators to be invaluable during development. Of course it also supports running on real devices, and that's essential.
In a small company with lots to do, things are moving fast! PCBs being designed at the same time app development is underway, and firmware doesn't exist yet, so Jacob came up with ingenious "fake device" that I can run on my laptop and interact with as if it were a real device. This has enabled many weeks of development that would otherwise be hampered by lack of hardware access.
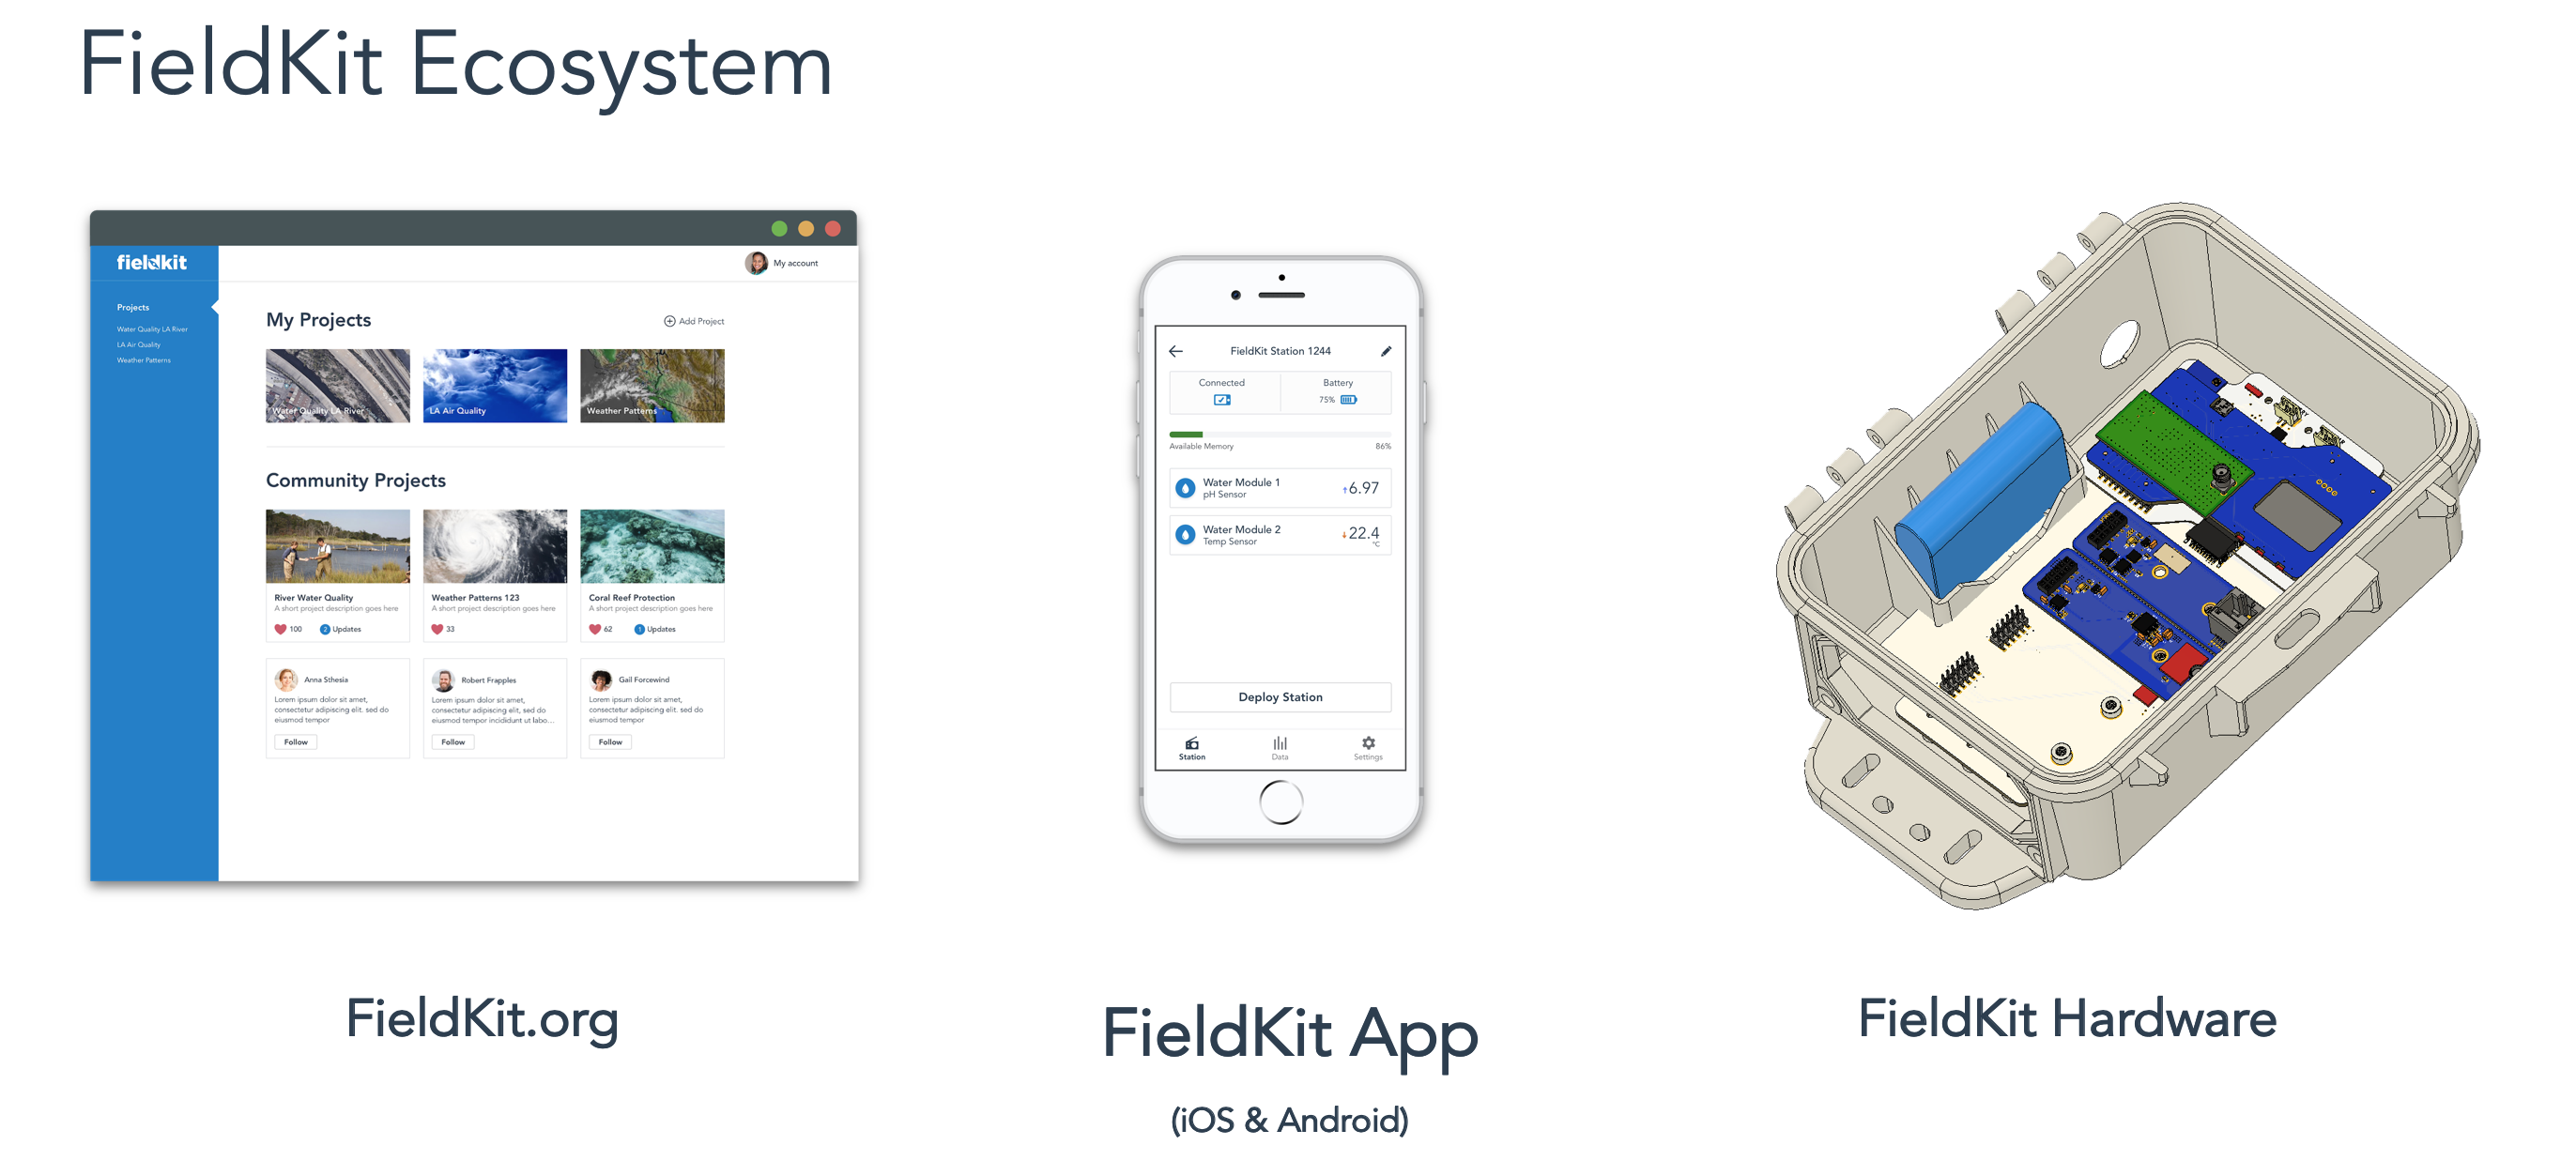
At present, the flow of information through the FieldKit software world goes roughly like this: Once a FieldKit station and the app are on the same local network (whether the station's WiFi access point or another shared network), the station will be "discovered" by the app. The user can then see live readings from the station, check its battery level, available memory space, and more. The app stores most of this information in an SQLite database on the phone. Data files, however, can be large, and are not stored in SQLite. After the user downloads a data file from the station, they can then upload it to the cloud (our FieldKit "portal"). There, they will have many more options for viewing and downloading the data. We will provide a variety of download formats (CSV, Dat, Python Jupyter Notebook, Excel, etc.), as well as options for sharing with the wider community.
We're doing exciting work at Conservify, and I can't wait to see how the app evolves. For the curious, the app repository is here: https://github.com/fieldkit/app
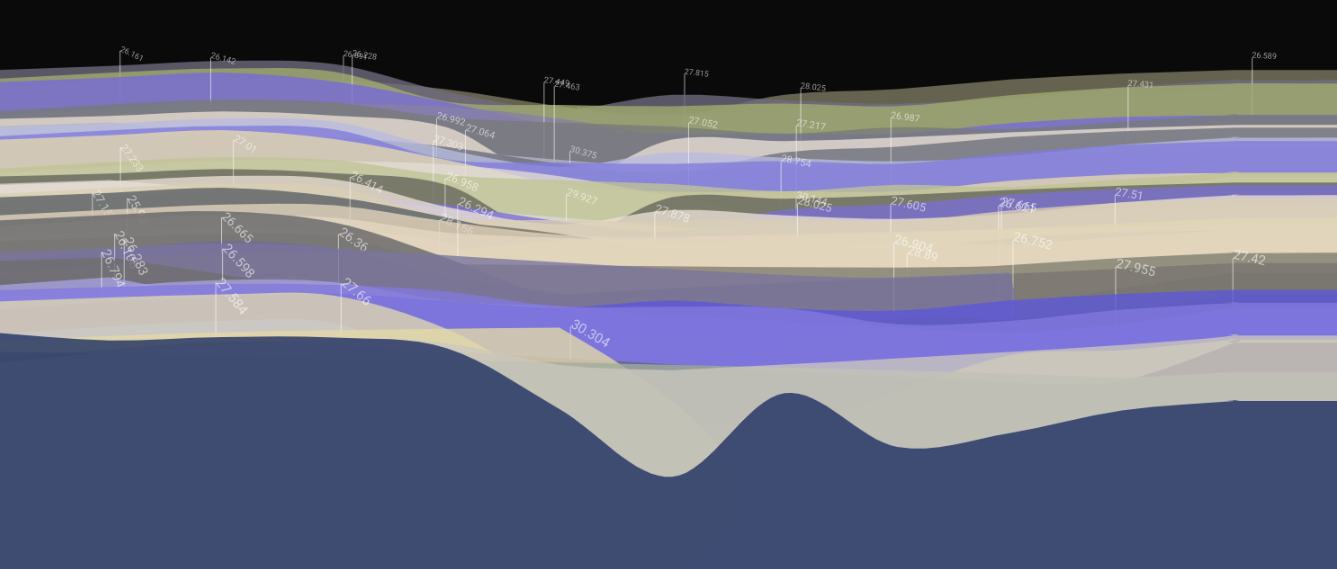
An abstraction of data from a FieldKit station in Peru, monitoring water conditions in the Amazon basin.
Five years ago, I met a neuroscientist who was wearing a strange, vibrating vest. The device, hidden under his clothing, took real-time data from the stock market and sent it to an array of quietly buzzing pads that were in direct contact with his skin. The vest was an experiment in sensory substitution— the idea was that if he wore the vest for long enough, his brain would accept the stock market stimulus as sensory data and he'd begin to actually hear, or to see the data. He would, in effect, gain a new sense.
It's a really cool idea. Scott Novich and his then advisor David Eagleman have gone on to start a new company marketing the vest and other similar technologies to people with hearing and vision loss, and to budding cyborgs. I'm writing about it here because it's a good reminder that our own experience of the world isn't so much about the sensors— our eyes and ears and taste buds —as it is about the sensorium, the whole brain and body system that gives us the ability understand the things that are around us.
Much of the focus of environmental sensing has been on gathering data. We deploy our humidity sensors and anemometers and geophones to turn real world conditions into numbers, which we dutifully write to SD cards and hard drives and file into sqlite databases. Less attention has been paid to what happens next. How do we recognize important patterns in the data? How do we share these findings with others, and how do we make impactful visual narratives to tell data stories to the wider public?
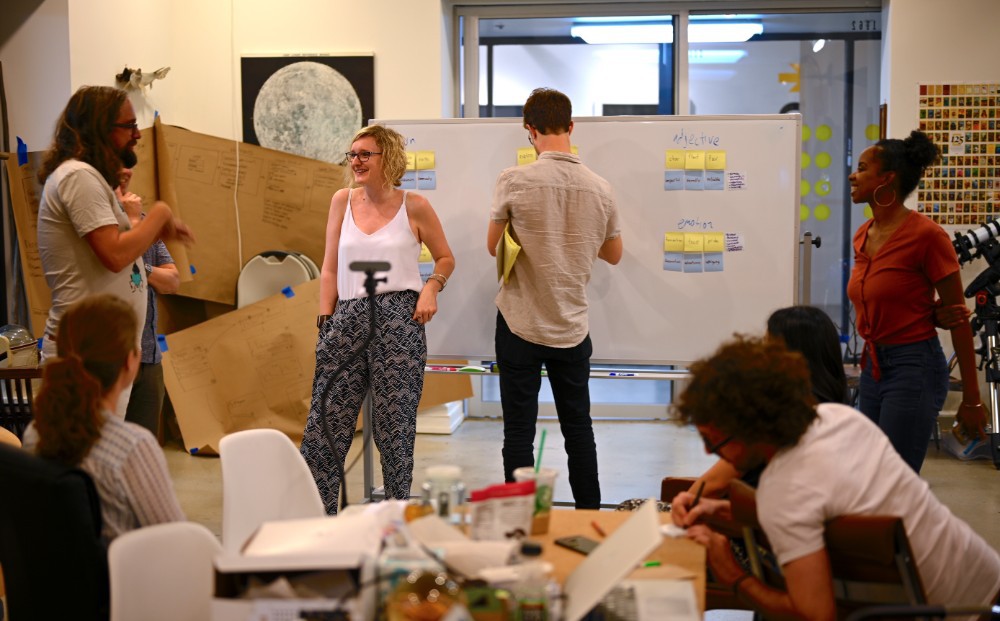
In our FieldKit design sessions, we're asking questions about how data from sensors might lead to real value for individuals and communities, regardless of technical ability.
We've spent much of the year at FieldKit designing interfaces and workflows that let users easily visualize their data, without having to write code or learn complicated tools. Core to our data platform is the capability to make comparisons, between data from separate sensors or from different time periods, and then to share these comparisons with other. A user in North Carolina might notice that water levels in the Tuckasegee are rising faster than they did for the same period in the previous year; by sharing this finding with collaborators and comparing their data to information from other FieldKit stations along the river, they are able to put their discovery into context. FieldKit also makes downloading and sharing data easy, so people can perform more detailed analysis, post their findings to social media, share the data with a governmental monitoring agency, or turn use it to make a sculpture, or a performance or a poem.
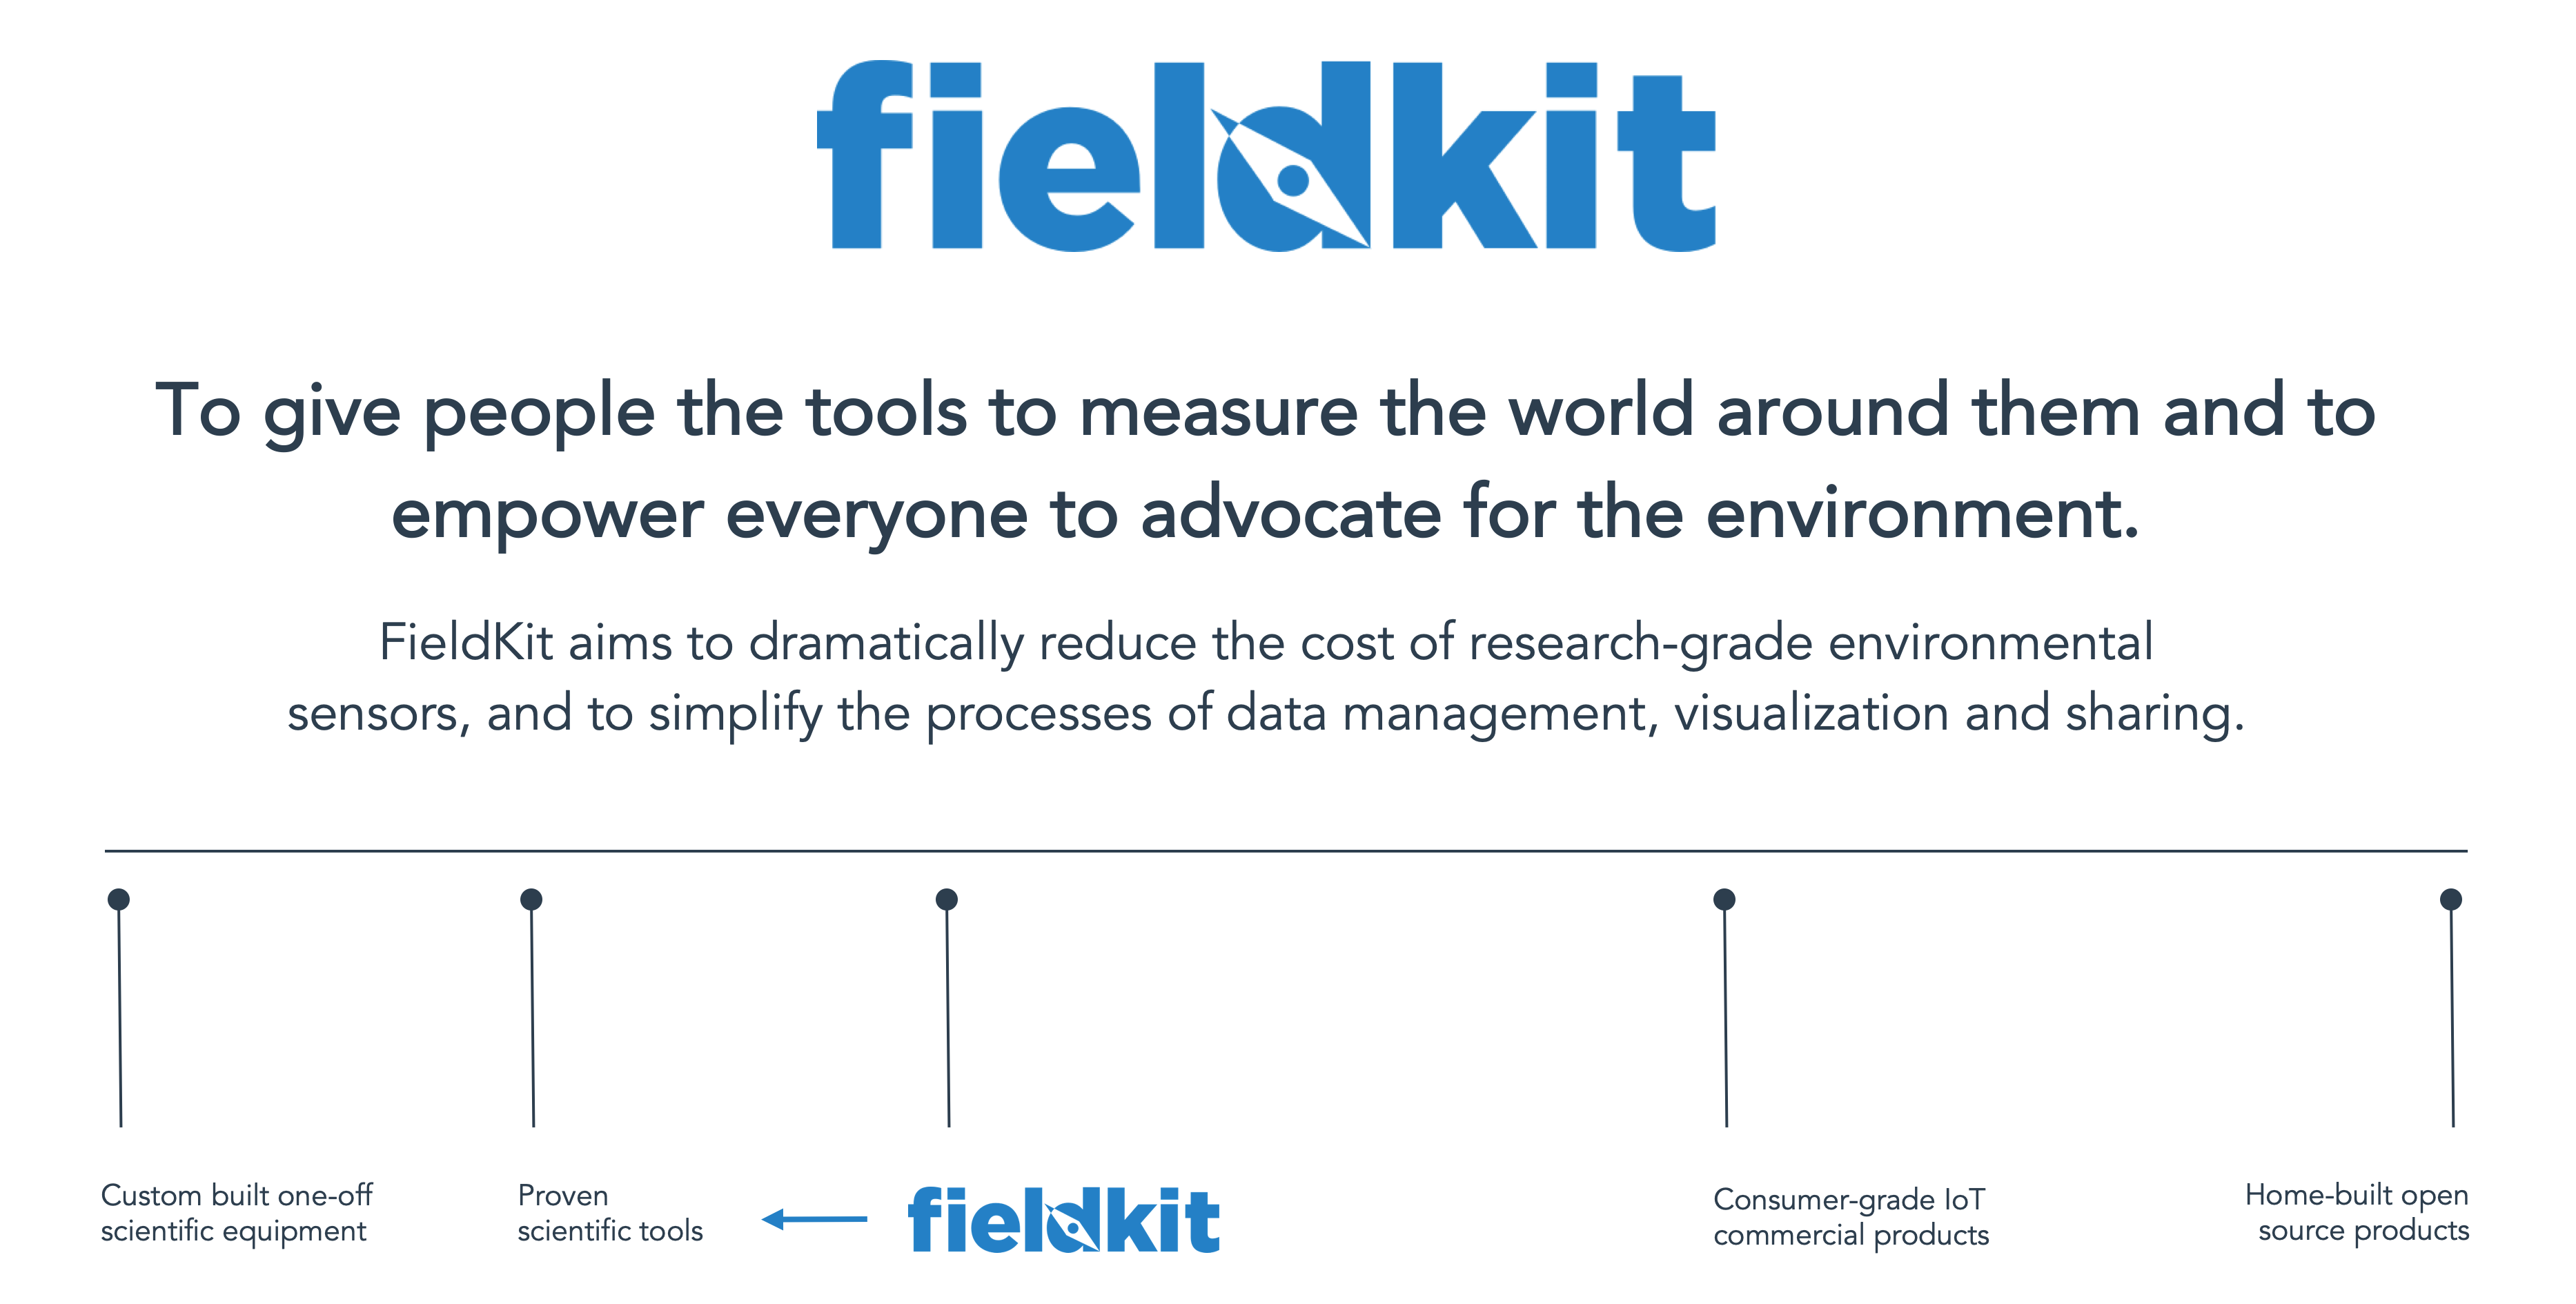
FieldKit's mission is to break down the existing barriers around environmental sensing. This means lowering the cost of sensors, but it also means empowering a wide range of individuals and communities (not just the usual suspects) to be able to discover and tell the stories that are encoded in the data they collect. It means that we're not only making sensors, but also designing an entire sensorium which writes people into the full process of collection, analysis, and telling of environmental data.
People often ask us about what we are trying to achieve in building FieldKit. There are a lot of sensor products out there and a ton of tutorials around building home-brew dataloggers. We kept realizing that those solutions didn't meet the needs of the users that we encounter at Conservify in the conservation, ecology, environmental, and education spaces. These are:
Create something with thoughtfully designed ease of use that gives people ownership over their own data.
Leverage recent innovations in technology to build something that doesn't break the bank, or at least something that is accessible to the majority of environmentally curious folks out there.
Build a tool for scientifically rigorous monitoring that doesn't tie you to unnecessarily proprietary formats or clunky software tools.
These things drove us to continue to try and build FieldKit for use in the greater world, and open source our designs to allow others to modify, build on, and take ownership over the future of this platform.
That means building something that doesn't stop at the hardware. It means understanding the users needs the whole way through. It means thinking about what happens to FieldKit data if Conservify were to disappear. It means thinking about what hardware would look like if it were deeply modular at its core. It means thinking through how data is visualized. It means thinking through how others build on FieldKit as a stepping stone. All of these things are concepts that we have been deeply considering over the last two years. Particularly as we consider the "whole product experience."
There will be more on that soon, but I wanted to share a quick vision of what that experience would look like in the following video:
I am also proud to announce that FieldKit was chosen as one of the 20 finalists in the 2019 Hackaday Prize. It is a huge honor to be in this pool of very interesting and capable projects. The FieldKit team is excited about this opportunity and is looking forward to share FieldKit with the folks at Supercon this fall.
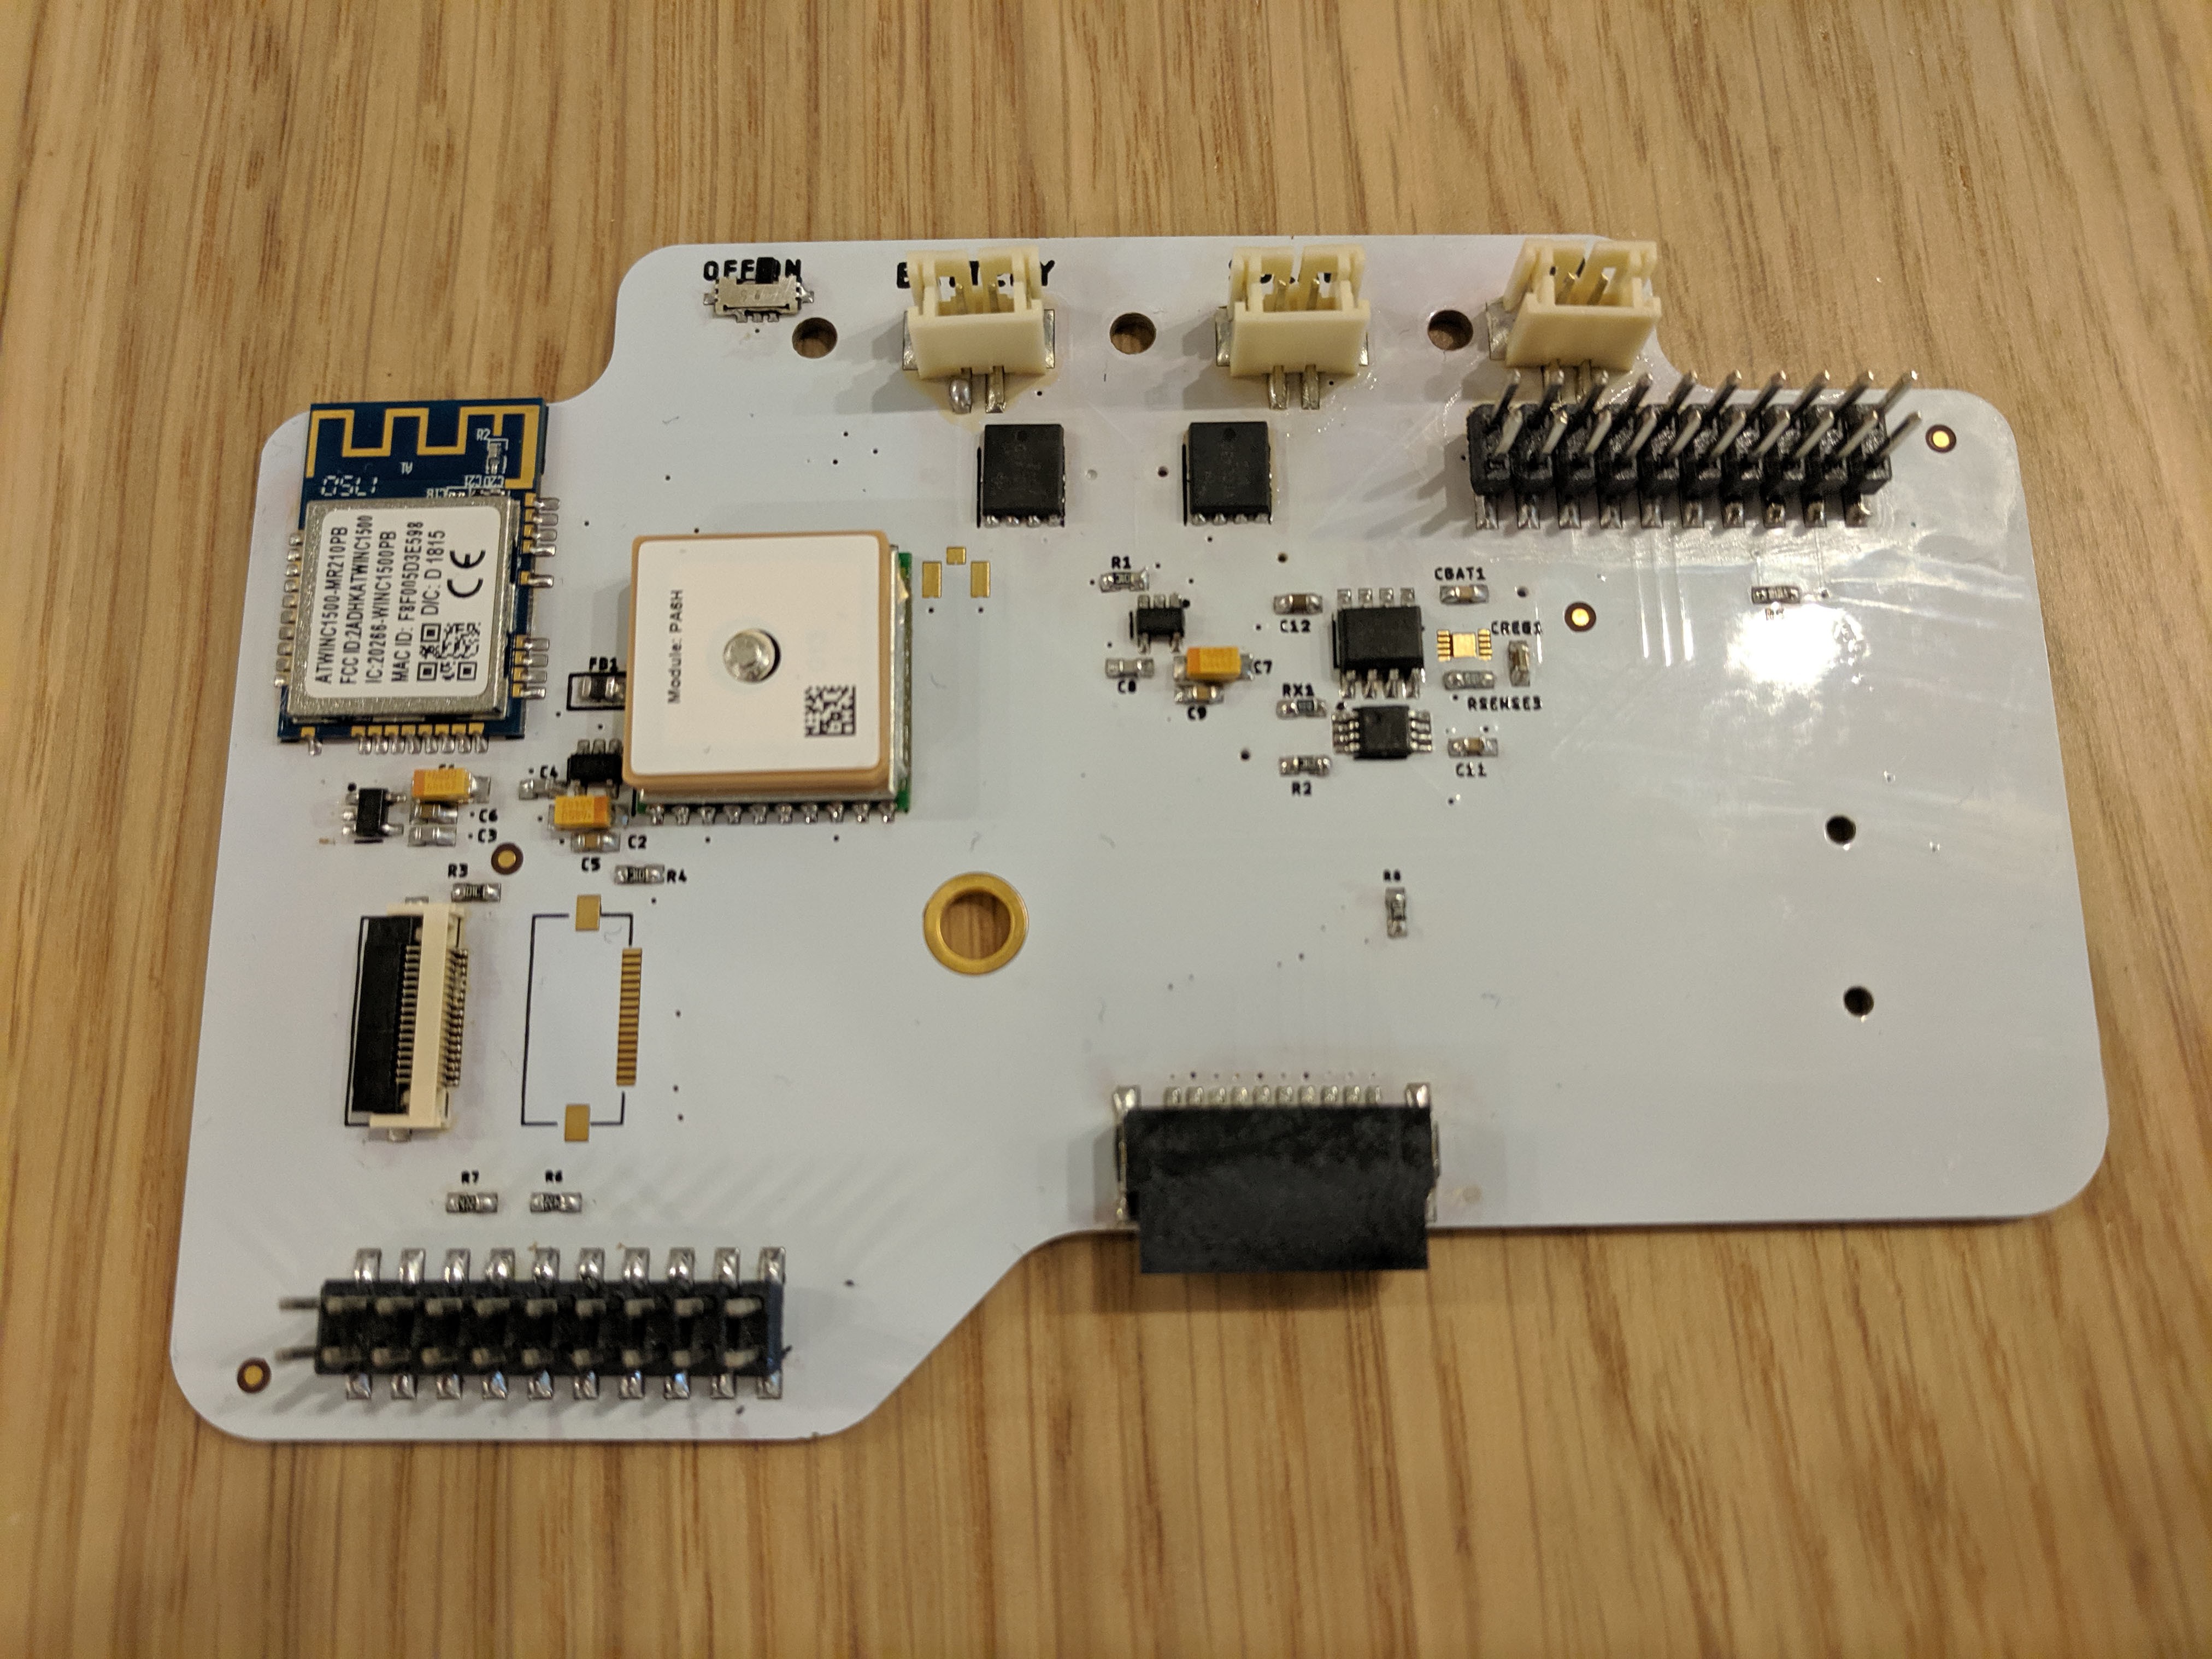
There are not a lot of surprises here, but the power system is surprisingly hard to simplify. It seems simple enough, Battery, Solar Panel, USB power, but edge cases pile up quickly! In any event, there's a battery charging IC (MCP7384) and a Maxim 'fuel gauge' style monitor (MAX17055) and their support circuitry.
The Wi-Fi and GPS duties are handled by a pair of Venerable modules (ATWINC1500 and FGPMMOPA6H). "Venerable" here is a word I use instead of "A bit long in the tooth." and they're the things most likely to be replaced in the near future. Each of them has a dedicated voltage regulator, and there's a third for all the stuff up on the Upper board. Hard experience has taught us things don't always turn off when asked nicely, so having control of their regulators can be a nice added measure of control.
Not all potential radios are good candidates to live on this board. LoRa and Celular radios and any future wacky development (satellite?) are provided for with a pair of FPC connectors providing power and the usual signaling buses (i2C, SPI) for future-proofing. More on this when we come to the LoRa radio board!
Speaking of connectors, the Radio board also plays host to the Backplane into which the modules are connected, so a horizontal board-to-board connector is on the bottom, again breaking out the needed power and signals. Different configurations for modules make separating this board a good hedge.
As a final trick up its sleeve, we're now working a single module footprint onto the back of Radio for small deployments in unusual enclosure situations (say, stuffed in a PVC pipe.)
That was a quick one, but buckle your seatbelts, because next time we're talking about Backplane, which is simple, and designing a standard for modules, which is not.
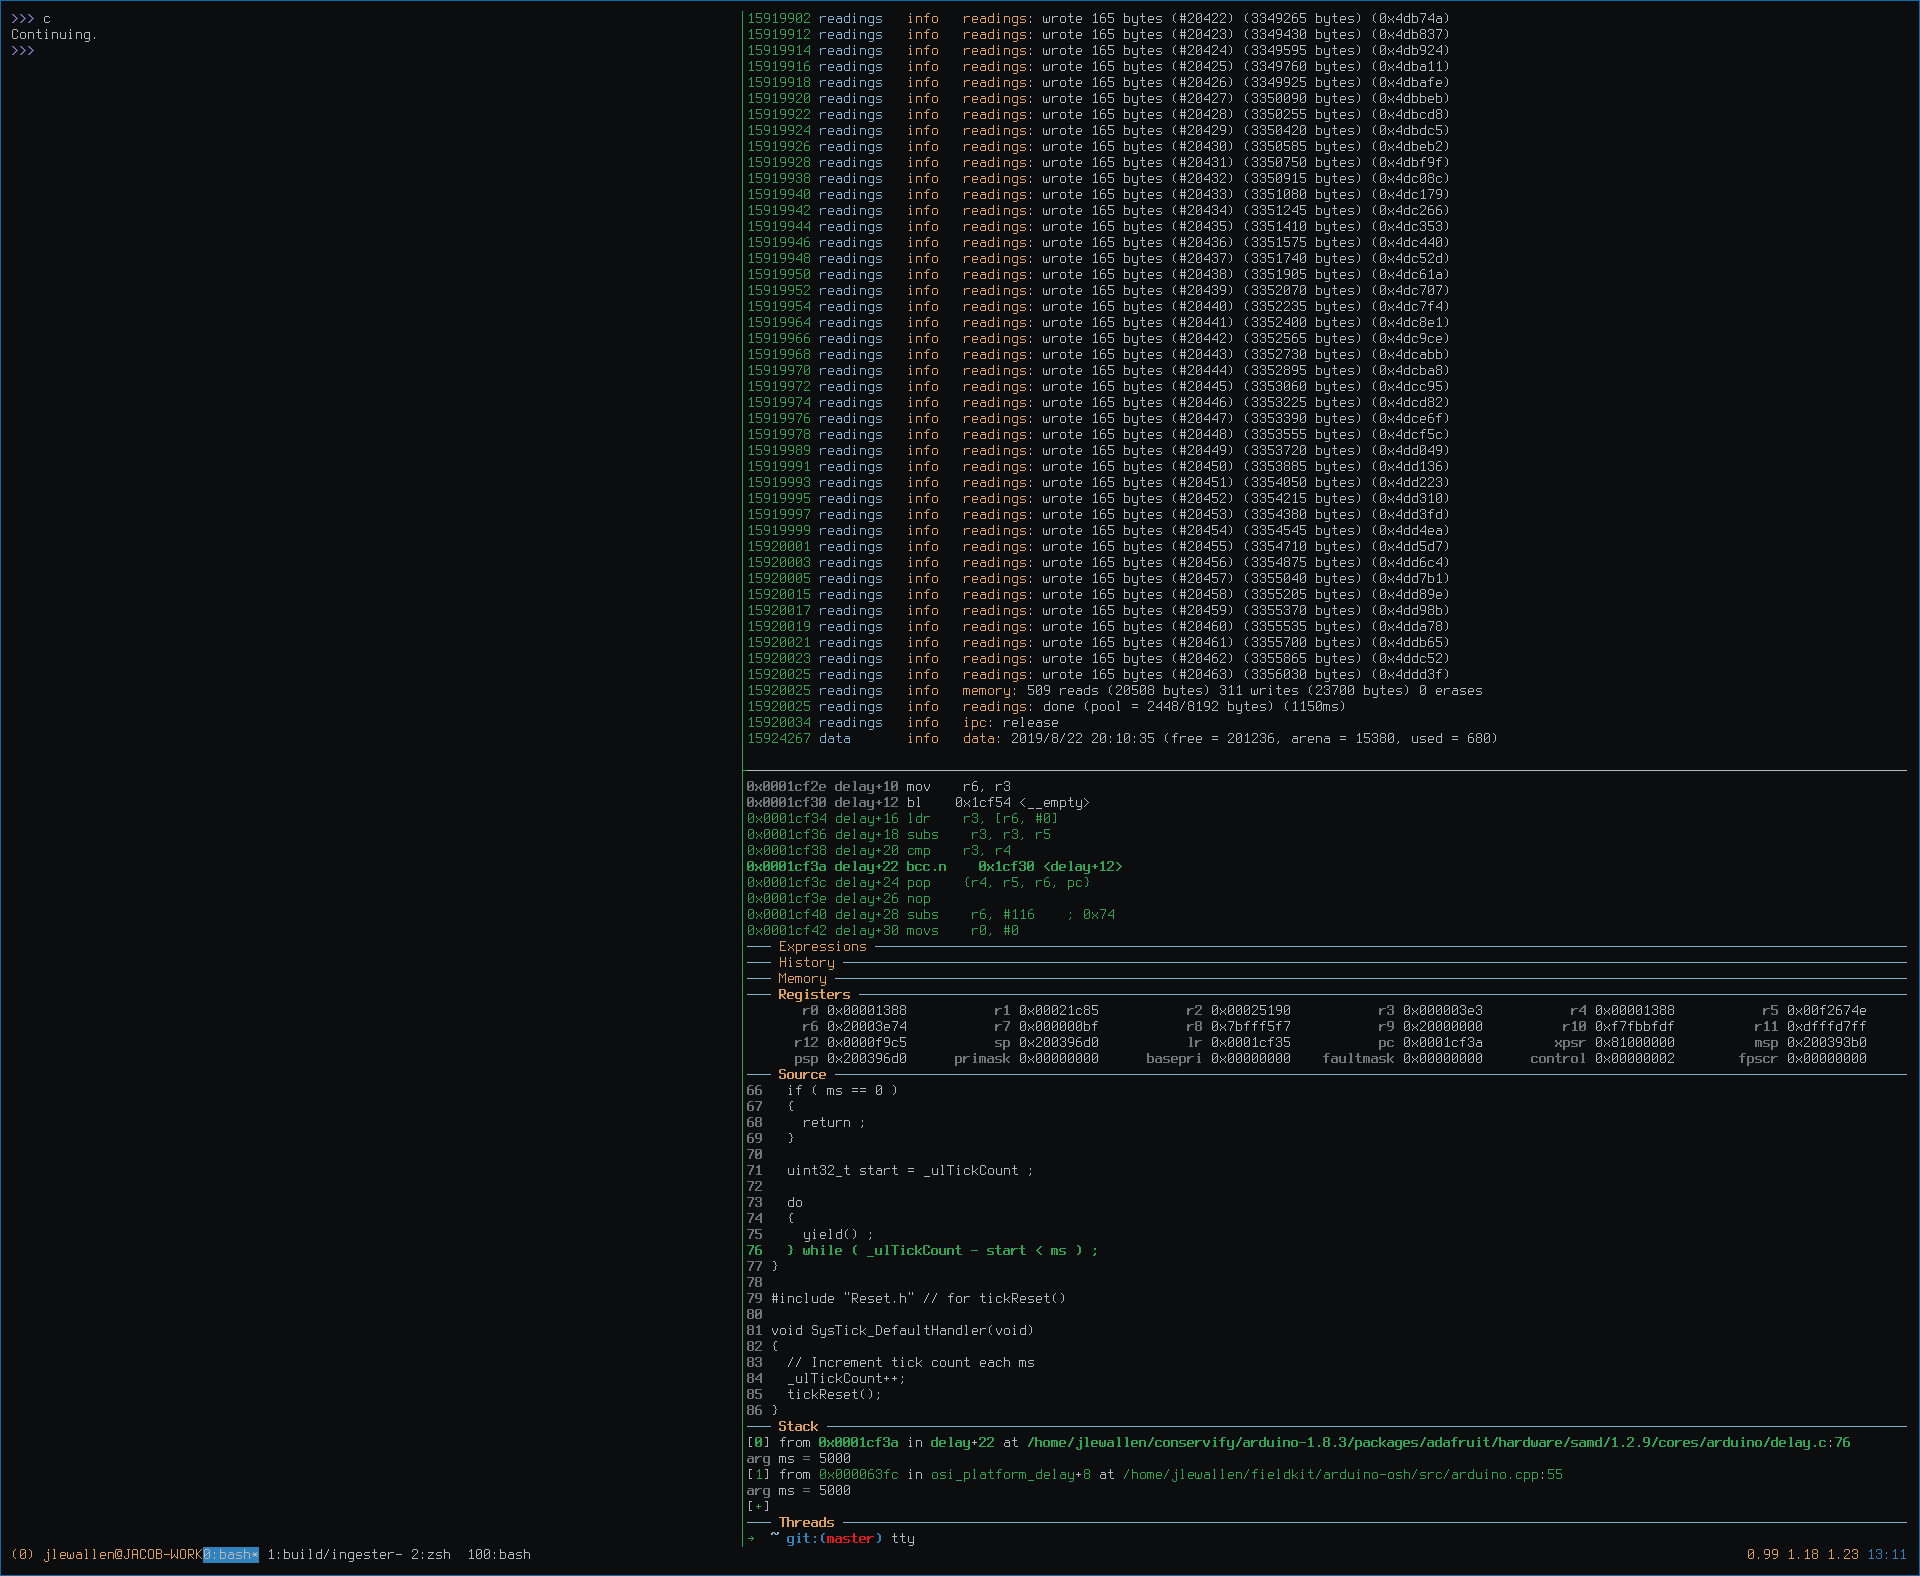
I spent a lot of my waking hours staring at a screen like this:
I wanted to throw together a quick post to talk about some debugging related things I’ve found myself doing more and more that I think others might benefit from. I’m just gonna rattle them off:
I exclusively load and run firmware from inside GDB. In fact, I now spend all my waking development time inside GDB. Prior to this development cycle I would rely heavily on uploading new firmware over USB, leaning on that functionality being provided by the standard Arduino bootloader. This was annoying in some cases, especially when dealing with hard faults and other serious bugs.
We use Segger’s JLINK brand of programmers, which I think are fantastic. They are scriptable and very predictable and reliable. Their only downside is you need easy access to a programming connector on your hardware, which Bradley kindly provided to me. Being able to step through and over code and inspect memory is invaluable. I should mention that the Grand Central M4 [1] board by Adafruit comes with this header ready to go, which was awesome before we got our own hardware up.
The JLink hardware includes some pretty cool additional features. My favorite so far is the RTT “real-time-transfer” functionality [2] Prior to this I would use a dedicated debug UART or USB CDC communications to view the console output from the firmware. Unfortunately, we were clean out of SERCOM peripherals (!) on the new hardware and so had to get creative. It was right around then that I discovered the RTT stuff. Basically, you dedicate a region of your own RAM to hold circular buffers and the JLink programmer is able to find this region and slurp the data for viewing on your host computer. It’s highly configurable and very fast. I’m a huge fan. In fact, I employ a similar linking trick as above to ensure these buffers are in the same location across all binaries so that the logs are seamless among binary transitions, say from the bootloader to the main firmware.
I write my own custom gdb commands now, typically in Python, for repetitive actions. Especially for things like the build, load, and run flow that I do hundreds of times a day.
Some GDB commands I like that took me a while to find existed:
n, s, ni, si
Next, step, next instruction, step instruction. Many of us know these.
finish
Run until execution returns from the executing function.
b *<address>
Break on a specific instruction, very handy for skipping over loops, for example.
disassemble /m
Disassembles the current function.
p/x, p/t
Most people know of p/print. You can change the format with these suffixes to print hexadecimal, binary, etc...
x/32x, x/32
Dump memory at the specified location. This is a complex command, like p and so should be looked up.
I apologize for the formatting of this table, I wish I could do better
I’m a big fan of the custom GDB dashboards that are out there, specifically this one [3] There’s so many and you can learn a lot about what’s possible with GDB by reading their source code and tweaking them to your liking.
I can't stress how useful Matt Godbolt's Compiler Explorer is - https://godbolt.org/ It's a tool I use all the time to get insight into the instructions my compiler is producing, especially when experimenting with C++. You'll also learn so much about the things going on behind the scenes.
I have a habit of learning just enough of a tool to get by and then halting my learning there. For tools like GDB this is horrible because of the sheer volume of utility lurking behind the common ways people use the tool. I'm trying to do better :)
Disclaimer: This post is highly technical and on a complicated subject. I learned enough to "get things working" and so I’ll probably get some things wrong and as always, criticism is welcome.
All of the above work is actually in preparation for phase two, which is the ability to load and run custom module firmware and extra versions of the main application firmware. In the short term, we fully intend to just bake our module firmware right into the main firmware, for simplicity. Long term, though, this won’t work. Especially as we get into users providing their own drivers for custom modules and the like.
Anybody that has gotten creative with firmware has inevitably ended up in this quagmire. My first foray was while I was trying to keep two separate versions of firmware around during upgrades so that the earlier version was available as a backup. This simply won’t work without some effort.
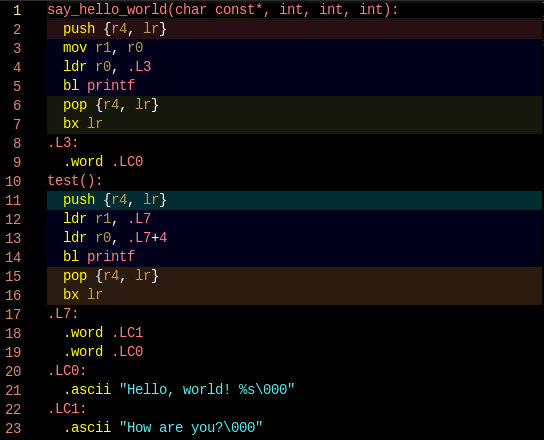
The problem comes down to knowing where data and code are during runtime. You see, when your code is being linked the locations of variables, functions and instructions used in loops and conditions are typically fixed in the binary as absolute addresses.
void say_hello_world(const char *message, int a, int b, int c) {
    printf("Hello, world! %s", message);
}

void test() {
    say_hello_world("How are you?", 34, 12, 76);
}
When you call a function the compiler turns the call into assembly instructions for passing arguments and receiving return values as per the architecture’s calling convention and then a jump to the absolute address of the callee. During link time the linker knows the memory regions the code is intended to run in (from the linker script). Typically this means the code expects to find itself loaded at some memory address and so that offset is baked into the absolute addresses used when calling functions as well as to finding global variables.
In many typical cases the running code is offset by the memory set aside for the bootloader. So if the bootloader occupies 0x0000 to 0x4000 then the application firmware is expecting to be loaded at 0x4000 and so all jumps and access will be offset from there. This means that loading firmware at a different location in memory will cause all those absolute addresses to be horribly wrong!
So, how do we fix this?
Thankfully this is a problem that’s had a solution for a long time. Under GCC, the first trick is to enable position-independent code [1] using the -fpic compiler flag. This tells gcc to avoid using absolute addresses and include link time information to decouple the binary from a predetermined location in memory. My solution involved combining this with a few other flags and so two different mechanisms come into play:
Relative addressing. By combining the above flag with -mpic-data-is-text-relative many of the addressing issues go away. This flag tells the compiler that the data section is always at a predictable location relative to the code section. So relative addressing can be used to find symbols in that section. Most jumps to functions will also be relative by virtue of using -fpic. This leaves the location of global variables as the problem.
Being able to find data relative to the code segment gets us close, but we’re still falling short because the code running needs to be able to find mutable variables that are in RAM. This is important because it’s very easy for two separate binaries to try and occupy the same region of memory for their variables, and so using relative addressing wouldn’t really help in that situation. Instead, the linker introduces a Global Offset Table [2]. This is a table that contains the addresses of global variables. (See “The Fundamental Theorem of Software Engineering” [3])
After compilation the compiler will have wrapped global variable accesses in an indirect lookup through the GOT. How does it find that table? Good question, enter another compiler flag: -msingle-pic-base. This, I believe, is ARM specific and tells the compiler to dedicate a specific register to holding the location of the GOT. In the default case this is R9.
What this means, is that before running a binary compiled with the above flags some runtime work needs to be taken care of. When the linker does its job, part of the process is to generate a section that contains “relocations”. Relocations are an incredibly complicated topic and if you’re curious or find this description lacking I urge you to do some research on your own and I wish you luck...
The general, high level idea is the linker adds a table to the ELF file that contains locations in the final binary that need to be corrected at runtime. How much of this information depends on your needs, really. Most discussions around relocations stem from their use in dynamic linking of shared libraries, which is very similar to the work we’re doing here, only our situation is simpler. For example, we only need to run one instance of these binaries against one instance of their data, rather than allowing multiple consumers to use a shared library with their own separate data regions. This means we simply need to allocate room for a single collection of global variables, fixup the GOT and ensure that R9 is set correctly!
The basic process looks something like this, from our dynamic loader in the bootloader or elsewhere:
Loop over all the relocations in the header, each symbol can have multiple relocations!
If we haven’t yet, allocate some memory for this symbol.
Fill in the location of the allocated memory in the GOT.
Before launching the application firmware, set R9 to the base of the GOT.
And we’re done! We now have true position independence for the binaries and can load and run binaries like this from arbitrary positions in memory! We’re also not that far from supporting more complex scenarios, should they be necessary. One more quick aside, is that during that runtime dynamic linking phase I manually intervene for some symbols that are truly global and shared among the various binaries. For example, the RTT buffers mentioned in the debugging article are shared and fixed in memory and so the relocations for those are still handled, but we can simply return the address of the bootloader’s instances instead of allocating new ones!
I apologize for how cursory this was… there was much more I could have addressed but there’s already so many great resources on relocations and that stuff out there, especially in the security and vulnerability space ;)
Some great resources I used, from Eli Bendersky's blog:
A few of the following posts will require a basic understanding of the memory layout used by the microcontrollers we're building FieldKit on top of. For many software developers this will be old news, but I wanted to take the time to make sure we're on the same... page.
Basically, memory is laid out in specific regions from a functional/hardware perspective and then further subdivided by software. So, let's start with some common diagrams:
Hardware Memory Layout
Many of us have seen this, I'll just give a quick summary:
Code: This is where program code and static data is stored. This memory is changed very infrequently. Understanding that data can also live here is important. The data that lives here cannot be changed, though without jumping through significant hoops. One common piece of data is the default vector table that's used by the hardware to kick off the execution of software.
SRAM: Ah glorious RAM. This is where the state of our software is stored during its execution. It's a treasured and valuable resource and the one most significantly imposed upon by software. By the way, you can run instructions from SRAM, at least on our architecture.
Peripherals: The physical hardware and how the software interacts with it is mapped to memory in this region. It's how the hardware makes itself available and is, hopefully, abstracted behind an intuitive software layer. We'll be talking the least about this region.
Now, summary imposes its own structure on memory, too. When our firmware first runs, part of its initial tasks is to setup and initialize various parts of RAM. Establishing a layout like this:
RAM Layout
This is where things are getting interesting!
Data: Our software contains variables and data that begin with a known value and will be modified over time. This is where that data lives. One of the first tasks of the software is to copy this data from the read-only Code memory to SRAM. Not only that, but to a place in SRAM where the executable expects that data to be! This caveat will be important later.
BSS: Some variables don't have an interesting initial value and just begin with 0. Rather than storing a huge block of 0's we save space by just remembering how big this region needs to be and initializing that are to 0. The name BSS is a throwback to the early days of computing [1].
Heap: This is where memory dynamically allocated by the software comes from. It is the first region that changes size and typically starts with a size of 0 at the start of execution. Notice that this region grows upward over time and can also shrink. Calls to malloc/free pull memory from here, as well as the plain calls to C++'s new/delete.
Stack: This region stores local variables, function parameters, and return addresses. It grows downward, towards the heap. It also plays a big role in handling interrupts in that certain state is pushed onto the stack prior to calling those routines. It will come up later when we discuss multi-tasking.
Now that we're... aligned, we can move onto more interesting subjects :)
As Bradley mentioned in his debut post, sometimes you gotta build something to really understand how to build that thing the right way. Unfortunately, it's not at all uncommon with software to find that the version that was written as a prototype to get user feedback and prove a concept ends up being the animal that you take with you into production. All software developers are familiar with the terror of feeling like they're building an airplane while it's flying.
During the 2018 field season I maintained a fairly long running list of things that I wanted from the firmware that weren't critical enough to implement but would be incredibly useful as the platform matured. The two most important where:
A very slick and flexible firmware upgrade process that was as end-user friendly as possible - from the beginning. The latter part is very important, because this means we could distribute stations to friends and family and be testing and supporting them. I started this work and mentioned it in early blog posts, but there were still some significant gaps, most notably in how the firmware was compiled and run that made certain upgrades tricky. Also, I desperately wanted the ability to upgrade from our mobile app.
Actual tasks/threads as part of a minimal real-time operating system. A lot of work and effort was expended with the first version of the firmware trying to make tasks non-blocking and asynchronous so that multiple systems could be “active” and cooperate while running concurrently. This made many things more complex than necessary and therefore, more brittle.
A side effect of deciding to overhaul the microcontroller situation was an opportunity to make significant improvements to the firmware. I can’t stress how happy I was the first time I ran code on the SAMD51 and saw that I had more than 256k of RAM at my disposal. Life on the SAMD21 was getting extremely cramped and I didn’t feel like I had the room to do the kinds of things I really wanted. Not just from a RAM perspective. The SAMD21 has 256k of FLASH memory and with the architectural changes around modules this simply wouldn’t be enough to work comfortably going forward.
Because the modules no longer had their own microcontrollers, the firmware to drive those had to live on the core SAMD51.
On that chip we have 1MB of flash memory, ignoring the QSPI memory Bradley added. This was more than enough room to store additional module firmware for our first modules.
In the beginning, the module firmware would simply be compiled into the core firmware as a kind of super-binary. Long term, this would need to be handled in a more flexible way, for a few reasons:
FieldKit is a modular system that is intended to grow beyond the offering we are able to anticipate, so the firmware handling situation needs to allow firmware from sources other than Conservify and the initial FieldKit team.
Upgraded module firmware needed to be possible, independent of the core firmware.
Modularity means that over time it will become impossible for all firmware for all available modules to live on a single device, so juggling and maintaining that firmware becomes the responsibility of the core firmware preinstalled on the hardware.
So, while I waited patiently for the new hardware I started to lay the foundation for these things. I spent a considerable amount of time at home writing some small, focused libraries to deliver on this extra functionality. Oh, and yes testing on Adafruit's Grand Central M4 :)
 Shah Selbe