Shah Selbe
-
Fourth Week: Amazon (no not that Amazon) Deadlines
07/24/2018 at 03:51 • 0 commentsFieldKit is designed to work with many different scientific applications, across various deployment scenarios and geographic locations. That requirement came from the type of work we do at Conservify, which can vary from partner to partner. One goal for this Residency at the Supplyframe DesignLab is to get us into a product line focus instead of the constant one-off projects that we have been doing time-after-time. We want to build something useful for the scientific community, that allows for anyone with any scientific level of knowledge or goal can go out and start learning about the world. We wanted to standardize the tools so we could start to focus on the projects in the field and getting the critical data that was necessary for the scientists and conservationists.
One of our implementation partners for FieldKit is a project called Ciencia Ciudadana para la Amazonia (Citizen Science for the Amazon) that is run by the Wildlife Conservation Society through support by the Moore Foundation. This past week we had a milestone for the project: we were sending out the first prototypes of the environmental sensors that will be used in the Ecuadorian Amazon. This milestone kept us very busy this last week, so much of our 0x03 residency was focused on getting the hardware and software ready for deployment. These included:
- Five (5) FieldKit Water Quality buoys measuring pH, water temperature, conductivity, dissolved oxygen, and water depth (using a pressure sensor at the end of 8 meters of cable - which was a requirement since the change in water level between the wet and dry seasons can remarkably be up to 8 meters of flooding).
- Five (5) FieldKit Weather stations measuring air temperature, humidity, altitude, ambient light level, rainfall, wind speed, and wind direction.
![]()
![]()
The photos above were of a few of the systems in their final integration, before we left them in Miami for the trip to Ecuador. Later project logs will cover the construction of these and some of the changes that we will undertake from the lessons learned over the last few weeks.
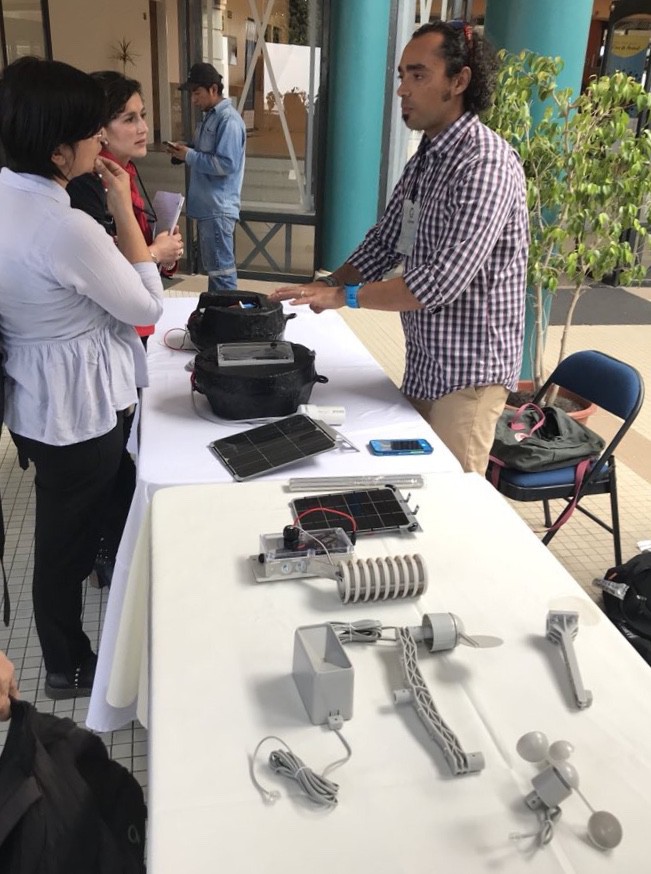
The plan was to take this hardware out to Quito (Ecuador) for the 2018 AQUATROP conference, where the team behind the Amazonia project had a large scientific representation. There was a showcase where the FieldKit sensors were deployed and many additional implementations were discussed with future partners.
![]()
Our partners for this first deployment (seen in the photo above) is the Tropical Rivers Lab at Florida International University. Every Conservify project partners with scientists (either at a university, government, NGO, or even citizen scientists) to handle the specific scientific questions around the technology we develop. This can be things like where to deploy, what to measure, and the specific requirements around the data we need. Getting the scientific question correct is fundamental to the technology development pathway.
Over the course of this project, we will outline some of the other work we are doing with other FieldKit partners and the expeditions that we go on during the development and deployment.
-
Third Week: Product Inspiration and Manufacturing Ramp-up
07/02/2018 at 23:04 • 0 commentsPosting this slightly late project log from last week, as we prepare for some upcoming tasks for FieldKit. We have quite a bit happening in both in the handheld device and in some of our upcoming deployments in the Amazon Rainforest with the Wildlife Conservation Society. More on both those in the coming weeks.
Manufacturing Update
We sent out for the panels for the handheld version to a New Zealand-based PCB supplier that Dan had worked with in the past. This is both for the main MCU and sensor board. They are separated (as Jacob mentioned in an earlier post) so we can mount the sensor board close to the enclosure for more accurate readings. Those sensors measure temperature, humidity, ambient sound, and ambient light.
Jacob has been pulling together the component orders for the pick-and-place machine, which has been an interesting exercise. We have only hand-built PCBs before so our quantities were much lower. Once you start looking into reels and trays of components, the numbers can really add up. Fortunately the common providers like Mouser and Digikey have smaller sub-reels that would be perfect for the runs we plan to do here at the DesignLab. We are still finding the right balance on quantities since we are not in full production yet.
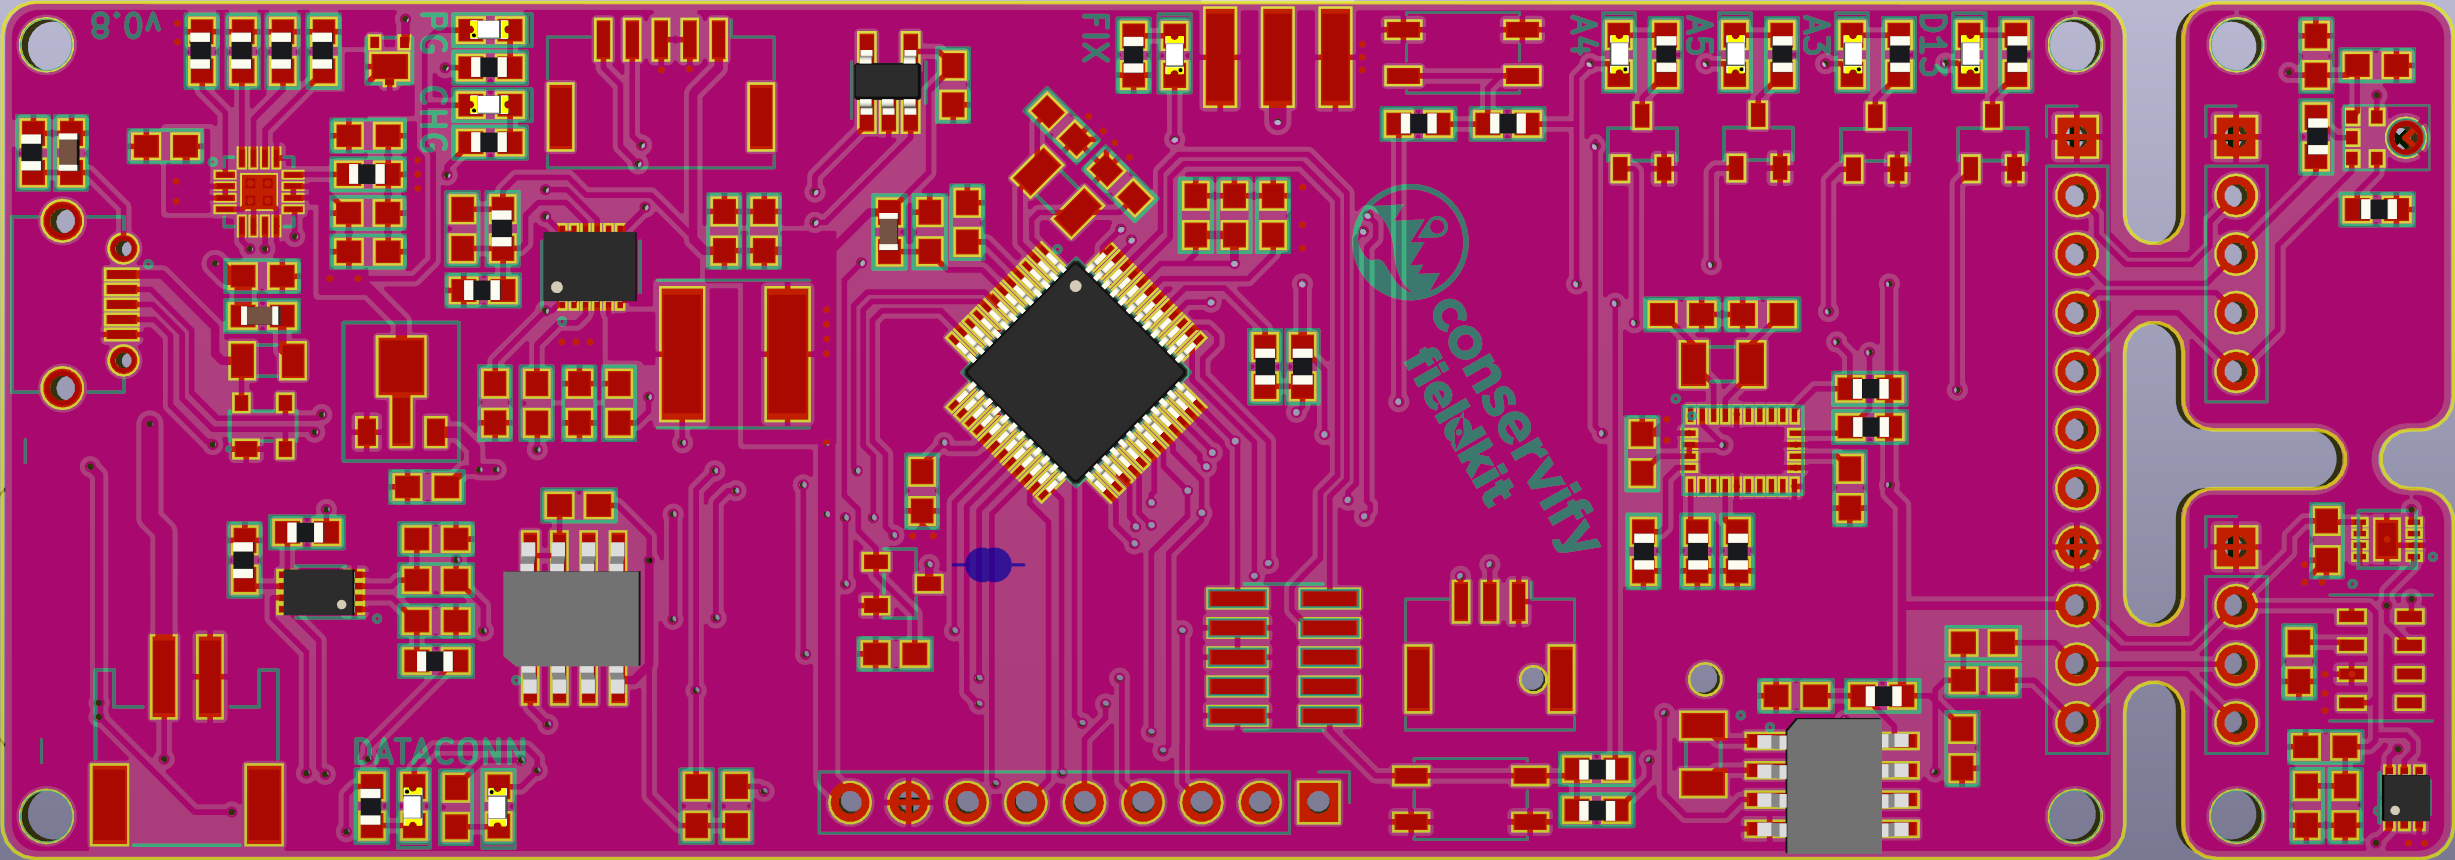
For all the other sensor boards (water quality, weather, etc), we are still ordering the trusty purple boards from out friends at OSH Park. They have been fantastic supporters of FieldKit since the Open Hardware Summit last year.
Product Design Ideation
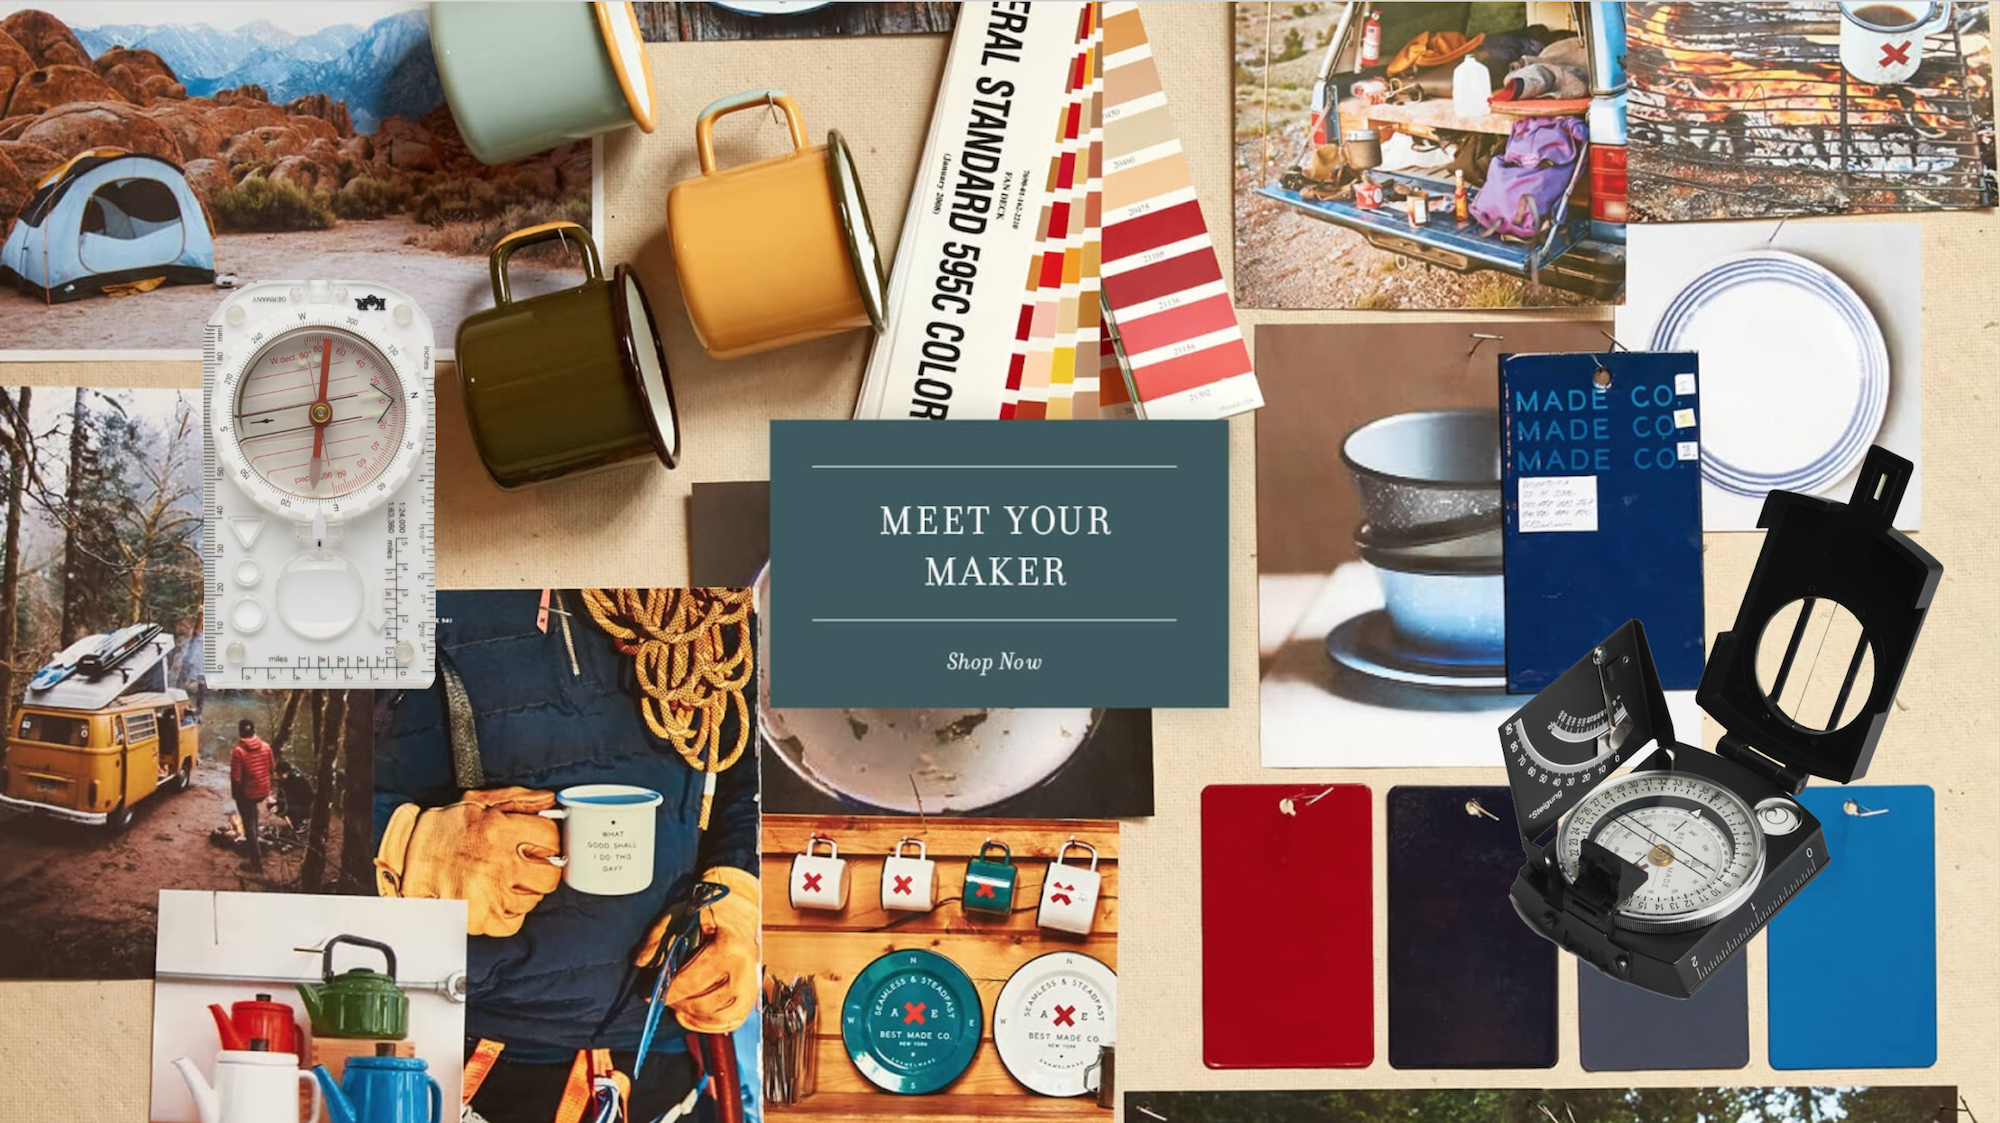
I have been working a lot on what the look and feel of FieldKit should be as we get into the enclosure design. Jacob and I both come from engineering backgrounds, so some of these industrial/product design stuff is new to us and we were really excited about those opportunities that would come out of the DesignLab residency. I already had a fantastic chat with Majenta and Giovanni about best practices around designing a product like that. The plan is to start on the handheld version (what we frequently call the "Naturalist") and design some solid 3D prints of potential enclosure designs that we can touch and feel. Using those, I will ask for feedback and we can discuss which one meets the feel that we are seeking for FieldKit in general. As these are to be used out in the field, we want them to have an outdoorsy vibe (much like the stuff that Best Made does so well):
![]()
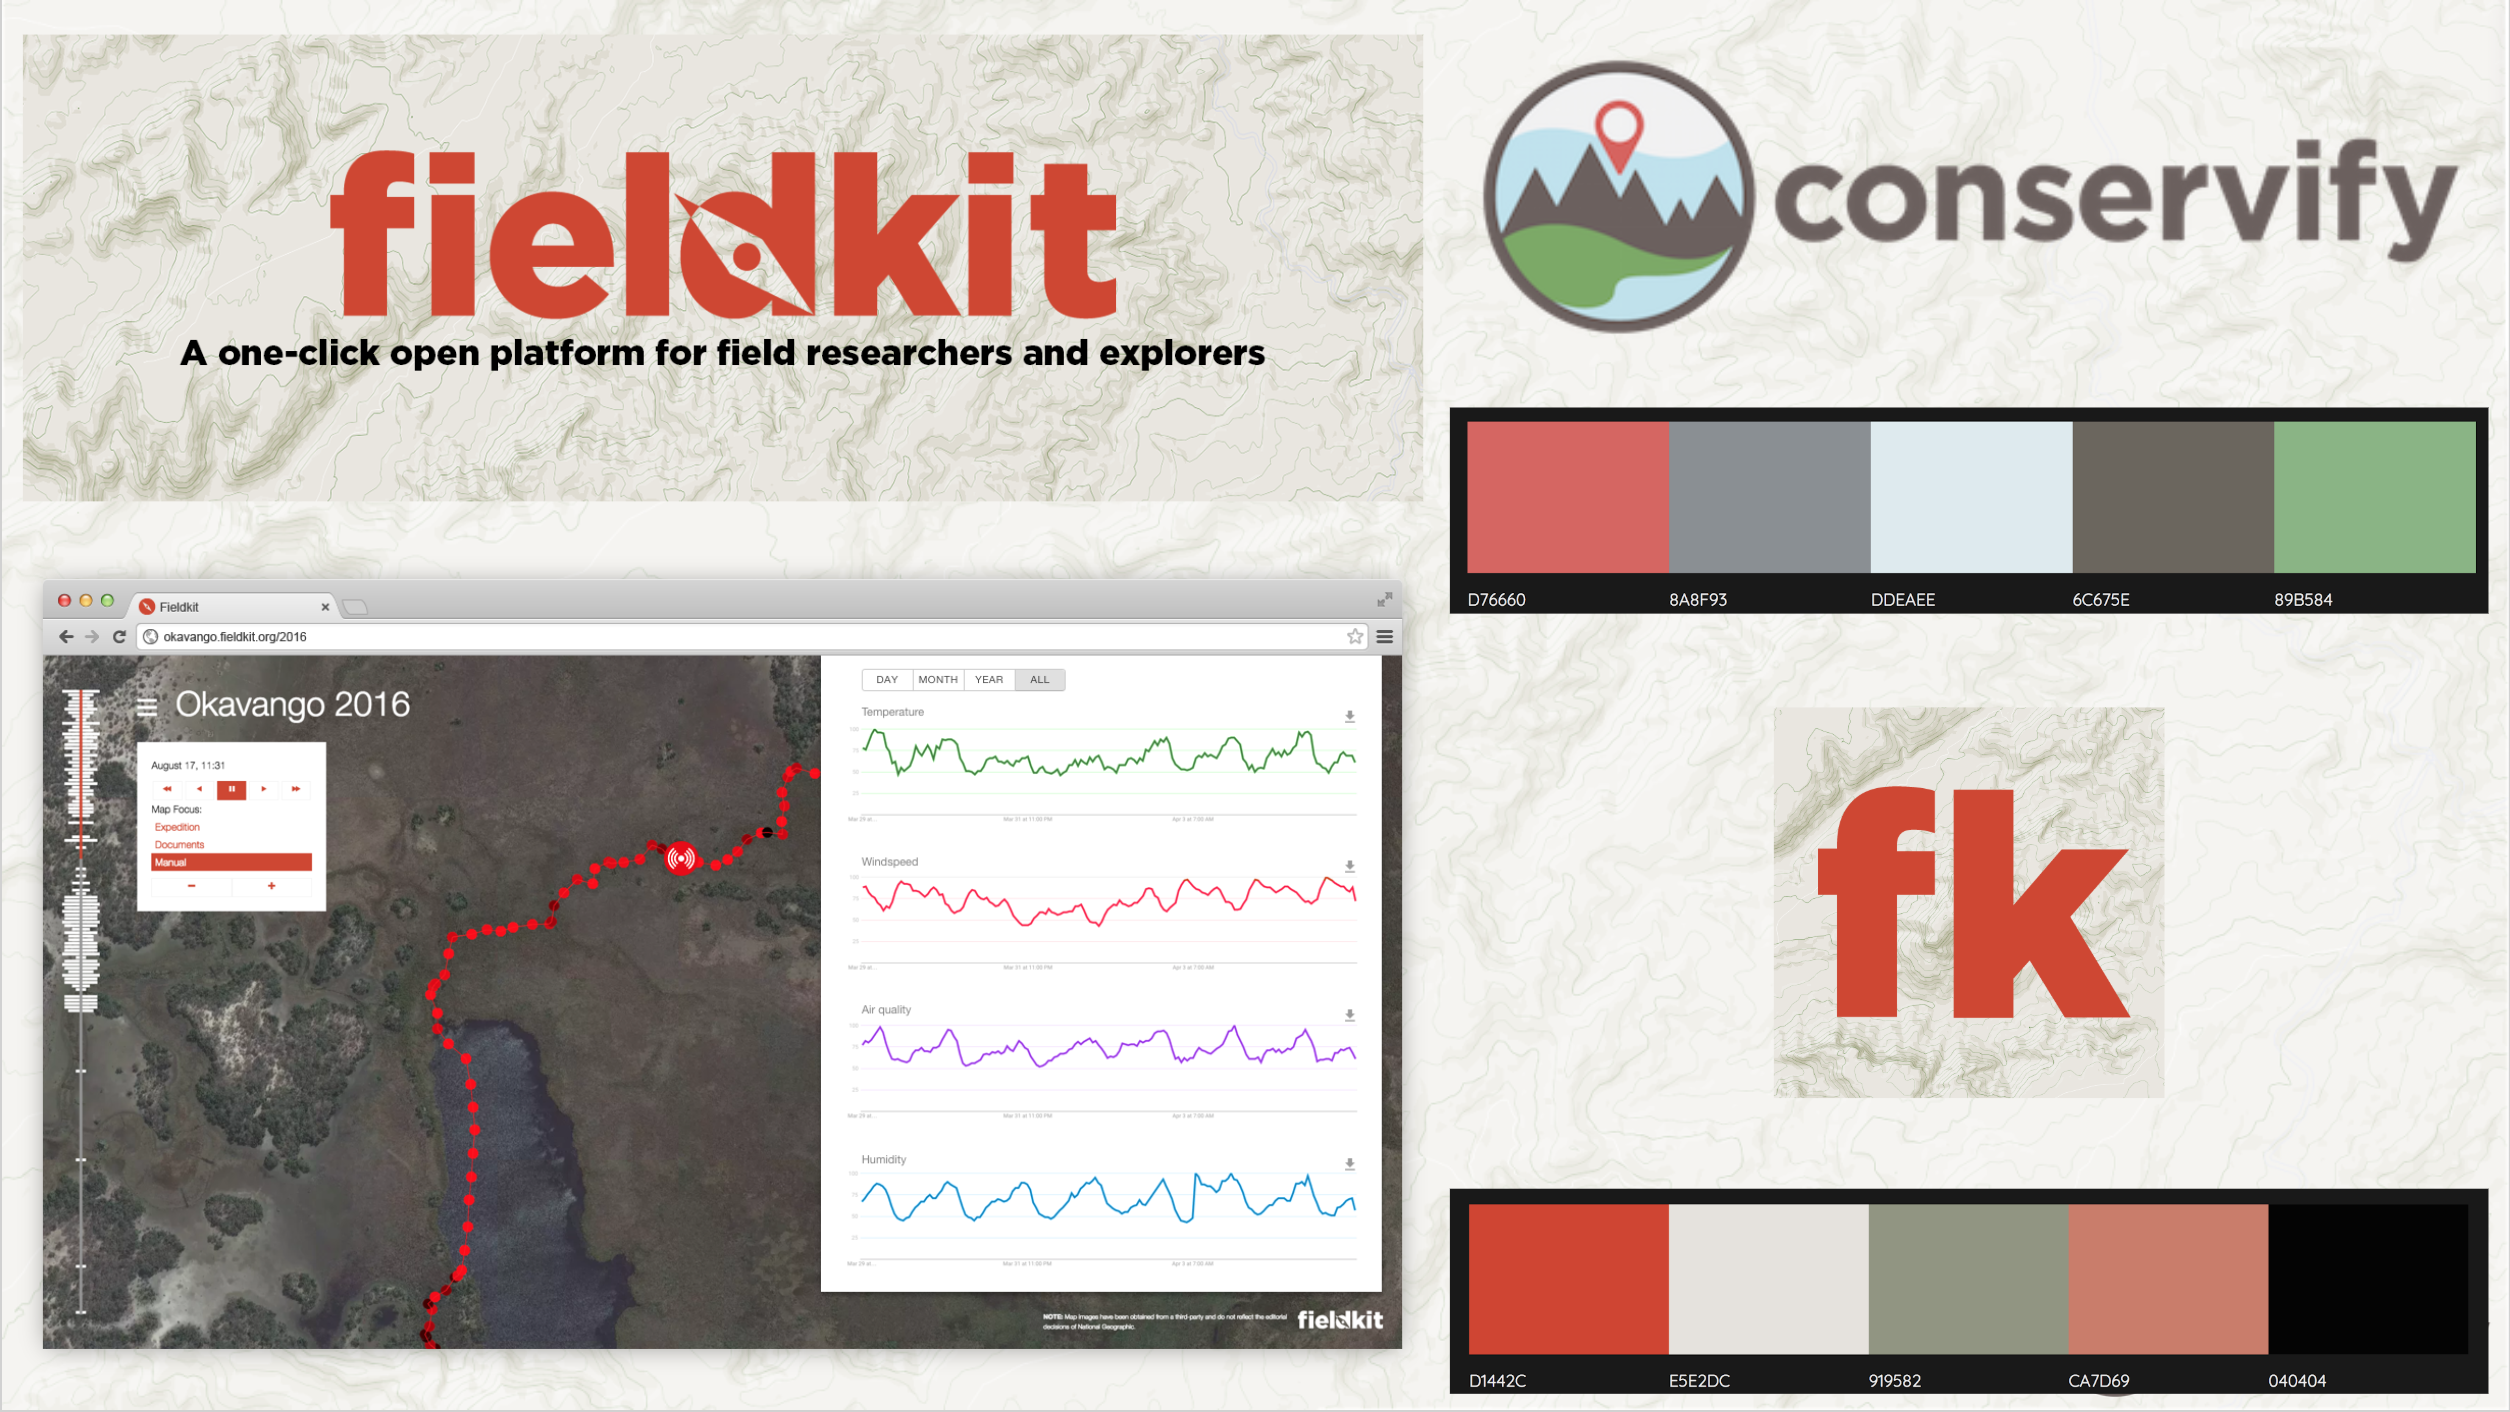
We also want the product to follow the branding that we have built for Conservify and started to develop alongside FieldKit partners Office for Creative Research (which, tragically, is no longer around) and the National Geographic Society. For those who haven't been following along for long, FieldKit came out of work we had done with OCR since 2014 as part of the Okavango Wilderness Project. That project came out of a collaboration between a few National Geographic Explorers to bring live data from the field during a biodiversity survey expedition in Botswana's Okavango Delta (more here and here). The branding and color schemes (as currently stands) looks like this:
![]()
Finally, there are some functional characteristics that we want for this handheld version. These are:
- It needs two buttons (one to reset the device and another to start the wifi hotspot). We have also been exploring some options on simplifying that to one button and way the devices responds to actuation.
- There needs to be external access to the SD card (to replace/remove) and micro USB plug (for charging and programming)
- The device needs to be designed for outdoor use and appropriately ruggedized
- There might be some potential for interesting mounting options, like a tripod mounting point or loops/slots that allow you to attach the device for in situ measurements.
- The design should influence the user to hold the device in correct orientation for best sensor readings
- Some level (TBD) of waterproof or weather resistant protection should be included
- Some level (TBD) of minimal drop protection should keep it from shattering if dropped in the field
- The material selection or texturing should provide additional grip
So these main thoughts are going into these first few designs, and we will share as we get some ideas flushed out on Fusion360 and off the 3D printers.
During a later project log, I will talk more broadly about some of our users and the community that we have used to develop and test the earlier versions. We have some really interesting deployments in the future. One of those is in the Amazon Rainforest, which we will discuss in our next log.
One more thing...
Oh, and if you never saw our talk at the Hackaday LA meetup earlier this year then check out below. It is a good summary of what we have been up to at Conservify and what FieldKit aspires to solve:
-
Second Week: BOM Preparations
06/18/2018 at 17:38 • 0 commentsHappy Monday everybody, hope you’re ready for another update! Things were fairly quiet this week as Shah was in Washington DC for the National Geographic Society Explorer festival. My focus was on the preparation for scaling up the manufacture of our FieldKit Naturalist boards.
We have two goals on this front. The first is the assembly of a panel of boards using the pick and place machine at the DesignLab and the second is having the capability of sending away for assembled boards from a 3rd party. In order to be ready to send away for a panel of PCBs, a quick design review was necessary.
Design Review
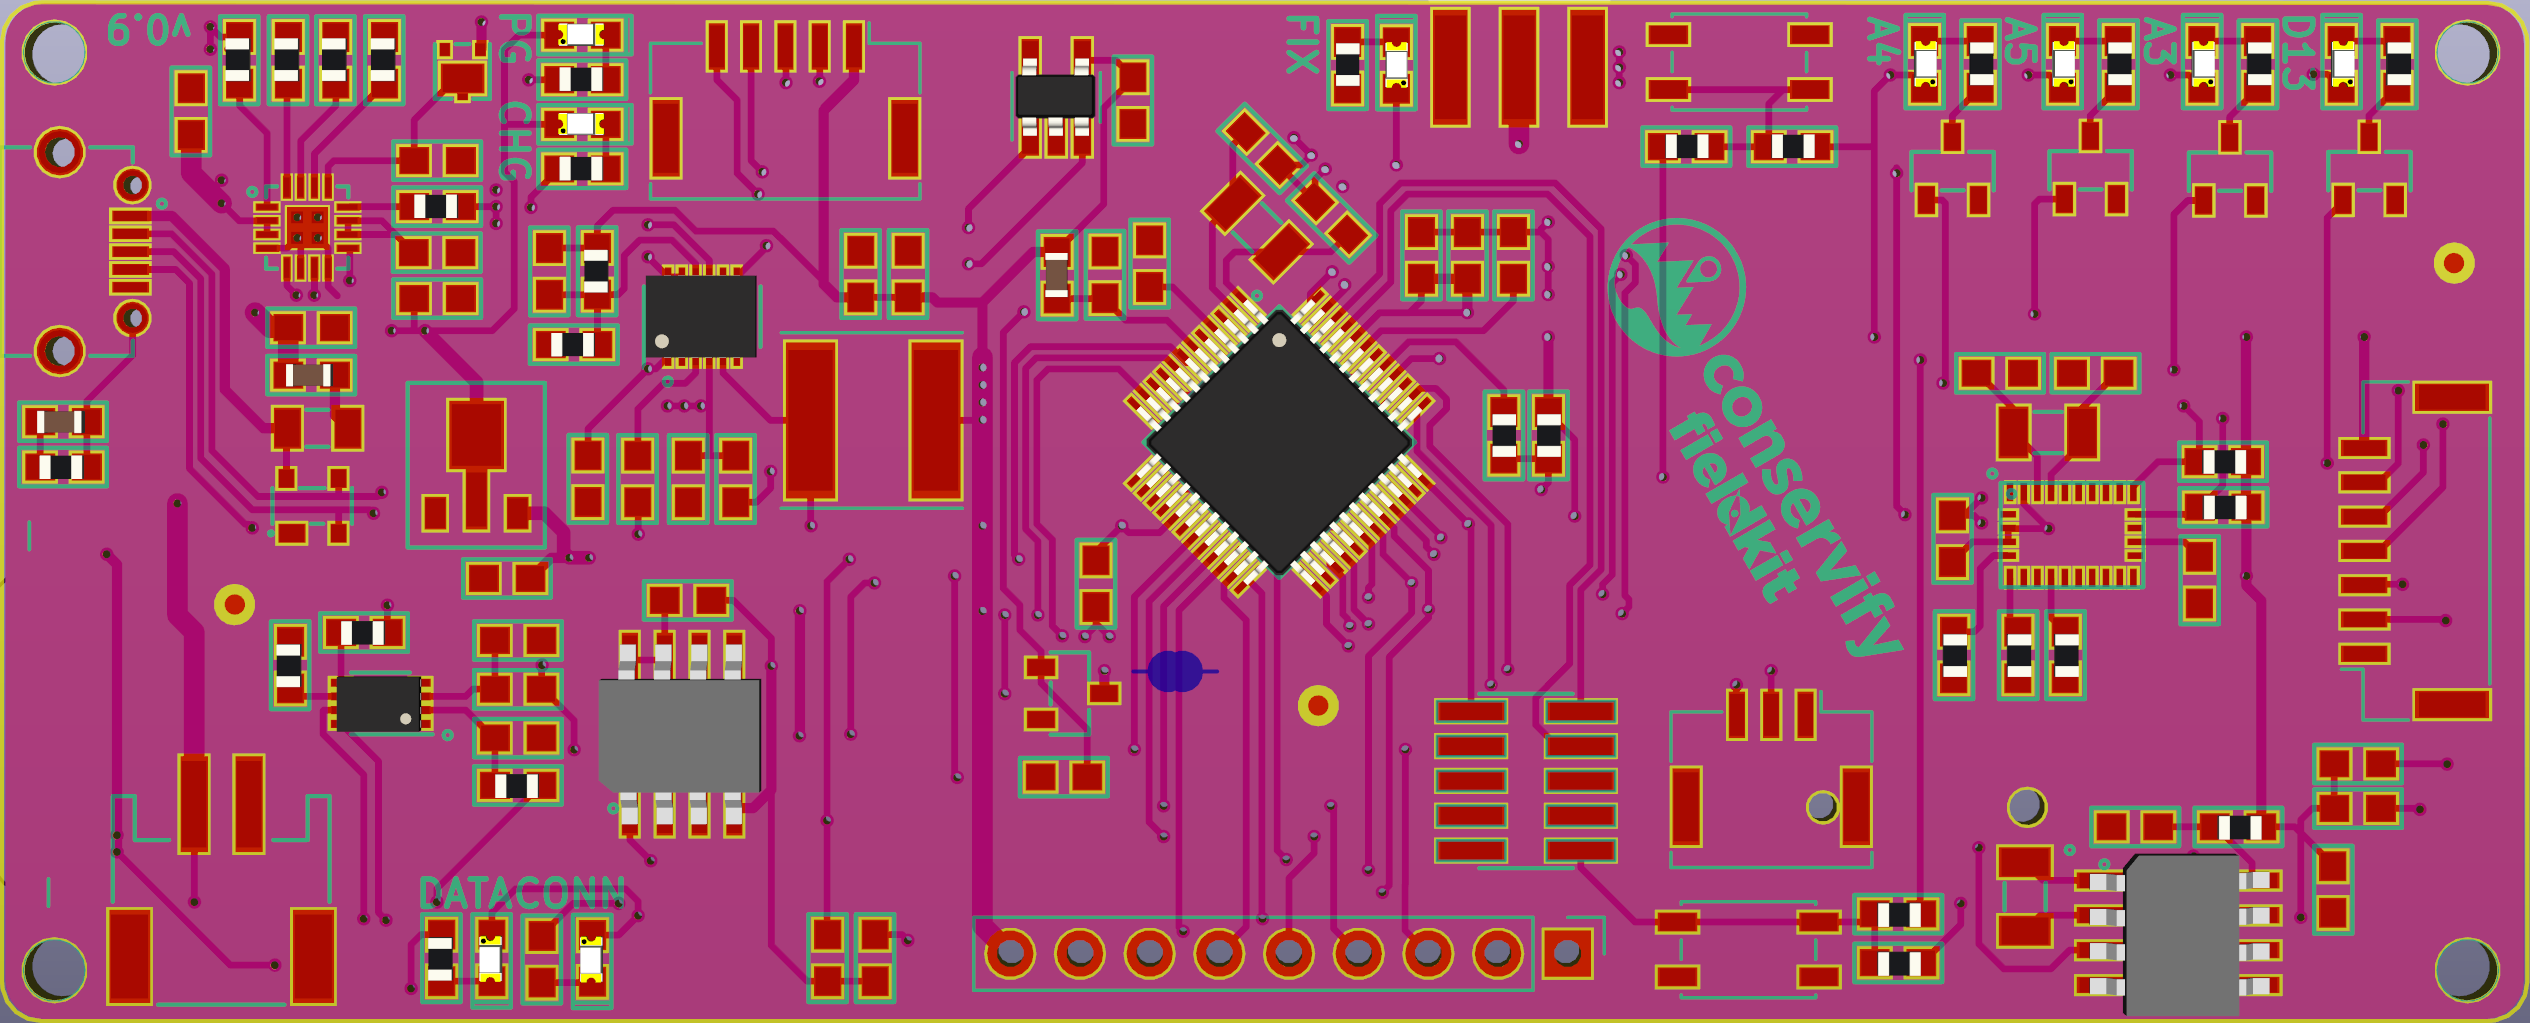
Before:
![]()
After:
![]()
This was fairly straight forward as we have some working prototypes that I hand assembled in our lab and so we have pretty high confidence in our current board design. We did make some changes, though:
- Drop the break-off sensor PCB feature in favor of two separate boards. We had originally intended the break-off design to be useful for STEM settings. Given the relative infrequency of that application when compared to the pre-assembled scenario we opted to just commit to two separate boards.
- We increased the separation between the Micro USB and the SD card. The gap between the two was fairly narrow and we were worried about having thin areas on the enclosure.
- The USB connector was nudged further out so that the board didn’t need to seat right up against the wall of the enclosure.
- Adding fiducials for the pick and place machine. Dan suggested three of them, and that they be as far from other circular features as possible to avoid confusing the CV of the machine.
-
![]()
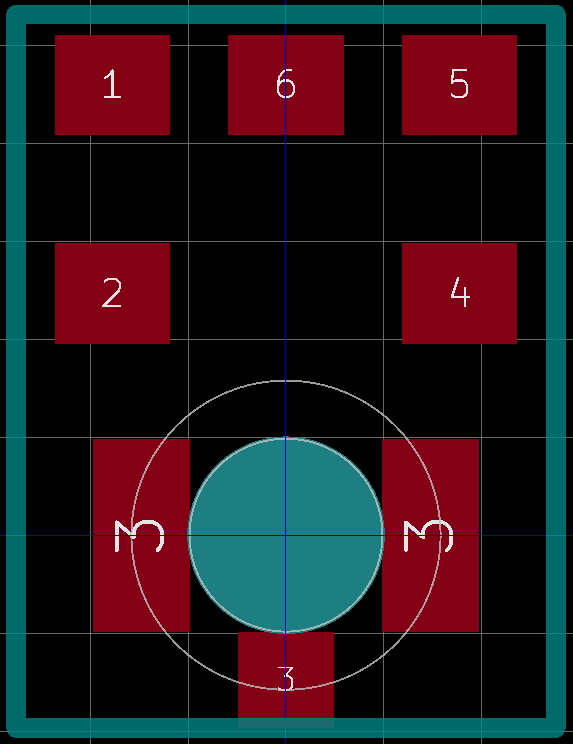
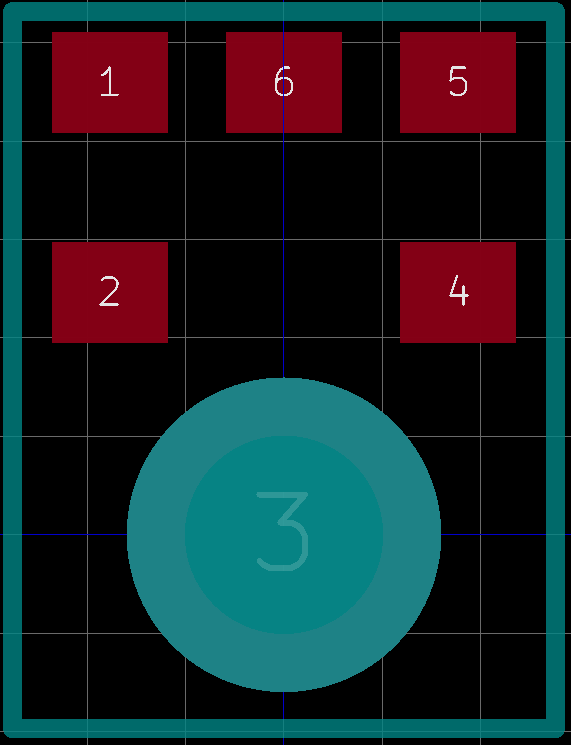
![]() One of our sensors, the SPH0645 MEMS Microphone, has a very strange footprint. The microphone port itself is on the bottom of the chip and so the PCB needs a drill to expose the port. In addition, the chip’s GND is a ring around the port, as you can see to the right. I was worried about solder paste being applied over the top of that drill and potentially sealing off the port. We decided to change the footprint to be more “stencil friendly” by placing some rectangular SMD pads in a way that overlaps the GND ring.
One of our sensors, the SPH0645 MEMS Microphone, has a very strange footprint. The microphone port itself is on the bottom of the chip and so the PCB needs a drill to expose the port. In addition, the chip’s GND is a ring around the port, as you can see to the right. I was worried about solder paste being applied over the top of that drill and potentially sealing off the port. We decided to change the footprint to be more “stencil friendly” by placing some rectangular SMD pads in a way that overlaps the GND ring. - Ensure we have as few through hole components as possible. These greatly increase the cost of assembly. Thankfully this board doesn’t have any of those.
- I asked Dan about the possibility of moving to a 4-layer board and he insisted we stay with 2-layer as long as possible due to the extra cost of more layers.
- Another optimization he suggested, specifically for future boards, is using resistor arrays when possible.
BOM Preparation
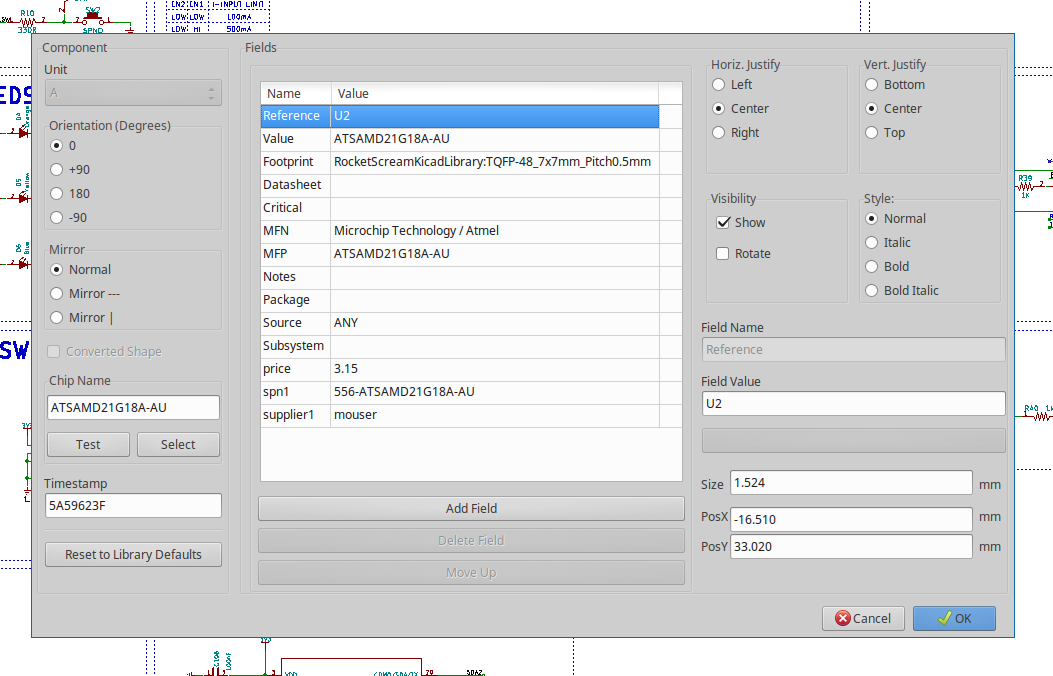
In ramping up for the pick and place we need to begin ordering pick and place friendly parts - reels and trays. We try and keep all of our BOM information in our schematic files. This means that going into this process each part already had a supplier name and supplier part number, typically from Mouser. Because many assemblers have their own preferred supplier for basic parts like passives, Dan suggested we keep manufacturer details in the schematic as well.
![]()
One of the things I love most about Kicad is how scriptable things are. It was easy to export a CSV of the parts and then fill in MFN (Manufacturer Name) and MFP (Manufacturer Part) there and then update the fields in Kicad from that. We also have scripts that go over all of our boards and their parts and look for parts with out-of-sync manufacturer and supplier information. We want the authority to be the schematic, but with several boards keeping the details consistent can be time consuming. Scripts help with that.
Soon, I hope to write a project log about our “grouped spread and place” script. This is a script we use when first starting to layout a PCB. If you’re careful to group your schematic into functional areas using the drawing tools the script will spread the parts out while also gathering related components together on the initially blank canvas, rather than clumping everything together like one giant parts yard sale.
With these things done we plotting the gerber files for the main board and Dan’s going to kick off the back and forth with his preferred assembler!
-
FieldKit Now: What We’ve Done So Far
06/11/2018 at 21:05 • 0 comments![]()
Last week, the Conservify team started their tenure at the SupplyFrame DesignLab Residency! This opportunity is something we've been looking forward to for several weeks and we're very excited. This first post is going to outline the current state of FieldKit and give a brief rundown of the goals we have for our time at the DesignLab. A kind of "state of the project" to set the stage for future updates.
State of the Hardware
FieldKit’s evolution began where many present day electronics projects do, as a series of glued together prototype boards from Adafruit and the internet at large. After a couple years bouncing between various MCUs in the Arduino space for various one off projects we eventually settled on the Adafruit Feather line, specifically those containing the ATSAMD21G chip (their M0 boards). We liked the variety they offered, the compatibility with Arduino tools and libraries, and the trade off the chip made between power and capabilities. It was nice having all the peripherals as well as the memory when compared to other Arduino boards. They became a natural choice as we began prototyping the various FieldKit modules. This post assumes you’re slightly familiar with our project so please read the summary if you haven’t.
This may be a good time to point out that Arduino compatibility is important to us as a feature for two reasons. First, we are hoping to provide a platform people are comfortable hacking on and modifying for themselves and Arduino provides that framework. The second is related, and that is that it's important to us that we have something approachable for STEM related applications.
![]()
So, going into the residency we have early versions of the following modules designed and being tested:
Core
Our core module is our most complicated board and was the first one we began designing last year. This board is pretty densely packed for our standards and includes GPS, SD, Serial Flash, WiFi (WINC1500), LoRa, LiPo Fuel gauge and charging, and some other smaller systems.
Atlas
Water quality based on the Atlas Scientific line of sensors. This board has room for five Atlas modules of any kind. We’ve been designing the board to be populated with ORP, DO, pH, Temp, and EC. In the next few weeks we'll also be adding a pressure sensor to this module for depth readings.
Weather
This module is designed to work with the relatively cheap rain/wind weather meters available at a few online retailers. It also has a separate PCB that holds a few environmental sensors like temperature, pressure, humidity and ambient light.
Sonar
A very basic module for attaching to a sonar sensor for water depth readings. This board also has a LoRa module and charging abilities because of certain slim municipal deployments we're anticipating.
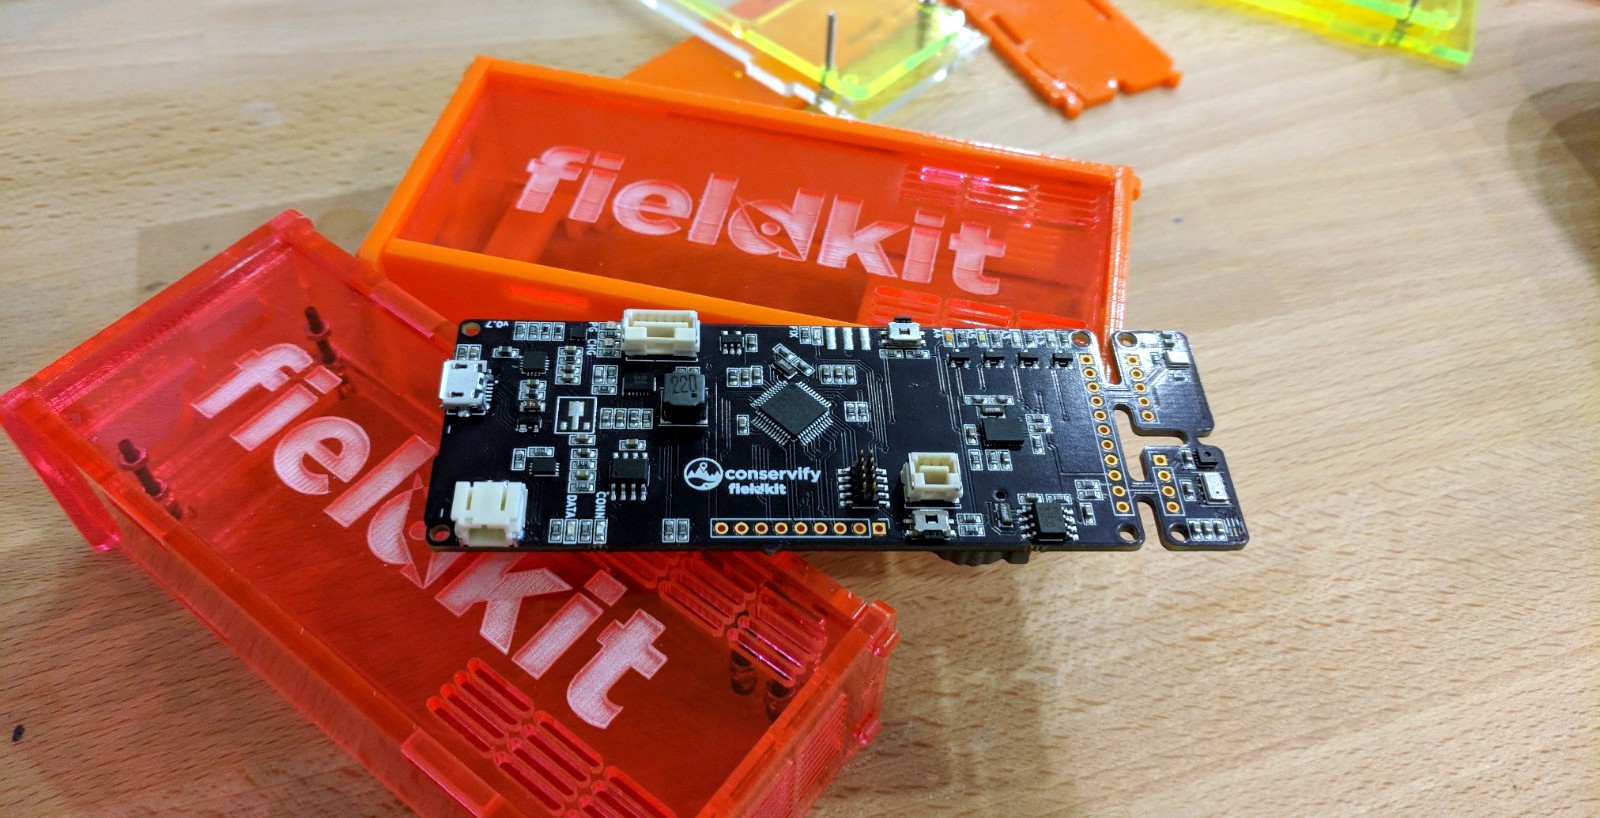
Naturalist
This board is effectively a Core board and a Weather smashed together with two other sensors thrown in, specifically an SPH0645 MEMS microphone and a BNO055 IMU. This was originally developed to be a separate module but was merged into a single board to save space and simplify the project. It will also be one of our early focal points at the DL residency as we experiment with enclosure fabrication.
Naturalist is also special because when we designed the integrated single-PCB version we did so anticipating using that as a basis for a new version of our Core board. Core had gone through enough revisions that we felt things could benefit from a redesign.
State of the Software
![]()
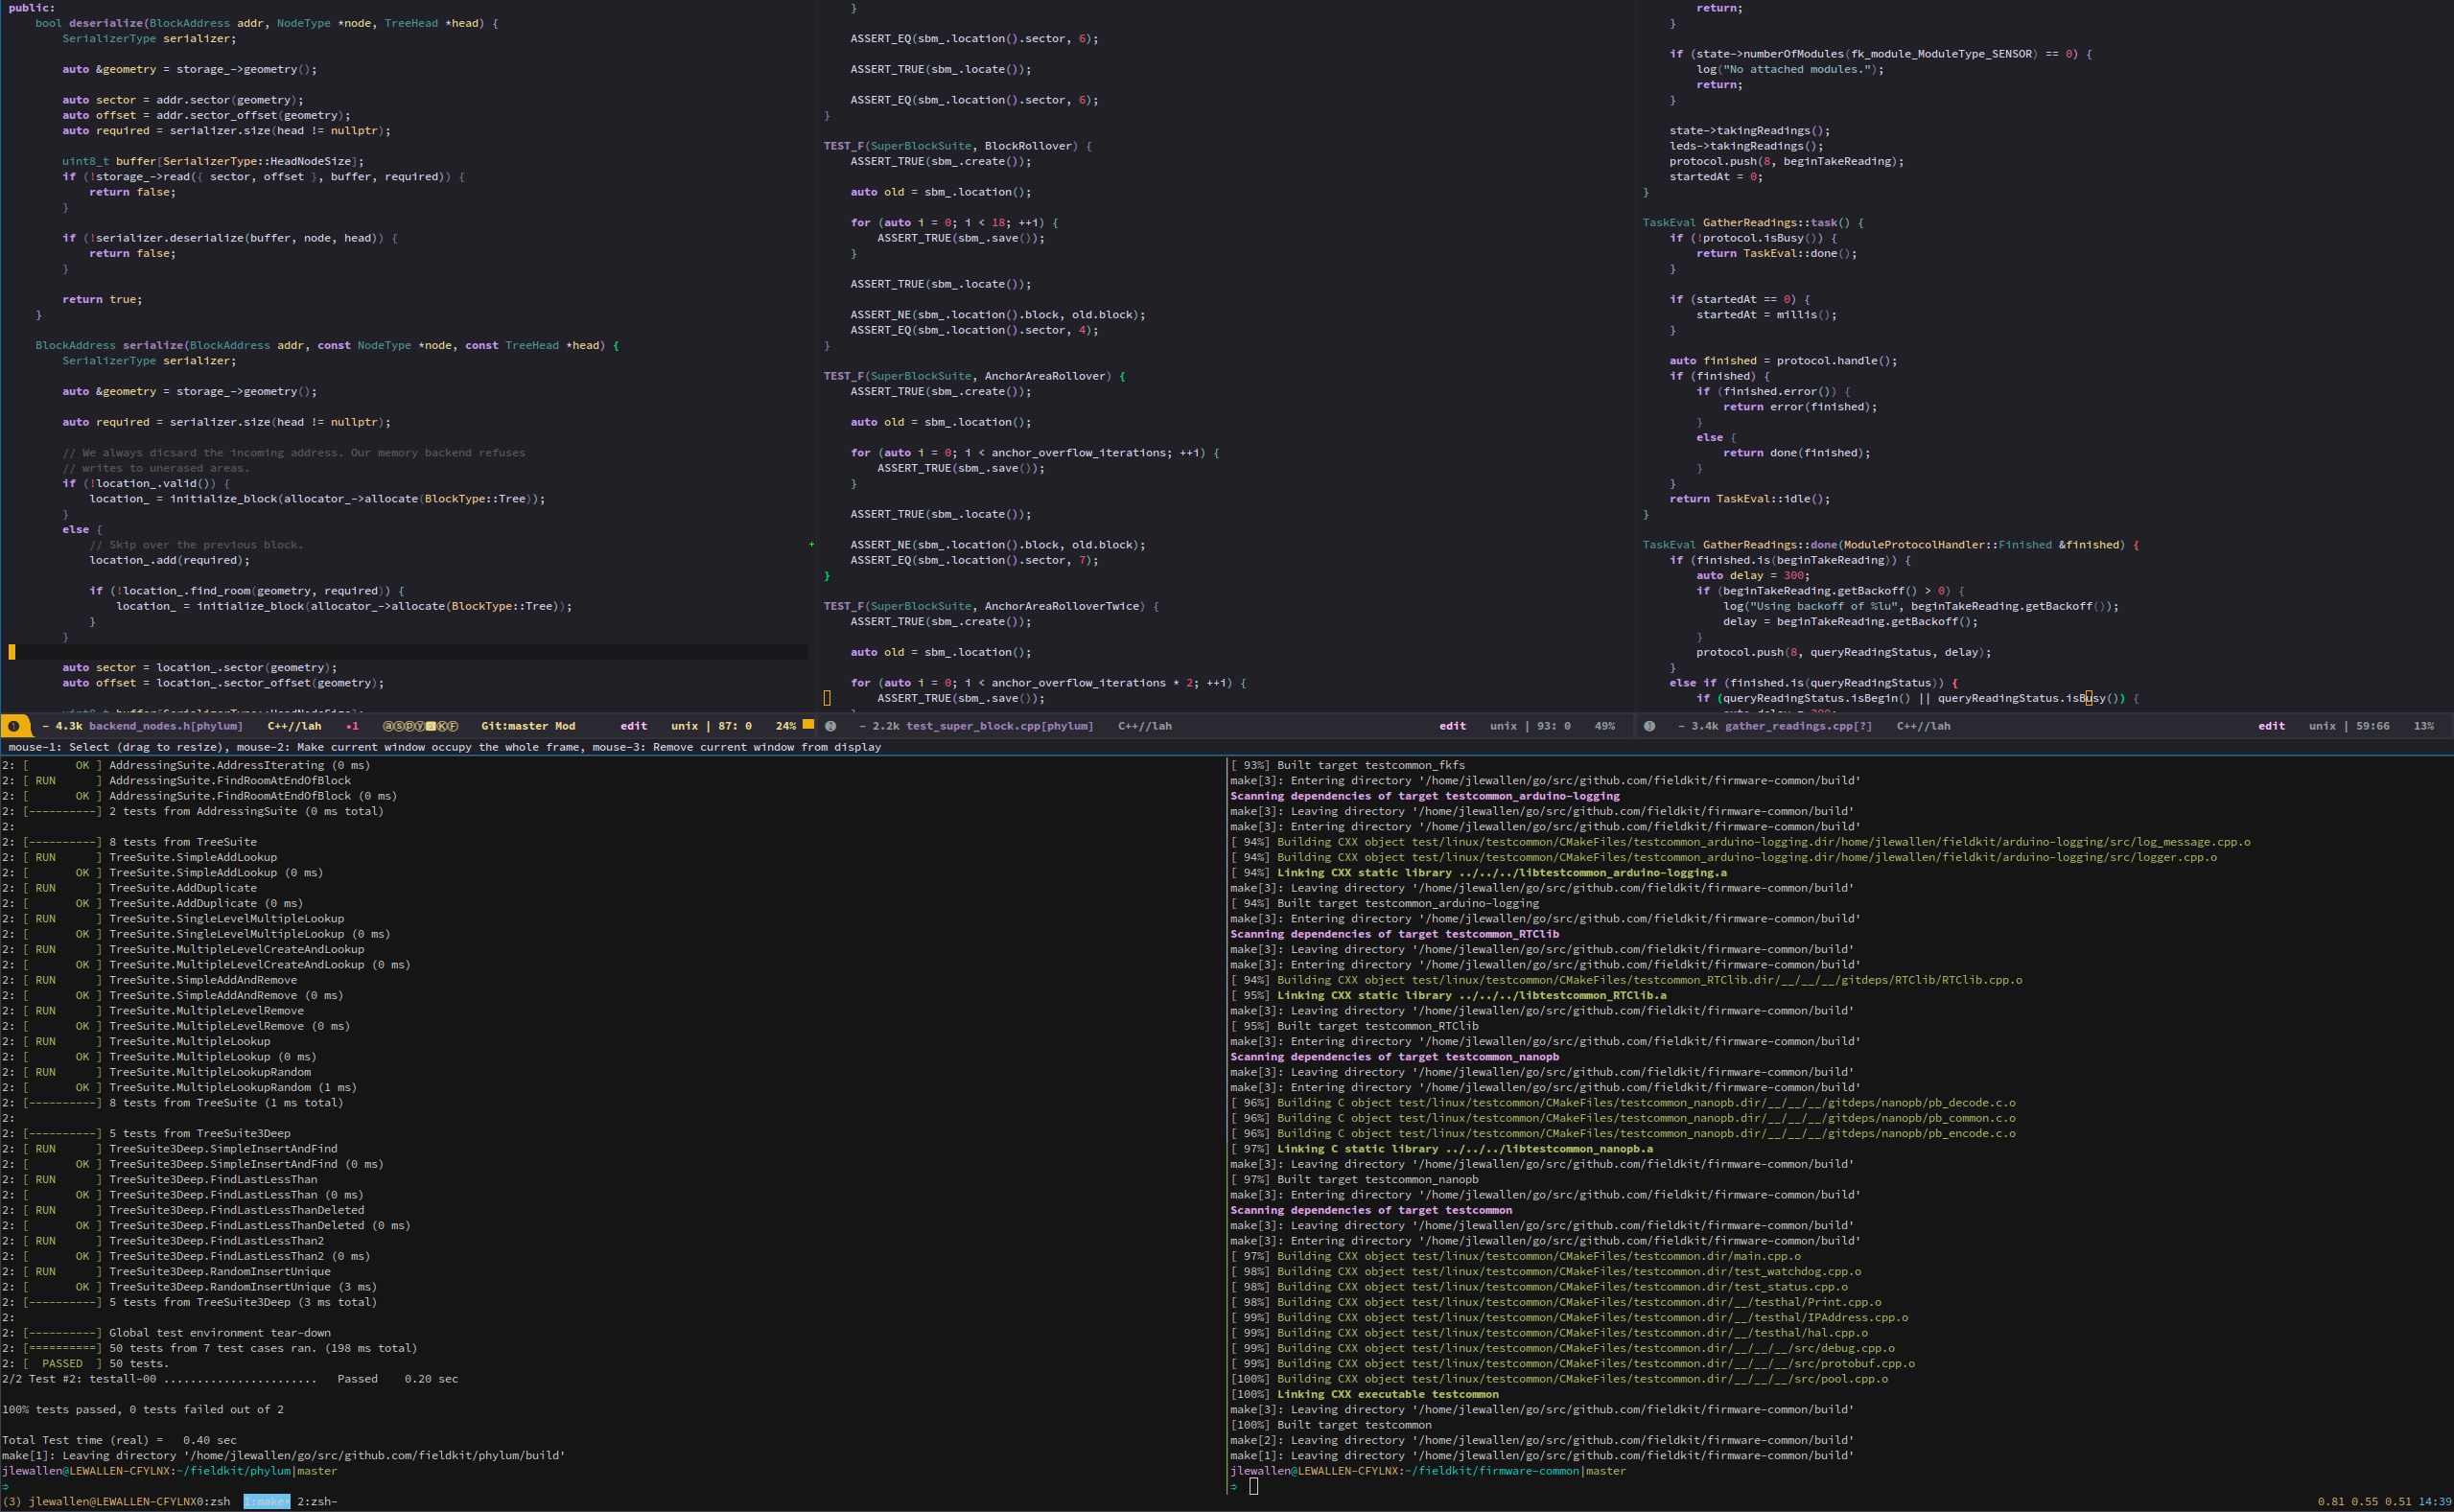
Our firmware is mostly C++ with some C sprinkled throughout. We keep separate repositories for our module specific firmware and all common code is in a shared repository. We’ve considered a mono-repo approach but haven’t felt a huge need to make that jump just yet. In some ways it would make things easier for us, especially as the build effectively treats the cloned repositories as one.
I’ll be writing more posts about our software architecture in the future. Part of our recent focus has been writing automated testing and creating re-usable components from the software we have, in addition to field testing the software for bugs that only appear after sustained real time use.
State of the Infrastructure
We have a development instance of our backend setup on AWS and managed through Terraform scripts. The server is written in Go and all storage is handled via S3 and a PostgreSQL RDS instance. Our frontend uses React/Redux.
Internally we have a dev server that hosts our ticket system (JIRA), Jenkins server and various smaller internal services.
![]()
Planned Work/Goals
Our main goals for our time at the residency is to prepare the hardware side of our products for manufacturer as much as possible. Given the current state of things this includes:
- Enclosure design and fabrication, specifically experimenting with the injection molding capabilities at the DesignLab. This includes establishing a set of common design idioms and elements to carry across the various modules.
- BOM optimization and handling for small batch assembly. All of the assembly we’ve done until now have been by hand (via reflow) We’d like to start seeing batches of boards arriving from a SBA place sometime this year.
If you’re familiar with FieldKit, and our organization Conservify, you may know that right now it’s just Shah and myself, Jacob. Shah’s focus will be on the enclosure design efforts, drawing on some of his experience recently using our Glowforge to laser cut some acrylic cases. My focus will be the boards and our various BOMs, as well as wrapping up our software backlog.
Last week we got settled and Shah met with Giovanni, a designer with the lab, to talk about initial considerations we should have as we begin to work on injection molded enclosure designs.
In more human, less technical news it’s been nice spending time in Pasadena, where the DesignLab is. The weather this past week has been gorgeous and walking the streets in Old Pasadena is always a treat. We’re starting to see some consistent summer sun down here in Southern California. It’s a much more green place than the part of Los Angeles where the Conservify lab is located.
We’ve got a few exciting projects we’ll be taking advantage of to test the work we’re doing and we’re looking forward to bringing you all more information about that as they unfold! Thanks for reading!


 One of our sensors, the SPH0645 MEMS Microphone, has a very strange footprint. The microphone port itself is on the bottom of the chip and so the PCB needs a drill to expose the port. In addition, the chip’s GND is a ring around the port, as you can see to the right. I was worried about solder paste being applied over the top of that drill and potentially sealing off the port. We decided to change the footprint to be more “stencil friendly” by placing some rectangular SMD pads in a way that overlaps the GND ring.