 agp.cooper
Introduction
WiFi Server
A WiFi Server is like an IoT (Internet of Things) but it is only connected to your local WiFi network (rather than the Internet). So it can only be controlled by a "client" that is connected to your local WifI network. This in most cases is all you need to play with IoT at home.
Web Server Options
There are many ways to do this but after some research I selected "uhttpd" and "php". I am a beginner here (i.e. I have never used these programs before) so this selection may not be "optimal" (what ever that means!).
"uhttpd" is the default OpenWrt web server and there is not much reason to go for anything better.
PHP is a server-side scripting language designed primarily for web development but also used as a general-purpose programming language. It should be more than sufficient for IoT type applications.
Task
The task is pretty simple. Turn on or off the LED on the LinkIt board.
Set Up
Log on to the LinkIt
You should know by now that you need to use a secure shell in a command window to work on the LinkIt, for example:
ssh root@mylinkit.local
Installation of uhttpd
It should be installed but it does not hurt to do the following:
opkg update
opkg install uhttpd
Install PHP
opkg install php5 php5-cgi php5-cli
The last package (php5-cli) allows you to run PHP scripts from the command line and is optional.
Nano text editor
I don't particularly like the "vi" text editor so I also install "nano":
opkg install nano
Edit the uhttpd configuration file
nano /etc/config/uhttpd
This is what my uhttpd configuration file looks like after being edited:
config uhttpd 'main'
    list listen_http '0.0.0.0:80'
    list listen_http '[::]:80'
    list listen_https '0.0.0.0:443'
    list listen_https '[::]:443'
    option redirect_https '1'
    option home '/www'
    option rfc1918_filter '1'
    option max_requests '3'
    option max_connections '100'
    option cert '/etc/uhttpd.crt'
    option key '/etc/uhttpd.key'
    option cgi_prefix '/cgi-bin'
    option script_timeout '60'
    option network_timeout '30'
    option http_keepalive '20'
    option tcp_keepalive '1'
    option ubus_prefix '/ubus'
    list interpreter ".php=/usr/bin/php-cgi"
    option index_page 'index.php'

config cert 'px5g'
    option days '730'
    option bits '1024'
    option country 'ZZ'
    option state 'Somewhere'
    option location 'Uknown'
    option commonname 'OpenWrt'
I have added:
    list interpreter ".php=/usr/bin/php-cgi"
    option index_page 'index.php'
Next, creating the Web Server Directory with:
mkdir /www/php
Add your "index.php" file to "/www/php", my index file contains:
<?php
  echo "Hello World, this is LinkIt running PHP!"
?>
Now, restart the uhttp server:
/etc/init.d/uhttpd restart
Finally, check the web-page by typing in a web browser:
http://mylinkit.local/php/
If it all works then magic!
Controlling the LinkIt WiFi LED
Unlike the Omega2 the LinkIt does not appear to have a "fast_gpio" command line tool. I could write my own code using the "mraa" library but I came across the "sysfs interface for user space" for control of GPIOs. This seems to be ideal for GPIO control for web applications. Basically on the command line you could do something like this:
// Goto the sysfs-gpio directory
cd /sys/class/gpio/

// Create the gpio directory for gpio1
echo 1 > export

// Go into the gpio1 directory
cd gpio1

// Set the pin direction (i.e. in or out)
echo out > direction

// Set gpio1 high (i.e. 1)
echo 1 > value

// Set gpio1 low (i.e. 0)
echo 0 > value

// Done, go up a directory
cd ..

// Remove the gpio directory
echo 1 > unexport
This does work but not for the WiFi LED (i.e. gpio44), it appears as if as soon as you take control of the LED, the WiFi process takes back control. Code written using the "mraa" library would not have this problem.
HTML Code for Controlling GPIO1
Okay, change in task, control of GPIO1.
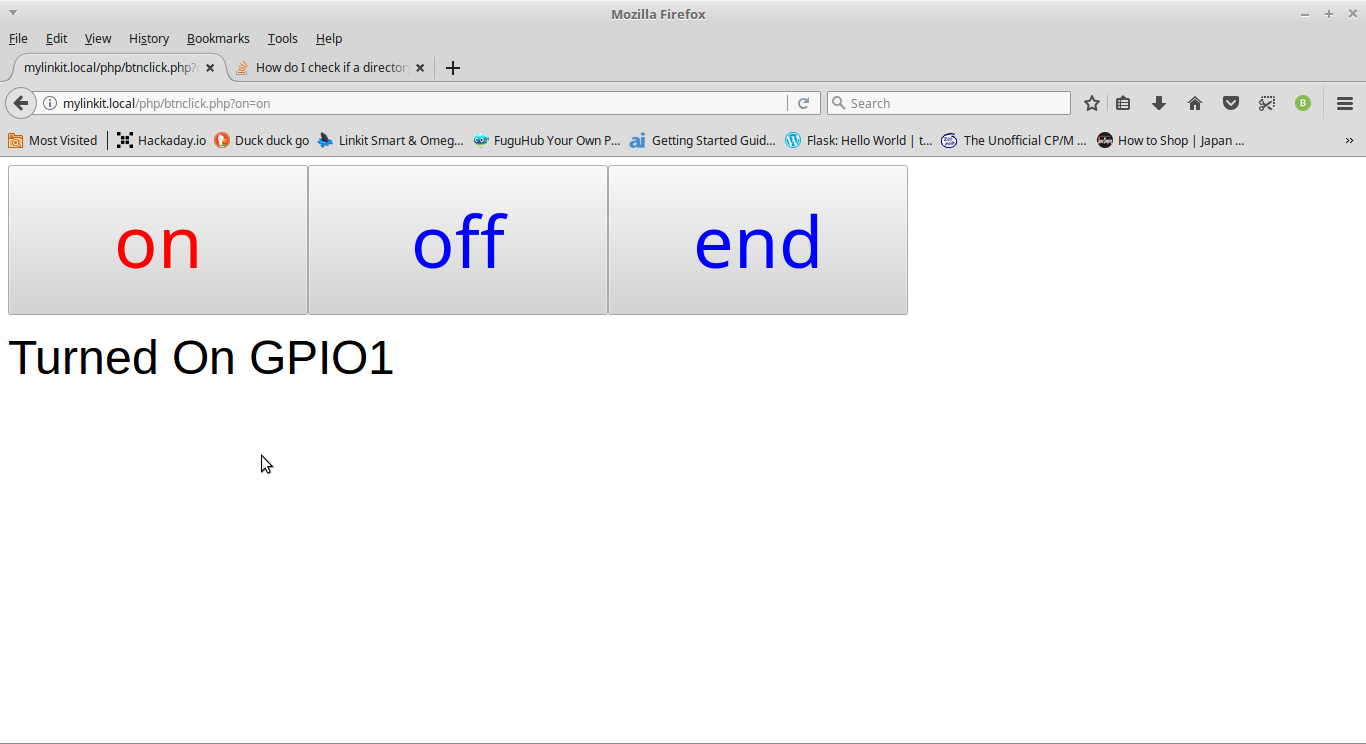
Here is the PHP code that creates three buttons for:
- Turn on gpio1
- Turn off gpio1
- End using gpio1
<!-- Preprocessor -->
<html>
  <body>
    <form action="btnclick.php" method="get">
      <?php
        if (isset($_GET['on'])) {
          echo '<input type="submit" name="on"  value="on"  style="color:red; height:150px; width:300px; font-size:72px">';
        } else {
          echo '<input type="submit" name="on"  value="on"  style="color:blue; height:150px; width:300px; font-size:72px">';
        }
        if (isset($_GET['off'])) {
          echo '<input type="submit" name="off" value="off" style="color:red; height:150px; width:300px; font-size:72px">';
        } else {
          echo '<input type="submit" name="off" value="off" style="color:blue; height:150px; width:300px; font-size:72px">';
        }
        if (isset($_GET['end'])) {
          echo '<input type="submit" name="end" value="end" style="color:red; height:150px; width:300px; font-size:72px">';
        } else {
          echo '<input type="submit" name="end" value="end" style="color:blue; height:150px; width:300px; font-size:72px">';
        }
      ?>
    </form>
  </body>
</html>

<!-- Postprocessor -->
<?php
  $GPIO=1;
  if (!file_exists("/sys/class/gpio/gpio".$GPIO)) {
    // Create GPIO as output
    exec('echo '.$GPIO.' > /sys/class/gpio/export');
    exec('echo out > /sys/class/gpio/gpio'.$GPIO.'/direction');
    exec('echo 0 > /sys/class/gpio/gpio'.$GPIO.'/value');
  }
  if (isset($_GET['on'])) {
    onFunc();
  } elseif (isset($_GET['off'])) {
    offFunc();
  } elseif (isset($_GET['end'])) {
    endFunc();
  } else {
    startFunc();
  }

  # Functions
  function onFunc() {
    global $GPIO;
    echo "<font size='32' face='Arial'>";
    echo "Turned On GPIO$GPIO<br>";
    // Turn on GPIO
    exec('echo '.$GPIO.' > /sys/class/gpio/gpio'.$GPIO.'/value');
  }
  function offFunc() {
    global $GPIO;
    echo "<font size='32' face='Arial'>";
    echo "Turned Off GPIO$GPIO<br>";
    // Turn off GPIO
    exec('echo 0 > /sys/class/gpio/gpio'.$GPIO.'/value');
  }
  function endFunc() {
    global $GPIO;
    echo "<font size='32' face='Arial'>";
    echo "Removed GPIO$GPIO<br>";
    // Remove GPIO
    exec('echo 0 > /sys/class/gpio/gpio'.$GPIO.'/value');
    exec('echo in > /sys/class/gpio/gpio'.$GPIO.'/direction');
    exec('echo '.$GPIO.' > /sys/class/gpio/unexport');
  }
  function startFunc() {
    global $GPIO;
    echo "<font size='32' face='Arial'>";
    echo "Ready to use GPIO$GPIO<br>";
  }
?>
And this is what the client sees:
AlanX
Discussions
Become a Hackaday.io Member
Create an account to leave a comment. Already have an account? Log In.