J. M. Hopkins
-
Analog Waveform Shaping and IMU Vibrato
06/14/2018 at 03:14 • 0 commentsGive this a listen... Not bad for a MIDI controller!
A thumb button activates vibrato/pitch bend mode, where once the gate is active maps z axis acceleration to pitchbend. On top of that, when the keep is pressed, the instrument angle is stored, and a 5 degree dead band created. Any instrument angle inside this dead band just allows vibrato via acceleration, outside this dead band it activates the traditional pitch bend.
This allows one thumb key to gate vibrato while still having full pitch up/down control.
-
Onboard Synthesizer Testing
06/10/2018 at 23:26 • 0 commentsUtilizing a DSP-1 sound chip.
-
More Testing
06/04/2018 at 19:22 • 0 commentsMost features are working great now:
Including some interesting fun with the IMU:
And a little more subtle on the IMU mapping:
-
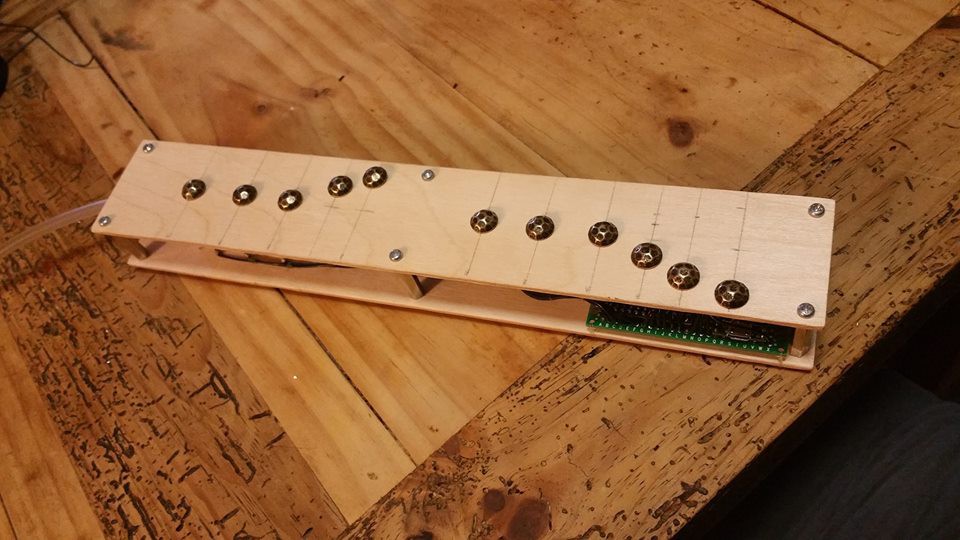
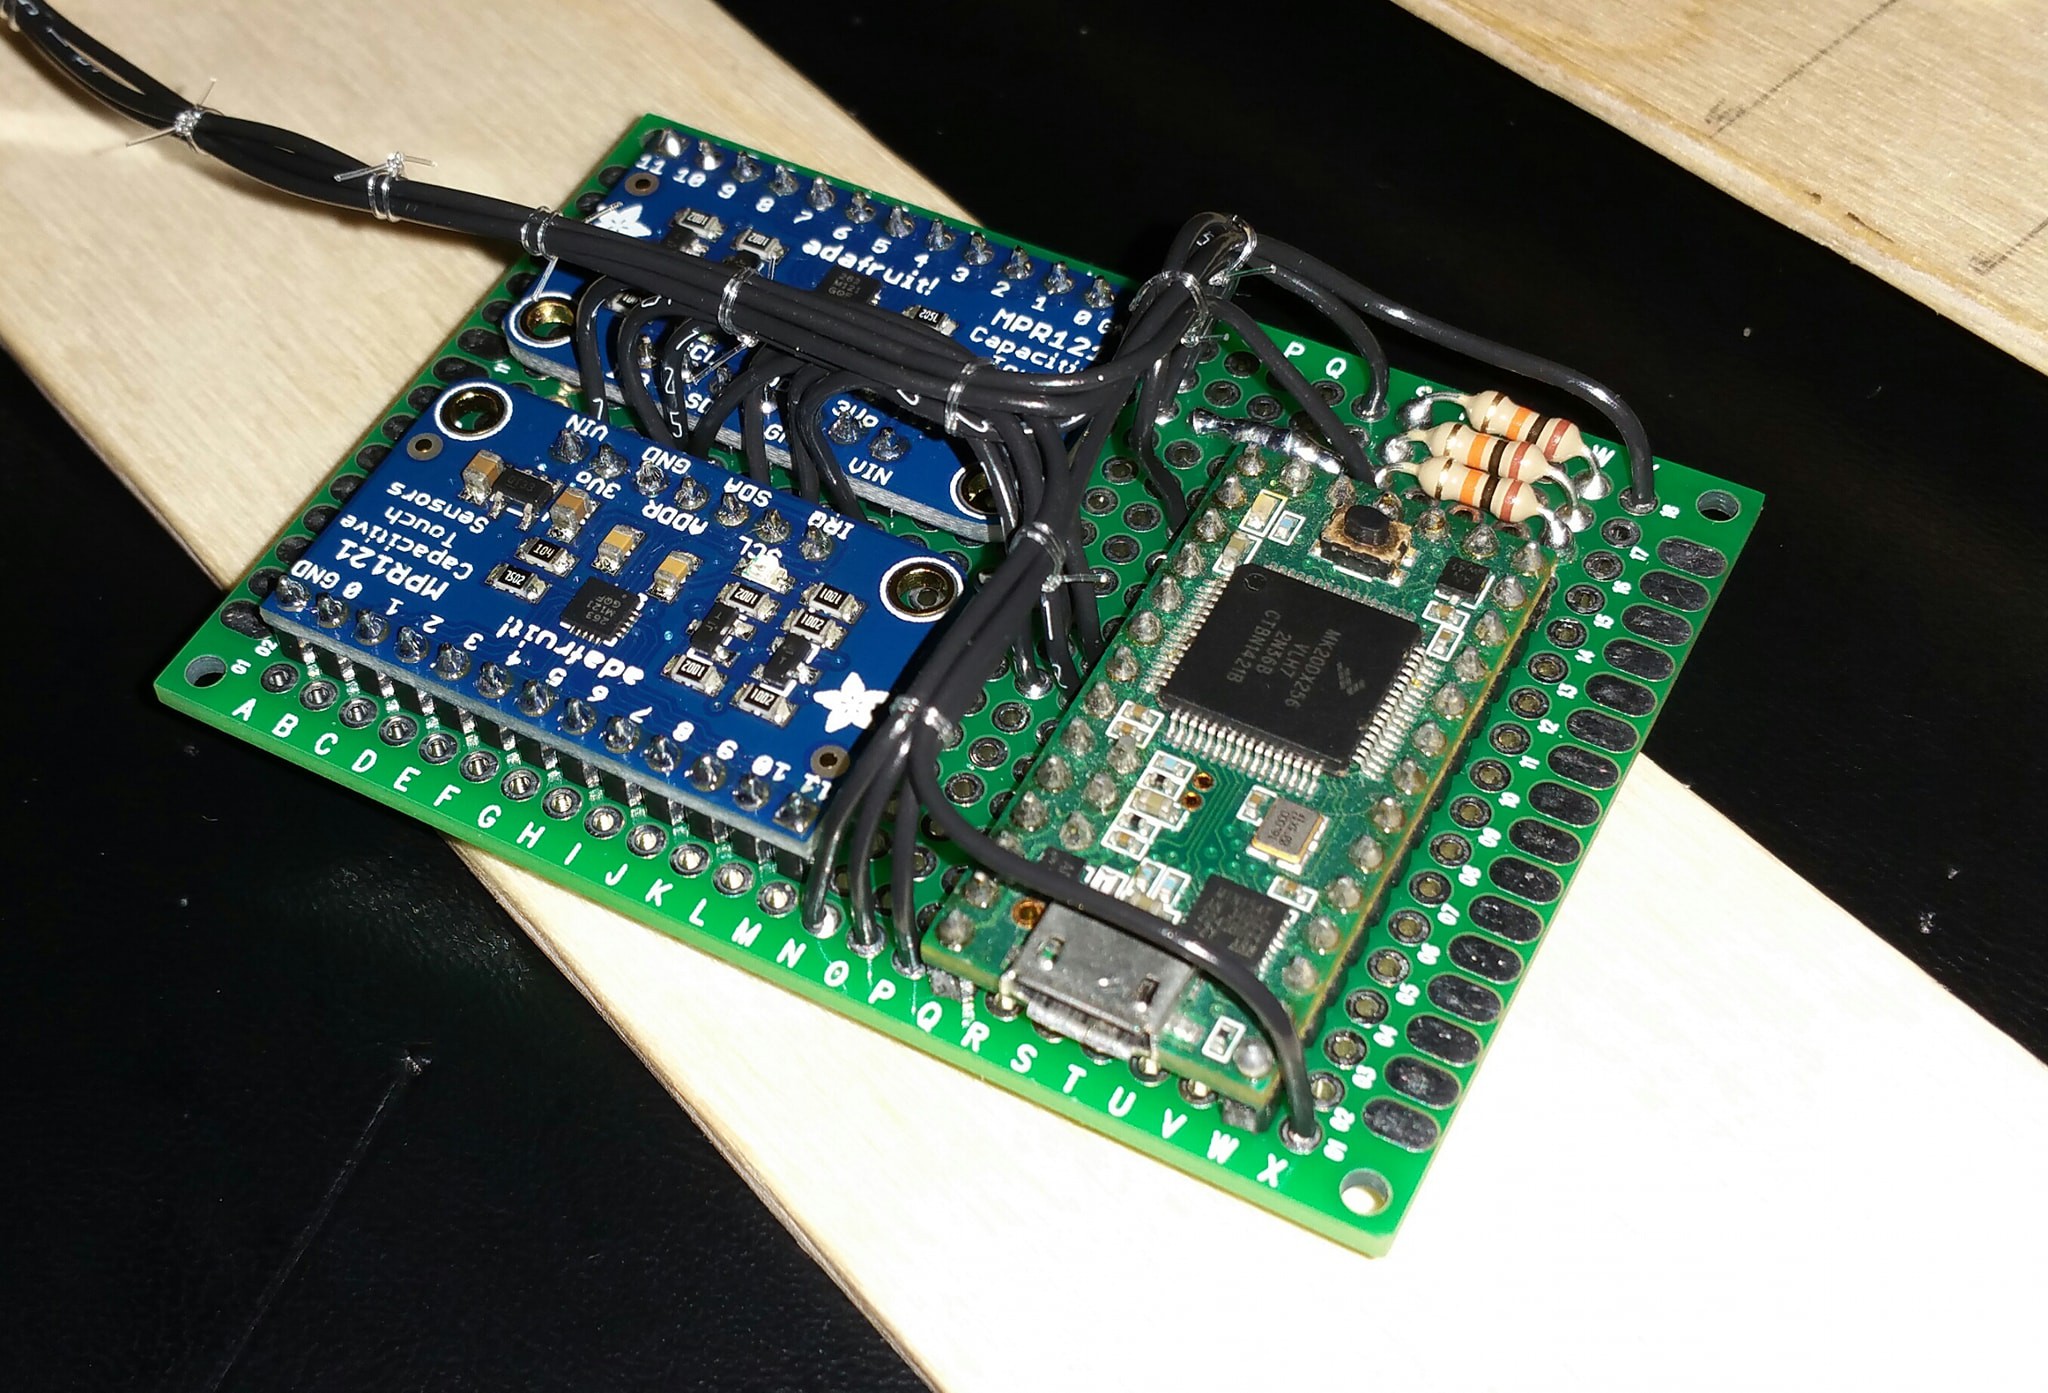
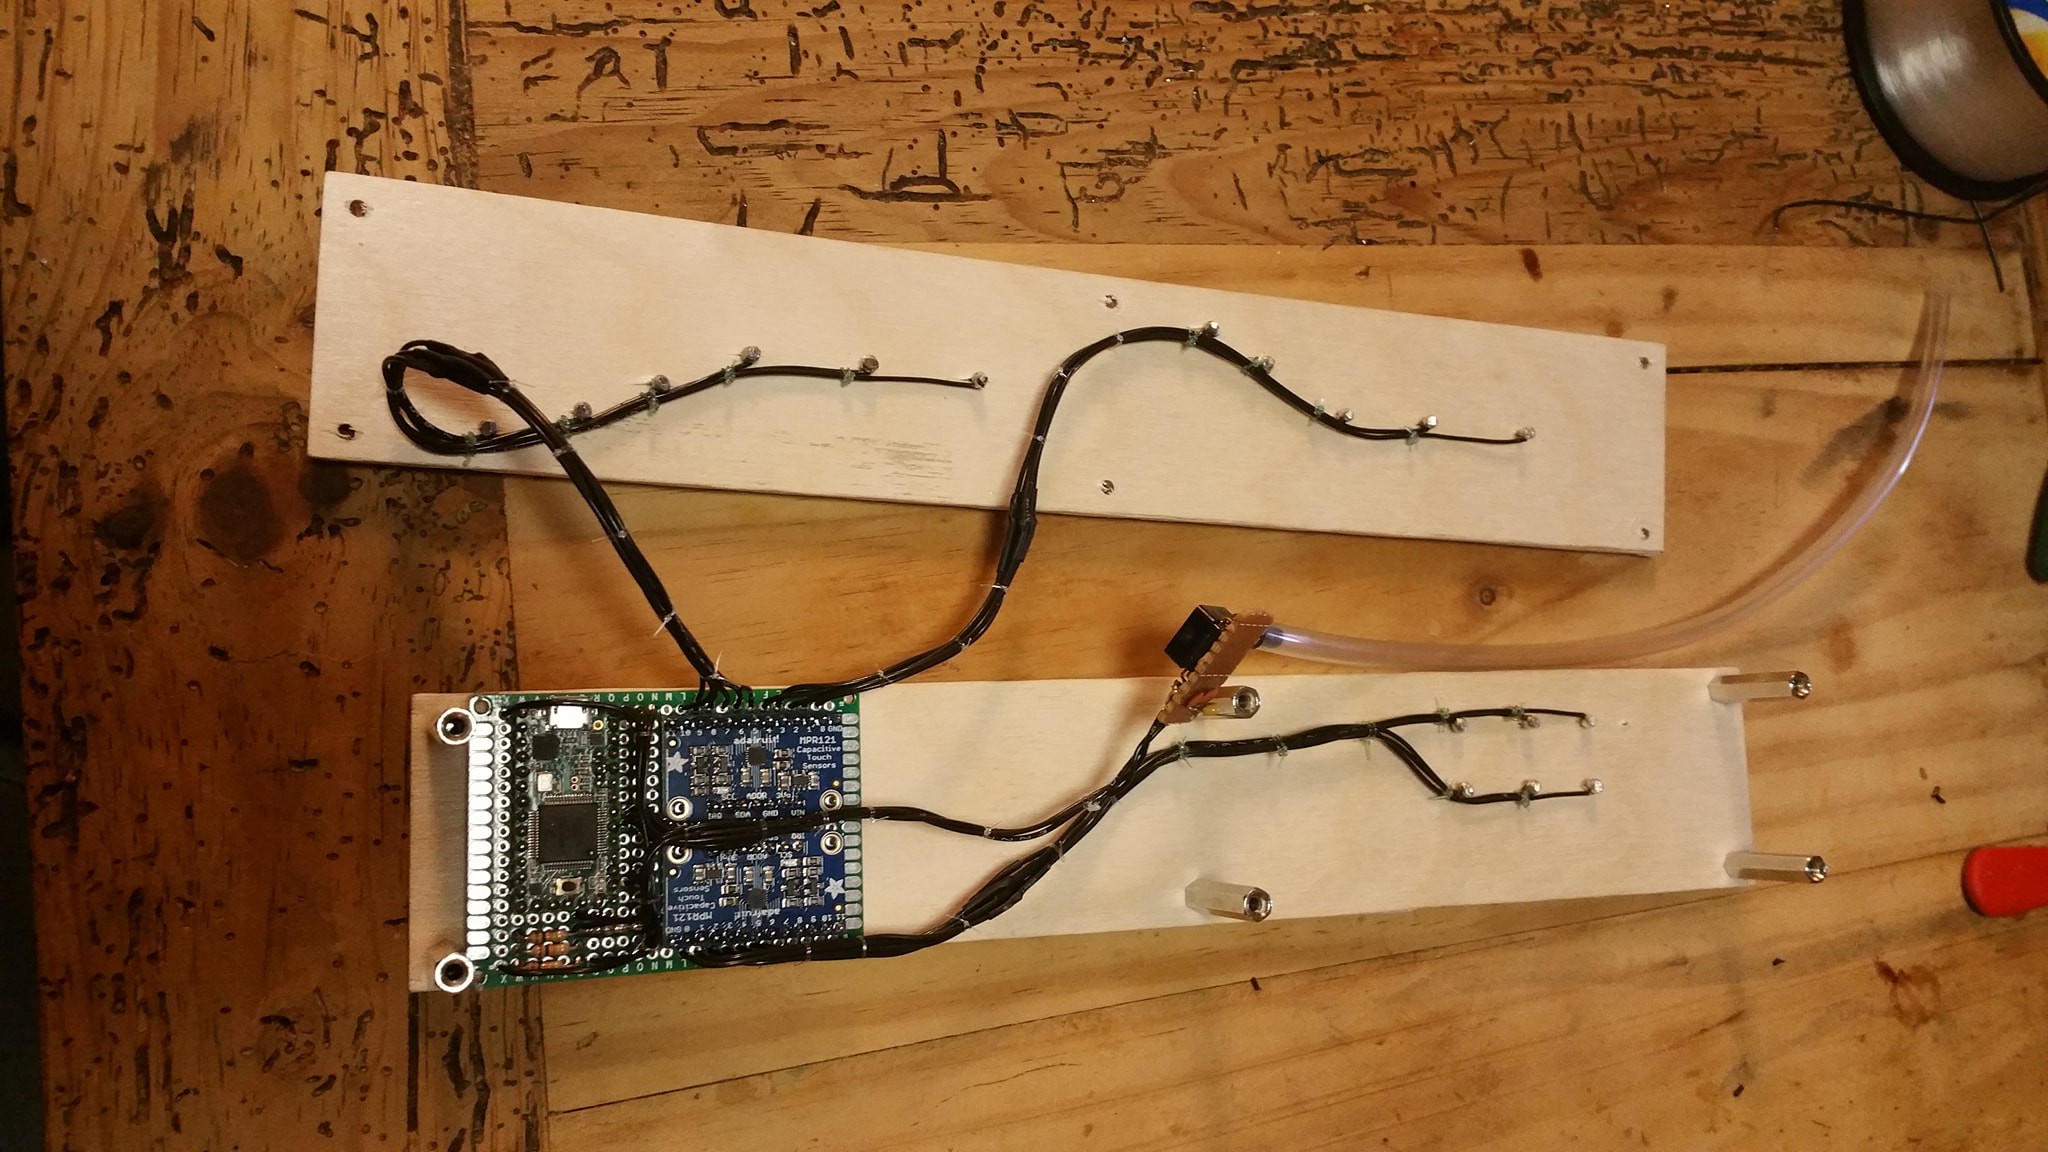
Prototype Working
05/30/2018 at 03:30 • 0 commentsThis weekend was very successful and allowed me to complete a preliminary prototype that has working touch and breath sensors. It is currently a plywood spacer sandwich, but keep in mind that this is for validating the capacitive touch sensors and fingering system.
![]()
The main microcontroller is a Cortex M4 development board from PJRC, the Teensy platform. Touch sensing is done via two MPR121 breakout boards.
![]()
Furniture tacks are used as keys, and the Freescale pressure sensor allows for breath pressure sensing.
![]()
And here's an example of the instrument being played with Reason as the main synth:
-
Main Loop
05/14/2018 at 04:03 • 0 commentsvoid loop() { updateBreath(); updateNote(); updateCC(); if(state == STATE_NOTE_OFF) { if(breath_measured > breath_threshold) { breath_time = millis(); state = STATE_NOTE_NEW; } } if(state == STATE_NOTE_NEW) { if(breath_measured > breath_threshold) { if(millis() > breath_time + breath_risetime) { sendCC(); sendNoteOn(note_fingered); cc_time = millis(); state = STATE_NOTE_ON } } else { state = STATE_NOTE_OFF; } } if(state == STATE_NOTE_ON) { if(breath_measured > breath_threshold) { if(millis() > cc_time + cc_delay) { sendCC(); cc_time = millis(); } if(note_fingered != note_playing) { if(legato) { note_temp = note_playing; sendNoteOn(noteFingered); sendNoteOff(note_temp); } else { sendNoteOff(note_playing); sendNoteOn(note_fingered); } } } else { sendNoteOff(note_playing); state = STATE_NOTE_OFF; } } } void updateNote() { note_fingered_debounce = rawNote(); //Update from capacitive touch board if(note_fingered_debounce != note_fingered) { if(note_debounce) { if(millis() > note_debounce_time + note_debounce_delay) { note_fingered = note_fingered_debounce; note_debounce = false; } } else { note_debounce_time = millis(); note_debounce = true; } } }In the above snips of code you can see the main microcontroller loop, and the updateNote() function.
It's a dead simple state machine with only OFF, NEW and ON states. Every cycle of the loop we read the raw breath, update our fingered note, and calculate CC values.
The full version will have functions for the different programming modes and extra features, but the heart of the instrument is this loop.
-
Component Selection - Capacitive Touch
05/12/2018 at 08:35 • 4 commentsPrevious Design
In my previous prototype I accomplished touch sensitive keys via a pulsed AC signal being amplified by Darlington paired NPN transistors, clocked by a shift register one at a time into a single digital pin on a microcontroller. While this worked, it required quite a bit of soldering, testing of components, and programming.Planned Design
In this next prototype I will be utilizing a true capacitive touch controller to provide key values. The MPR121 from Freescale was chosen for its 12 channels of capacitive touch and I2C communications. Two of these will be used on the same bus and will provide the microcontroller with 24 channels of touch feedback.
Easily accessible libraries allow for easy programming with the touch data.
Example Programming
MPR121 touchA = MPR121(); touchA.begin(0x5A); uint16_t keysA = touchA.touched(); if(keysA & (1 << 4)) { //Button Pressed } -
2018 Update!
05/09/2018 at 09:22 • 0 commentsIt's been a while!
Over the last two years I've moved across the country and started a new time-demanding job at SpaceX, and I've had little time for my side projects between work and family. I am re-opening this project for active development however due to my recent interest in modular synthesis, and of course because I do love playing my Akai EWI.
New parts are on order, and I'll be stepping through another development process to get my instrument up and running.
I'm moving away from a high beta transistor amplified resistance touch sensor strategy to the more common capacitve touch strategy, and will be trying to get my pressure sensitive keys working.
An onboard analog synthesizer as well as pitch and gate voltages will be available (for eurorack modular synthesizers), as well as hardwired MIDI and wireless MIDI options.
After the instrument is up and running and I'm happy with it, I will finalize schematics and requirements and place an order for PCB fabrication at which time if others are interested can probably get a board or two for themselves to build their own instruments as well.
During the development process I'll post code snippets and hardware explanations, so please, follow and keep updated!
-
Super Mario Theme
06/20/2015 at 01:58 • 0 comments -
Onboard Synthesizer Demonstration
06/15/2015 at 12:20 • 0 comments -
OLED Display and Body Progress
06/11/2015 at 02:09 • 0 commentsSorry for the lack up recent updates, life gets in the way of hobbies too often versus what I'd prefer.
![]()
My camera had a difficult time photographing the OLED Display, but in real life the .96" screen is super bright and clear. You can see the quick and dirty debug screen currently in use, and understand it has full graphics capabilities.
![]()
Here is a test body with the new pressure sensor being calibrated. Conducive copper tape is used to sandwich a physically variable resistive polymer that is in place under the individual keys.
I hope to have a full bodied prototype done shortly, which will pave my way forward to the eventual kickstarter and open source release. Stay tuned!
The Open Woodwind Project
An Electronic Aerophone with focus on usability as an instrument.