J. M. Hopkins
-
Starting Body Construction
03/06/2015 at 01:20 • 0 commentsIntroduction: I'm going to start showing the progress on the physical construction of the instrument. If there are any questions please let me know with comments. I'll try to post as I go, so please subscribes, skull, etc to keep up to date!
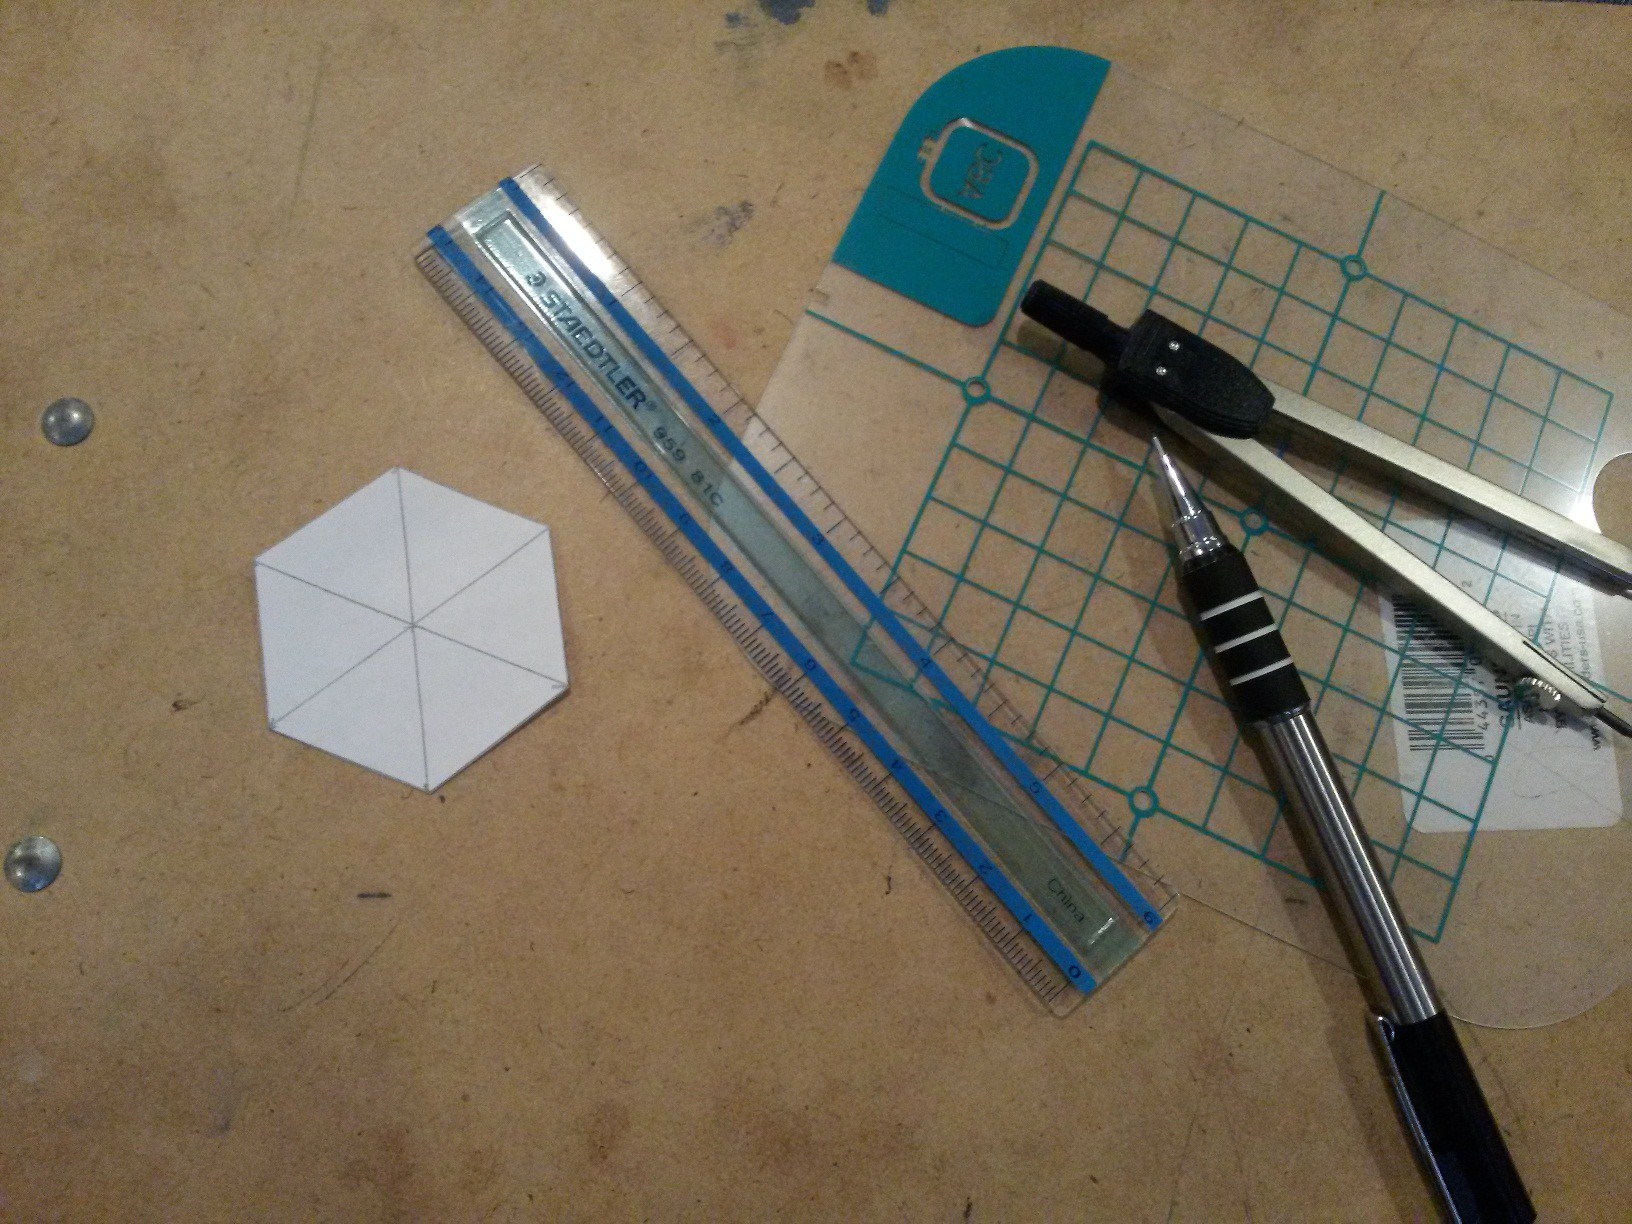
Make Paper Template of Body Ribbing - The internal cavity of the instrument is a hexagon, with a diagonal cross section of 5cm (about 2 inches). Using a compass and ruler I created a paper template to transfer to the wood.![]() Cut out Master Body Ribbing - Trace the paper template onto the wood, and cutout the master body ribbing template which will be used to create all the other ribbing pieces.
Cut out Master Body Ribbing - Trace the paper template onto the wood, and cutout the master body ribbing template which will be used to create all the other ribbing pieces.![]()
![]()
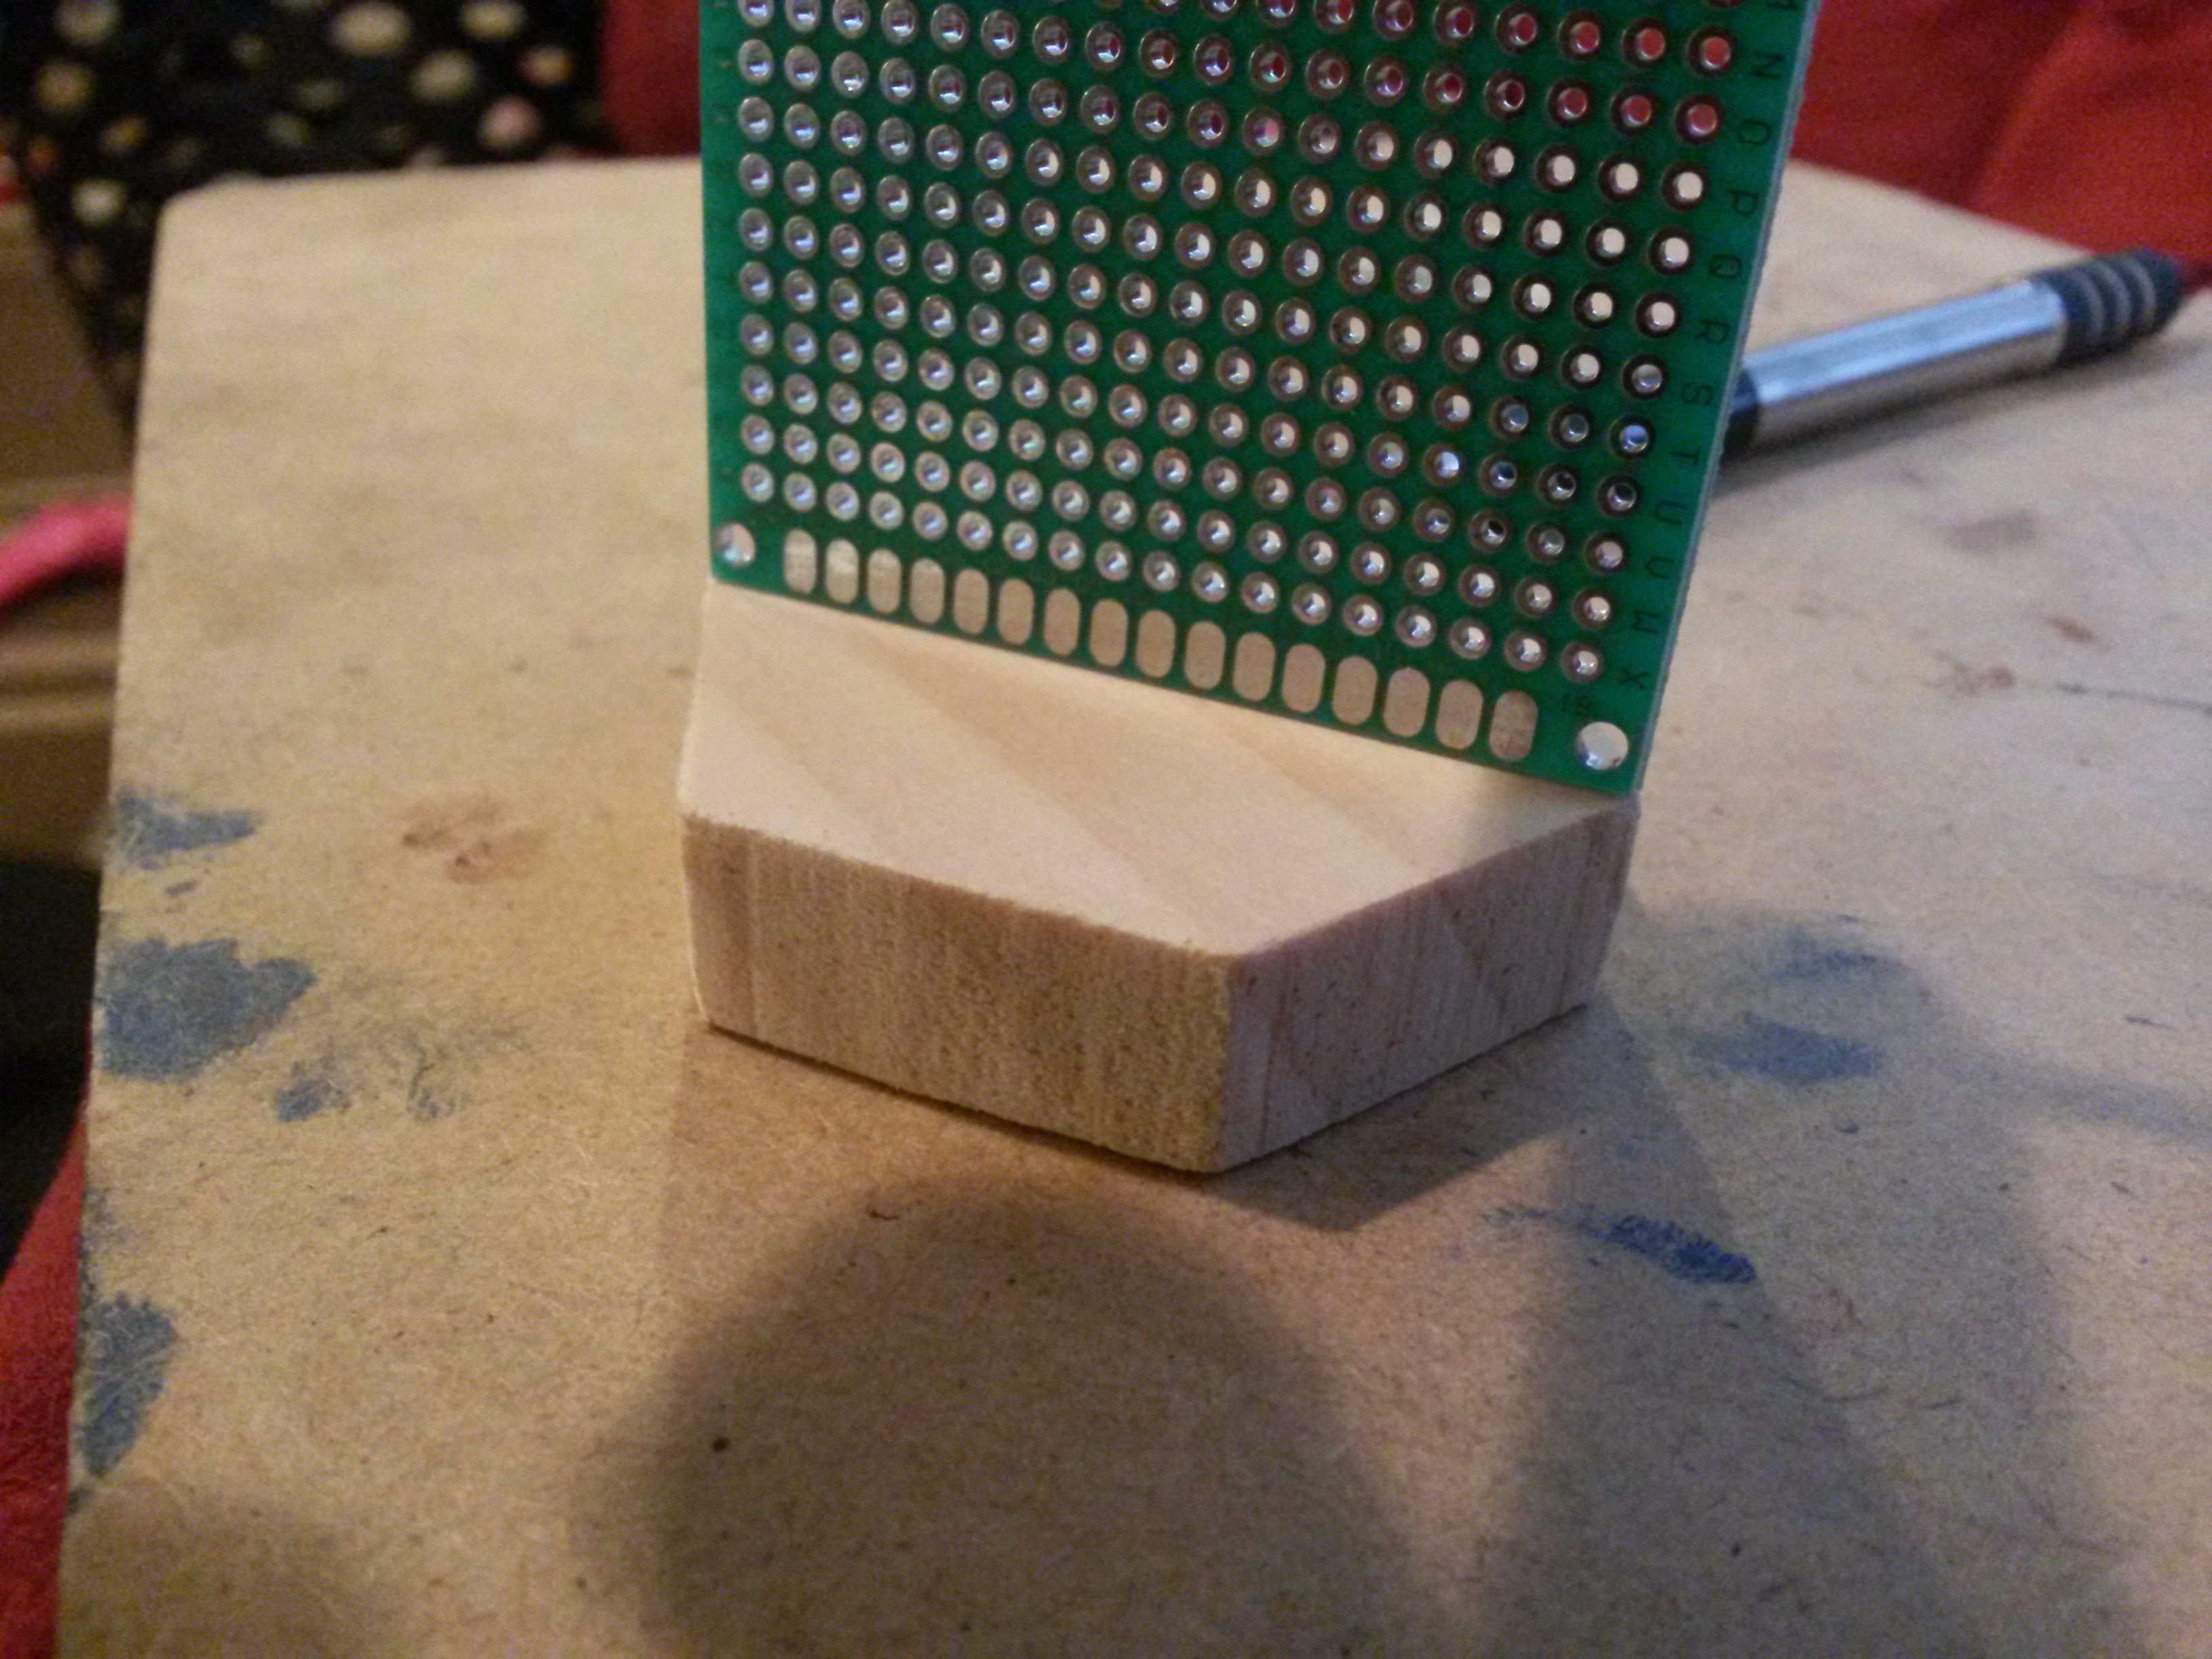
Test fit the circuit board to the wooden template - The circuit boards I'm using are 5cm wide, so I test fit the board to insure a snug fit into the instrument during construction.
![]()
Rip 1/8" boards from larger stock - After setting a guard to rip wood at 1/8", six pieces were created to become the body pieces of the instrument.
![]()
-
Questions Answered
02/23/2015 at 14:50 • 0 commentsSo I've had a few questions on what exactly this next version will have and why it will be better than the previous, so here we go.
Onboard Synth - Like the EWI-USB my first prototype lacked an onboard synthesizer. People enjoy being able to practice anywhere, and to that end I'm adding a modeled analog synthesizer. It will be only one 'patch' but still be result configured for a wide range of sounds. It will be utilizing the DSP-G1 IC, a fairly new design by Jan Ostman from Sweden. More on this synth can be find at https://janostman.wordpress.com/category/dsp-g1/. And an audio sample here: http://dspsynth.eu/files/Gplugpad.mp3
![]()
Pressure Sensitive Keys - Underneath each key is a new sensor that allows for pressure to be measured. Techniques like vibrato played on violin, open holed finger slurs, and custom CC (aftertouch, modulation, etc) can all be assigned to these sensors. You can also assign CCs to the lowest fingered key, which allows for simple control that is very intuitive. Each key can be calibrated so that the CC messages are not sent until a specific value is reached. Very cool stuff.
Dedicated Base Unit - Instead of just a serial transceiver attached to a synth, a base unit will have 4 control knobs, and 7 assignable buttons for ease of patch configuration. These controls will be mapped into Reason's Combinator device.
Wooden Construction - As first planned, the instrument will be of wooden construction, not plastic. With a dedicated beautiful veneer specially chosen to make a beautiful instrument. It should look at home in an orchestral setting.
OLED Display - A small 1 inch display will be recessed into the top of the instrument with a 5 way navigational button allowing for menu driven settings configuration. It can also be configured to display the current values of sensors in real time in bar or number format. Here's a sample of the OLED:
![]()
I hope this answers some questions!
-
Transceiver Details
02/14/2015 at 22:53 • 0 comments![]()
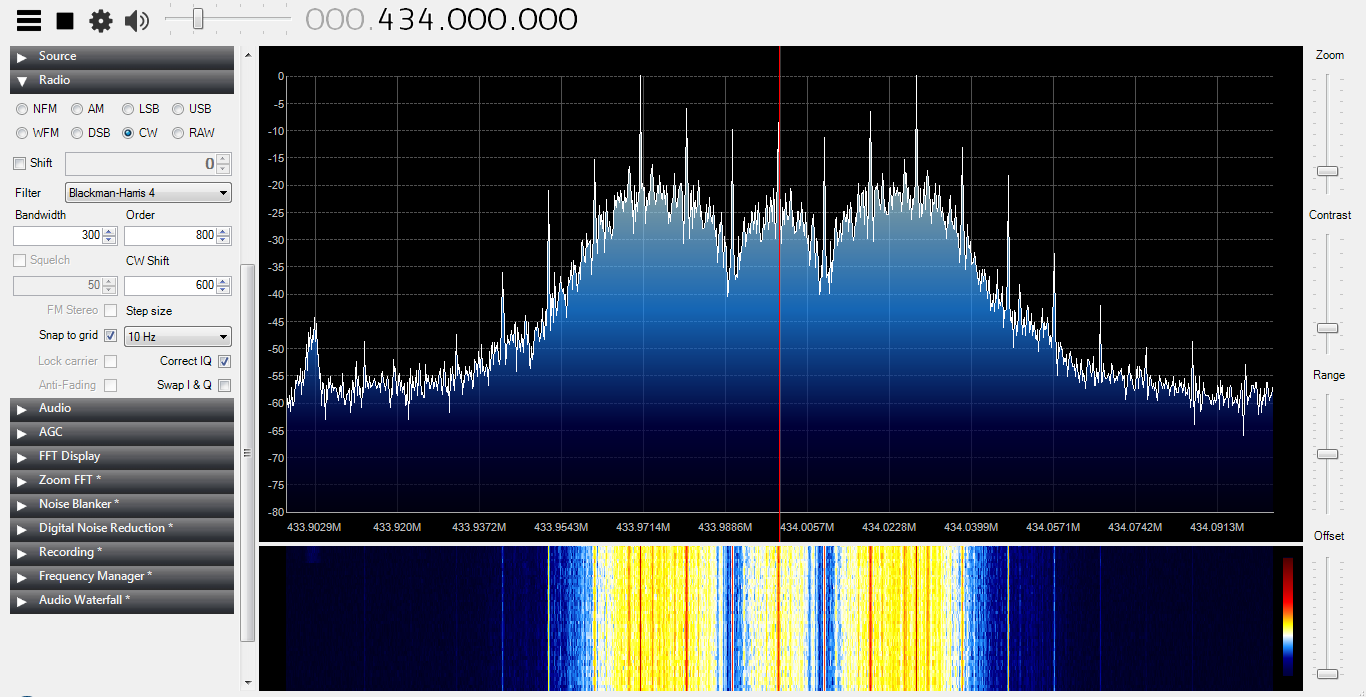
Part of my new parts that came in was a new transceiver in the 70cm band. One of the difficulties of this band is that it is not ISR in the United States and requires the proper licensing to operate any devices. That being said I went ahead and obtained my FCC amateur license and am now able to use some of these transceivers that was previously off limits. Overall about a 150KHz bandwidth is being utilized. At full power (which is not being used) I can reach about 3 or 4 houses down without signal drop. Significant improvement over my previous 1 or 2 rooms away.
You can see from the spectrum above that it is running an FSK modulation, which gives it a rather robust transmission for data transfer.
Of course these transceivers will not be available to everyone, but I can put back in the 2.4GHz transceivers for those without the proper licensing.
-
New Components Arrived!
01/10/2015 at 23:09 • 0 commentsExciting news towards the development of the next iteration of the Hopkins Electronic Aerophone! The final shipment of new parts and components have arrived and the next prototype will start being constructed.
Of the new parts the most exciting include the new Teensy microcontroller and APC 220 RF modules. The Teensy provides much more processing capabilities and more importantly better ADCs. The RF Modules have a much better power and signal level that should provide much improved range.
Also included is the veleostat subsititute that will be used for pressure sensing underneath the keys which will provide the easiest way for an electronic woodwind to provide open hole technique to the instrument.
The Combinator interface box will also be constructed this iteration and will provide a lot of functionality to the instrument.
Pictures will come soon! I regret the long delay in the development of this idea, but some times real life gets in the way, but have no fear, the construction of this instrument will continue!
-
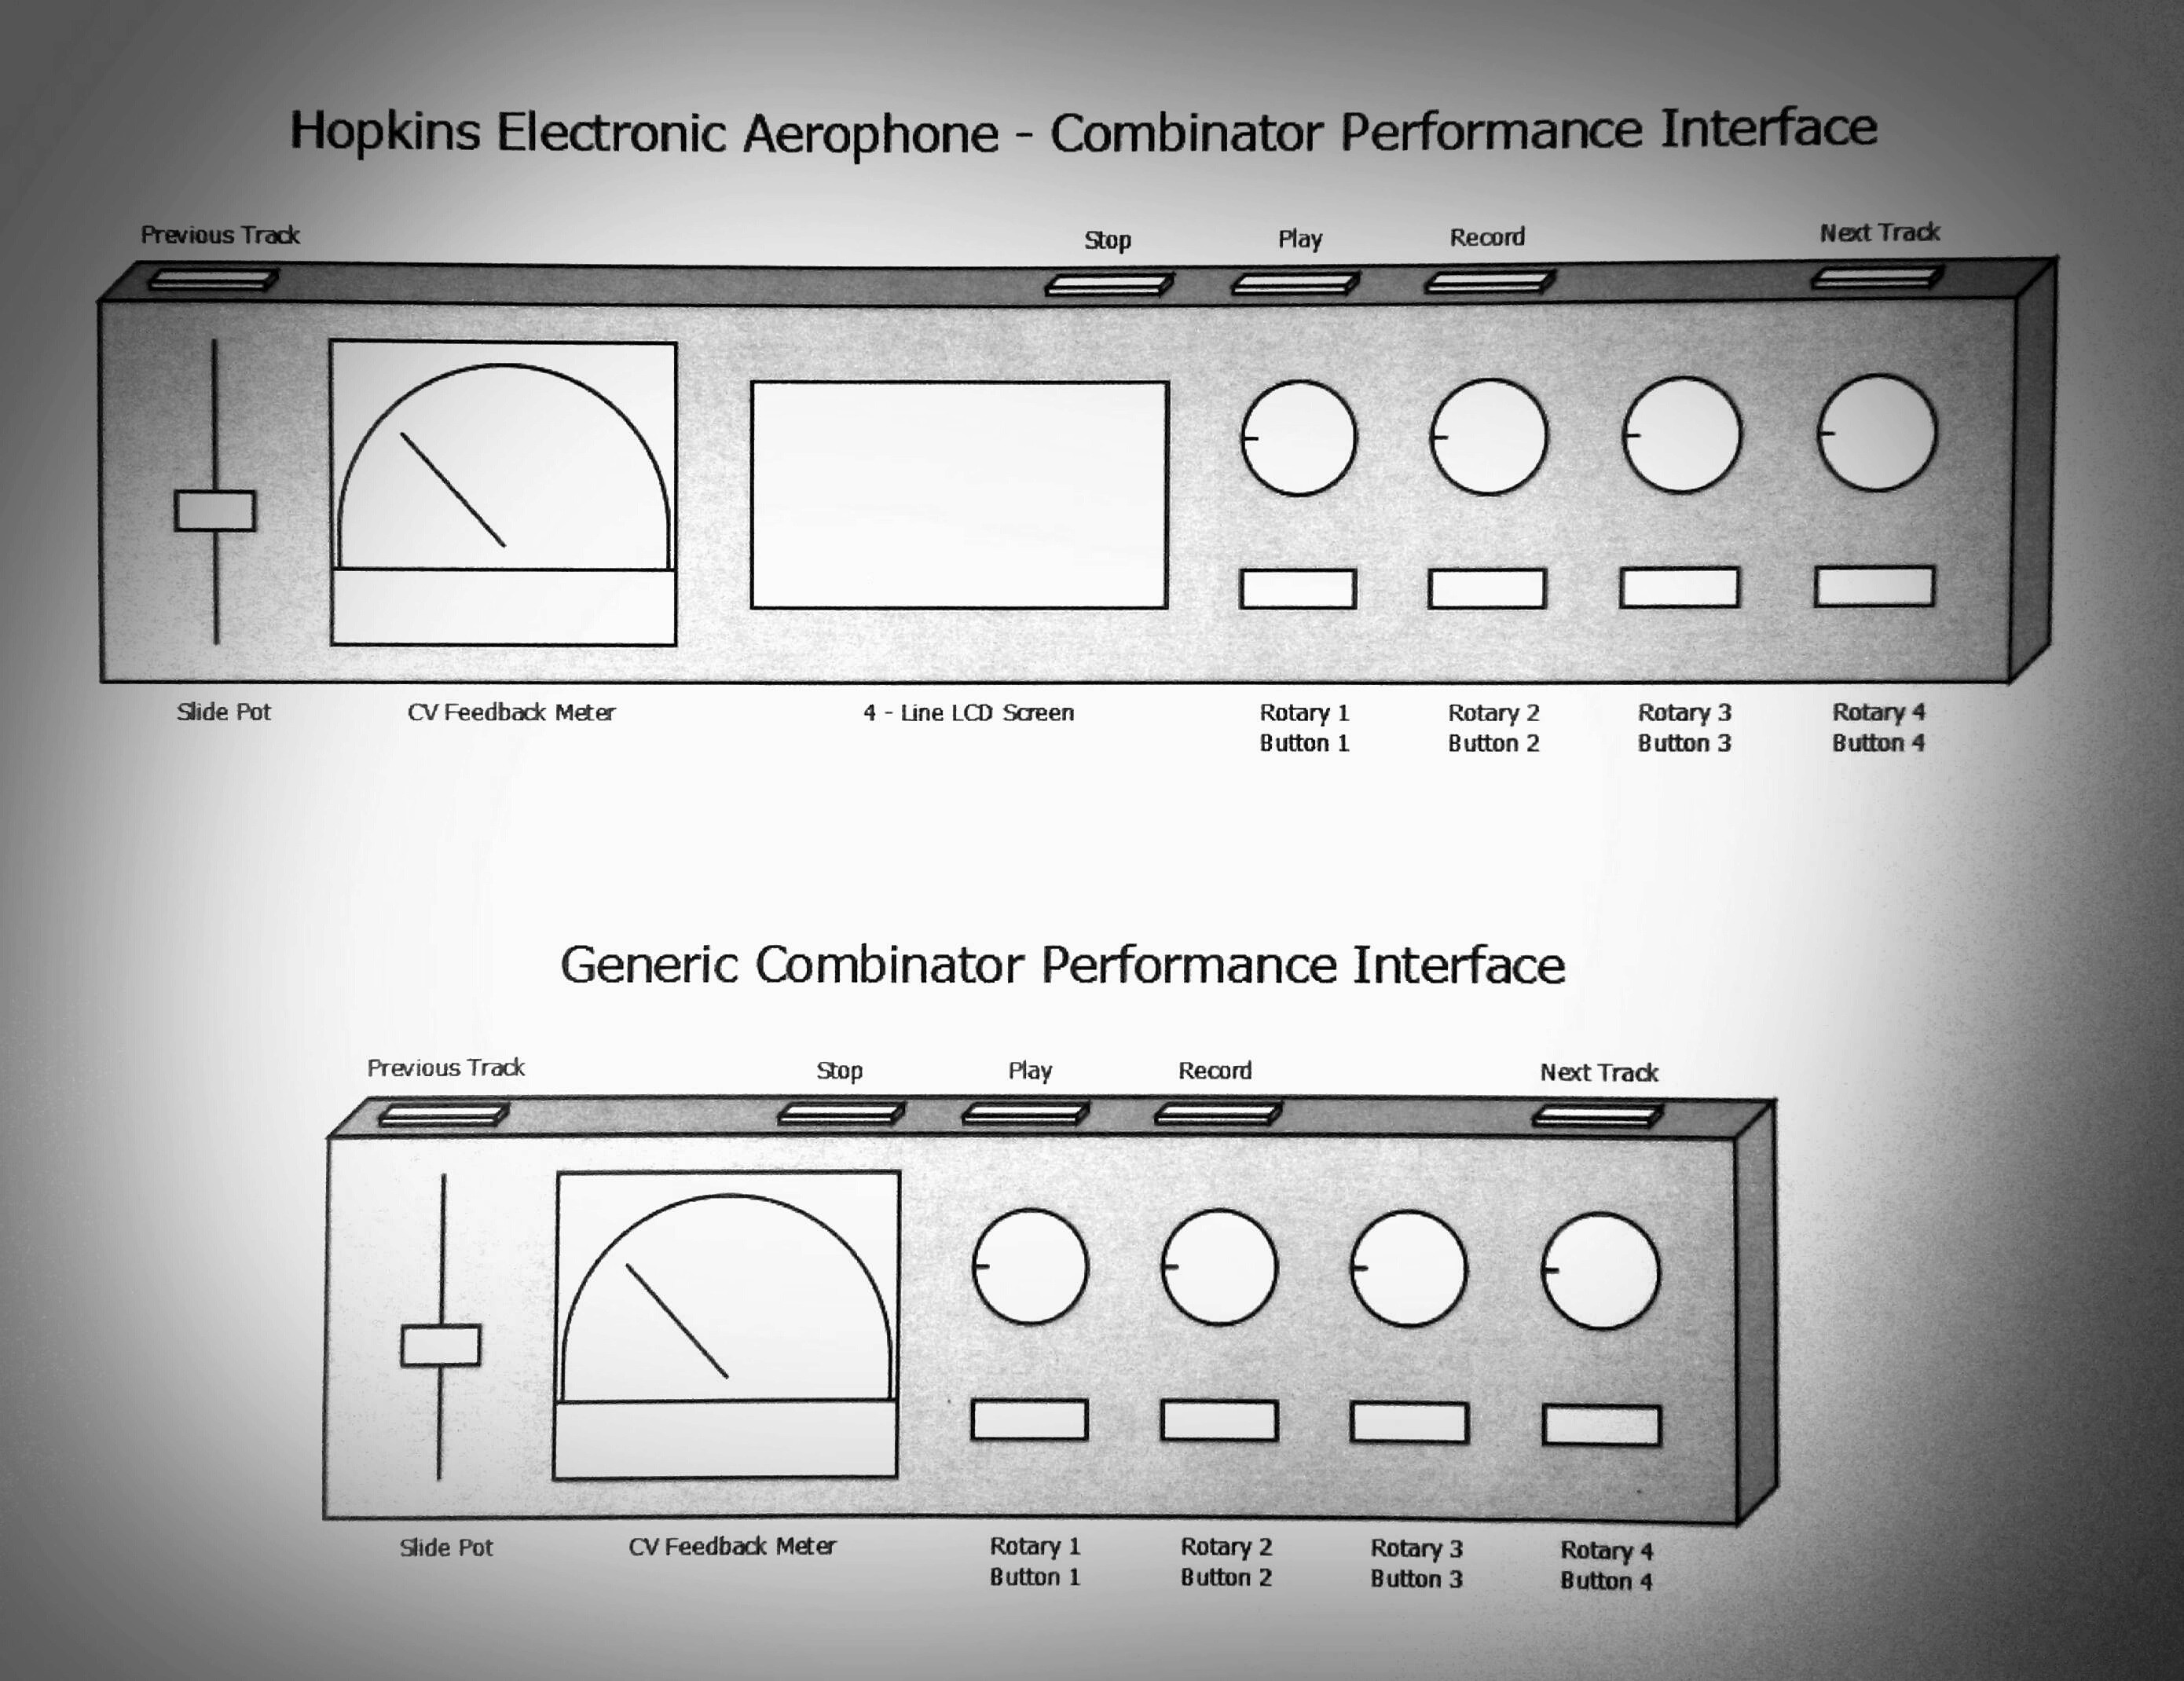
Combinator Performance Interface
10/13/2014 at 17:53 • 0 commentsI'd decided to update my base station to something much more! A Combinator Performance Interface. What is that you may ask? It's a box with a set of knobs and buttons that interface with Propellerhead's Reason. It will be used for controlling patches in real time, changing tracks, starting, stopping, recording songs and loops, and so much more.
There will be two versions, one that will interface with the Hopkins Electronic Aerophone, and another that will be a stand alone device so that other MIDI controllers can partake in it too.
I'm really excited about this, and think that this controller might open up some more customer base for all types of synth players.
![]()
-
Main Loop Flowchart
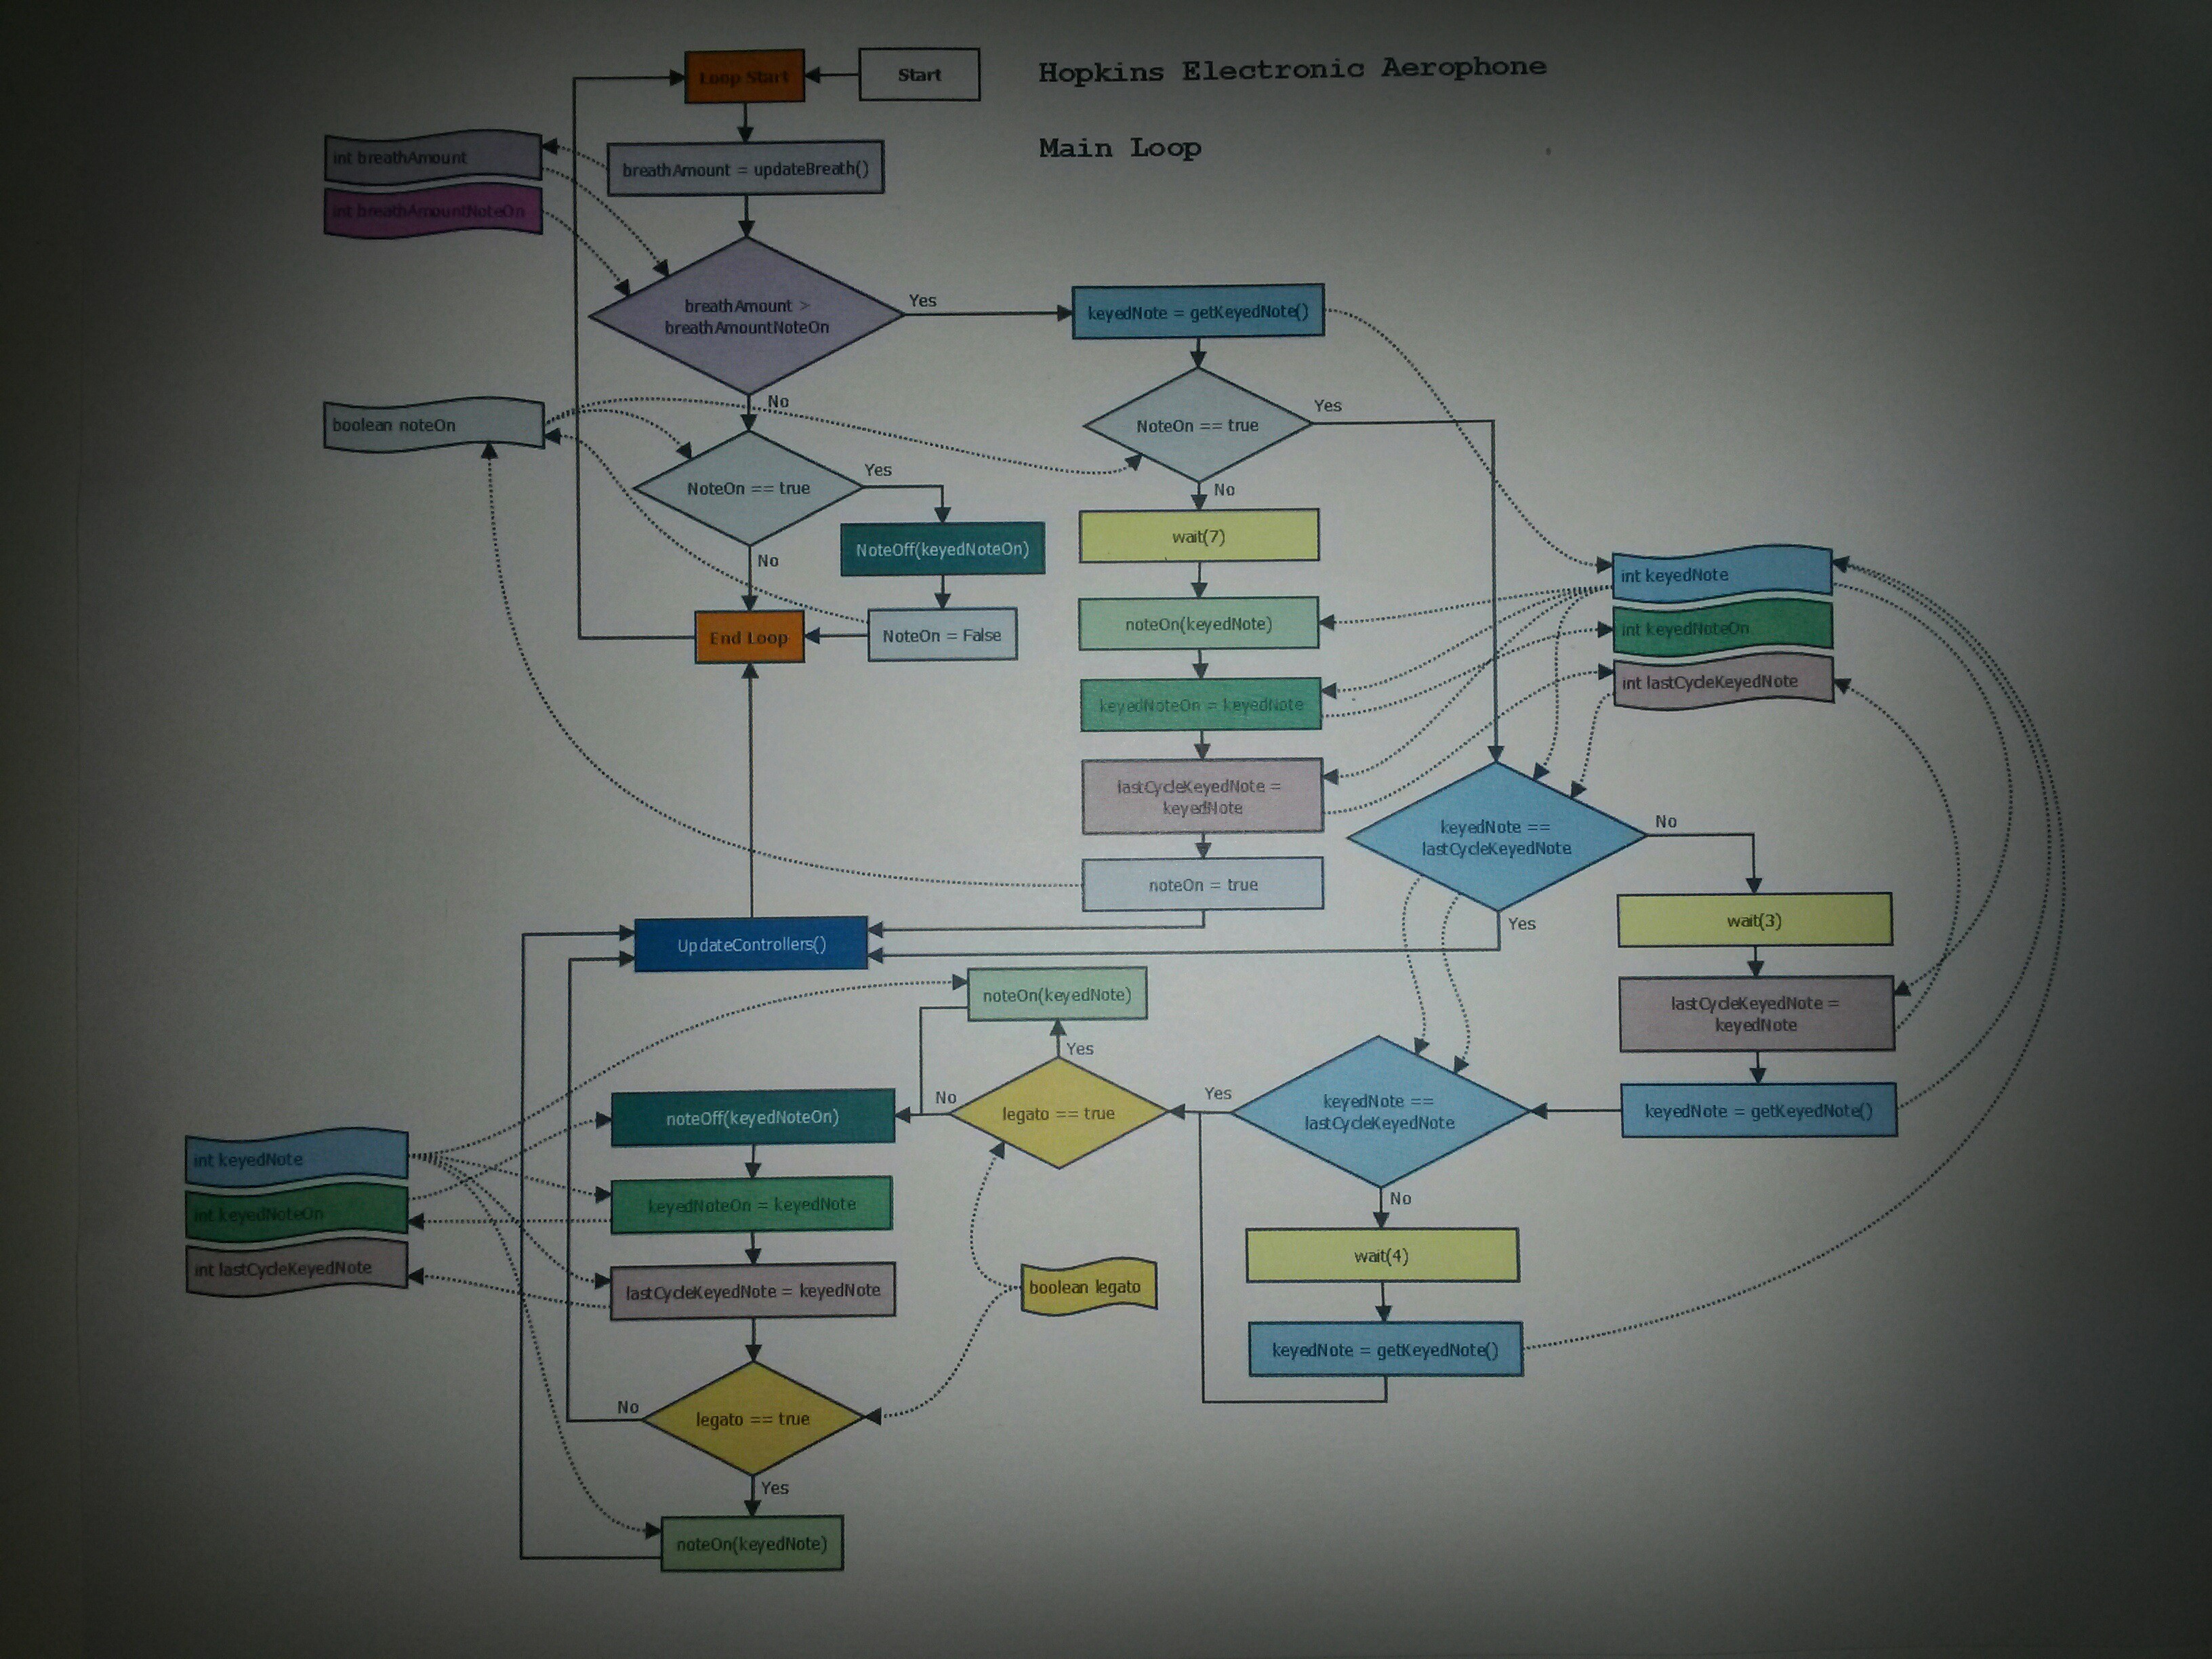
10/09/2014 at 18:42 • 0 commentsFor those of you interested on how the main loop in the microcontroller is working I've added the main loop flowchart. Dotted lines link variables (as do color coding of blocks) and solid lines are flow. Any questions are welcome.
![Flowchart]()
-
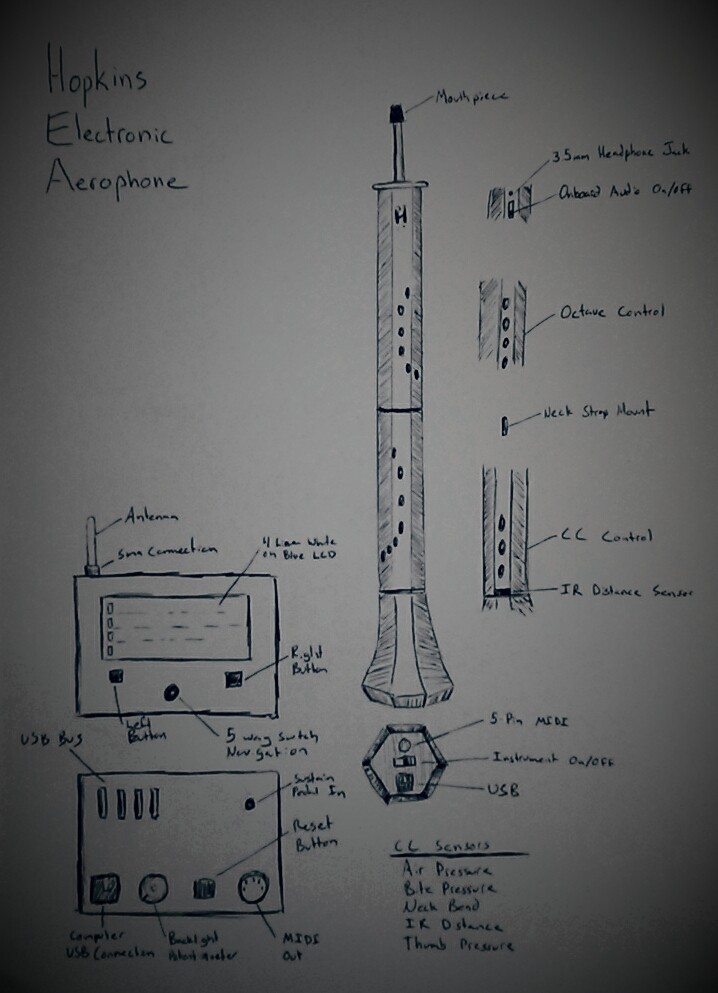
Final Instrument Design Ideas
09/23/2014 at 17:14 • 0 comments![]()
Here is the basic idea for the final constructed instrument and base station. It will be constructed of wood with a nice wood veneer to make the grain pop and be unique. It will also look like a wooden instrument add opposed to the plastic EWIs and such. Overall it's a hexagonal shape with a bell.
I've changed the mouthpiece design to something similar to an oboe as opposed to the bassoon idea I had originally been thinking. This allows for easier sensor integration for the neck bend sensor.
CC input sensors include breath, bite, neck bend, IR distance, and thumb pressure. This gives me a lot of input to play around with.
The base station shows feedback from the instrument and let's you change settings on the fly. Patches can be loaded from the instrument from specific fingering, but patch CC, fingering modes, etc are controlled per patch on the base station.
-
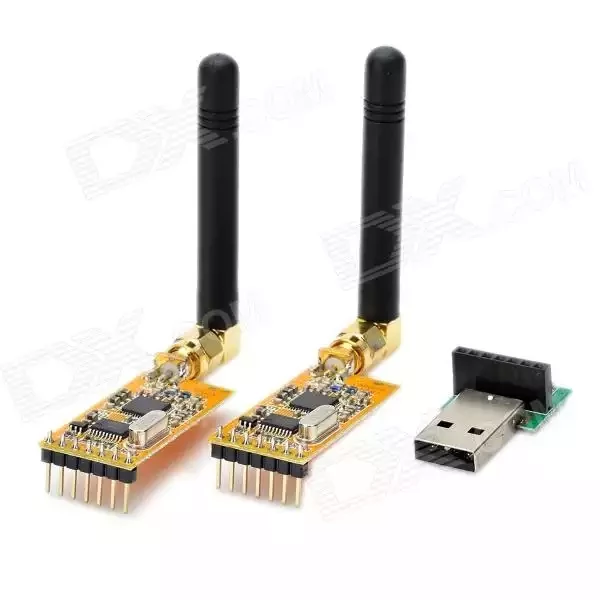
Wireless Transceivers
09/16/2014 at 10:48 • 0 commentsCurrently I'm using the Polulu Wixel 2.4GHz transceiver pair as my device for communication. Due to the ever present noise associated with that band, and it's limited range I've been thinking of changing the transceivers to a higher power.
One of the nice things about the Wixels were their power usage, and upgrading to a 433MHz device will start eating into battery life.
![]()
The APC 220 RF modules have a much increased range, and though the available baud rate is lower, still fits within MIDI standards.
Ranges of 1km at full power are achieved with line of site, however, a lower power well suffice for my needs and help save battery life. At around $30 for the set, it's not a bad deal either.
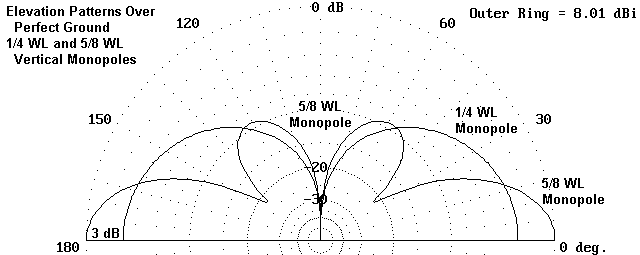
With the addition of sma connectors for the antenna connection I'll change from a trace antenna to a 1/4 lambda for the instrument and a 5/8 lambda for the base station. The reason for the differing length for the two is the radiation pattern. 1/4 gives 2db and a higher angle of radiation (useful for when the instrument is moving around), and the 5/8 gives 3db but with a pattern much lower. This gives a 16.3 inch antenna for the base station and a 6.88 inch antenna for the instrument. The antenna well be hidden on the inside.
![]()
-
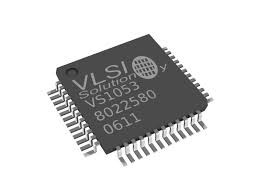
Onboard Audio
09/12/2014 at 19:58 • 1 commentFor the longest time I had decided that my instrument would stay tied to external synths for all audio output. At this point in time I think that I can change this. I'm not trying to add performance ready sound, but rather a way to practice without the need of an external synth.
![]()
VLSI's VS1053b can do real-time MIDI, MP3, and Ogg Vorbis decoding. It can be purchased in small quantities and is easily interfaced with a simple serial stream of MIDI data. It can handle headphone level amplification and can be turned off if not in use to preserve battery life.
The sound quality is similar to an early Sound Blaster card. It can also decode OGG and MP3. Power usage under payback and headphone amplification should be around 11mA, which is doable.
This will have to wait a few months until I'm back stateside, but I'm excited about the chance to add onboard audio to my project that is power and form friendly.
The following video has sample audio from the chip. breath data could be mapped to volume/expression to make it more responsive.
-
Instrument Basics
09/10/2014 at 13:56 • 0 commentsSince this is a woodwind controller for MIDI data some things are a given: keys to change notes and a way to determine breath control over those notes. Everything else is pretty much fair game.
Fingering
I've decided to go with a fingering paradigm similar to a saxophone or flute, but also similar to Akai's EWI as well.
The left thumb controls octaves, but dissimilar to Akai's fingering does not use rollers, but rather 4 keys giving a range of seven octaves (one for each key, and an additional 3 while the thumb is between keys).
To ease the octave break where players will practice hours and hours to rid themselves of glitching, I've added an extended fingering compliment both above and below the one octave. This is accomplished by keeping partial fingerings down while continuing into the next octave. I will publish a fingering chart later.
After playing with the new fingering system, runs that are fast around the break are readily achieved where before it would have been glitched.
Breath Control
Air is moved down the mouthpiece and to the pressure sensor which is read by the microcontrollers 12-bit AD converter and transformed into Note On/Note Off/breath controller data. The microcontroller auto senses the ambient pressure to determine the offset value for minimal breath level note activation. A max breath setting can be adjusted as well for a fine tuned responsive system.
Additional Control Sensors
There are a two other main sensors for additional CC messages. A physical pressure sensor on the mouth piece, and an IR distance sensor at the bottom of the instrument facing your body.
Two buttons at the right thumb can decide which CC is output by the sensor. Most common use would be pitch bend. The closer to the body the higher the pitch bend amount.
It makes for a very intuitive easy to control sensor for CCs.
Touch Sensitive Keys
The instrument uses touch sensitive keys with no mechanical movement. Similar to the EWI this allows for fast and accurate transitions between notes. Unlike the EWI I'm using a custom control board which actually sends a very very small signal through the body which then goes through the fingers and into the keys. The keys are then attached to a Darlington paired transistor setup which hugely amplify the signal that latches through a diode and into a shift register to the microcontroller. This allows for relatively fewer pins to be consumed and for there to be a faster response time due to there not having to be a capacitive recharge timing scheme for a true capacitive touch setup.
Wireless Transceivers
The microcontroller outputs it's data in a real-time MIDI serial connection. This data is piped into a Polulu Wixel 2.4GHz transceiver which connects to its pair attached to the computer. The computer then transfers the MIDI stream to your synth of choice (Propellerhead's Reason) and out your speakers.
Control Box
As of right now the computer side transceiver is just that, a transceiver. I will change it into having a 4 line LCD display with a 5 way button to allow changes of the instrument and monitoring of current playing and wireless signal level.
The Open Woodwind Project
An Electronic Aerophone with focus on usability as an instrument.
 Cut out Master Body Ribbing - Trace the paper template onto the wood, and cutout the master body ribbing template which will be used to create all the other ribbing pieces.