In my initial research, before I even had a design in mind (beyond the idea of a machine that would sort M&Ms), I quickly discovered the biggest problem would be reliably extracting a single M&M from a random pile of them. Determining the color and moving a single M&M around the machine were relatively easy, but getting that single M&M in the first place, consistently, was a bear, and that's what took the better part of 10 years (not of constant work, fortunately; months would go by without me even thinking about it).
While it might be instructive to others to review all the dead ends I pursued, it would just be too depressing for me, plus it would take up more space than describing the finished piece. Suffice it to say that many of the approaches I pursued failed because any approach that subjected an M&M to shear forces would, sooner or later, lead to an M&M jammed in the mechanism, something like this:
As the years passed, M&M sorting kind of became a thing on the Internet and you now can find a number of videos on Youtube and elsewhere (including Hackaday) of machines happily sorting M&Ms. Curiously, a number of these machines use variants of mechanisms I’ve investigated and discarded due to unreliability. So, I contacted the builders of several of them to ask how they got them to work so well in their videos. The answer, consistently, was, “editing.” Now, my stuff needs to be reliable, not just because I like it that way, but, hopefully, someone buys it and puts it in their home or office where I’ll neither be able nor inclined to service it. Plus, they’ve paid good money for it and expect it to work longer than it takes to demonstrate a one-off for a final exam. Back to the drawing board.
Then, in 2017, during one of my periodic breaks from thinking about sorting M&Ms, I came across this post on Hackaday. That disk with the holes in it started me thinking about a similar approach for extracting M&Ms. I quickly built a proof a concept, and it worked:
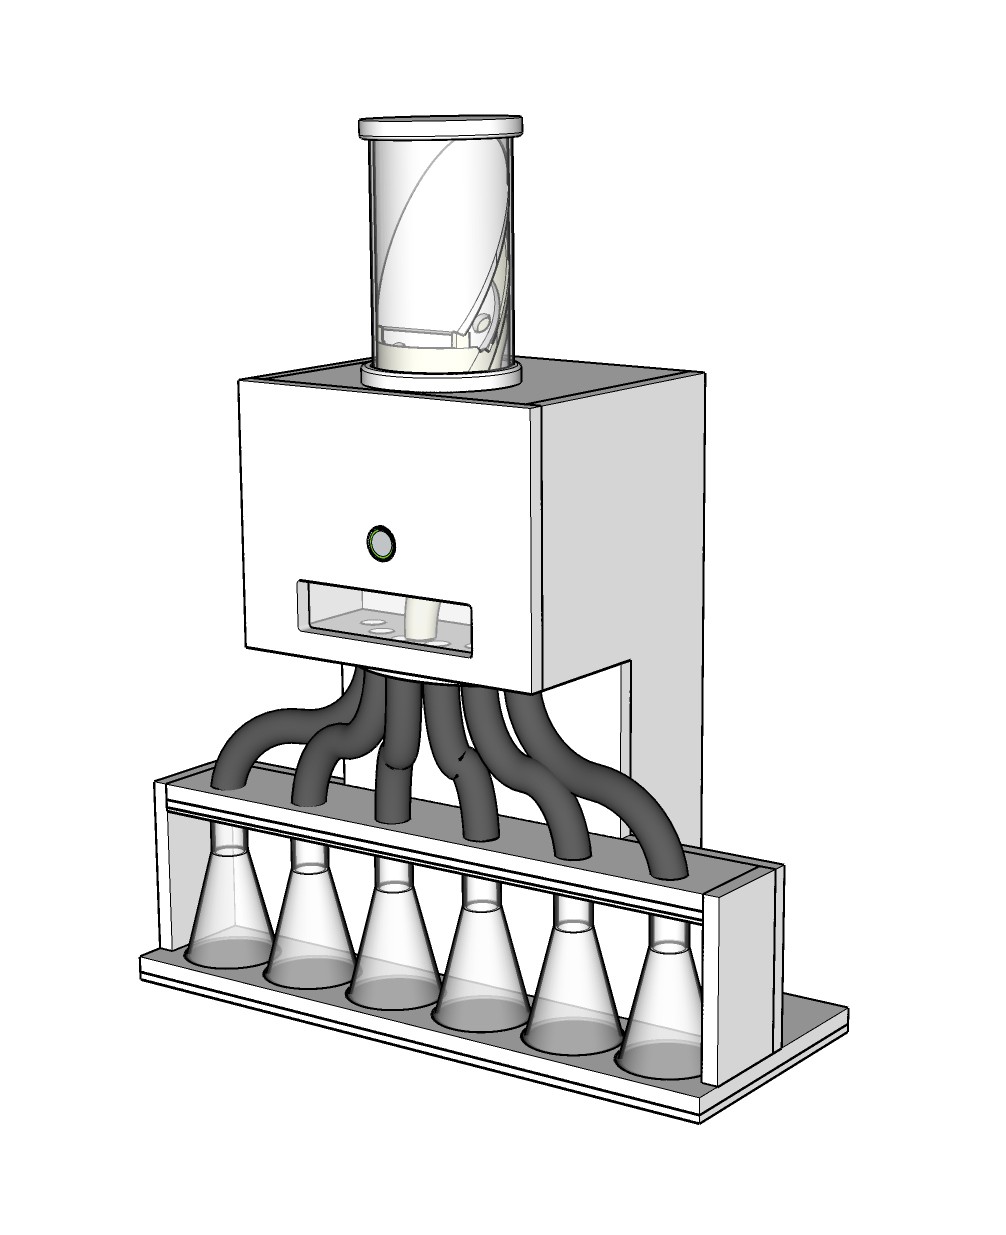
I was off and running. Over the years, I’d given a lot of thought to various designs for the rest of the piece, so I was able to quickly settle on this:

The piece is made primarily out of .5" MDF, cut on a radial arm saw and by hand, with some details CNC'd. You can see around the flasks I've used some .25" and .125" MDF laminations. None of the part lines are visible in the completed piece thanks to surface prep and paint. The opening beneath the pushbutton has a .063" piece of clear acrylic behind it to keep the machine's interior somewhat sealed.
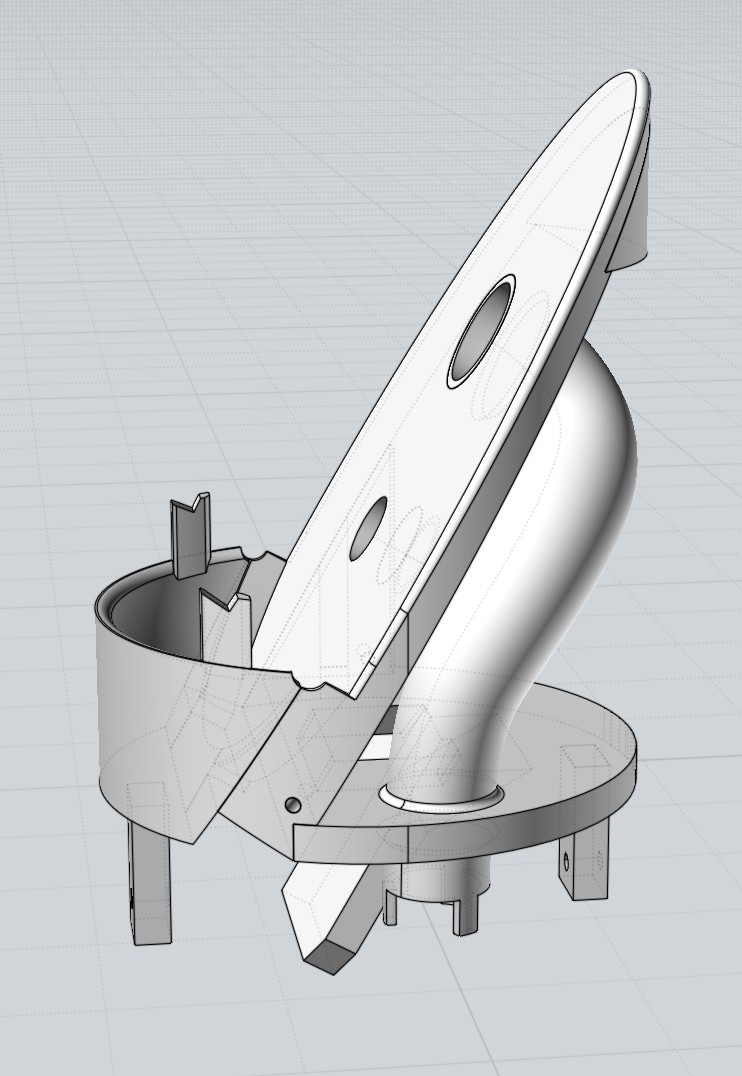
The M&Ms start in a cylindrical hopper on top of the machine and are gravity fed to a version of the disk shown in the previous video. You can just see the disk underneath an oval plate which keeps the bulk of them off the disk. The plate and the disk attach to this 3D printed piece:

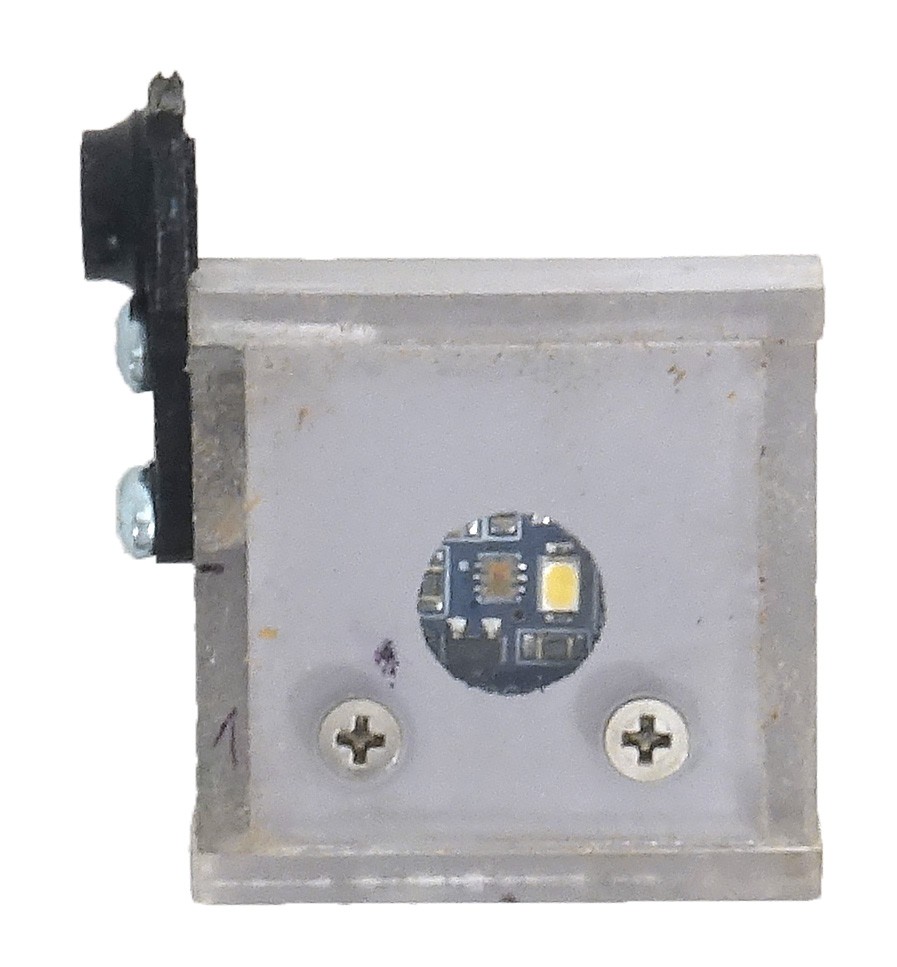
The disk is attached to a rotating shaft that passes through a bushing pressed into the lower of the two large holes you see above. It's turned by a Pololu #1200 5V stepper. When a hole in the disk aligns with the upper hole, the M&M falls out and into the tube you see bending down. The M&M comes to rest on top of a color sensor (an Adafruit TCS34725) which is housed in an acrylic frame attached to a servo:

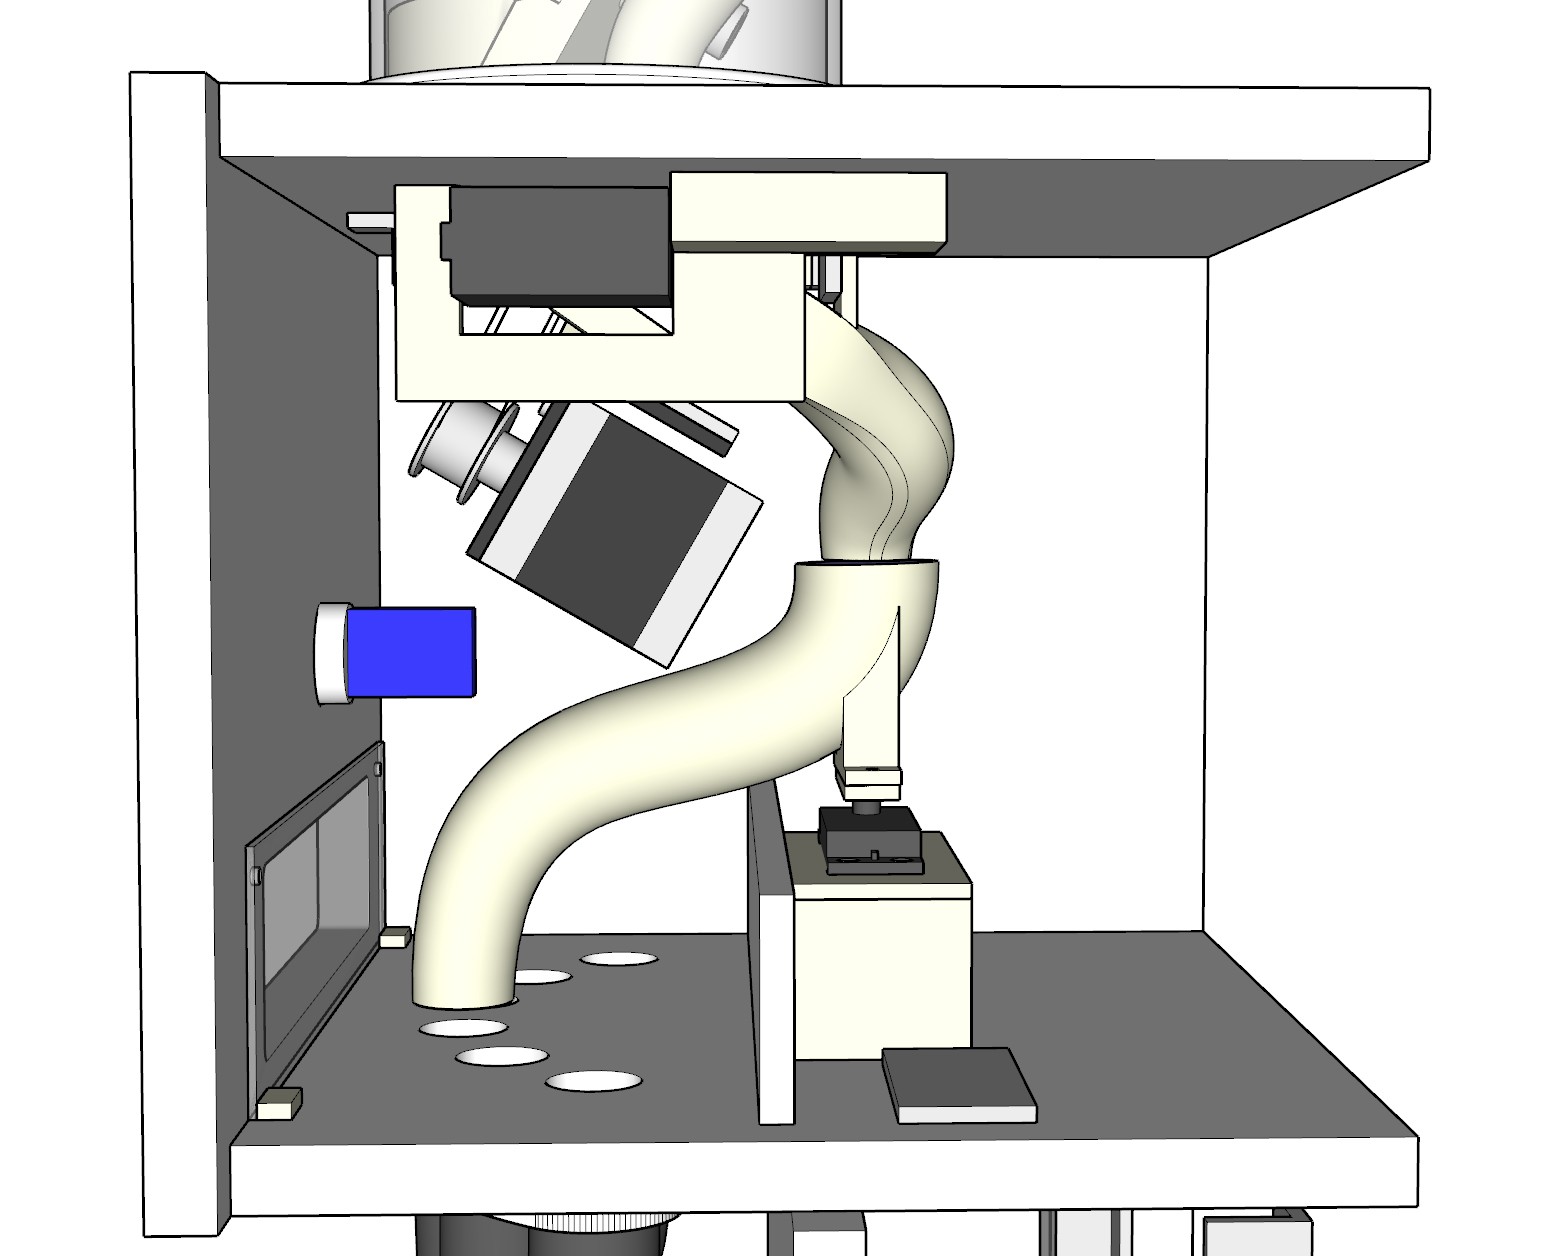
The color is determined by an Adafruit Pro Trinket - 5V (which controls the whole piece, btw). The S-shaped tube in the render below is rotated by another servo so it's aligned with the hole corresponding to the color:

The first servo rotates the color sensor down, dumping the M&M into the oddly-shaped tube you see running between the upper servo (which is the one I'm calling "first") and the S-shaped tube, and the M&M falls into its corresponding Erlenmeyer flask. Here's a clip of the interior in operation:
You'll notice the color sensor shaking each new M&M briefly.. This is because an M&M will occasionally come to rest on its edge, preventing the sensor from making an accurate reading. Unfortunately, the sensor can't tell if an M&M is on its edge or not, so it shakes each one to make sure the occasional side-sitting one falls over onto its face.
The stepper and the two servos are the only motors used, and are all controlled by an Adafruit Motor Shield (which is really just a pass-through for the servos, simplifying connections).
I wanted the option of not having to anchor the machine to an AC outlet, so it runs off a large, removable 12V battery that may be easily replaced via a door in the side:
It takes about 55 minutes to process a full hopper of M&Ms, and the battery lasts a little more than an hour. When it gets low (determined by monitoring the voltage via the Trinket's AD), the ring LED surrounding the pushbutton on the front flashes. There's also a jack for plugging in a 12V wall wart, obviating the need for the battery. Both 12V sources are run through a simple buck converter from Amazon, set to 5V (the only voltage needed):
Here's a timelapse of the finished piece:
And here's the full video:
The few non-brown M&Ms in the far right flask aren't being mistaken for brown; they're simply not being recognized as any of the six colors. I'm not quite sure why they're not being recognized because whenever I re-test unrecognized ones they're unambiguously identified. There's some rare occurrence causing the misidentification and by the time this issue appeared I was so close to completing the piece I no longer had the patience to track it down.
I always knew there'd be misidentifications, but I assumed they'd come from broken pieces (which, in reality, occur much more rarely than I'd figured). I chose to send unrecognized M&Ms to the far right flask, rather then dedicate a flask to them, since that would make the sculpture bigger and call even more attention to its sorting imperfection. I also thought that, since they'd primarily be broken, they'd hide better in a pile of other whole M&Ms. Oh, well. If I ever make another one of these I may try to send the unknowns to an internal container that's easily removed, like the battery drawer. Of course, then I'd have to monitor how full it is and signal the user when it needed to be emptied.
 Involute