Close
0%
0%

Servo Generator Light

Turn an old servo into a "forever flashlight"

Similar projects worth following
Using an old servo as a generator, and supercapacitors for energy storage, this LED flashlight will last for decades. The original was built c. 2001, and still works fine in 2018! I'm planning a new version with a modern LED, boost regulator to get maximum energy from the caps, and a 3d-printed crank.

This is another one of those old projects I never documented.  Back around 2001, I was looking for a small red flashlight for astronomy, but hated dealing with dead batteries.  It didn't need to be very bright, so a single ultrabright LED would do.  I finally stumbled upon the idea of using an old servo as a generator.  I threw the thing together in a half-hour, and it's lasted 17 years so far.  The gears are a little worse for wear, but it still works.

Here's the schematic:

It doesn't get much simpler than this.  A Schottky diode protects the capacitors from discharging back into the motor (and from reverse polarity if you turn the horn the wrong way).  A pair of 47mF/5.5V capacitors store the energy from the motor-turned-generator, while the 470-ohm resistor limits the current to the LED and stretches out the run time.

I removed the servo brains, and replaced them with the above circuit.  I left the two ceramic noise-suppression capacitors that were soldered to the motor, but they don't really do anything for the flashlight.  If you build one, you will need to modify the servo for continuous rotation.  In some cases, this is as simple as removing the feedback potentiometer; for other servos, you may need to modify a gear slightly.  You'll figure it out.
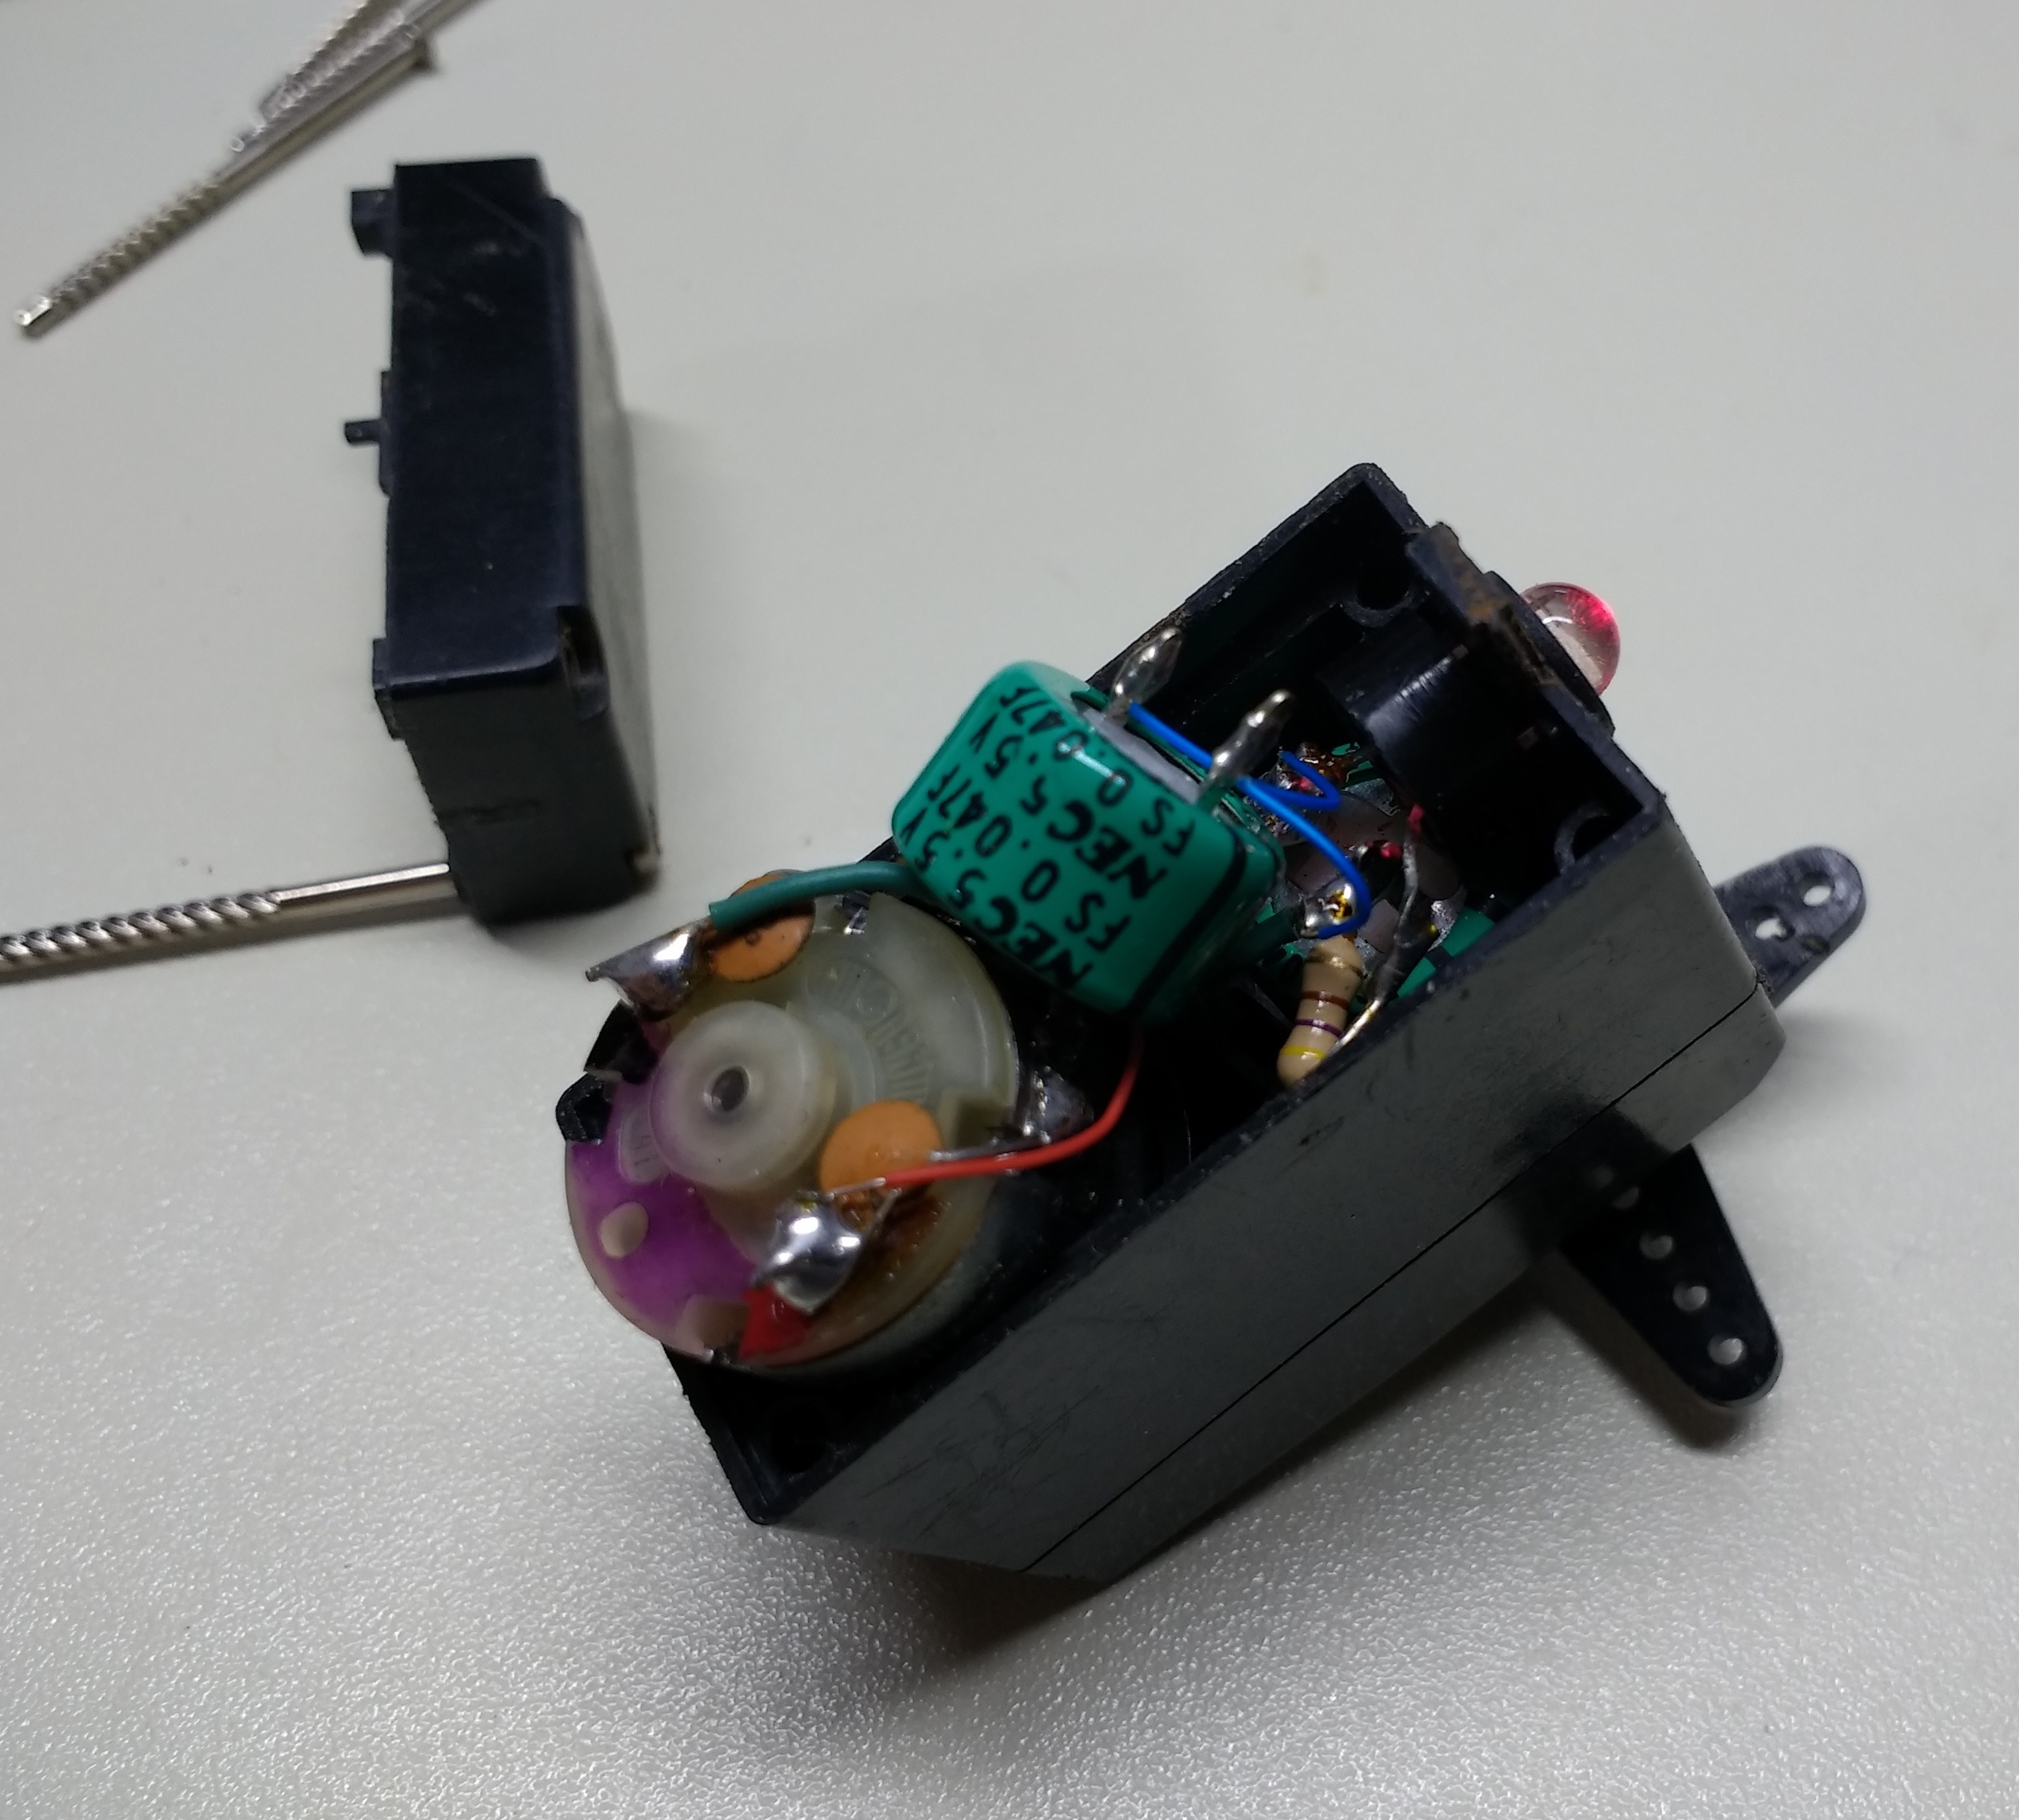
That's it.  Very simple and reliable.  It only takes a few cranks to get the LED going, and it will run for a few minutes, slowly growing dimmer.  As a general-purpose flashlight, it's not that impressive, but it's perfect for preserving night vision.

I'm planning an update, using a modern LED, boost regulator, and 3D printed crank (turning the servo horn is tough on the fingers).  I'll document it in the build logs as I go.

  • Testing boards and busting servos

    Ted Yapo02/01/2018 at 20:05 0 comments

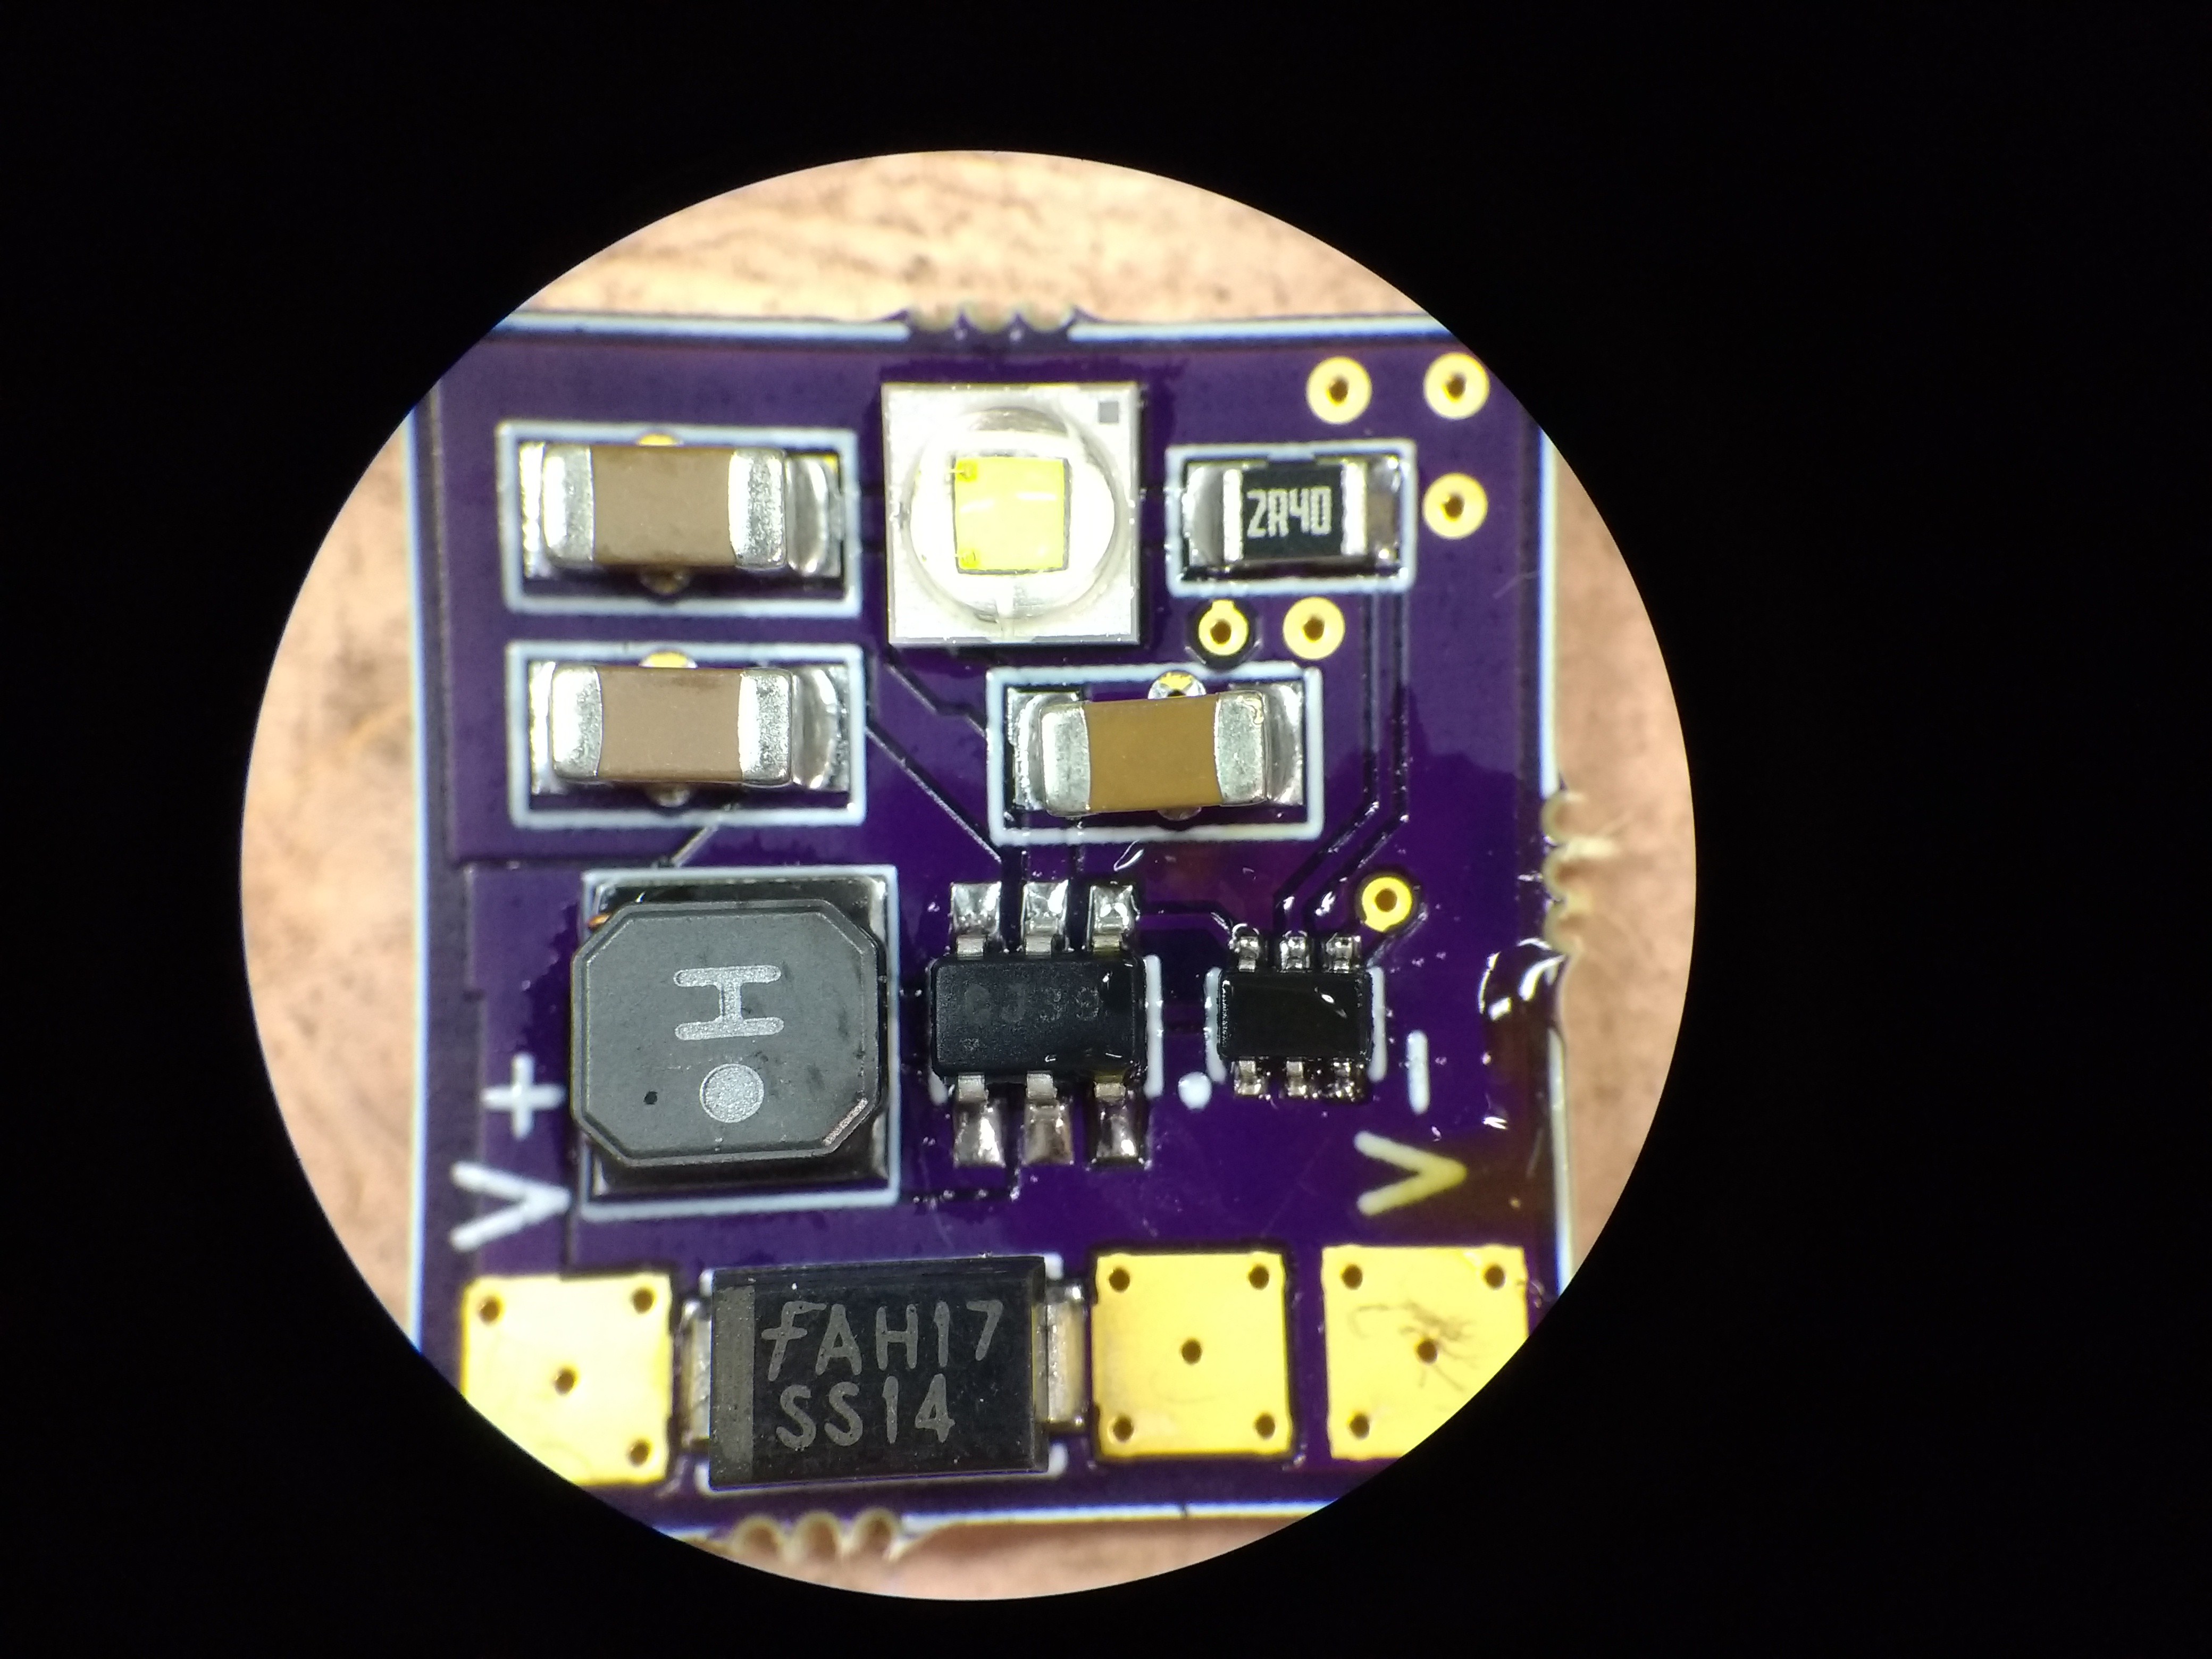
    I had a chance to assemble one of the LED driver boards today.  It's funny how your perspective changes: I felt relieved by the "large" size of the SOT23-6 package after placing the SC70-6.

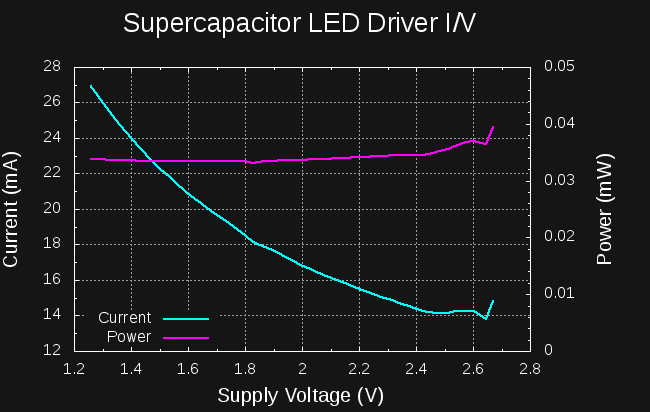
    The circuit is supposed to provide constant current to the LED, and hence approximately constant power.  To test this, I swept the supply voltage while measuring the current drawn.  Unfortunately my setup uses an LM317 so is limited to around 1.25V on the low end.  I keep meaning to swap in an LT3080, but never seem to get around to it.  Here's what I was able to measure:

    As expected, the current increases as the supply voltage drops (cyan curve).  The power stays approximately constant at 35mW (magenta curve).  At the LED design current of 10mA, the LED has a forward voltage of about 2.7V, so the converter (a MCP1624 boost) would have to be a buck after that point.  As it is, the current increases very quickly beyond 2.7V.  This is, quite coincidentally, the maximum voltage for the supercapacitor(s), so the LED will protect the caps by dissipating excess charging power.  Since the LED is rated for 1A (when properly heatsinked), this isn't a bad protection mechanism.  You can't crank 1A into the thing for very long with a modified servo.

    There is some weirdness to this circuit, though.  Take another look at the I-V curve.  The current drops with increasing voltage.  That's a negative resistance, and it's a recipe for oscillation and stateful behavior (hysteresis).  For instance, I tried to cheat and measure lower supply voltages by using a series resistor and large capacitor to drop the voltage.  The board got stuck in a high-current (~60mA) state at around 0.35V (the LED was on).  This current was enough to maintain a large voltage drop across the series resistor, maintaining that state.  Turning up the voltage eventually snapped out of that state, then continued to behave "normally" as the voltage was reduced.  I'm not really worried about this behavior - in use, this board will be driven from a capacitor with a minuscule ISR.

    Braking == Breaking

    I busted two servos in the past week, both plastic gear types.  The gears stripped while I was testing charging capacitors with them. Interestingly, the one I've used for years is also plastic, and I couldn't figure out how it had lasted so long.  On one hand, it was a genuine Futaba, from when that really meant something vs the cheapest no-name servos I could find on ebay.  But then it hit me - the capacitors are different, too.  In 2001, supercapacitors had crazy high ISR - enough resistance to limit the charging current and hence the force on the servo gear train.  Modern supercapacitors present essentially a dead short to the generator, making it very hard to turn and really stressing the gears.

    Lesson learned: only use metal gear servos.

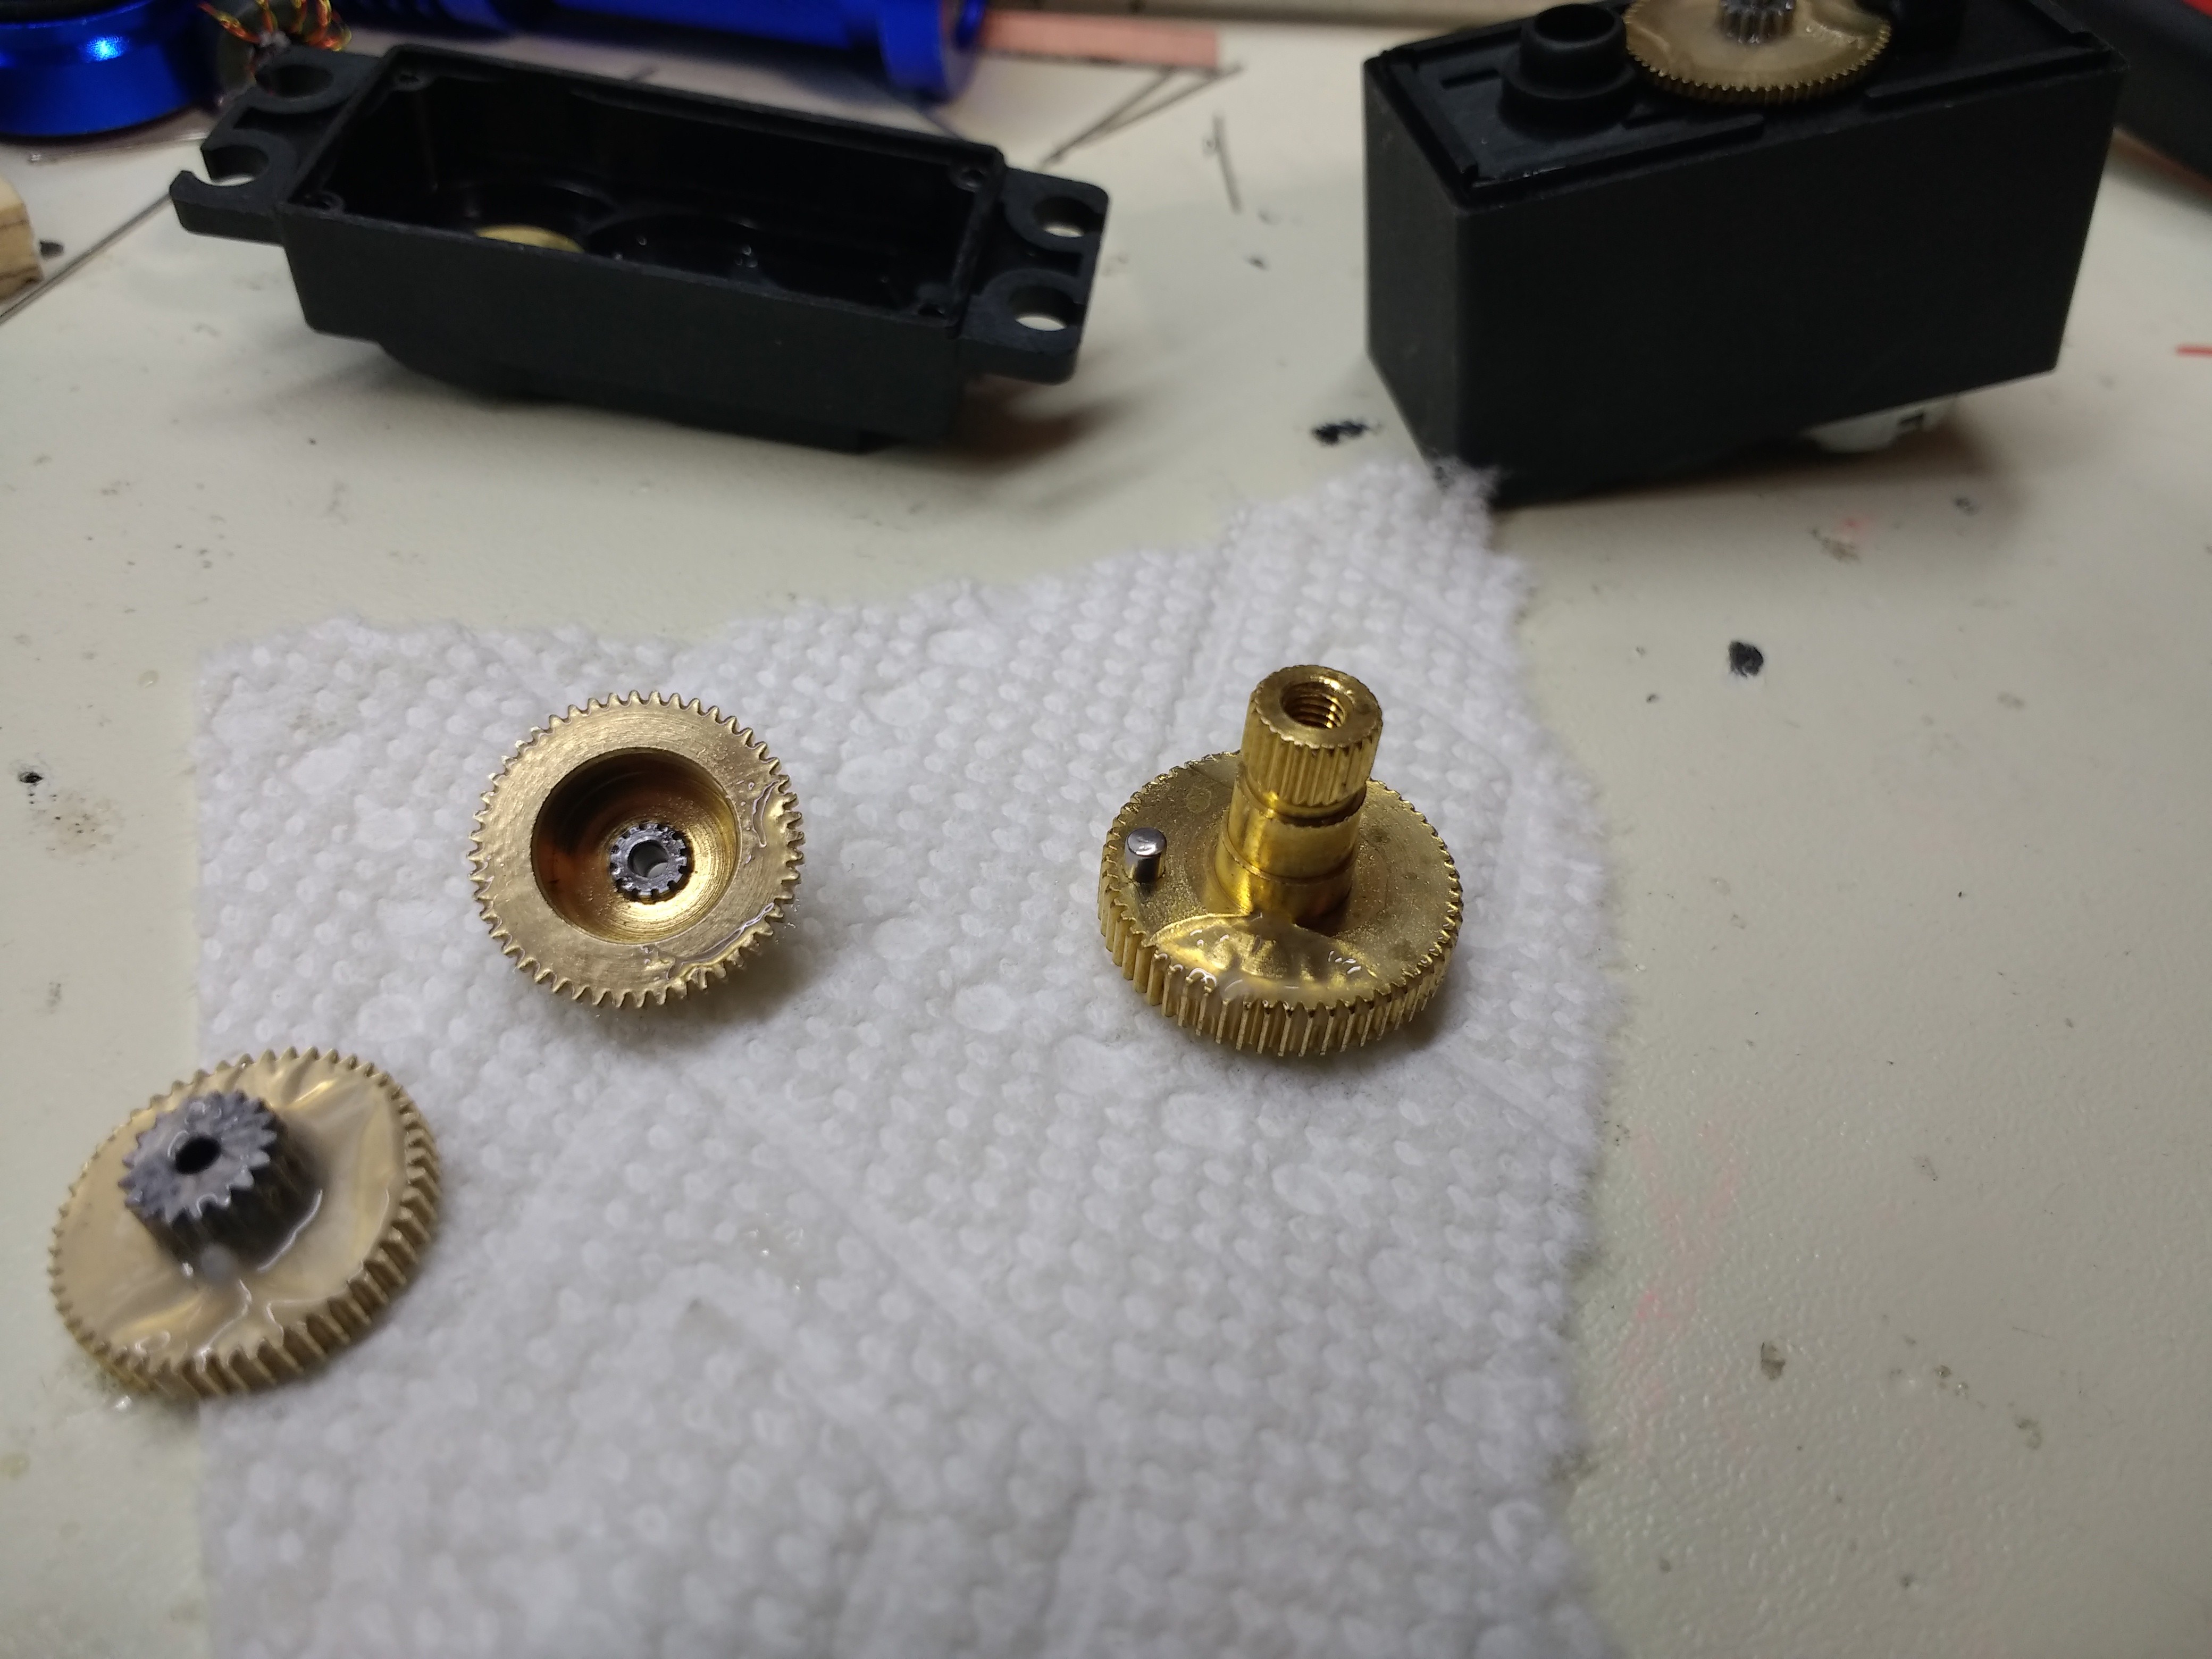
    So, I modified a metal gear servo for continuous rotation.  All I had to do was pop out a pin that had been press-fit into one of the gears (see the pin on the gear to the right, below).  A light tap with a finishing nail and a hammer did the trick.

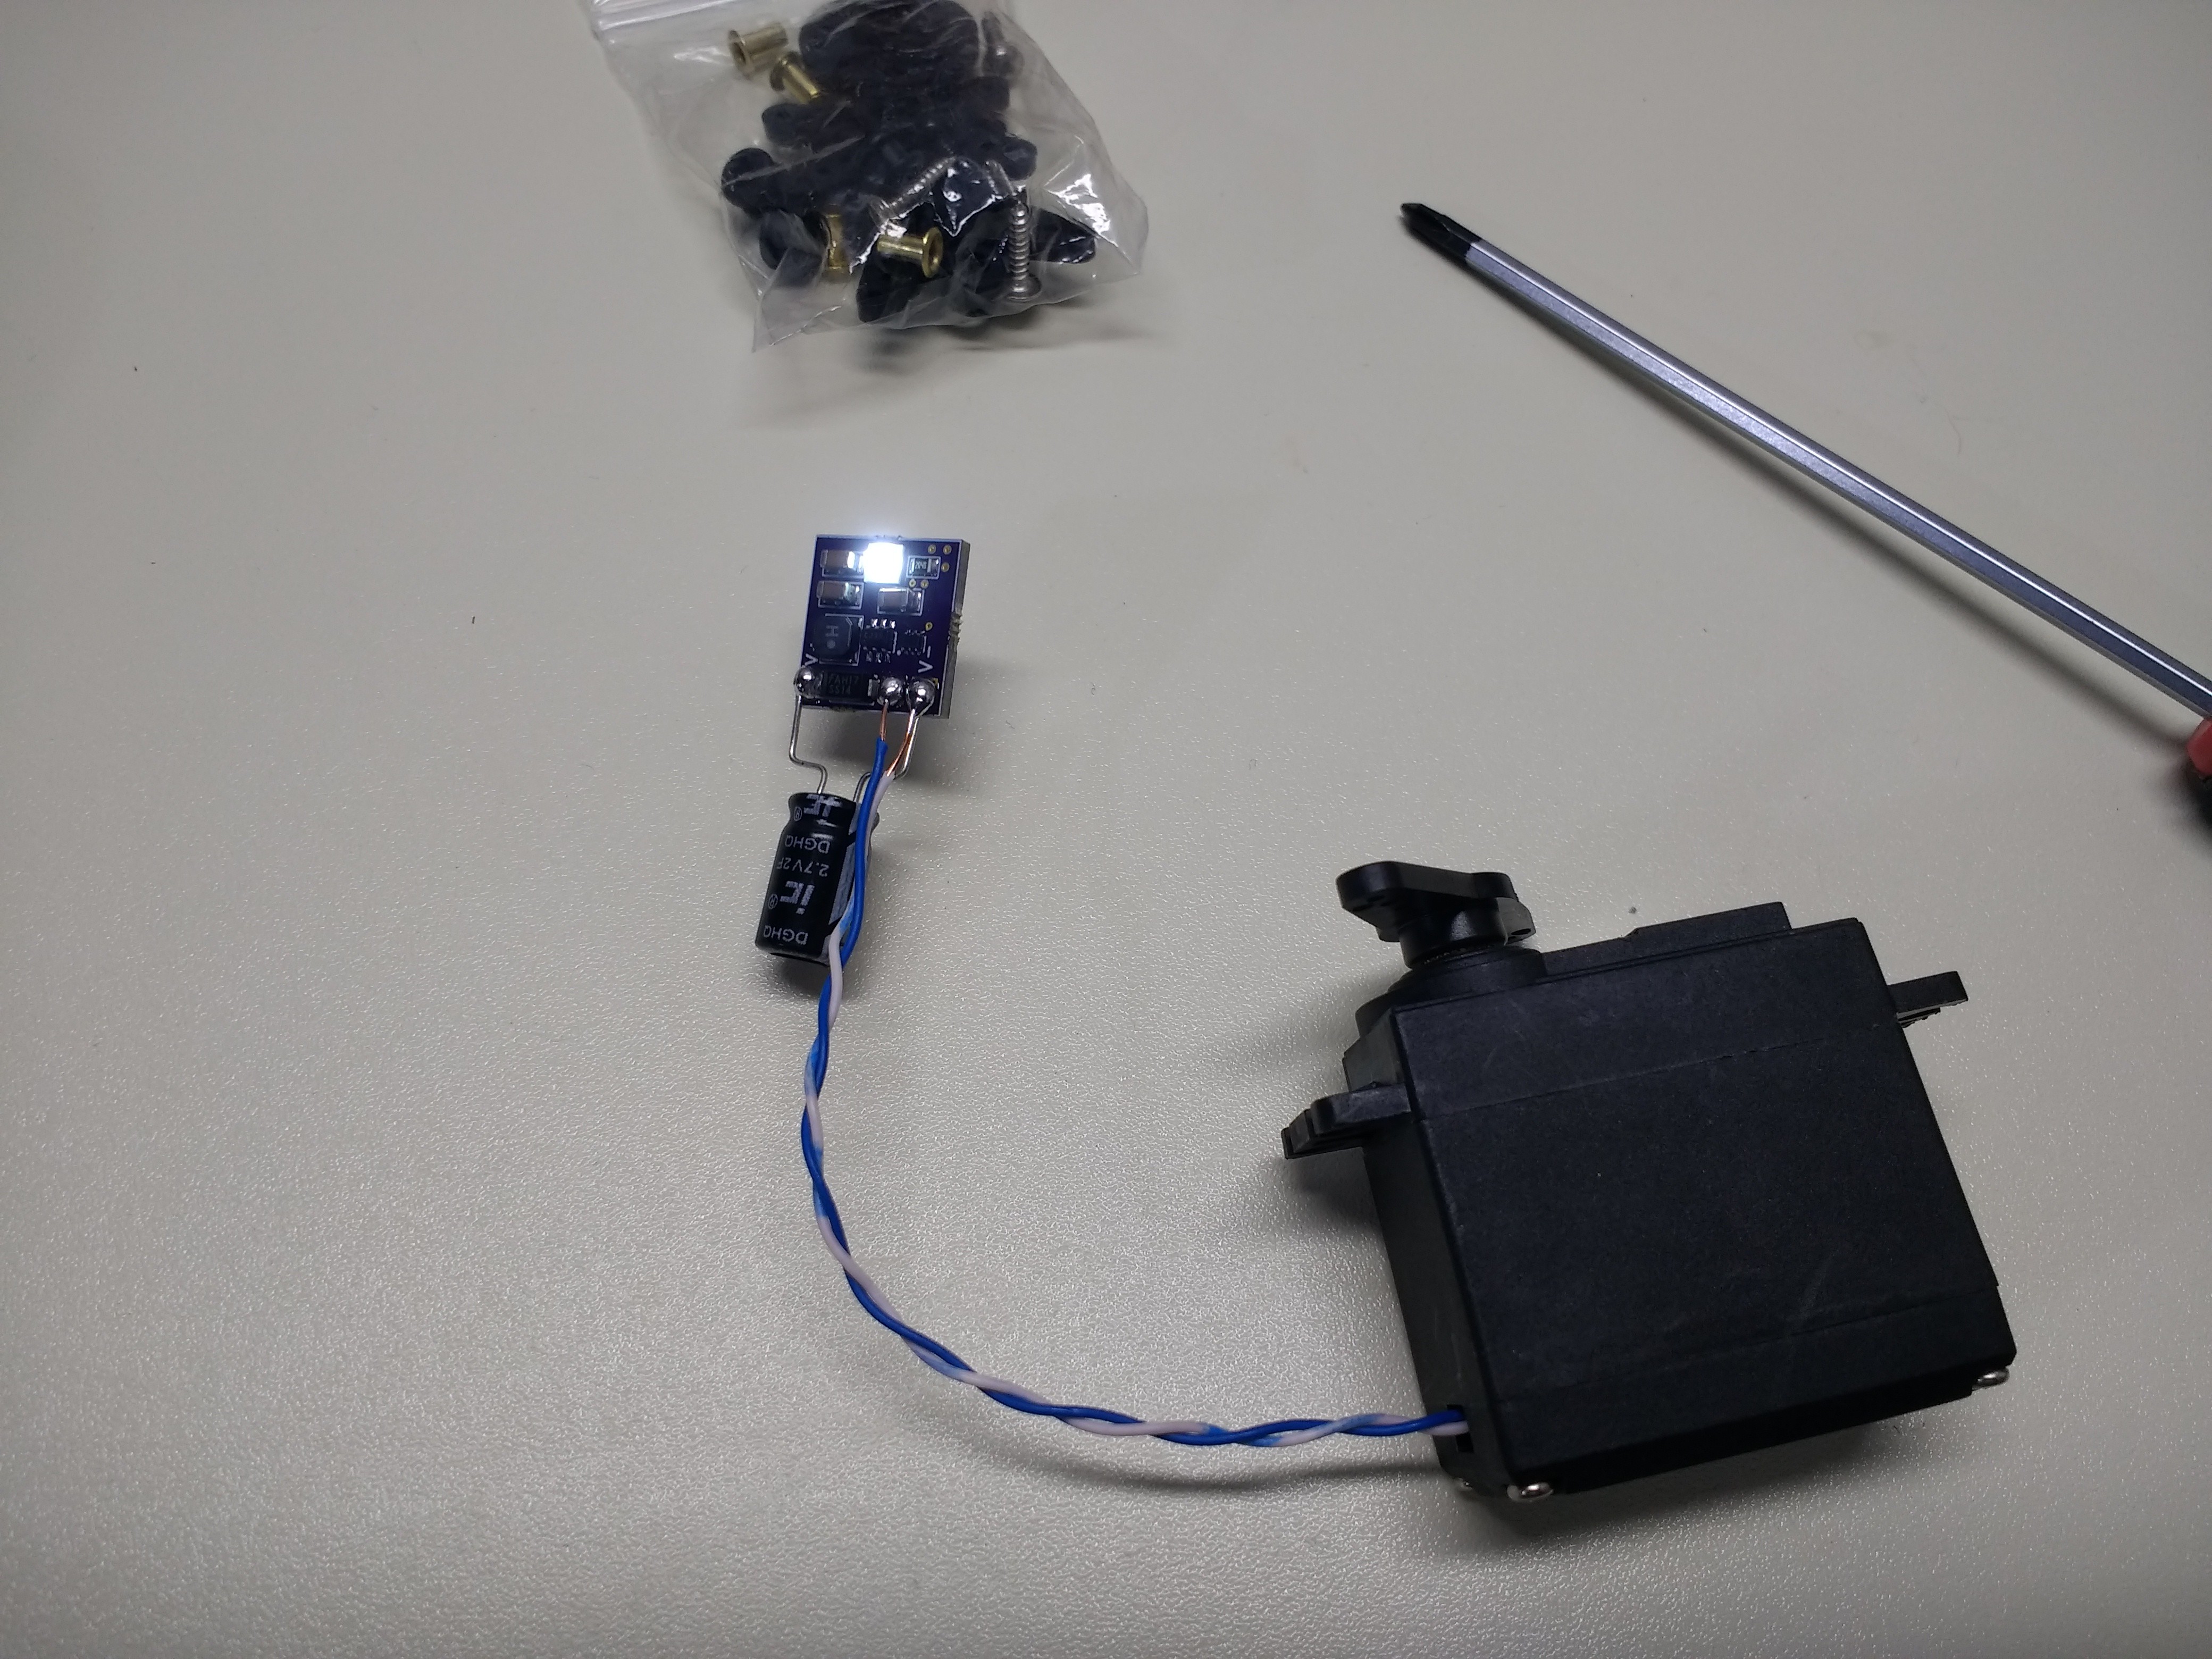
    I wired up the converted servo to the test board and a 2F 2.7V capacitor.  I haven't finished testing it yet, but three full turns of the servo horn (which doesn't turn easily!), gives about 70 seconds of very bright light, which suddenly drops to a dim glow for another 20 seconds before going out.  I haven't measured the voltage during this process yet, but I suspect the capacitor isn't charged anywhere near 2.7V.  I need to print a real crank for more tests - my fingers hurt from turning the servo horn.

    I also found that these inexpensive flashlights use a Cree LED, which looks like an XPE-series.  In any case, the lens used in the flashlight is a great match for focusing the LED I've chosen.  I...

    Read more »

  • Boost Converter - First Try

    Ted Yapo01/22/2018 at 04:16 0 comments

    I know I shouldn't send this board out yet - always wait a day - but, I've just sent out three boards in as many days, and feel like I'm on a lucky streak :)

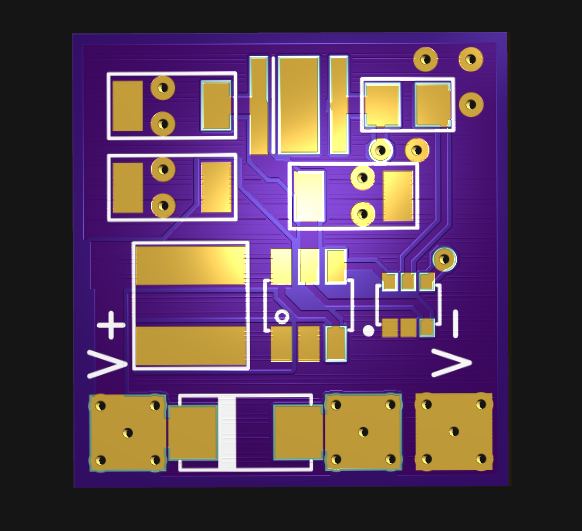
    Then again, even with super-swift service, these boards are only $3.70.  The PCB should fit inside a standard servo case with some room for a capacitor or two.

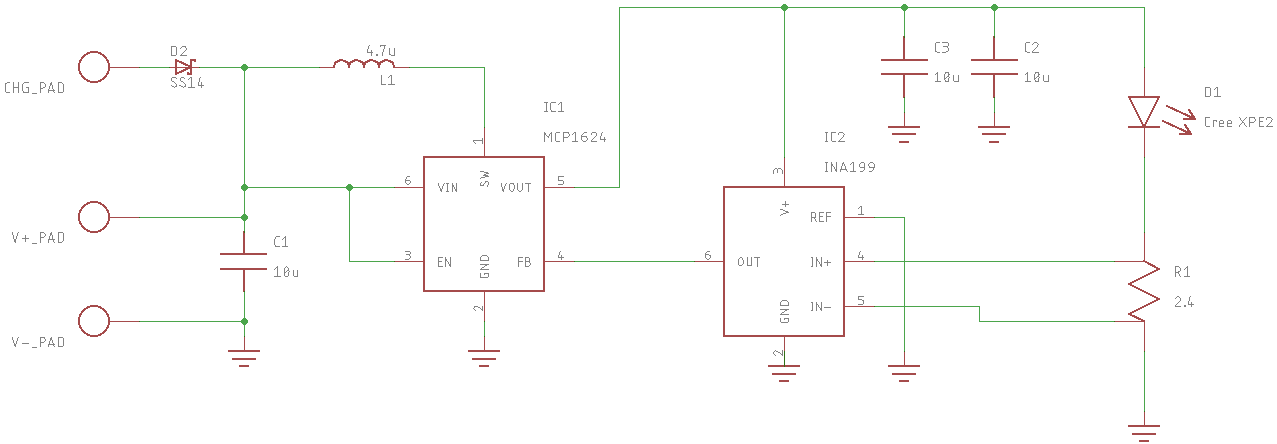
    The circuit is a boost converter built around an MCP1624.

    The MCP1624 will start at 0.65V, and once started will run down to 0.35V.  Usually, the output is a fixed voltage determined by a resistive voltage divider into the feedback pin.  In this case, I've substituted an INA199 current sense amplifier.  This is basically a difference amplifier built around an auto-zero amp so it has a very low offset voltage.  The gain is fixed at 50.  With 10mA flowing through the 2.4-ohm sense resistor, there will be a 24mV drop.  This is multiplied by 50 to get 1.2V, which is the feedback reference voltage for the MCP1624.  If it all works, this should keep the current through the LED a constant 10mA.

    The INA199 is specified down to 10mV full-scale drop across R1, which is impressive.  I took care to use Kelvin connections to the sense resistor, which meant making a special resistor symbol and footprint in Eagle so the low-side sense trace didn't get absorbed into the ground plane.  I used two overlapping SMD pads on each side of the resistor, and connected them to separate pins on the schematic.  Eagle was a little finicky about it, but it seemed to work.

    This arrangement allows a very small sense resistor to maintain high efficiency.  With 2.6V across the LED at 10mA and 24mV across the resistor, the efficiency lost to the sense resistor is under 1%.  Using a higher-valued sense resistor with the MCP1624 directly would cost more than 30%.

    I have to be honest, I don't know how to evaluate the feedback stability of this combination.  If it seems unstable, I'm going to whack it over the head with more capacitance.  Hopefully, it just works.

    I added an SS14 Schottky diode for charging the capacitor from the generator.  I had intended to include a TL431 shunt regulator and a pair of resistors to clamp the supercapacitor voltage to 2.7V, but they didn't fit on the board.  I can always wire a TO-92 version and a few 1/4W resistors free-form in the case.

    If this circuit works, it could be interesting for driving LEDs from single 1.5V cells, too.  A quick calculation has it running for more than a week from an AA alkaline cell, and probably longer from an AA LiFeS2 cell.

    Wait, did I just re-invent the wheel?  Is this just a solar garden light?

  • Designing V2.0

    Ted Yapo01/21/2018 at 20:21 0 comments

    I'll be adding a constant-power DC-DC converter in the new version.  Right now, I'm considering a MCP1624 switcher with an INA199 current-monitor amp for the feedback.  More on that to come.  Before sending out boards, I decided to simulate how a constant-power output would work powered from a capacitor, so I made a model in LTspice.

    C1 is a 2.2F supercapacitor (final value may differ).  With a DC-DC converter and current feedback, the LED will consume constant power - as the capacitor discharges, more current will be drawn to keep the LED current constant.  To simulate this, I use B1, a voltage-dependent current source.  The current is set to the LED power divided by the capacitor voltage and the converter efficiency. This will cause the capacitor current to increase as the voltage drops, just as it will with the converter.  I drop the current to zero when the capacitor voltage reaches the minimum input voltage for the MCP1624, 0.35V.  The capacitor size, LED power, and efficiency numbers are just guesses so far, but it's a nice way to play around with potential designs.

    The waveforms look like this:

    The capacitor voltage (cyan) starts at 2.7V and drops to 0.35V in 272 seconds.  During that time, the capacitor current (yellow) goes from 10.7mA to 81mA, while the LED power (magenta) stays constant at 26mW.  So, the LED is on with a constant brightness for four and a half minutes.  That's not bad.

    One thing that is not modeled is the converter efficiency change with input voltage.  That depends very heavily on the converter itself, and I don't have a good model for that (yet?).

    It's interesting to compare this with powering the circuit from a battery.  With a battery, the internal resistance increases as the voltage drops, so the large currents required near the end wouldn't be possible.  With the capacitor, the ESR remains constant, so it should be able to deliver this constant power down to 0.35V, when the boost converter stops.

    LED Selection

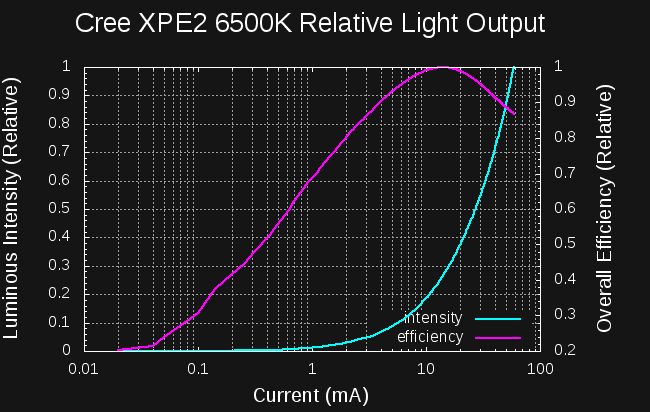
    I've chosen a white LED for the update to this project (when I made the original in 2001, I had never seen a white LED).  I'll be using a Cree XPE-2 6500K led.  I had a chance to test one of these LEDs on #Automated LED/Laser Diode Analysis and Modeling this morning, and here's what I found:

    This LED is most efficient at around 15 mA, but you can achieve 90%+ of that between 4.5 and 40mA. I initially guessed I'd use 10mA.  The analyzer measured a forward voltage of 2.63V at 10mA, which is where I got the 26mW power for the LTspice simulation above.

    I'll have to play with this LED a little to see if this results in a good brightness.

    I'm also thinking of a very efficient bright flashlight with an array of these LEDs driven near the efficiency peak.  It will be very expensive due to the numerous LEDs required, but also run for a very long time compared to normal LED flashlights.

View all 3 project logs

Enjoy this project?

Share

Discussions

Morning.Star wrote 06/04/2018 at 17:00 point

Heh, sweet gearbox too. Well spotted, love it dude. :-D

  Are you sure? yes | no

fabian wrote 06/02/2018 at 13:17 point

where wideo?

  Are you sure? yes | no

Ted Yapo wrote 06/02/2018 at 13:50 point

wideo?  A wideo of me turning a crank?  Hardly worth the effort.

  Are you sure? yes | no

saphid wrote 05/31/2018 at 02:24 point

Depending on how small you wanted to keep this, if you made a big bigger housing you could maybe make it gravity powered by hanging it from something, or just pull powered instead of turn powered.

  Are you sure? yes | no

Ted Yapo wrote 05/31/2018 at 13:28 point

Yes, that's an interesting way to go.  I've also thought about making a hinged arm to connect my boat to my dock with these as geared generators at the hinges.  The boat is constantly moving, and I wonder how much power could be collected.

  Are you sure? yes | no

AVR wrote 05/30/2018 at 19:46 point

very cool, really appreciate your style of creativity Ted!!! This might be a good project for younger hackers/kids too. 

  Are you sure? yes | no

Ted Yapo wrote 05/30/2018 at 22:41 point

Thanks!  Yeah, I bet kids these days have servos around, too.

  Are you sure? yes | no

Vishnu Mohanan wrote 01/21/2018 at 15:28 point

Nice and obvious idea of using servo as the generator.

  Are you sure? yes | no

Ted Yapo wrote 01/21/2018 at 20:42 point

It works pretty well.  It's a pre-made gear train and motor in a small case, with standard connector for a crank :)

  Are you sure? yes | no

Similar Projects

Does this project spark your interest?

Become a member to follow this project and never miss any updates