I tried to set up Code::Blocks to use libopencm3, which was not that hard, after all. It's just a lot of work, but it can be stored as a template! This post might appear to be very long, but about 90% of it are screenshots, and cut 'n paste code.
Sources of information
- Compiler and library readme. I'm using GCC ARM Embedded 4.9-2015-q2-update
- Code::Blocks forum and wiki (for setting up the compiler)
- libopencm3 wiki and examples
First of all I downloaded and compiled libopencm3 according to their instructions, with a custom destination directory. This left me with a set of chip libraries (opencm3_stm32f0 and many more for other chips) to be included in my project. I also have the compiler configured already. So here are a few screenshots of my C::B setup.
Create an empty project (File->New->Project):
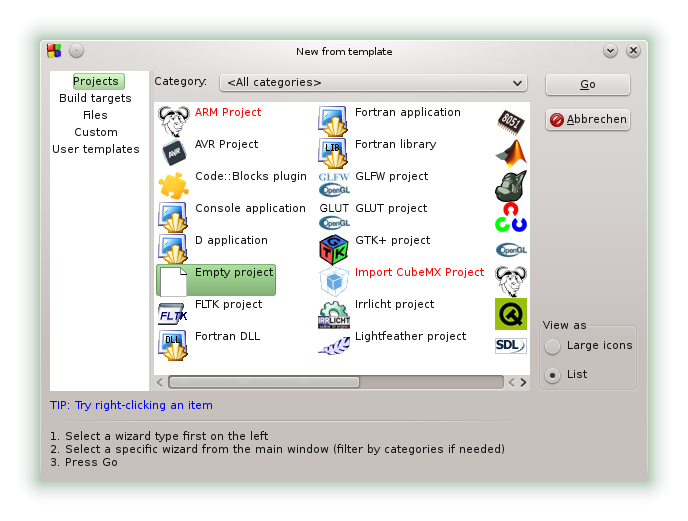
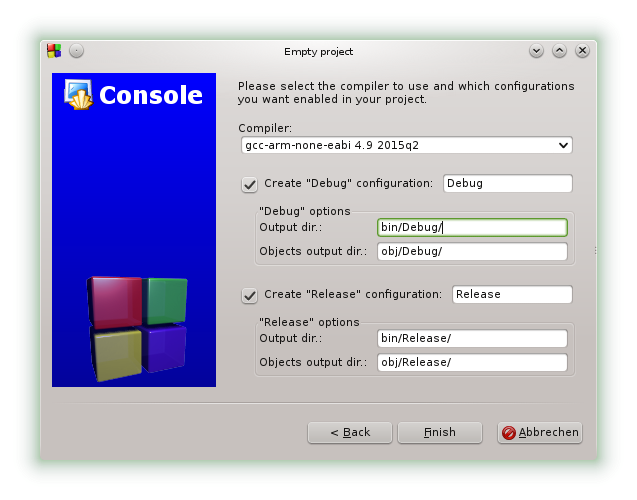
Hit go and enter your project's title and filename. Select your arm-none-eabi-gcc when asked for a compiler, and hit finish (this automatically creates debug and release configurations):
Code
Create a main.cpp (File->New->Empty File or CTRL-Shift-N) and add it to the project. Mine looks like this (based on code taken from one of the STM32F0 examples from https://github.com/libopencm3/libopencm3-examples/blob/master/examples/stm32/f0/stm32f0-discovery/systick_blink/systick_blink.c):
#include <libopencm3/stm32/rcc.h>
#include <libopencm3/stm32/gpio.h>
#include <libopencm3/cm3/nvic.h>
#include <libopencm3/cm3/systick.h>

/* PB1 is connected to the onboard LED on the STM32F030F4P6 breakout board. */
#define PORT_LED_ONBOARD GPIOB
#define PIN_LED_ONBOARD GPIO1

/* Called when systick fires */
void sys_tick_handler(void)
{
	gpio_toggle(PORT_LED_ONBOARD, PIN_LED_ONBOARD);
}

/* Set up timer to fire freq times per second */
static void systick_setup(int freq)
{
	systick_set_clocksource(STK_CSR_CLKSOURCE_AHB);
	/* clear counter so it starts right away */
	STK_CVR = 0;

	systick_set_reload(rcc_ahb_frequency / freq);
	systick_counter_enable();
	systick_interrupt_enable();
}

/* set STM32 to clock by 48MHz from HSI oscillator */
static void clock_setup(void)
{
	rcc_clock_setup_in_hsi_out_48mhz();

	/* Enable clocks to the GPIO subsystems */
	rcc_periph_clock_enable(RCC_GPIOB);
}

static void gpio_setup(void)
{
	gpio_mode_setup(PORT_LED_ONBOARD, GPIO_MODE_OUTPUT, GPIO_PUPD_NONE, PIN_LED_ONBOARD);
}

int main(void)
{
	clock_setup();
	gpio_setup();

	/* setup systick to generate 2 LED flashes per second */
	systick_setup(4);

	/* Do nothing in main loop */
	while (1);
}
Compiler and Linker flags
Now comes the trickier part: Set up flags for the compiler and the linker. Go to Project->Build options and select the top-level entry, which has options for all sub-targets (debug and release):
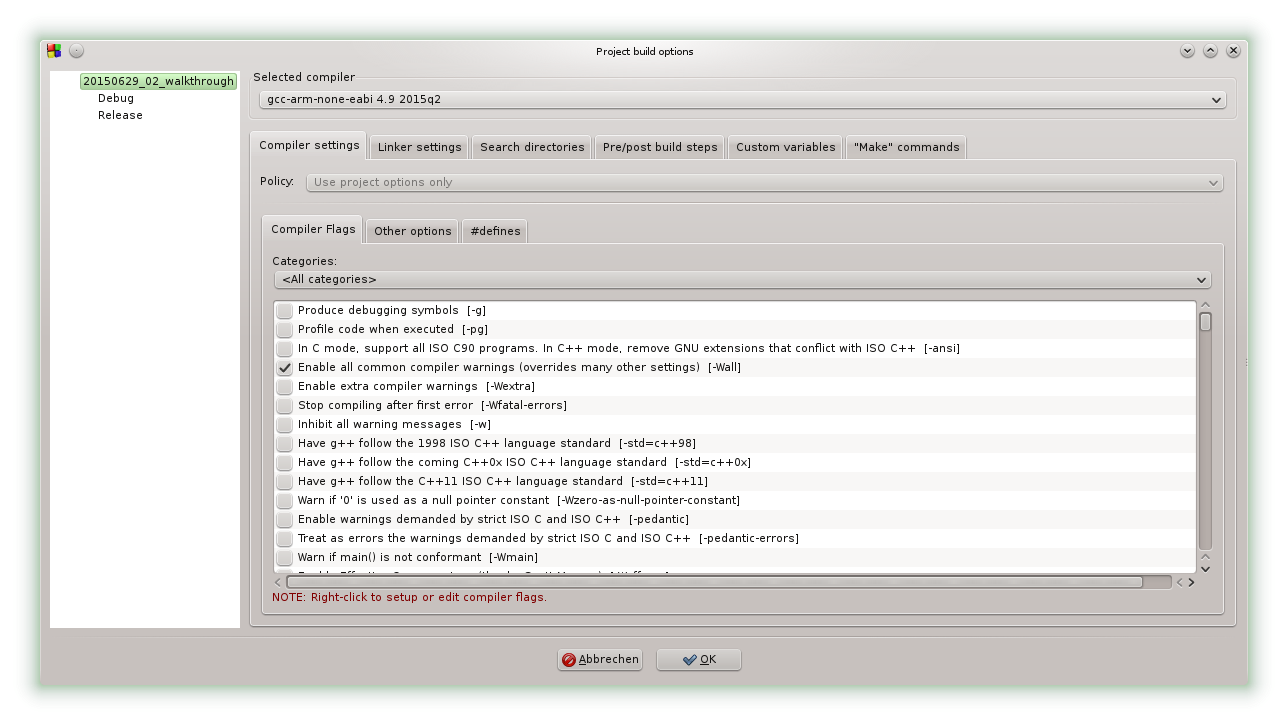
My compiler flags in the "Compiler Settings" tab, combined from the tabs "Compiler Flags" and "Other options", are:
-Wall
-pedantic
-mlittle-endian
-msoft-float
-mthumb
-mcpu=cortex-m0
-ffunction-sections
-fdata-sections
-fno-exceptions
and one define in the "#defines" tab:
STM32F0Now for the linker ("Linker settings" tab):
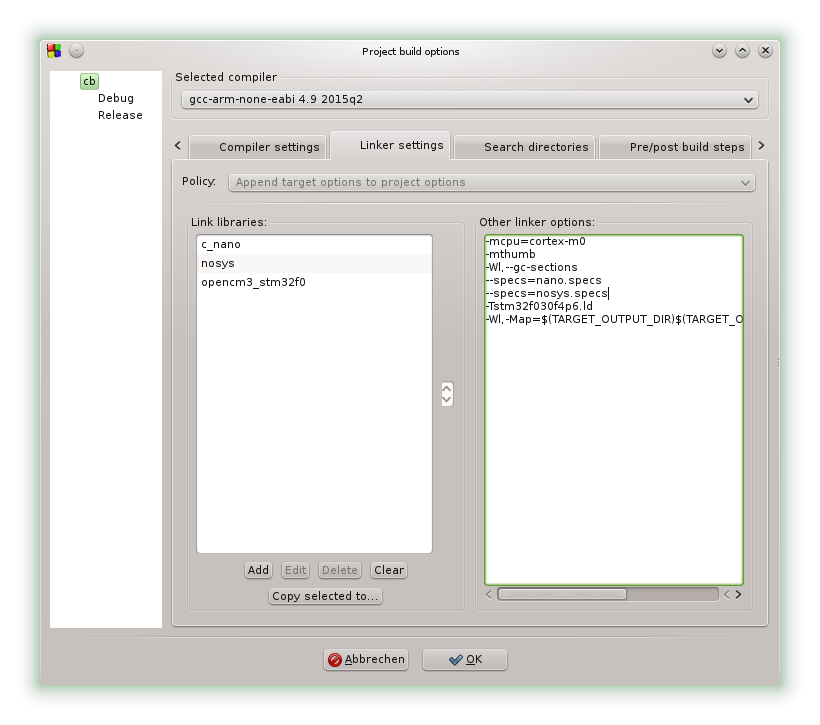
That is in the "Link libraries" list:
c_nano
nosys
opencm3_stm32f0
and in the "Other linker options":
-mcpu=cortex-m0
-mthumb
-Wl,--gc-sections
--specs=nano.specs
--specs=nosys.specs
-Tstm32f030f4p6.ld
-Wl,-Map=$(TARGET_OUTPUT_DIR)$(TARGET_OUTPUT_BASENAME).map,--cref
Search Directories for the compiler:
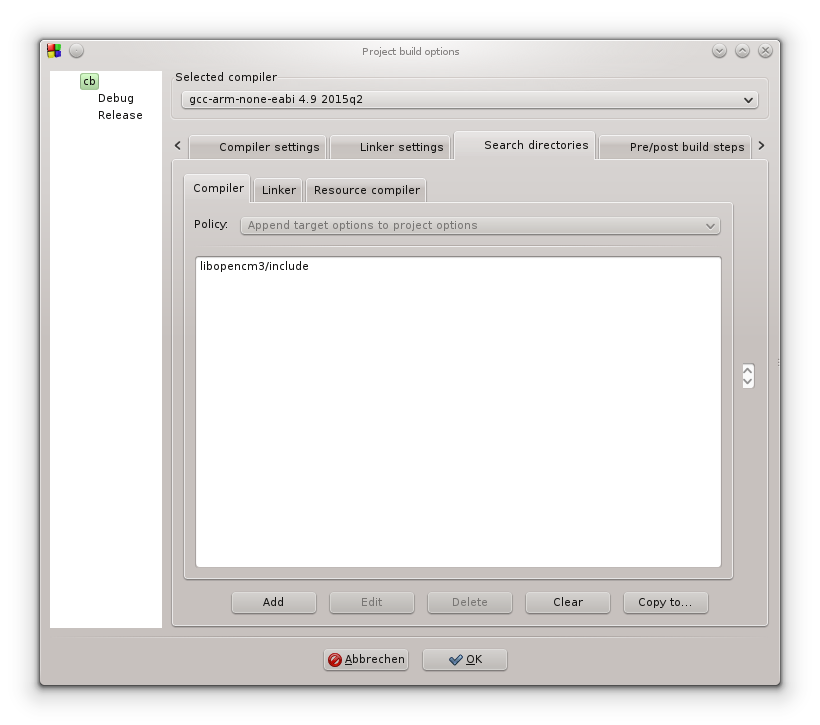
For the linker:
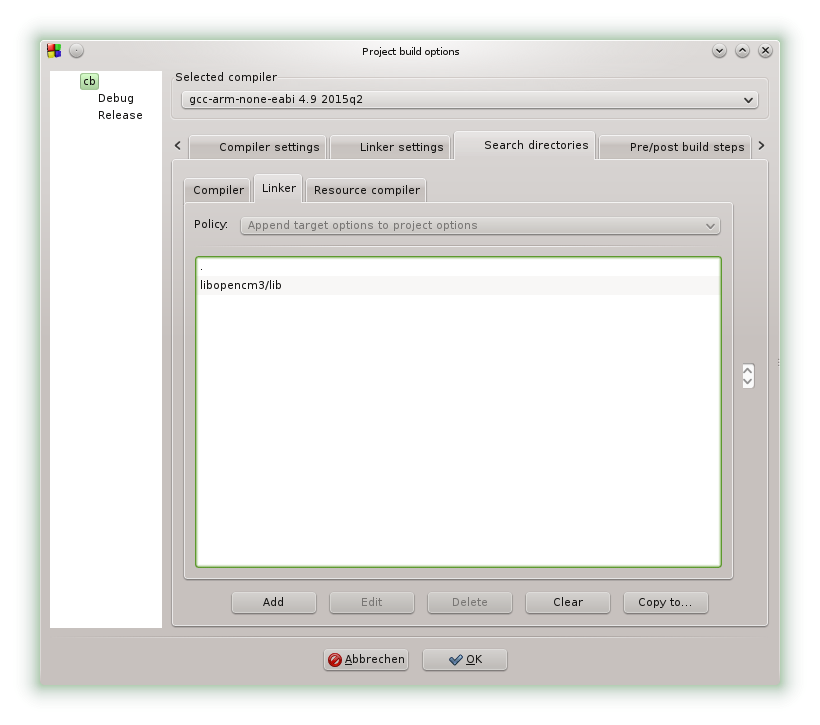
We're almost there, just some fine-tuning after the build is finished:
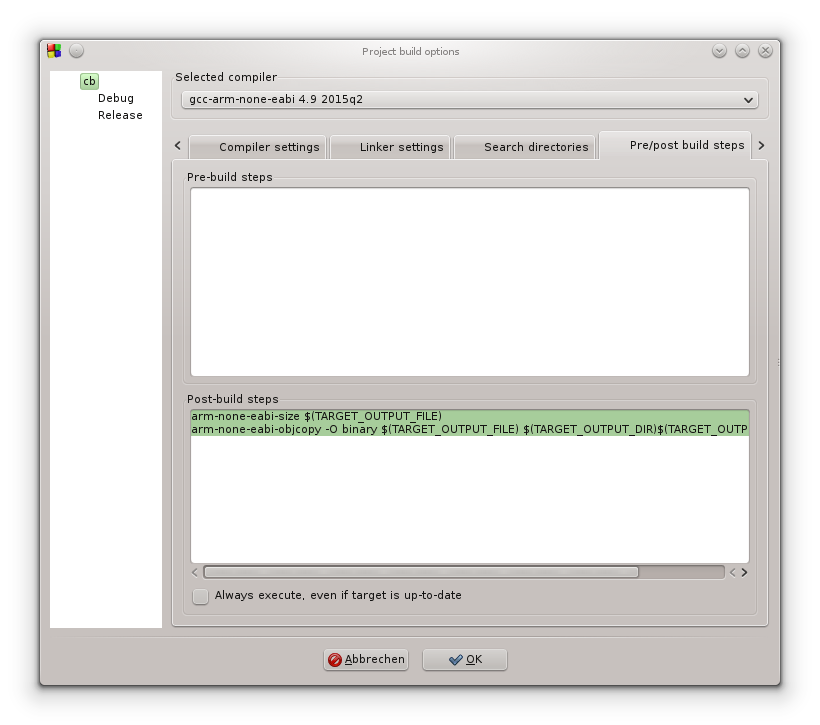
arm-none-eabi-size $(TARGET_OUTPUT_FILE)
arm-none-eabi-objcopy -O binary $(TARGET_OUTPUT_FILE) $(TARGET_OUTPUT_DIR)$(TARGET_OUTPUT_BASENAME).bin
Now you can also add extra flags for debug and release builds (generate debugging symbols, or strip symbols and optimize, whatever you need).
Linker script
This was a bit harder, because libopencm3 has some kind of automatic linker script generation magic built in. I couldn't use that from within Code::Blocks, so I cobbled together my own from their template and chip data file. Note that I did this without any notable experience with linker scripts, I just try and see what happens.
This one worked indeed, because blinky.
stm32f030f4p6.ld in the project root directory:
MEMORY
{
	rom (rx) : ORIGIN = 0x08000000, LENGTH = 16K
	ram (rwx) : ORIGIN = 0x20000000, LENGTH = 4K
}

/* Enforce emmition of the vector table. */
EXTERN (vector_table)

/* Define the entry point of the output file. */
ENTRY(reset_handler)

/* Define sections. */
SECTIONS
{
	.text : {
		*(.vectors)	/* Vector table */
		*(.text*)	/* Program code */
		. = ALIGN(4);
		*(.rodata*)	/* Read-only data */
		. = ALIGN(4);
	} >rom

	/* C++ Static constructors/destructors, also used for __attribute__
	 * ((constructor)) and the likes */
	.preinit_array : {
		. = ALIGN(4);
		__preinit_array_start = .;
		KEEP (*(.preinit_array))
		__preinit_array_end = .;
	} >rom
	.init_array : {
		. = ALIGN(4);
		__init_array_start = .;
		KEEP (*(SORT(.init_array.*)))
		KEEP (*(.init_array))
		__init_array_end = .;
	} >rom
	.fini_array : {
		. = ALIGN(4);
		__fini_array_start = .;
		KEEP (*(.fini_array))
		KEEP (*(SORT(.fini_array.*)))
		__fini_array_end = .;
	} >rom

	/*
	 * Another section used by C++ stuff, appears when using newlib with
	 * 64bit (long long) printf support
	 */
	.ARM.extab : {
		*(.ARM.extab*)
	} >rom
	.ARM.exidx : {
		__exidx_start = .;
		*(.ARM.exidx*)
		__exidx_end = .;
	} >rom

	. = ALIGN(4);
	_etext = .;

	.data : {
		_data = .;
		*(.data*)	/* Read-write initialized data */
		. = ALIGN(4);
		_edata = .;
	} >ram AT >rom
	_data_loadaddr = LOADADDR(.data);

	.bss : {
		*(.bss*)	/* Read-write zero initialized data */
		*(COMMON)
		. = ALIGN(4);
		_ebss = .;
	} >ram

	/*
	 * The .eh_frame section appears to be used for C++ exception handling.
	 * You may need to fix this if you're using C++.
	 */
	/** DISCARD/ : { *(.eh_frame) } */

	. = ALIGN(4);
	end = .;
}

PROVIDE(_stack = ORIGIN(ram) + LENGTH(ram));
Note that the .eh_frame section is not discarded (it is by default).Hit build (or CTRL+F9) and you should be rewarded with binaries in the target/bin directory. You can now program your target board with the programmer of your choice. It's also possible to include the programming in the post-build steps or to configure it as a tool to be accessed in the C::B tools menu.
I hope this helps some people!
 Christoph
Discussions
Become a Hackaday.io Member
Create an account to leave a comment. Already have an account? Log In.
How to build libopencm3 lib? Help me, please?
Are you sure? yes | no