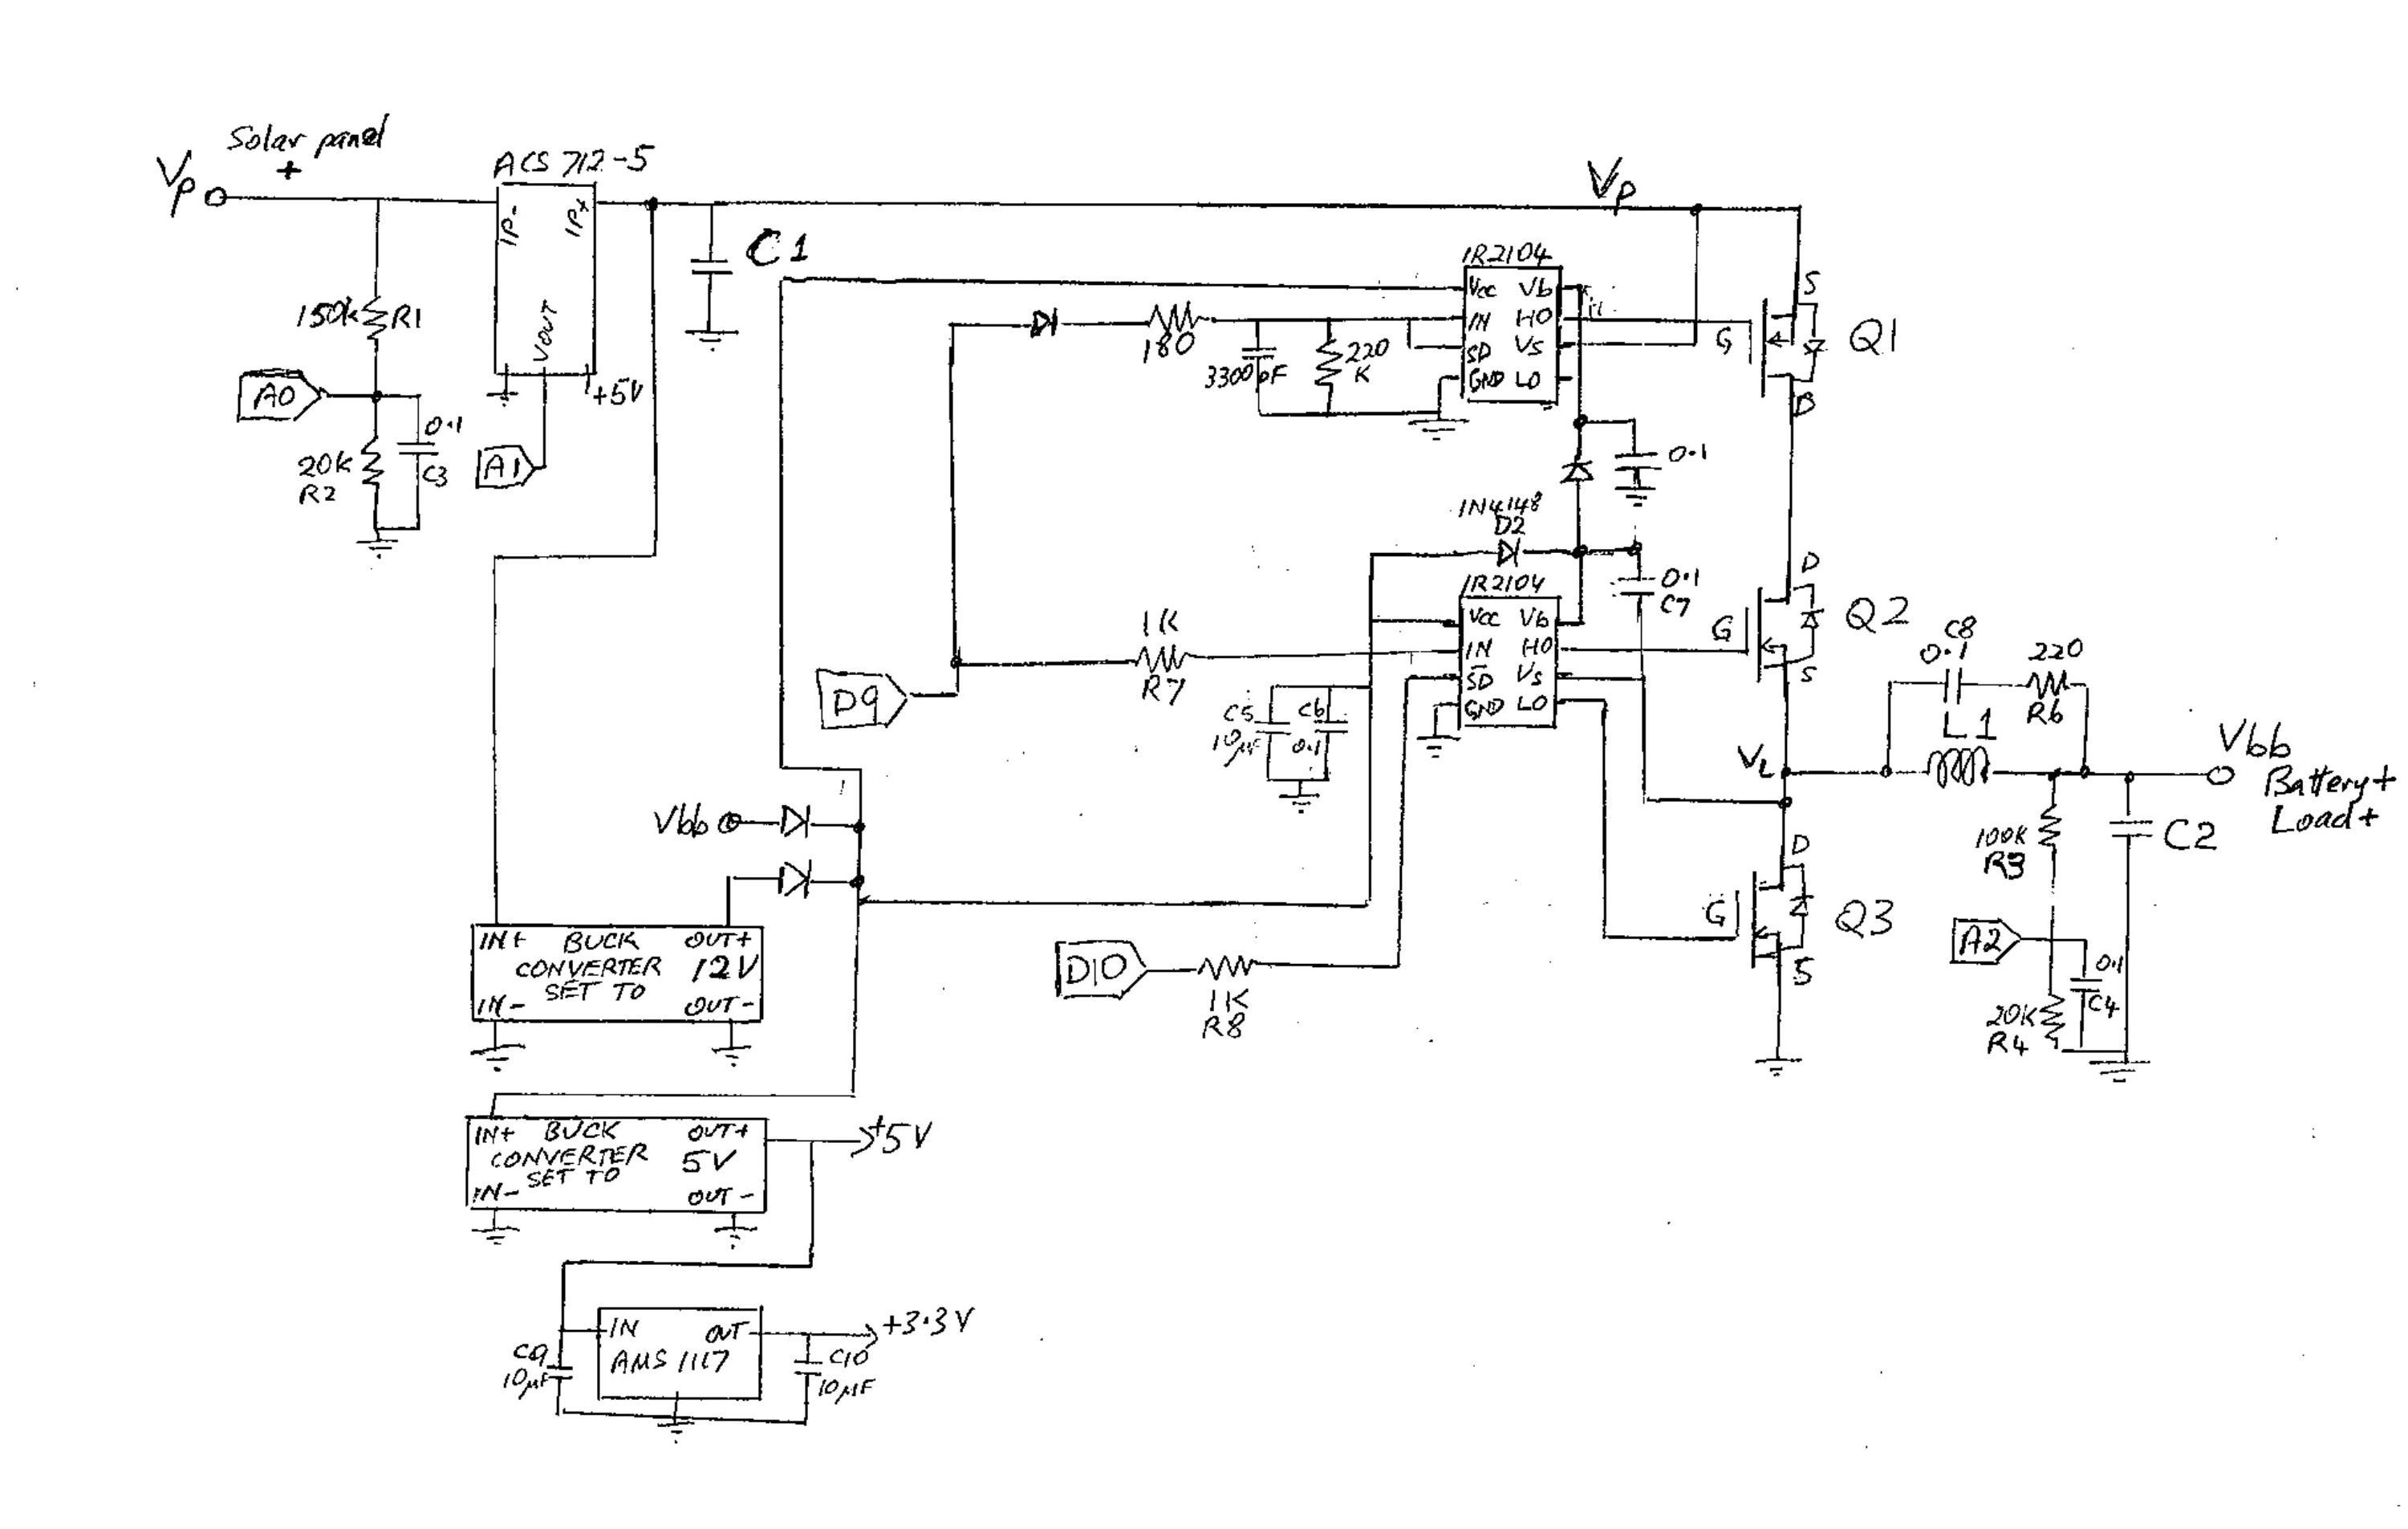
After lot testing we observed that MOSFET ( Q3 ) in ver-3.0 design is burning repeatedly.We tried to modify the existing software but not find any satisfactory result.
The other problem was that MOSFET Q1 ( in V-3.0) conduct even when there is no solar input.
To solve the above problems and enhance the power handling capability we are modifying both the hardware and software.This is named as Version-3.1 Charge Controller.This version have 3 options.
1. 5 Amp version :
T94-26 toroid, 48 turns of AWG20 wire to give 135 uH (it takes almost 1.5m of wire)
Q1, Q2 and Q3 all pairs of IRFZ44N MOSFETs (6 in all).
C1 will be 3 * 220 uF low ESR capacitors in parallel,
C2 will be a single 220 uF low ESR capacitor
Single ACS712 on the panel side as per version 3.0
2. 8 Amp version :
T106-26 toroid wound with 23 turns of a compound wire made from 3 strands of AWG20 wire twisted together to give 47 uH (this takes about 3.1 m of wire).
Q2 will be a pair of FDP150N10A MOSFETs in parallel.
C1 will be 5 * 220 uF low ESR capacitors in parallel,
C2 will be a single 220 uF low ESR capacitor
Two ACS712, one on the panel side as per version 3.0 and one in series with the battery.
3 10 Amp version :
T130-26 toroid wound with 23 turns of a compound wire made from 4 strands of AWG18 wire twisted together to give 41 uH (this takes about 4.5 m of wire).
Q2 will be a pair of FDP150N10A MOSFETs in parallel.
C1 will be 6 * 220 uF low ESR capacitors in parallel,
C2 will be 2 * 220 uF low ESR capacitors in parallel.
Three ACS712, one on the panel side as per version 3.0, one in series with the battery and one in series with the load.
Here is a rough sketch for V-3.1

You can download the complete schematic from here
We are working on new PCB for V-3.1 Here is the sample of one

The drive circuitry (common to all 3 versions) will use 3 separate IR2104 driver chips, one for each of Q1, Q2 and Q3. We drive the Q1 and Q2 drivers from pin D9 and HO1 and HO2, and drive Q3 from pin D10 and LO3.
In driver chips 1 and 2, pins IN and SD are driven in parallel by Arduino output pin D9. In the case of driver 1 (for Q1) there is a low pass RC filter in series, with a time constant of about 1 ms. Driver 2 is driven directly (as in the current circuit, but probably with a slightly higher series resistor to allow more current for the Q1 driver and its RC filter).
In driver chip 3, IN is driven by D9 and SD is driven by D10.
The purpose of using separate drivers for Q2 and Q3 is to enable us to switch Q3 OFF to operate in Asynchronous mode at low current levels when the controller will be in DCM (Discontinuous Current Mode). There may be a better way to do this but in the short time we have available this is a simple option and easy and reliable to implement.
All 3 versions should have LCD displays, WiFi, LED indicators (maybe with a more fancy coding scheme to separately indicate DCM and CCM).
All 3 versions should be able to cope with either 18 V or 30 V panels, and use algorithms that stop them burning out if the panel can produce more current than the rating allows. This can all be done auto-detect.
All the components exposed to panel voltage need to be rated for at least 40 V (in particular C1 and our buck converter to generate 12V for the drivers and to power the control electronics.
 Open Green Energy
Discussions
Become a Hackaday.io Member
Create an account to leave a comment. Already have an account? Log In.
file PCB share.good job
Are you sure? yes | no
plz reply as soon as possible
Are you sure? yes | no
updated code of v3.1
Are you sure? yes | no
Hi Team,
This 3.1 version board is stable and get rid of issues ?? or any more issues we have to solve ?
Are you sure? yes | no
This circuit is still being worked on. I am hoping we can go back to 2 driver ICs and avoid asynchronous mode.
At least one of the problems is with the driver IC for Q1, where under some conditions Vs can be higher than Vb. The IR2104 data sheet says Vs should be a maximum of 0.3 volts higher than Vb, which this circuit does not achieve. I think a diode from Vs to Vb will solve that problem.
There may be more.
Are you sure? yes | no
Not sure what "Asynchronous mode" means. I am assuming that it means that you are not using synchronous rectifier for low power. If that's the case, might be worth while to at least put in a foot print for a large enough schottky diode. Body diode in MOSFET aren't usually as good.
Are you sure? yes | no
the 8 and 10 amp models, Q1, Q3 and Q4 will each be a single PSMN3R3-80PS MOSFET (3 in all).
Are you sure? yes | no