 Matt
Matt-
Firmware Update #3
07/16/2015 at 13:05 • 0 commentsI've spent this evening messing around with the firmware, it is getting really close to something that I can take away from my PC and give a good test. There were a few things outstanding on my last update, I've done most of them, and more.
- Wi-Fi/Net
- You can now set the access point you want to connect to from the web interface.
- Unfortunately you need to manually type in your SSID at this point. I do plan on implementing a site survey option to let you choose from a list, but NodeMCU is fighting me the whole way.
- You can now choose a static IP address that will keep its state on restart. You can flip it back and forth between DHCP and Static if you really want.
- On IP change/Wifi change, the web interface tries to point you in the right direction. It wont always be right, for example, if you have chosen to join a new network and use DHCP, it has no way of knowing where you've put the unit.
- Dim enable/disable is now implemented on the web interface properly. If your light isn't dimmable, flip the checkbox and it will remove the dimming slider.
- Moved the JS into index.html. I don't like this, but it is more reliable at this point in time. I was occasionally getting reboots when it tried to load too many files at once.
I've also tidied up the repo a little bit. You can see what files need to be uploaded to your ESP8266 now. Scripts in the 'Debug Files' directories aren't needed on the unit itself, but they may be helpful!
I've updated to the latest dev build of NodeMCU and it seems to break the web server I am using when in SOFTAP mode, so that is a bit of a pain in the backside.
Edit: Well that was easier than I thought, it was breaking when trying to get the current IP address. I've committed a fix to repair it.
- Wi-Fi/Net
-
Firmware Update
07/15/2015 at 11:42 • 0 commentsHey everyone! It is time for another firmware update for you all.
I've been pushing hard to get the firmware fully functional. I am quickly running out of time if I want to get my project into the best product category. I've gotten more of the features I was talking about in my previous project log sorted.
Here is a list of newly added features:
- Variables have been set up to allow ESPLux to know its state after reboot.
- ESPLux now remembers your previous light value for when you restart the box, if you so choose to turn on that feature.
- You can set a light name under settings to make sure you know what light you are playing with!
- The little button on the ESPLux itself can now be pressed on restart to reset wifi settings back to defaults. When you do this, the indicator lights will pop on to let you know that its operation has completed
- I have the back end of setting up Wifi sorted. There is a script all ready that you can run to configure it
- I have the back end of configuring an IP sorted. Turns out this isn't saved on restart which is a pain, so need to fix that
Things that are still outstanding are:
- Wifi needs to be configurable from the web interface.
- Site Survey needs to work
- Hitting save wireless needs to actually do something
- Static IP stuff at the moment is a mess, this needs to be implemented. I want to be able to set wifi up and set a static IP at the same time, but I need to make sure the UI is clear enough in this operation
- Dim function needs to work on webpage refresh, and needs to be clearer about the light not being dimmable.
One again, feel free to check out my github if you want to check it out. When it is all finished (or close enough to) I will do up a video on its functionality. From here, feel free to fork my github repo if you have a similar project. I have yet to see a firmware with the same feature set as what I have here. It might be worth waiting a little while until I have gotten it a bit closer to completion. The wifi setup stuff will be pretty neat.
Thanks again for following my project all! Hopefully I will have a new update soon enough.
-
Trello
07/11/2015 at 15:02 • 0 commentsand yet another short update. I've been meaning to post this for a while now.
Here is a link to my Trello board: https://trello.com/b/df53ueGl/esplux
This is where I keep track of where I am up to in the project. We use it at work all the time, and it is quite effective. I'm obviously not using it to its fullest potential, but it helps me keep focused when I'm working on the ESPLux. The link is also on the sidebar for the future to save you searching through all my old logs.
It's a shameless plug for Trello I know, but it's a fantastic tool. The free version works perfectly for everything I need.
-
Case Design
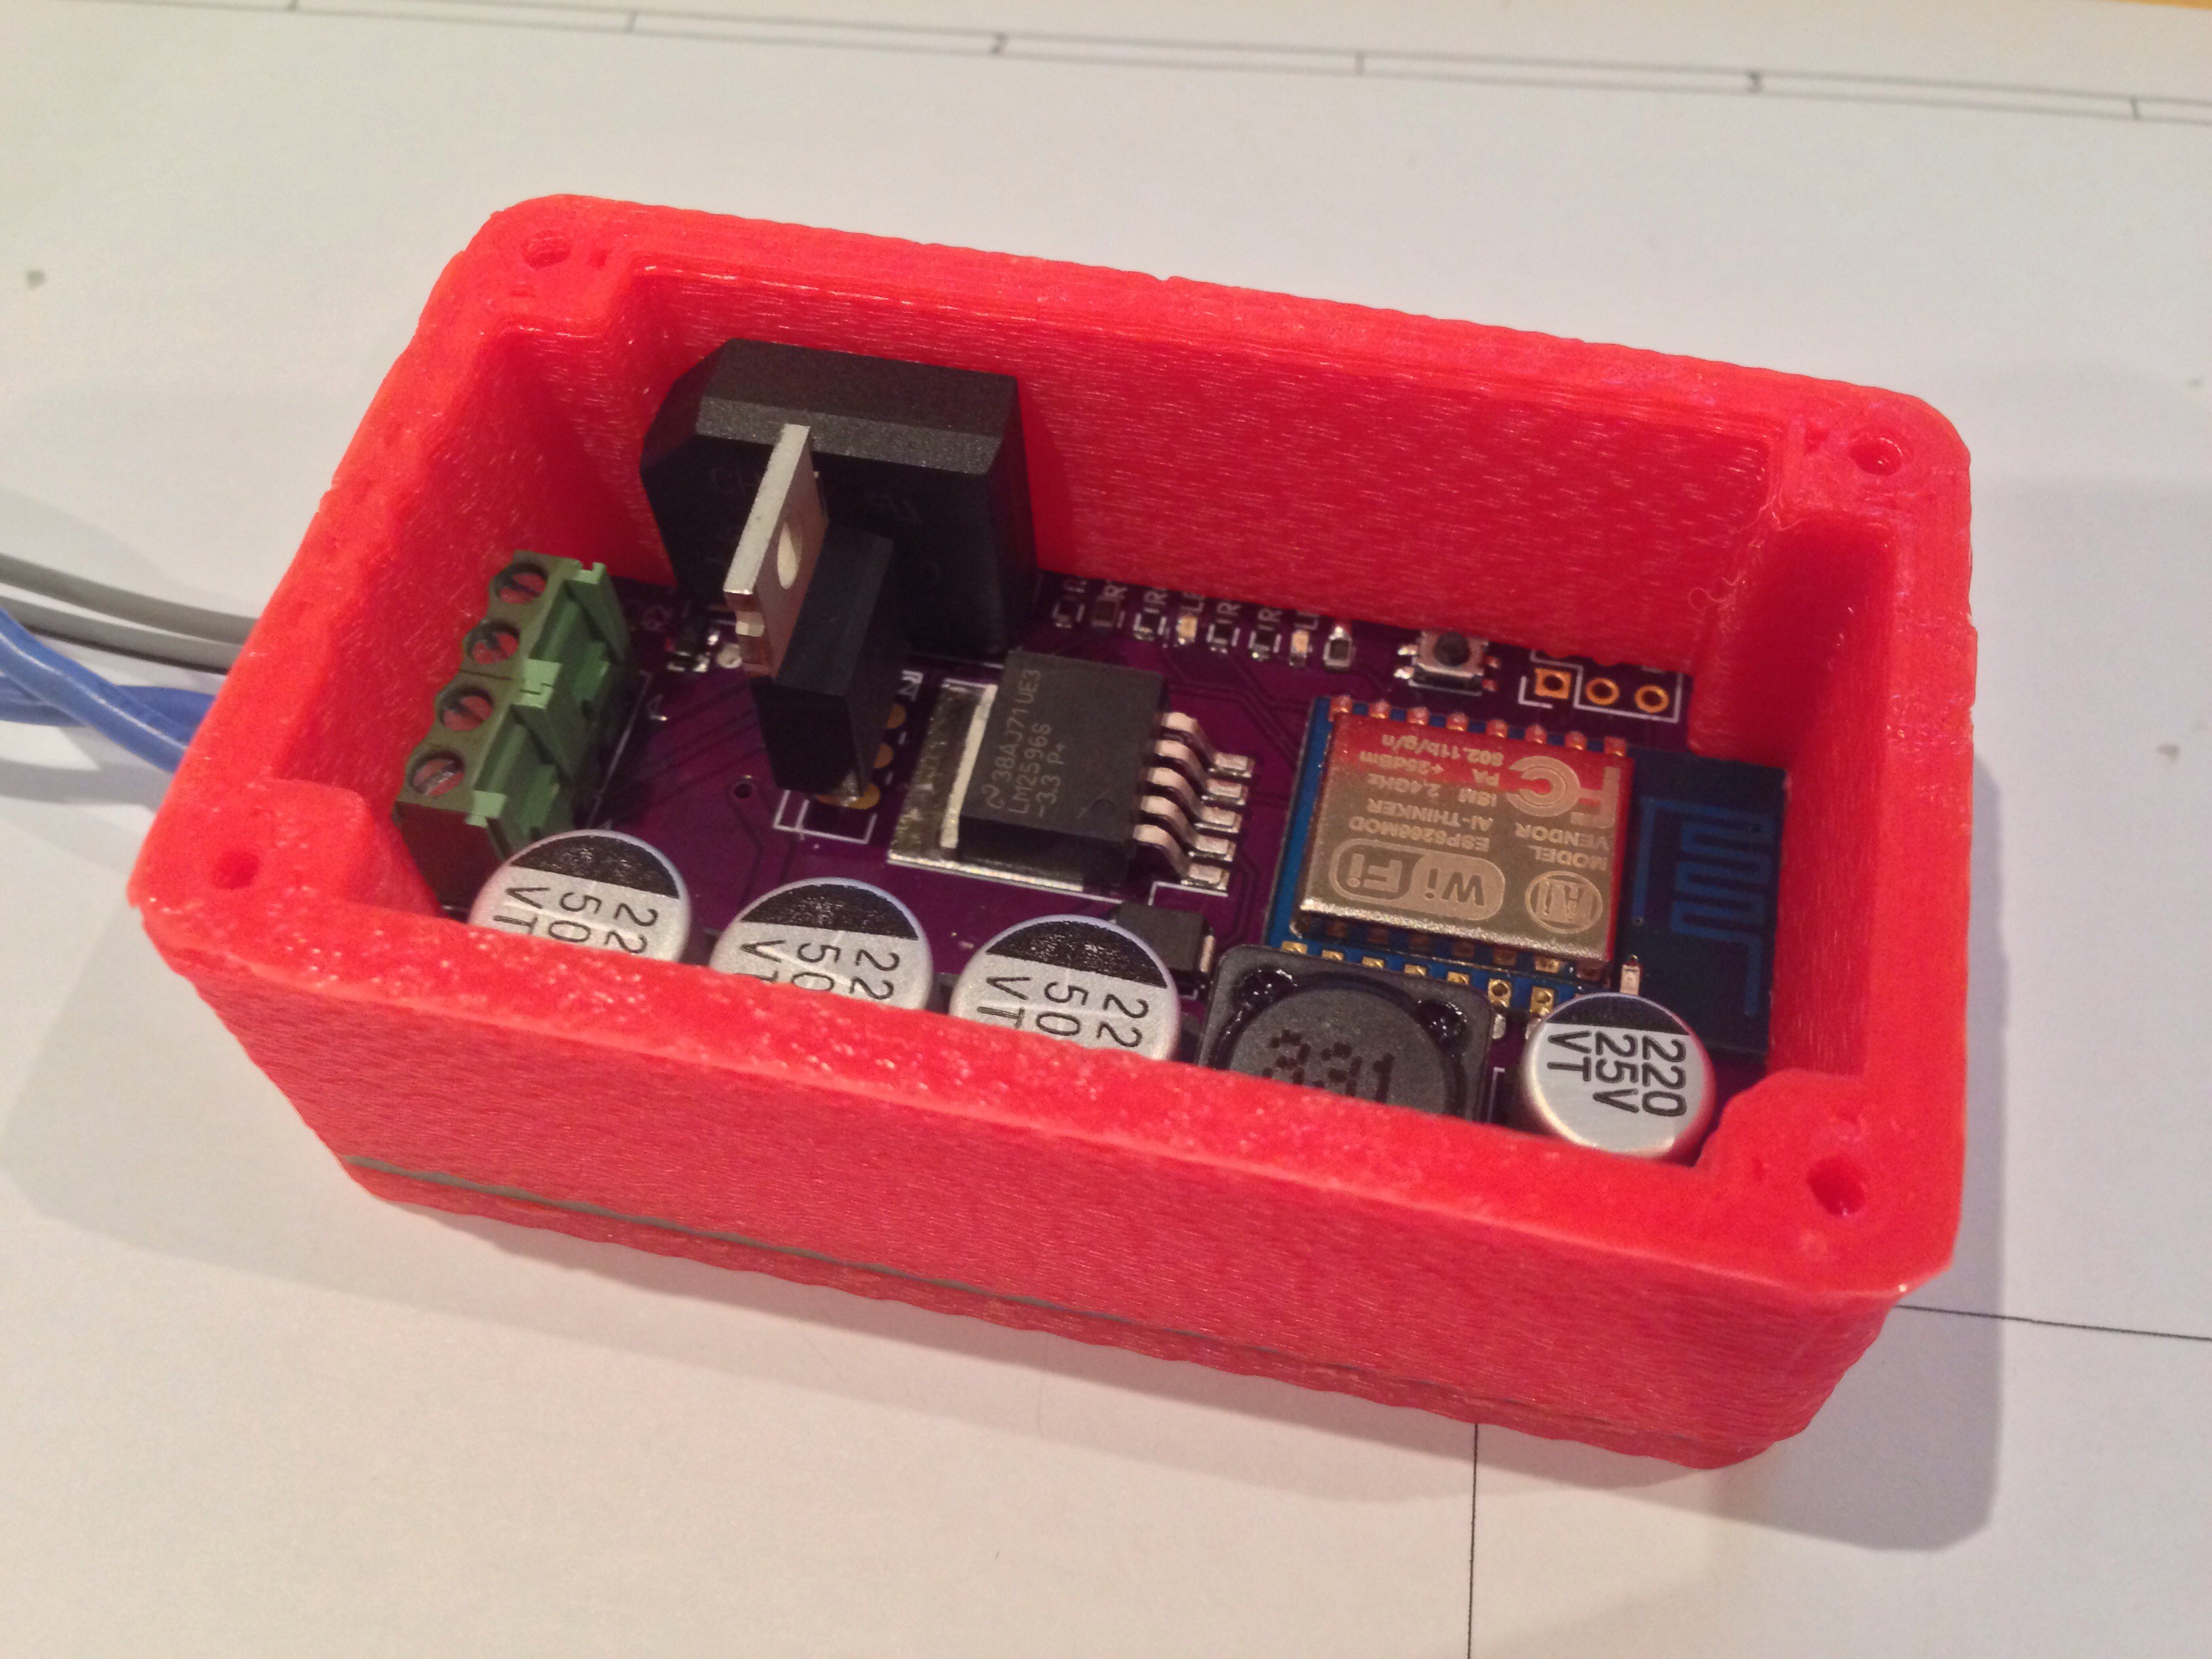
07/11/2015 at 14:13 • 0 commentsI've got another short update for you, I printed the first pass of the case today. My ultimate goal is not to have the case printed, rather a laser cut stack up like you can see in my GitHub repo. Unfortunately my laser cutter has packed it in and I can't get it going again quick enough for my project. I guess that's the price you pay for eBay rubbish. Here is the concept anyway:
![]()
My plan is to have a stack of black acrylic for the outside, and a clear top for it. In theory, you should be able to use my design files for my case design for your own project if you are using the dangerous prototypes DP7043 board size. Anyway, I hope you like it
-
Firmware
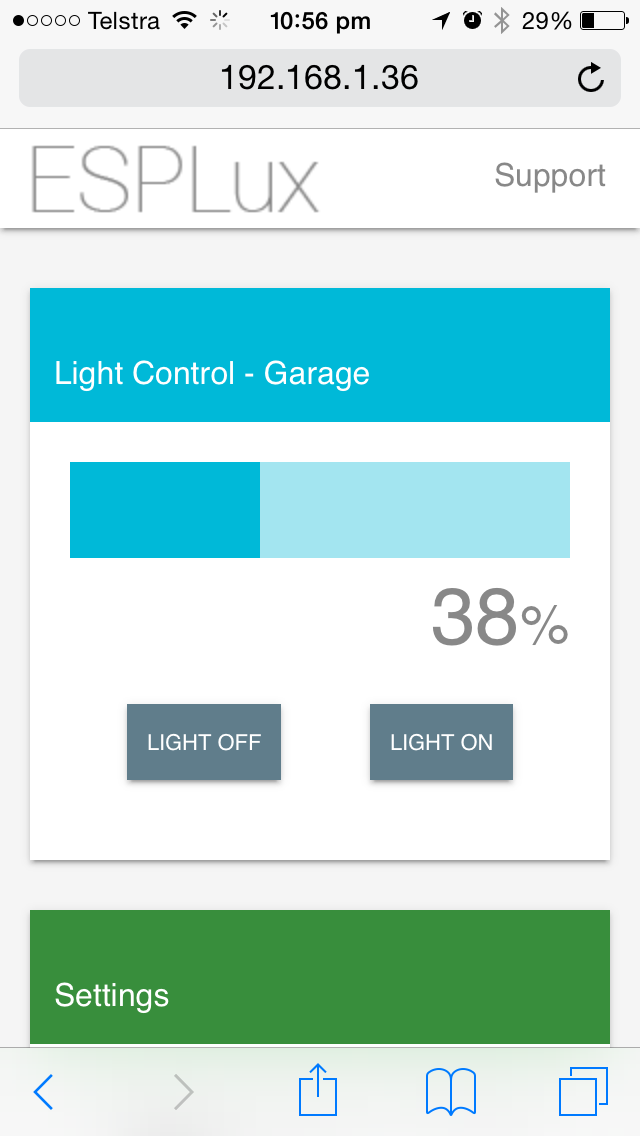
07/10/2015 at 13:17 • 0 commentsAs promised (better late than never I guess) I have been working on the firmware on my ESPLux. I've been interested in Google's Material Design project. I quite like the aesthetic of it, and so I thought that I would stand on the shoulders of giants and use their style guide. The backend code is plain old Javascript. I started off using jquery, but it was just far too bloated for my needs. First up, a couple of screen grabs!
![]()
This is on my iPhone, with the webpage running directly on the ESP8266.
![]()
This is a screen grab of the entire page, so you can see all the functionality I anticipate adding in the first instance.
Not everything you see at the moment is functional. I figured it would be best to start from the top and work my way down! I've gotten the first two bullet points working, the rest are a work in progress.
- The top bar under 'Light Control' lets you click/tap to set the brightness of the lamp. The two buttons underneath them simply set this to either 0 or 100%. This all is working as intended.
- Indicator lights: This lets you flip the indicator lights on and off. To start with, I figured just leaving the light on full instead of the flashing I had in my video I posted recently. This will reset back to off if you power cycle your ESPLux.
- Set light to previous value when switch is flipped: There are two options I plan on starting out with. First is the light will always turn on to full brightness on power up. Second is remembering your previous setting. The first option is great if you have a light switch you want to be able to use as well, the second is a better option if there is no light switch available. I have yet to implement this, or anything else below for that matter!
- Light Name: I figured having multiple units floating around could leave you in a bit of confusion as to which unit you were working on. A name probably is a helpful thing, so here it is!
- WiFi: I really want to be able to set wireless up from the webpage rather than having to mess around with serial connections and everything. As a product, it would be a requirement.
So yeah, that's where I am at. I plan on posting a quick video of the functionality that I have at the moment soon. The files are up on github, but oh boy, its an absolute mess. I really need to tidy everything up. My laptop decided to bsod on me and it dropped my VS settings file. That is a task for another day.
-
Thanks HAD!
07/09/2015 at 04:41 • 0 commentsYet another thank you to HAD for selecting my project to win a Cordwood Puzzle! I am looking forward to getting my hands on it and testing my reverse engineering skills out!
-
Scope Results
07/01/2015 at 02:45 • 6 commentsHowdy all,
I've put my DS1054z over the ESPLux. Here are a couple of screen grabs from it. I think out of all this, I really need more smoothing for the output. Please let me know what you think, I could really do with some input on this one from someone who knows more about what I am looking at than me! I'll put a read more tag in here so that you don't get spammed unless you want to be.
Main Output
First up is the output voltages for the light itself.
8w LED Data
![8w LED, full brightness]()
LED turned on full brightness. You can see I get about 5v ripple current. Ouch.
![]()
LED turned on 50% brightness. I don't know why it keeps going below 0v. Help?
![]()
Here is 50% brightness at 500us divisions.
35w Incandescent
I didn't expect this to turn out too well, and sure enough, the rectifier and mosfet get pretty warm when I'm running in this configuration.
![]()
Full brightness. More than 10v ripple. Ouch.
![]()
Here is 50% brightness. Again, whats up with it dropping below 0v?!
3.3v Rail data
Here is some information on the 3.3v rail. This is probably a more important statistic to have a look at. I'm thinking that I should put a bigger cap on the output of the regulator. Please let me know if there is a better way!
![]() 3.3v rail with no load
3.3v rail with no load![]() 3.3v rail, 8w LED load, full brightness
3.3v rail, 8w LED load, full brightness![]() 3.3v rail, 8w LED load, 50% brightness
3.3v rail, 8w LED load, 50% brightness![]() 3.3v rail, 35w incandescent load, full brightness
3.3v rail, 35w incandescent load, full brightness![]()
3.3v rail, 35w incandescent load, 50% brightness
So yeah, I think overall the 3.3v rail looks alright, although with a relatively high load I do get about a 500mV ripple. This probably would be fixed if I threw a bigger cap in on the output stage of the regulator.
Anyway, please provide feedback! I appreciate you all checking out my project.
-
Video!
06/29/2015 at 14:13 • 0 commentsSo in the end I stayed up and finished editing the video anyway. I'm sorry about the poor quality of the video, getting a close up of the board proved more troublesome than I initially thought! I thought this would be a good point to make my 2 minute video for the quarter finals.
Up next I have to build a case for it and tidy up the firmware. Onwards and upwards!
-
Working on a video
06/29/2015 at 12:51 • 0 commentsHey guys,
Just a quick note to say I am working on a short video that goes through the first working prototype board of the ESPLux! I have recorded the video, I am just having to now go edit out all of the outtakes, and trust me, there are more than a few! Everything seems to be working well so far, I've had it plugged up on my desk for the past few days with no hitches. I'm really enjoying learning about making boards and going through the troubleshooting process and getting things working. Thanks everyone for taking the time to follow my project. I really appreciate it.
-
The first ESPLux board!
06/23/2015 at 13:13 • 0 commentsWhat a journey this has been! And it's only just getting started!
As I said below, I have my first batch of PCBs back! Work got in the way a little bit and I've not had an opportunity to get them soldered up, that is, until now.
Here it is! It works! (mostly)
![]()
The road to getting to this point has been a little bit rocky! Lets take a bit of a step back in time to before the board was all soldered up. First up, I have learnt an important lesson about solder paste. When they say it has a shelf life, they are right. When they say to get good quality paste, listen! The stuff I have is pretty terrible. The first few boards I made up went alright. Spreading the paste on this board a few months later is horrible. I guess it is time for some new stuff.
Here is the board in its pre-soldered, but post populated state:
![]()
To me, everything looked great. There probably should have been a little more solder paste in spots, and I did touch them up a bit, but I thought it'd be fine. Onwards and upwards! I threw it into my brand new Zallus reflow oven. I've tested a few boards with a couple of smaller parts on them, and it's been working great. I think it might have been more luck than good management, because throwing my board in didn't quite go to plan. I think my reflow profile was a little bit on the low temp side, or my solder paste truly is an abomination. Anyway, the oven went ding, I pulled it out and the bigger parts hadn't fully reflowed. The controller did its job beautifully, just the bag of meat behind the controls hadn't set it up right. I knew that I wasn't supposed to reflow a board that has already gone through the oven, but I don't really have any other options. I rebuilt the profile with settings that (should) work, and powered on! I put the board through the oven again and bingo, all the solder melted properly.
![]()
I soldered the few through hole parts in, wired in my lab power supply, held my breath and turned it on... None of the LEDs lit up. I should at least see LED4, the power indicator. The power supply showed that it was pulling current, so I measured voltages, power was getting to the LED properly, so that meant that all the components in-between were working fine. I then plugged up my programmer board, installed the latest NodeMCU, and switched on the indicator lights, LED1 and LED2. Power, but no lights. I then switched on the main LED output. LED3 didn't light up but I had power at the output terminal. By this stage I had figured out what I had done wrong. I had misread the silkscreen and put every one of the LEDs on backwards. 'Double face palm!' as Dave says.
![]()
After a fiddly job of pulling the LEDs off and hand soldering new ones on in the correct direction, they all worked! Next up, I tested the little button which will hopefully reset all the wifi settings. Unfortunately, I screwed up here. The schematic has the ground symbol not connected to the other leg of R5. Doh. Looks like a bit of a bodge is needed. I scraped off some of the solder mask just above the resistor and dumped a bunch of solder in it. Problem solved! I think I probably could have used the internal pull-down resistor in hindsight .. I'll give that a shot on the next board. You can see the bodge on the resistor to the left of LED3.
![]()
So far, everything seems to be in order. I haven't tested AC in yet, nor have I plugged an actual LED globe into it. It is getting late, and I think it is a job for another day.
My next task is to get this firmware sorted. What I thought was going to be the easiest part is giving me a bunch of grief. Oh well. I'll also get my laser cutter and 3D printer out soon so that I can build up a case. If I do get these made in any kind of volume, I don't think 3d printing is the way to go. I can either stack multiple layers of perspex together, or get them manufactured somehow. Injection molding perhaps?
We aren't too far away from having something I can set up and test in place! Thanks for reading!
ESPLux - Smarts for your downlights
A circuit you can place inline with your existing low voltage lights to allow for wireless control


 3.3v rail with no load
 3.3v rail, 8w LED load, full brightness
 3.3v rail, 8w LED load, 50% brightness
 3.3v rail, 35w incandescent load, full brightness


