 alusion
-
The Wired
04/19/2016 at 01:18 • 0 comments32c3: Gated Communities
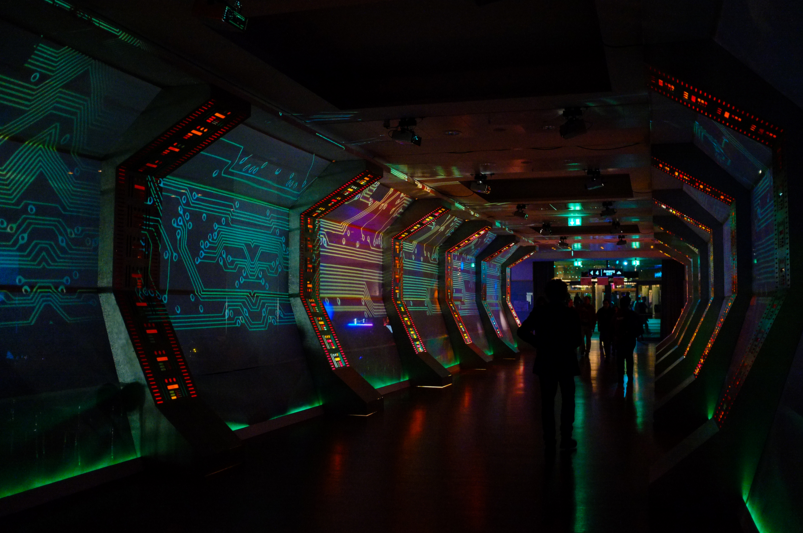
I periodically reflect back on my experience first time attending Europe's largest hacker conference. The Chaos Communication Congress is an annual four-day conference on technology, society and utopia and is going onto its 33rd year. I planned my trip in advance with the goal of participating in the congress with some amazing virtual art. The response was amazing and a very positive feeling to be amongst the most brilliant minds in the world. I made sure this experience is one I'll never forget.
![]()
During CCC I sampled various bits around the congress and created my own mini congress inside AVALON.
![]()
https://ipfs.io/ipfs/QmXwG57htZagbFUHdJsnyB9vuqkva2mfbFq4LiQhetKBq7/
![]()
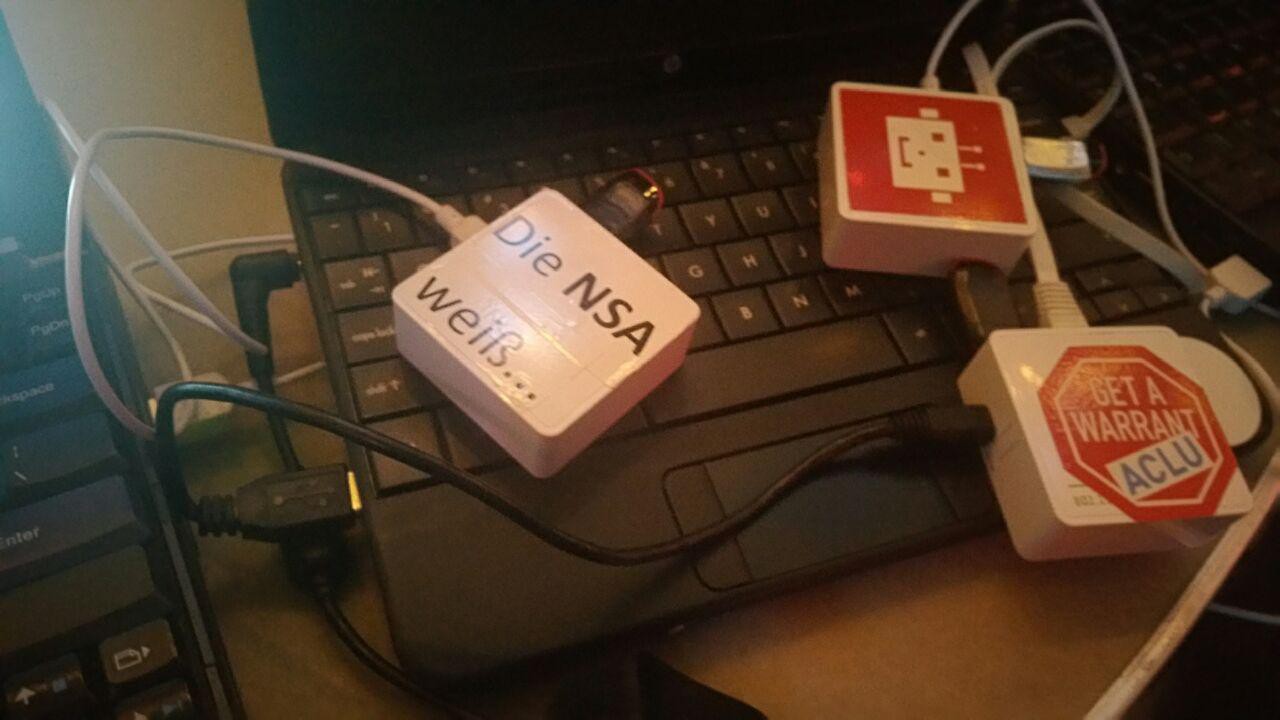
Successful test with Pirateox GL-inets. AVALON nodes configured in a meshnet.
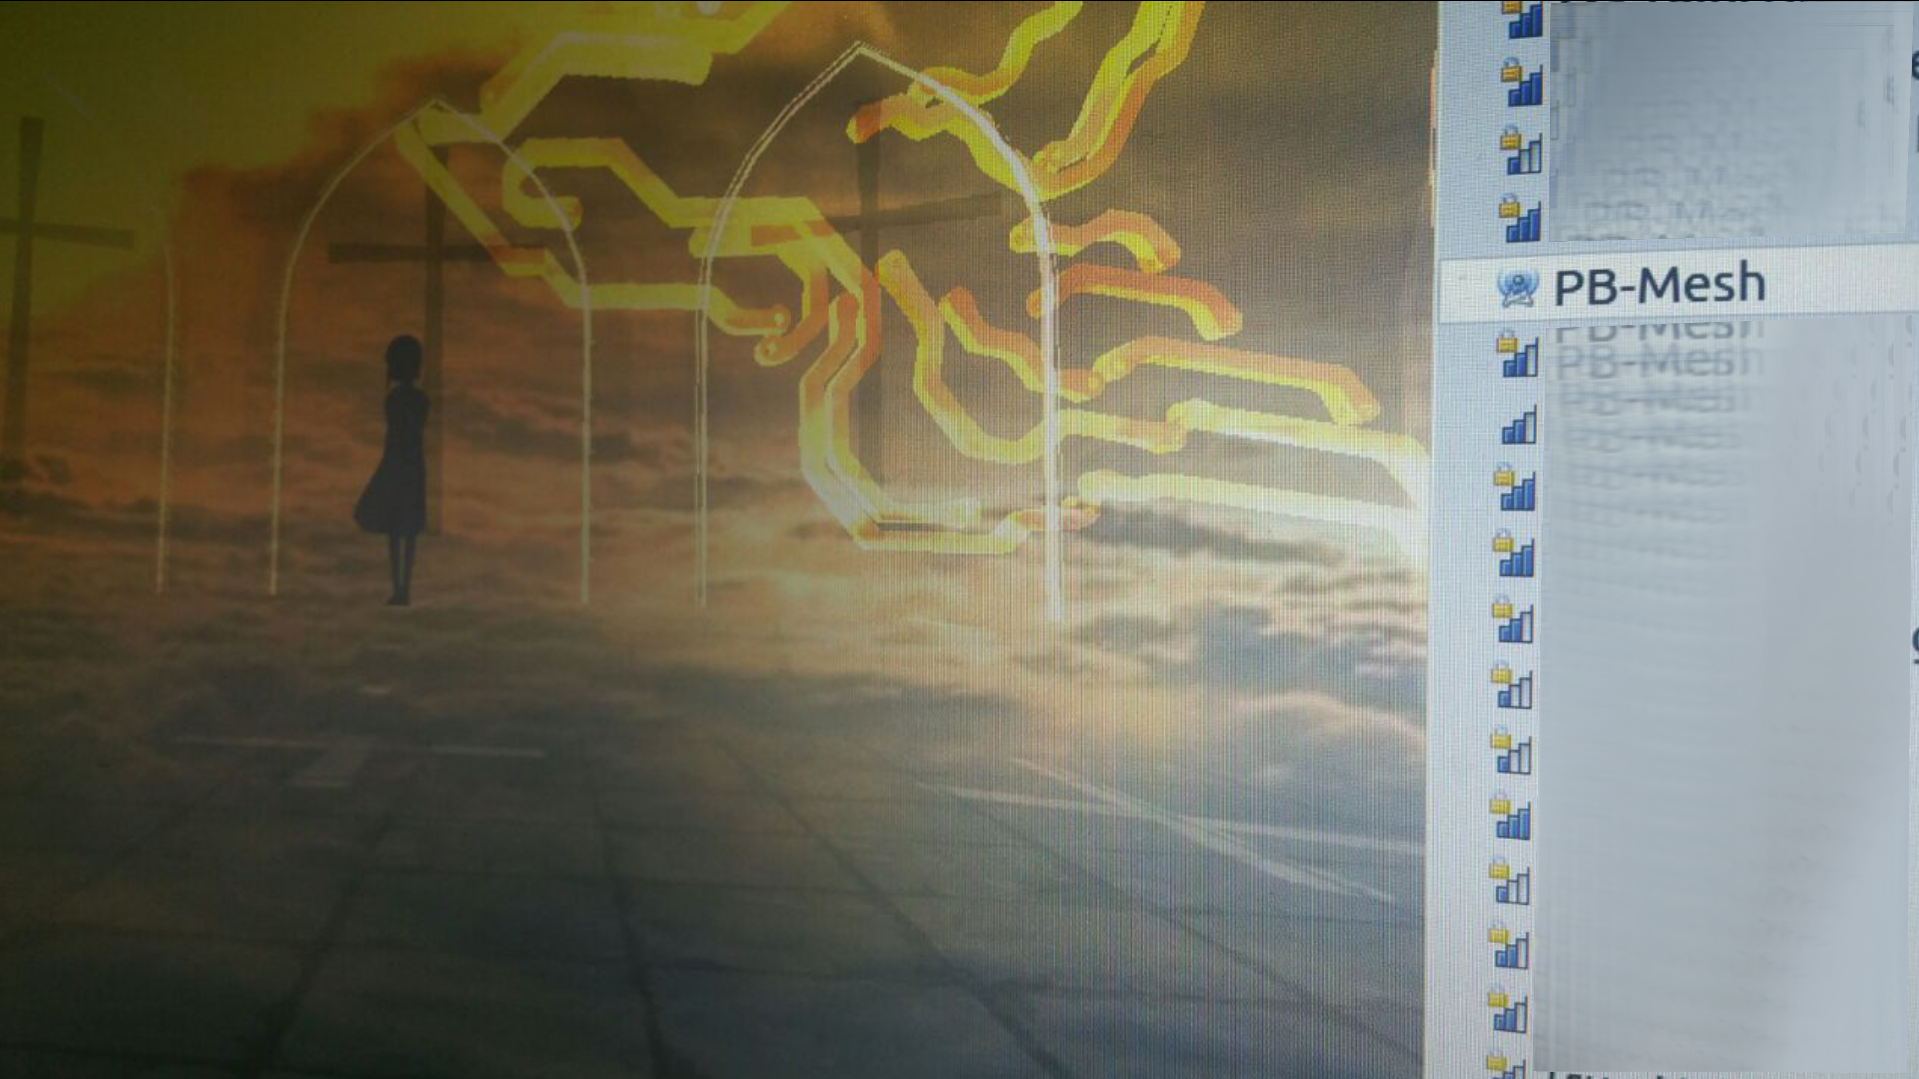
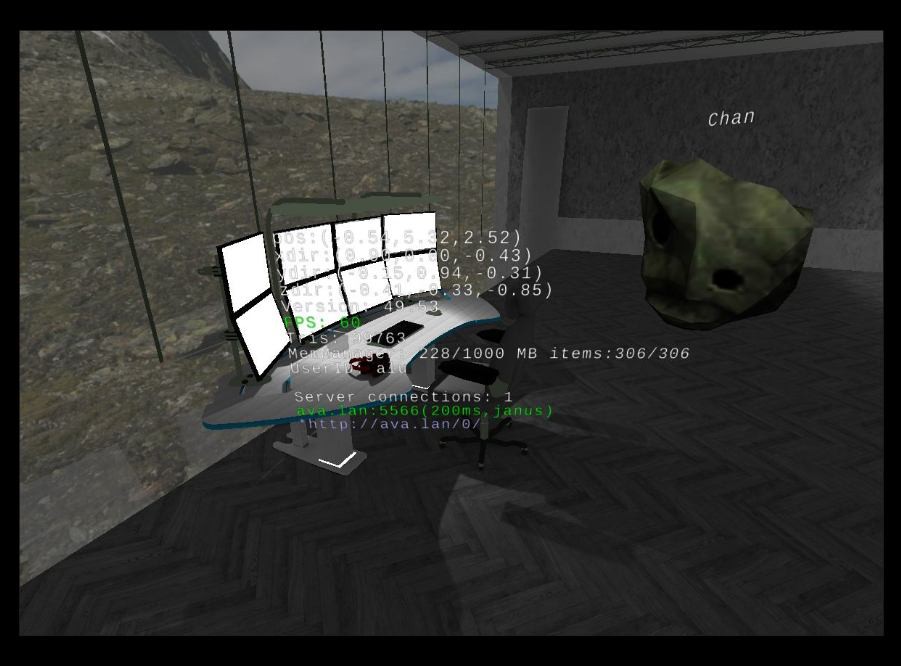
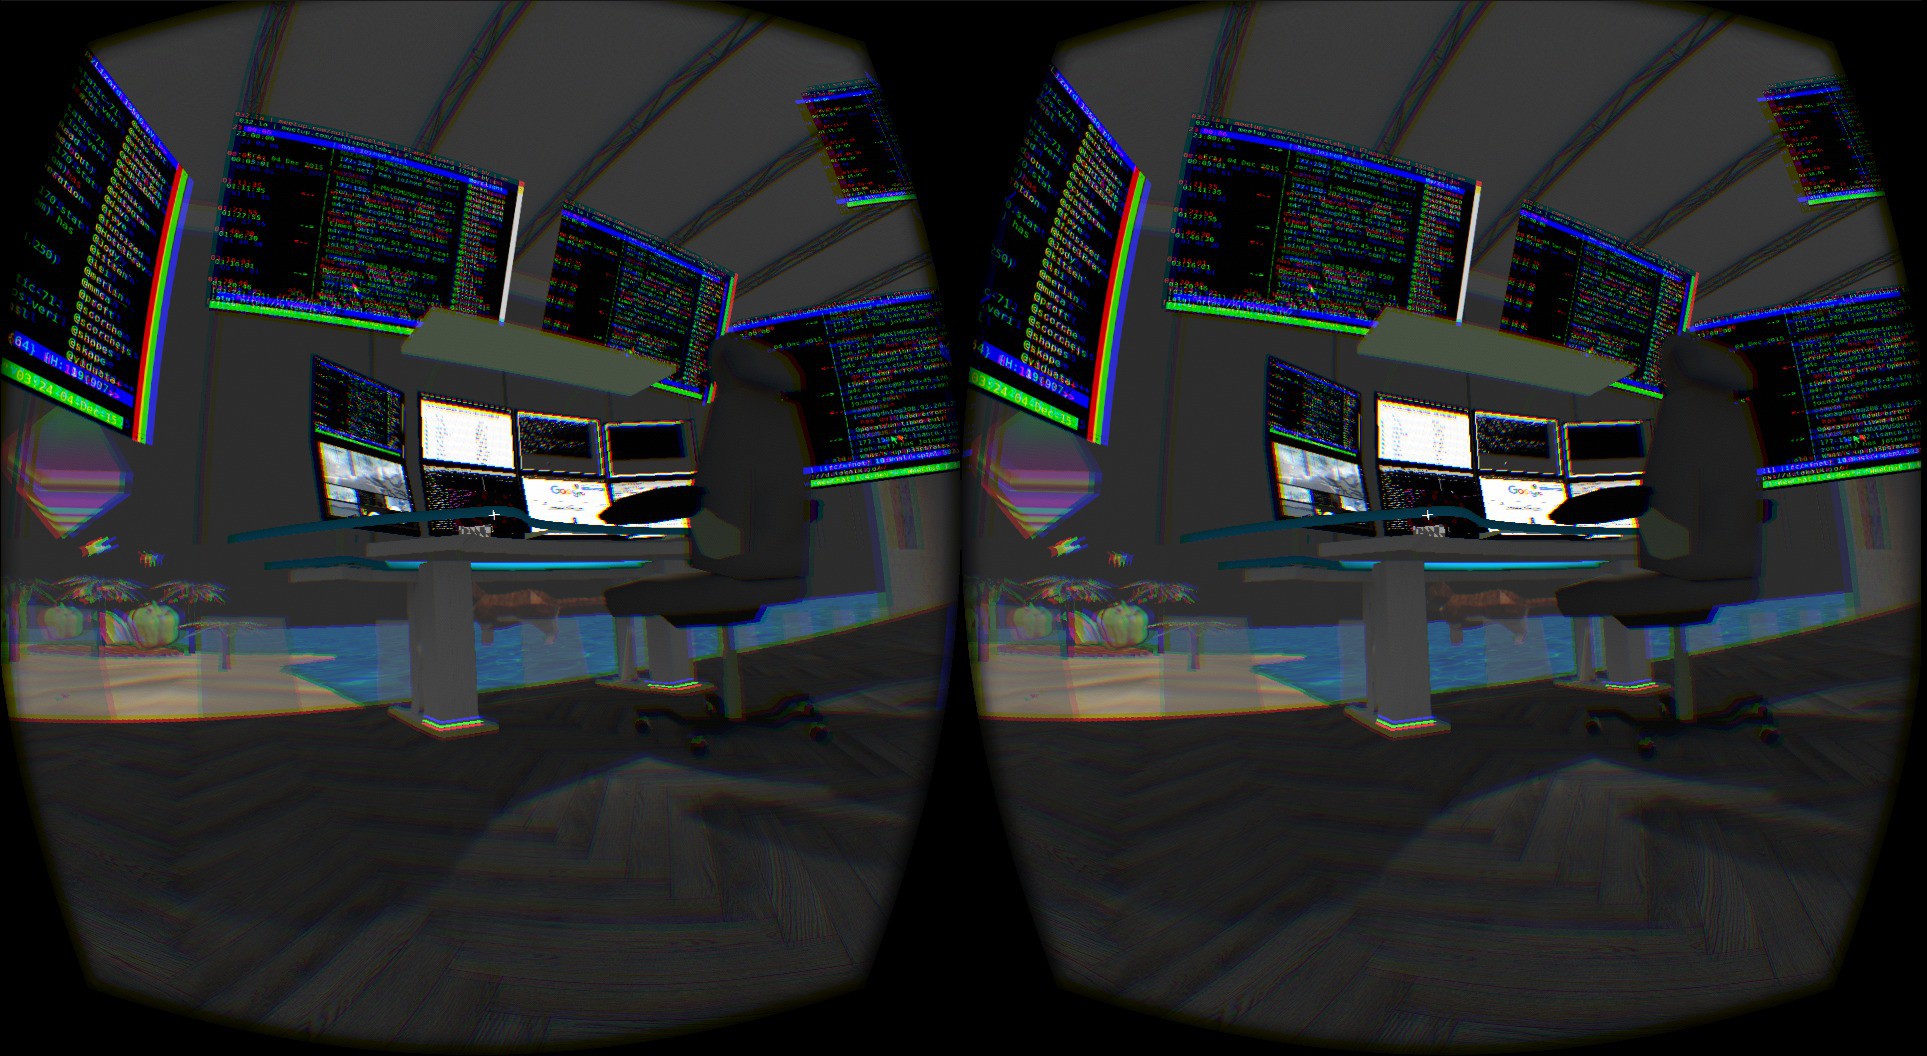
![]() Congress inside the congress, multiple people can connect to the AVALON mesh network and congregate inside a private virtual world. You can use Avahi to browse for services that are being broadcast on the local network. The command-line tool can be used to see mesh connected nodes and their ipv6 address. With Janus, you can just open a portal to that room.
Congress inside the congress, multiple people can connect to the AVALON mesh network and congregate inside a private virtual world. You can use Avahi to browse for services that are being broadcast on the local network. The command-line tool can be used to see mesh connected nodes and their ipv6 address. With Janus, you can just open a portal to that room. http://janusweb.metacade.com/#janus.url=https://ipfs.io/ipfs/QmXwG57htZagbFUHdJsnyB9vuqkva2mfbFq4LiQhetKBq7/
Interplanetary Scale
Using IPFS, we can build a global distributed supercomputer to upgrade the internet to a metaverse.
The goal of IPFS (InterPlanetary File System) is to connect all devices with the same system of files, like the web plus Git and Bittorrent. In some ways, this is similar to the original aims of the Web. It creates a P2P swarm that allows the exchange of IPFS objects that aims to make the web faster, safer, and more open.
https://hackaday.io/project/5077/log/18650-general-updateIssues with HTTP works that are not scaling with our uses of the network and our uses of the web in general. In terms of how websites store data on the internet, HTTP is quite brittle. We need protocol to reason how data moves and properties in links that you have to check integrity or cryptographic proofs.
![]()
The core problem with HTTP is that it's location addressed (IP address / domain name to access computers to server information you're requesting: problem when you can't access those resources). Short lifespan to websites and links become stale / broken. (Internet Archive has been trying to make backups, IPFS can make it more automatic).
IPFS enables websites that are completely distributed, do not have any origin, can run on client side browsers without any service to talk to.
Read this excellent comparison of HTTP versus IPFS here:
https://ipfs.io/ipfs/QmNhFJjGcMPqpuYfxL62VVB9528NXqDNMFXiqN5bgFYiZ1/its-time-for-the-permanent-web.htmlQuick Summary of IPFS
![]()
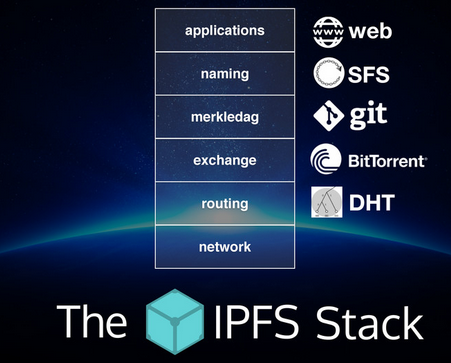
libp2p is the guts of the IPFS network
IPFS is a protocol:
- defines a content-addressed file system
- coordinates content delivery
- combines Kademlia + BitTorrent + Git
IPFS is a filesystem:
- has directories and files
- mountable filesystem (via FUSE)
IPFS is a web:
- can be used to view documents like the web
- files accessible via HTTP at http://ipfs.io/<path>
- browsers or extensions can learn to use ipfs:// directly
- hash-addressed content guarantees authenticity
IPFS is modular:
- connection layer over any network protocol
- routing layer
- uses a routing layer DHT (kademlia/coral)
- uses a path-based naming service
- uses bittorrent-inspired block exchange
IPFS uses crypto:
- cryptographic-hash content addressing
- block-level deduplication
- file integrity + versioning
- filesystem-level encryption + signing support
IPFS is p2p:
- worldwide peer-to-peer file transfers
- completely decentralized architecture
- no central point of failure
IPFS is a CDN:
- add a file to the filesystem locally, and it's now available to the world
- caching-friendly (content-hash naming)
- bittorrent-based bandwidth distribution
IPFS has a name service:
- IPNS, an SFS inspired name system
- global namespace based on PKI
- serves to build trust chains
- compatible with other NSes
- can map DNS, .onion, .bit, etc to IPNS
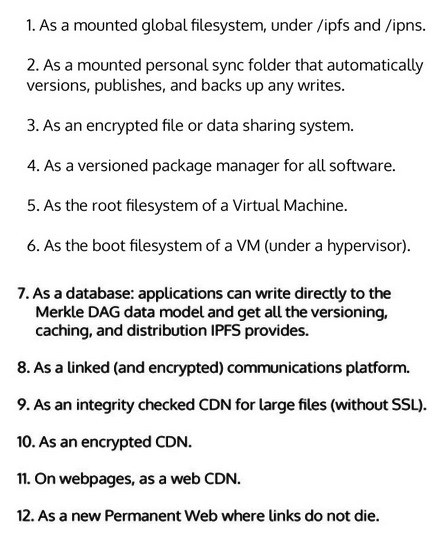
Example Use Cases:
![]()
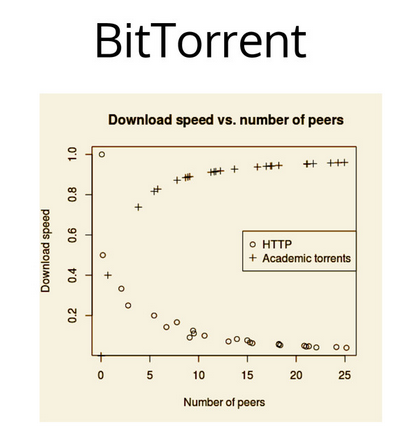
IPFS delivers speed which is important for having quality WebVR.
![]()
Ideally we will need a pubsub (publish subscribe) system in order to achieve milisecond resolution on the network. IPFS knows this: https://github.com/ipfs/notes/issues/64
Experiments
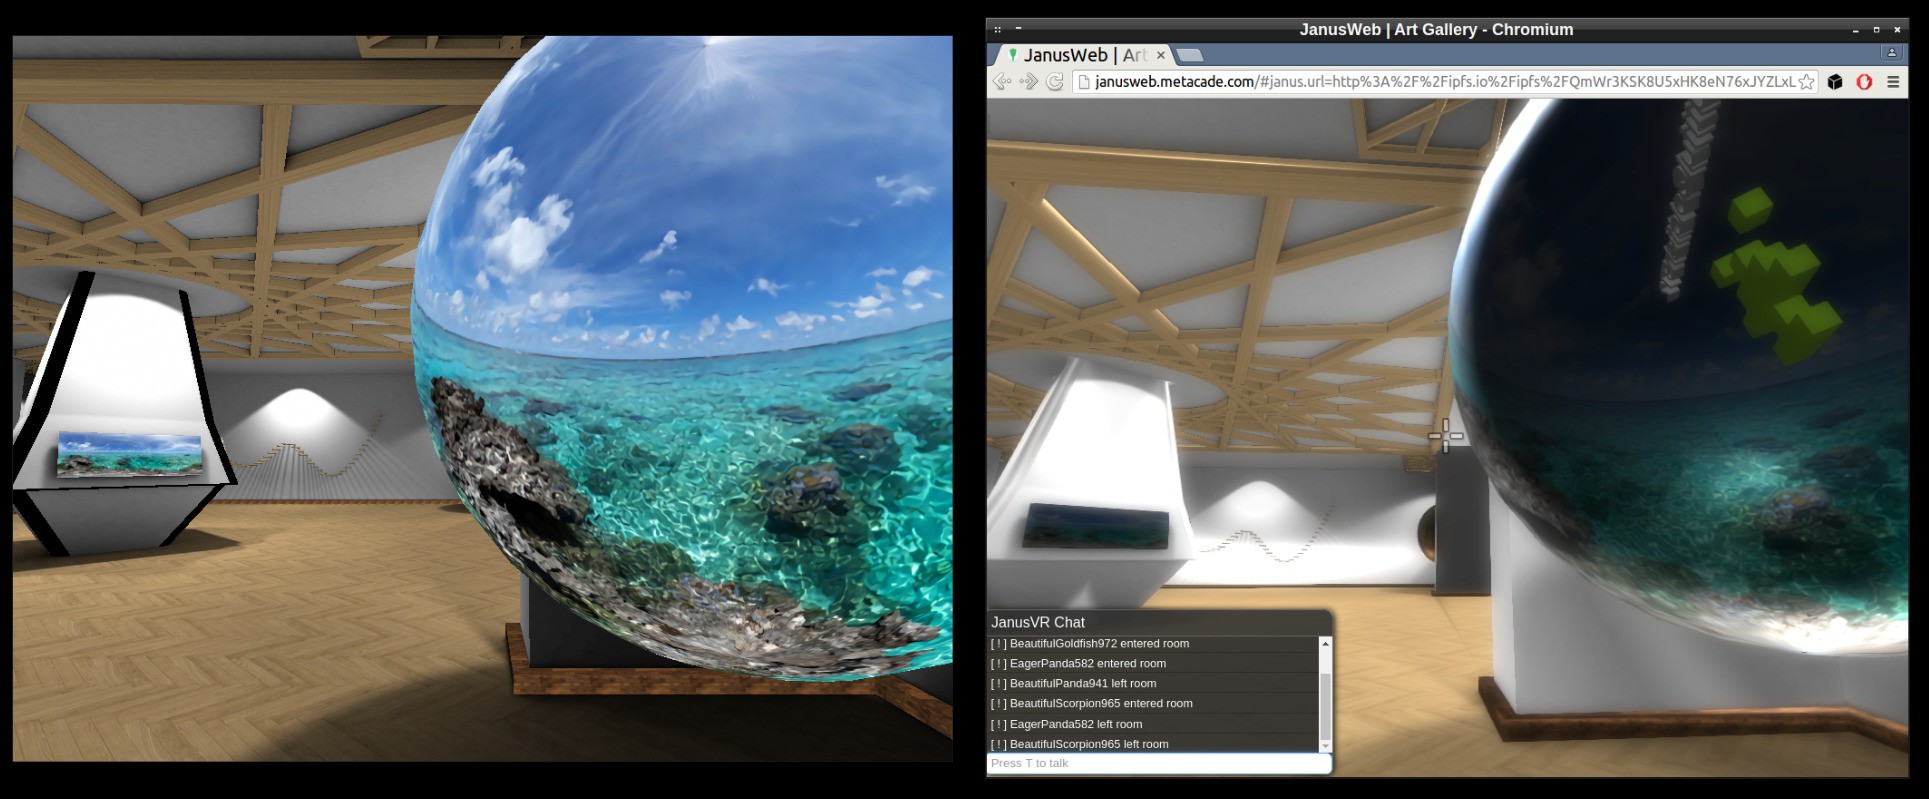
IPFS used for hosting the Janus web app with functioning multiplayer support.
![]()
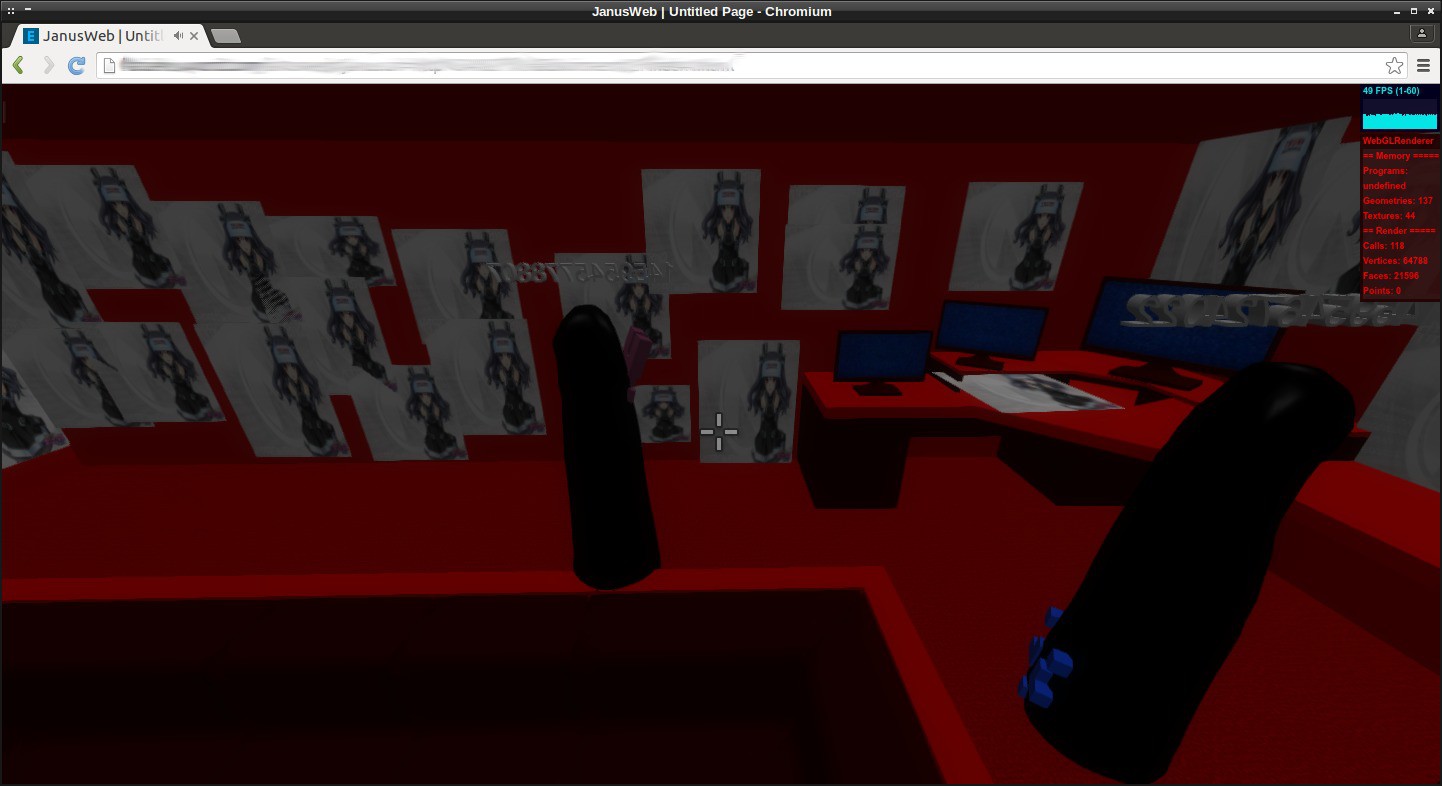
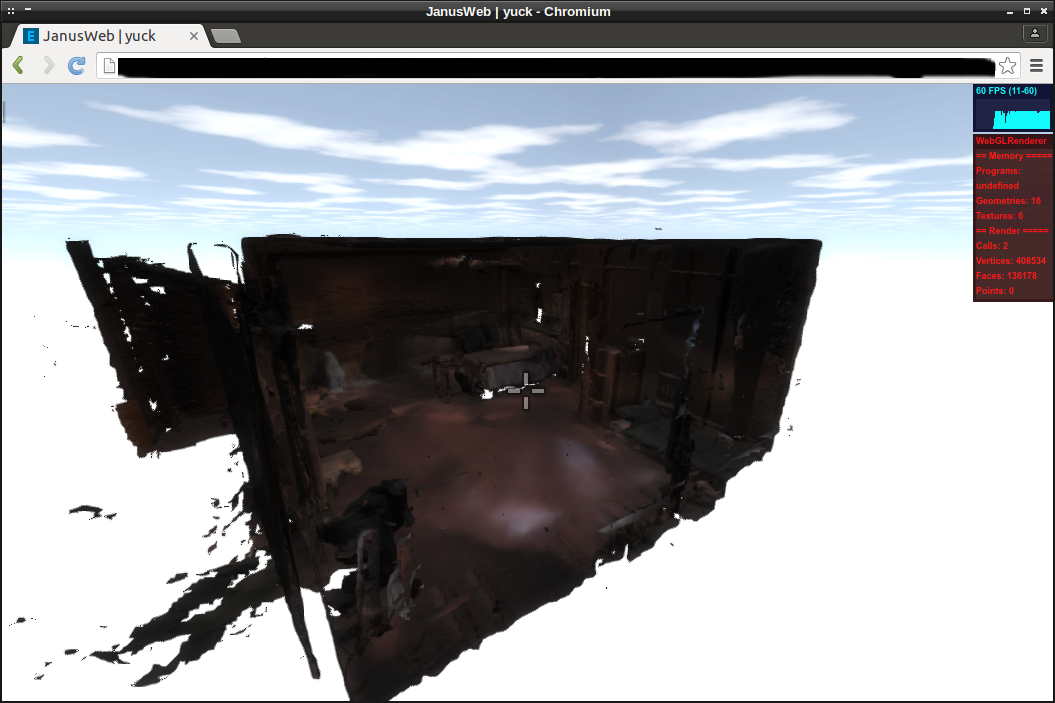
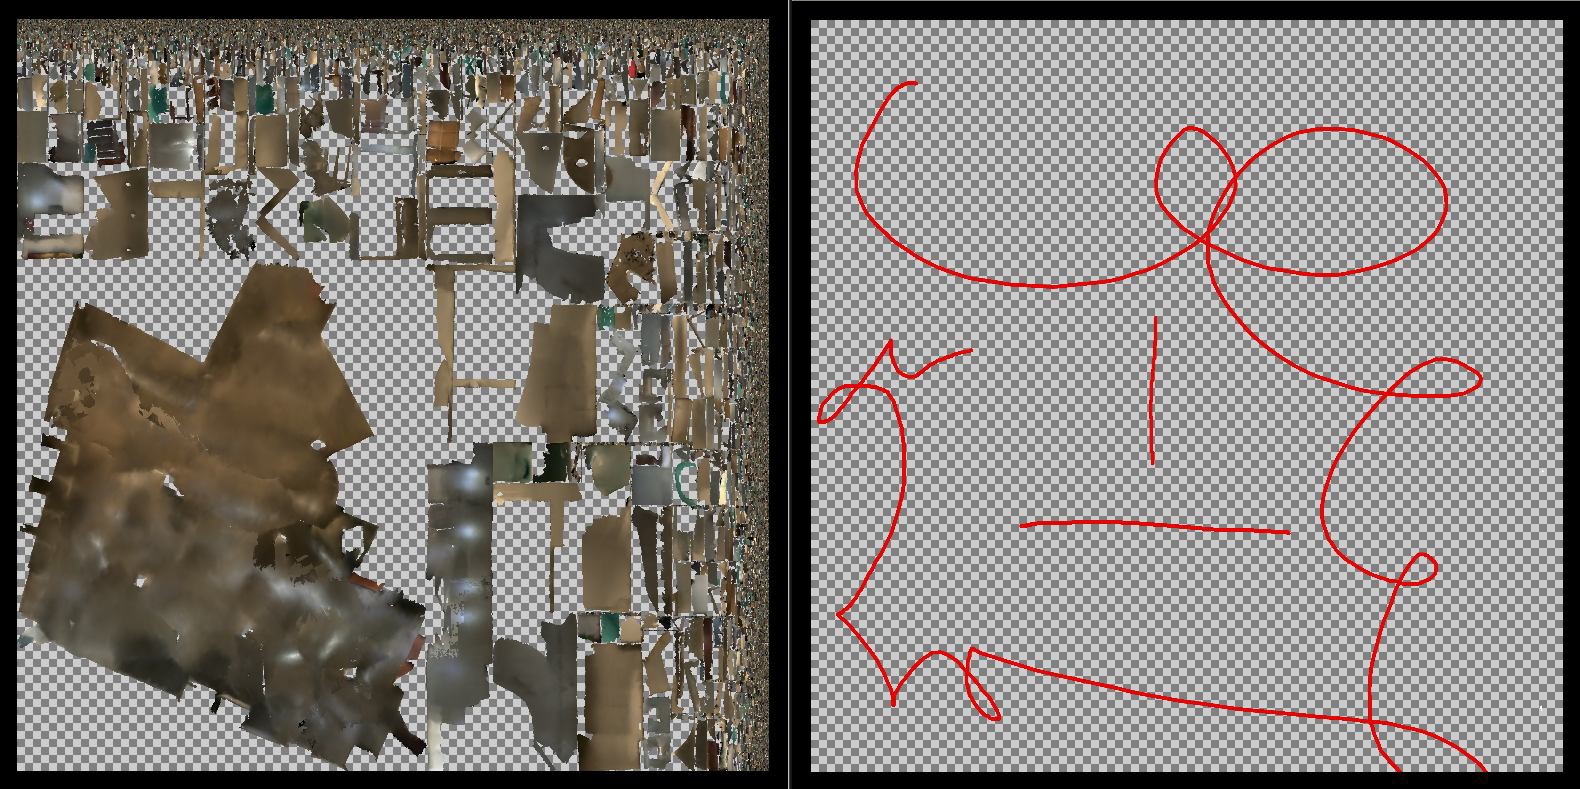
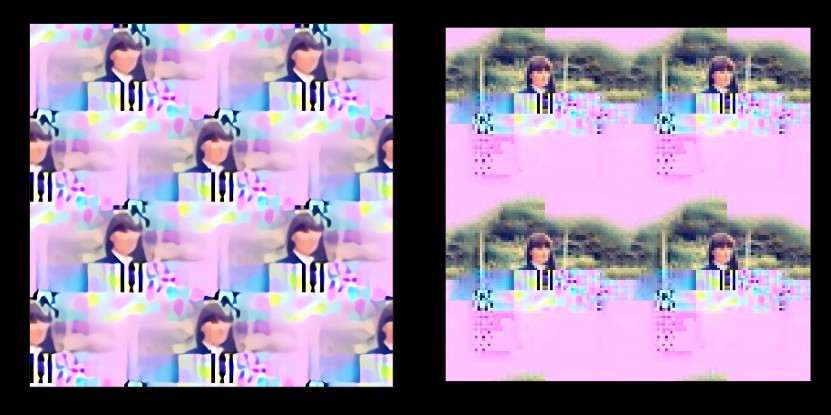
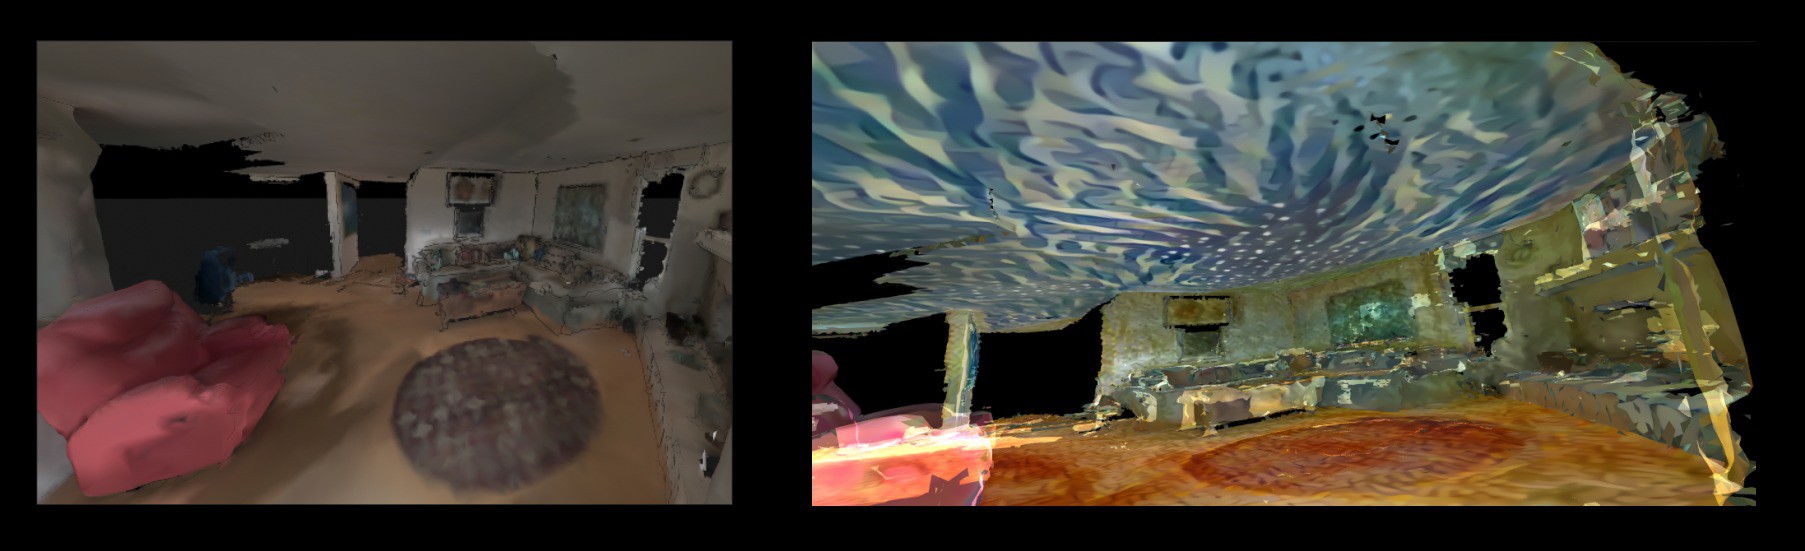
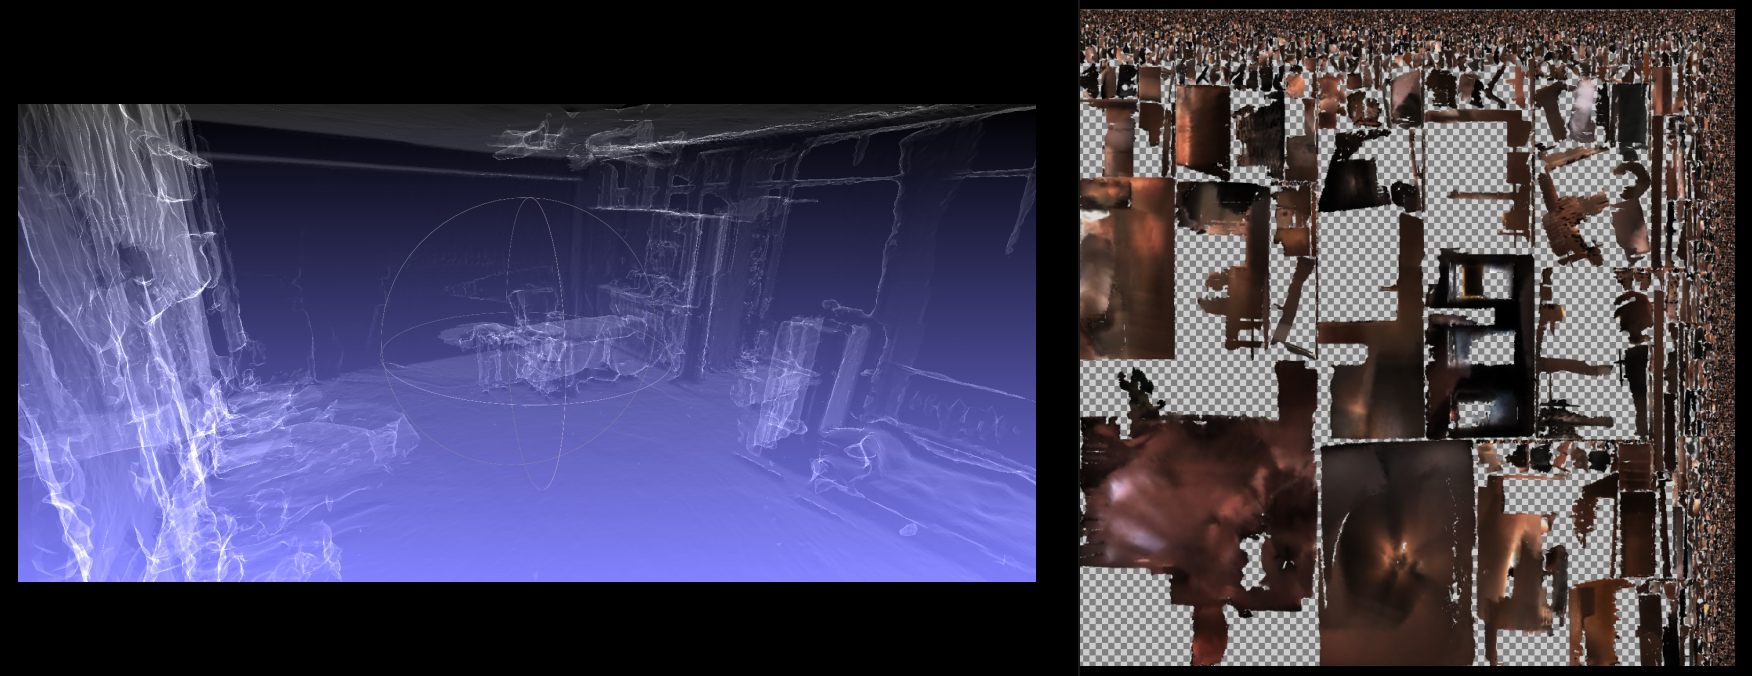
Comparing JanusVR (left) versus JanusWeb (right), need to fix the lighting of certain objects.
The total size of the room is < 100mb. It has been seeding for 3 months and loads very fast now.
![]()
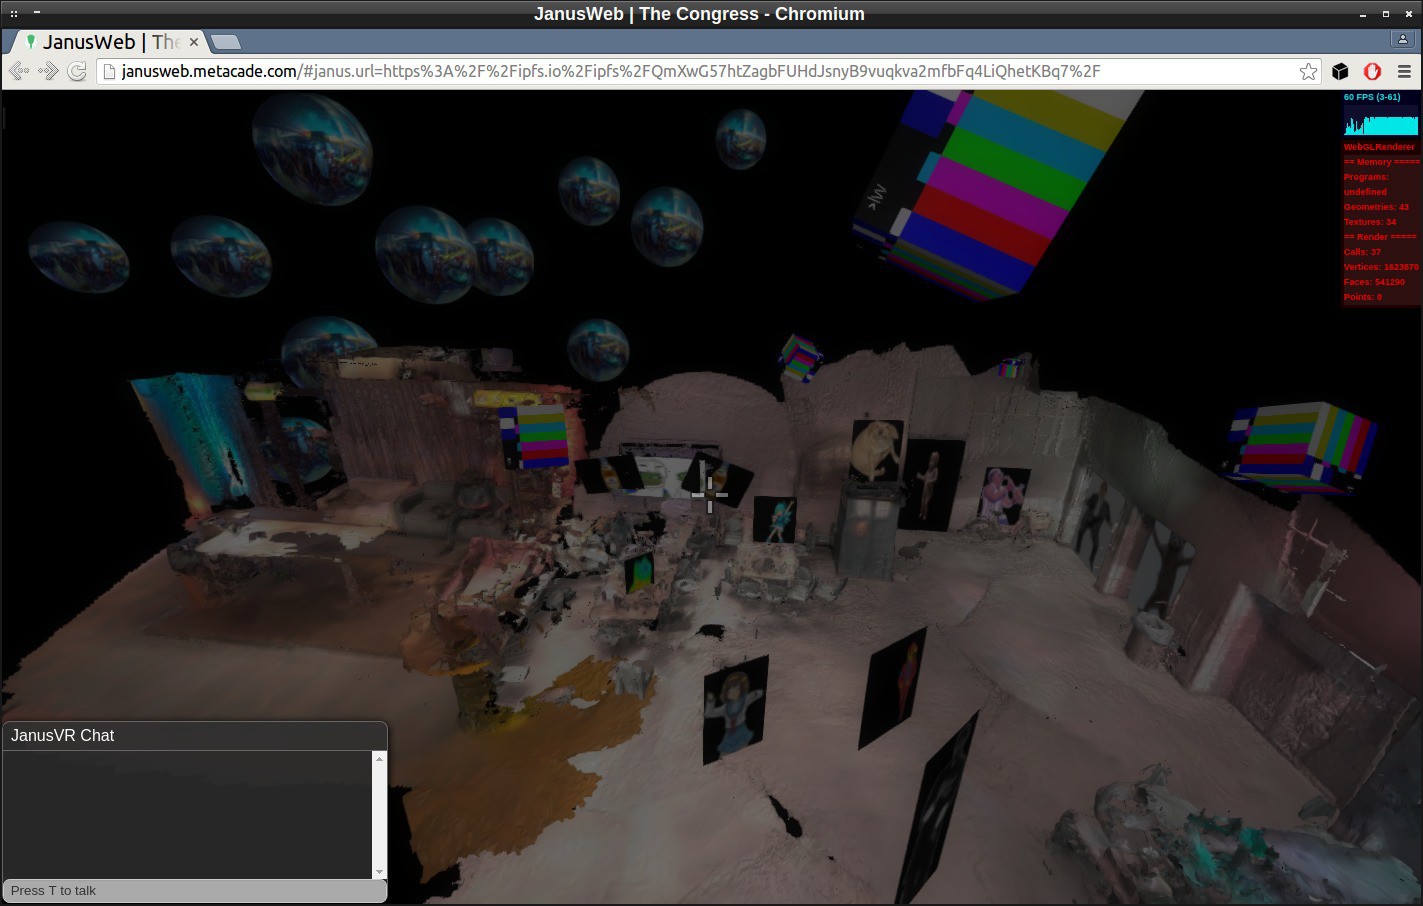
JanusWeb rendering has some bugs such as the lack of alpha channels for GIFs and transparent images and duplicate textures seen in the background photospheres.
Shader support is buggy right now, this Tango scan has the metallic gold color stuck by the disco light shader from Metaverse Party.
Running the entire JanusWeb app on IPFS
There were a number of steps I took to get here. I first had to import files janusweb.js janusweb.css from elation and media/ from elation and edit the index.html file to look something like this:
<!DOCTYPE html>
<html>
  <head>
    <title>JanusWeb</title>

    <link rel="stylesheet" type="text/css" href="janusweb.css" media="all" />
    <script src="janusweb.js"></script>
  </head>
  <body>
    <script>elation.janusweb.init()</script>
  </body>
</html>
There's also a config file one has to setup, although this step in the process is looking to be automated in the future. https://github.com/jbaicoianu/janusweb/blob/master/scripts/config.js
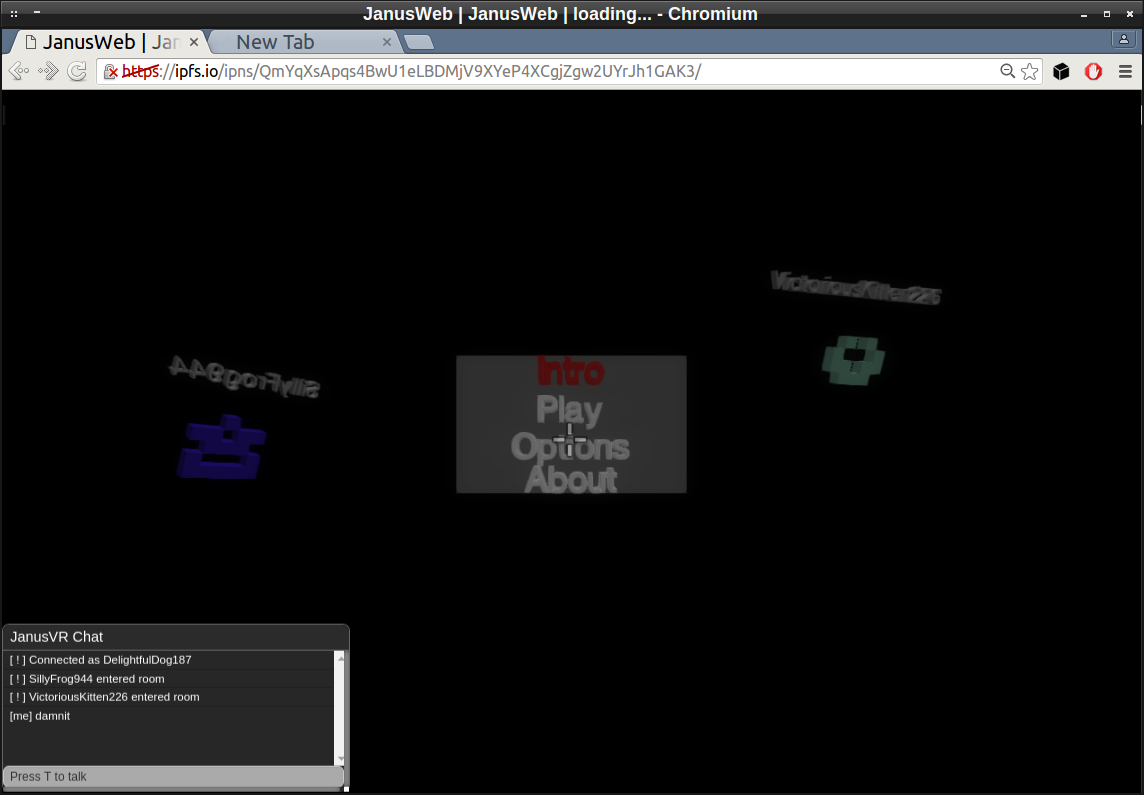
After configuration, you can ipfs add -r the directory and grab the last hash representing the root. I published the latest hash to my IPFS id. The IPNS system allows anyone tand choose to share thao store a reference to an IPFS hash under the namespace of your peerID ( hash of your public key ). This is an immutable ID meaning it won't change when you update it. View examples.
IPNS: /ipns/QmYqXsApqs4BwU1eLBDMjV9XYeP4XCgjZgw2UYrJh1GAK3/
![]()
So close. Next time this is updated I'll have it.
![]()
Links
Janus Art Galleries: http://imgur.com/a/s9ovA
called Orbit: https://github.com/haadcode/orbit
c-base created the most badass IPFS deaddrop.
https://github.com/c-base/ipfs-deaddrop
https://github.com/ipfs/ipfs/blob/master/README.md#who-designed-it
https://medium.com/@ConsenSys/an-introduction-to-ipfs-9bba4860abd0#.26qm803nv
http://whatdoesthequantsay.com/2015/09/13/ipfs-introduction-by-example/
32c3 had a lot of cool talks, videos are freely available to public here: https://media.ccc.de/c/32c3
-
A Year of Metaverse Lab
04/02/2016 at 03:21 • 0 commentsMetaverse Engineering
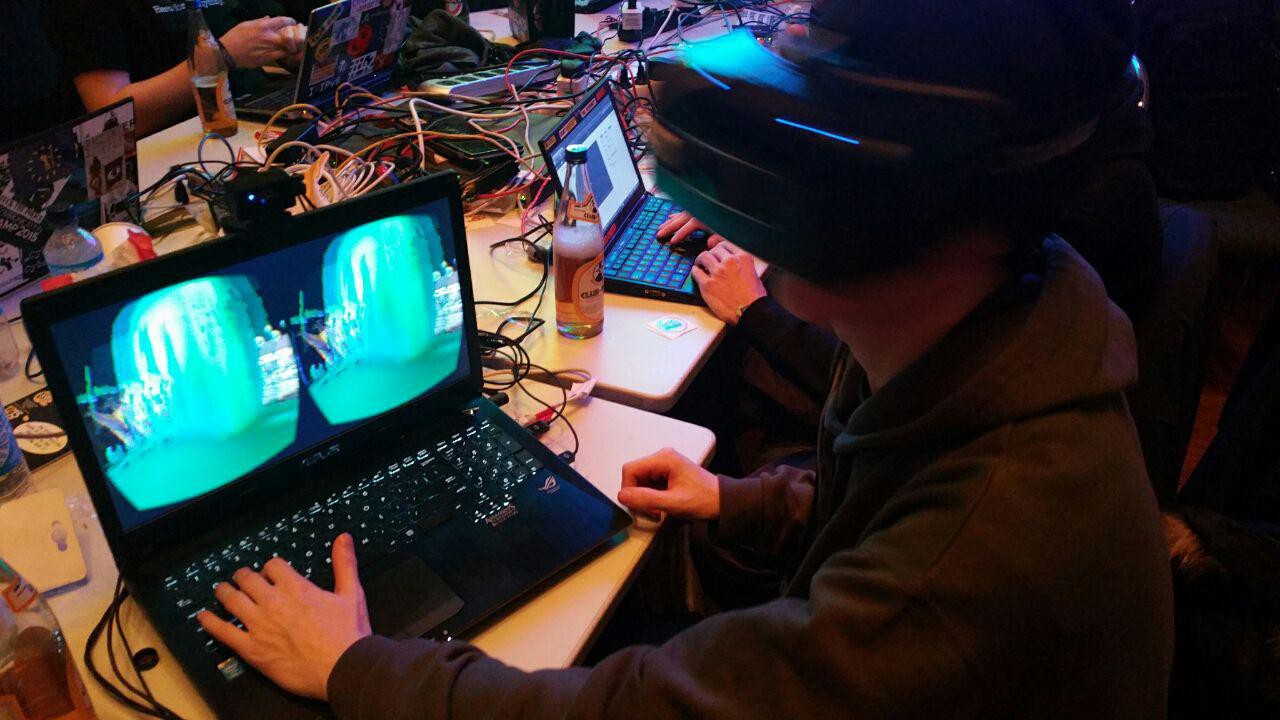
It's the dawn of the virtual age and the first high end virtual reality headsets have begun arriving, delivering a sense of presence for the masses. I have sought to utilize distributed infrastructure- and democratize the best in 3D technology with the maker spirit to help foster a global renaissance moment. It has officially been a year since I began Metaverse Lab and the vision is at last coming to life.
![]()
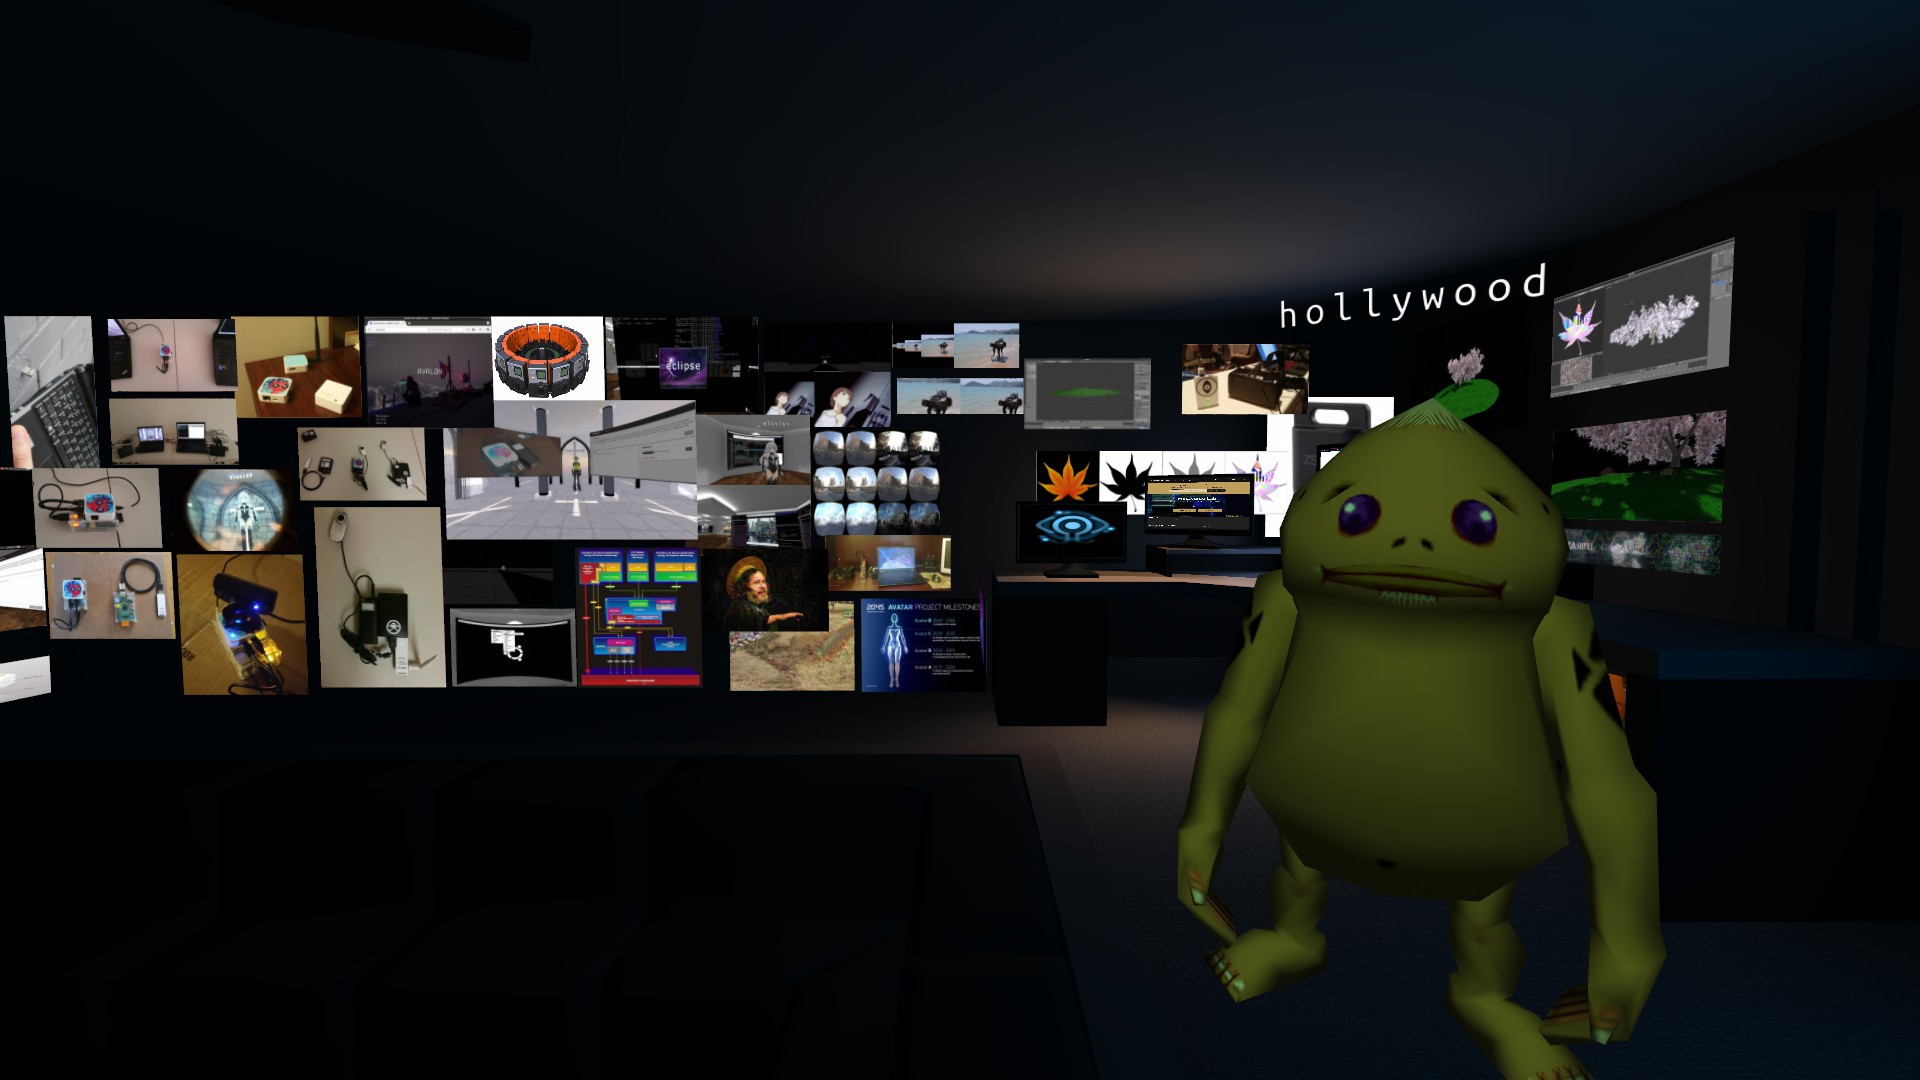
As project logs started to expand beyond average web user attention span, I recently decided to rebuild my website into a hangout place with a panoramic vision wall.
![]()
I'm figuring out how to do a mailing system for version controlling room edits. One idea might be to record a ghost of the room edits done inside Janus and then to paste the script somewhere.
![]()
I decorated the entire walls with images dropped from Metaverse Lab in a timeline. You can as easy as using Ctrl + drag and dropping from websurfaces. I'm working on various tracking methods for creating a guake style UI for use within Janus. Here's a first early test I made:
The next test will most likely involve leap motion tracking, although I'm in no rush unless suddenly Orion gets Linux support.
![]() https://www.reddit.com/r/janusVR/comments/47mjg4/release_4943_leap_motion_transform_bugfix/
https://www.reddit.com/r/janusVR/comments/47mjg4/release_4943_leap_motion_transform_bugfix/room.update = function(delta_time) { if (player.hand0_active) { room.objects["cube"].pos.x = player.hand0_pos.x; room.objects["cube"].pos.y = player.hand0_pos.y; room.objects["cube"].pos.z = player.hand0_pos.z; room.objects["cube"].xdir.x = player.hand0_xdir.x; room.objects["cube"].xdir.y = player.hand0_xdir.y; room.objects["cube"].xdir.z = player.hand0_xdir.z; room.objects["cube"].ydir.x = player.hand0_ydir.x; room.objects["cube"].ydir.y = player.hand0_ydir.y; room.objects["cube"].ydir.z = player.hand0_ydir.z; room.objects["cube"].zdir.x = player.hand0_zdir.x; room.objects["cube"].zdir.y = player.hand0_zdir.y; room.objects["cube"].zdir.z = player.hand0_zdir.z; } if (player.hand1_active) { room.objects["cube2"].pos.x = player.hand1_pos.x; room.objects["cube2"].pos.y = player.hand1_pos.y; room.objects["cube2"].pos.z = player.hand1_pos.z; room.objects["cube2"].xdir.x = player.hand1_xdir.x; room.objects["cube2"].xdir.y = player.hand1_xdir.y; room.objects["cube2"].xdir.z = player.hand1_xdir.z; room.objects["cube2"].ydir.x = player.hand1_ydir.x; room.objects["cube2"].ydir.y = player.hand1_ydir.y; room.objects["cube2"].ydir.z = player.hand1_ydir.z; room.objects["cube2"].zdir.x = player.hand1_zdir.x; room.objects["cube2"].zdir.y = player.hand1_zdir.y; room.objects["cube2"].zdir.z = player.hand1_zdir.z; } }Further JanusVR JavaScript documentation can be found here: http://www.janusvr.com/js.html
JanusWeb
![]()
It also has nearly been a year since I was inspired for project AVALON [Anonymous Virtual Augmented LOcal Networks]. Looking back and reading https://hackaday.io/project/5077-metaverse-lab/log/16699-digital-immortality from April 2015, one is able to see the ideas coming together. This excerpt alludes to the vision that has kept with me over the year:
Everything in this project must be set to scale with the physical world to be effective at delivering its vision. Access into Janus from a browser client is under development. - April 2015
At the time I was referring to SceneVR, a project by Ben Nolan that is now built atop of Mozilla's A-Frame. The fact is, it might be too much for someone to download a program such as Janus because of the average attention span of a web user.
A webVR developer to keep an eye on is Bai, a talented Javascript programmer and creator of the elation engine, a JS game engine with Oculus Rift support for interacting with Janus worlds from any web browser. Here I am testing the Project Tango scan of my old apartment in WebVR. Link to project log
![]()
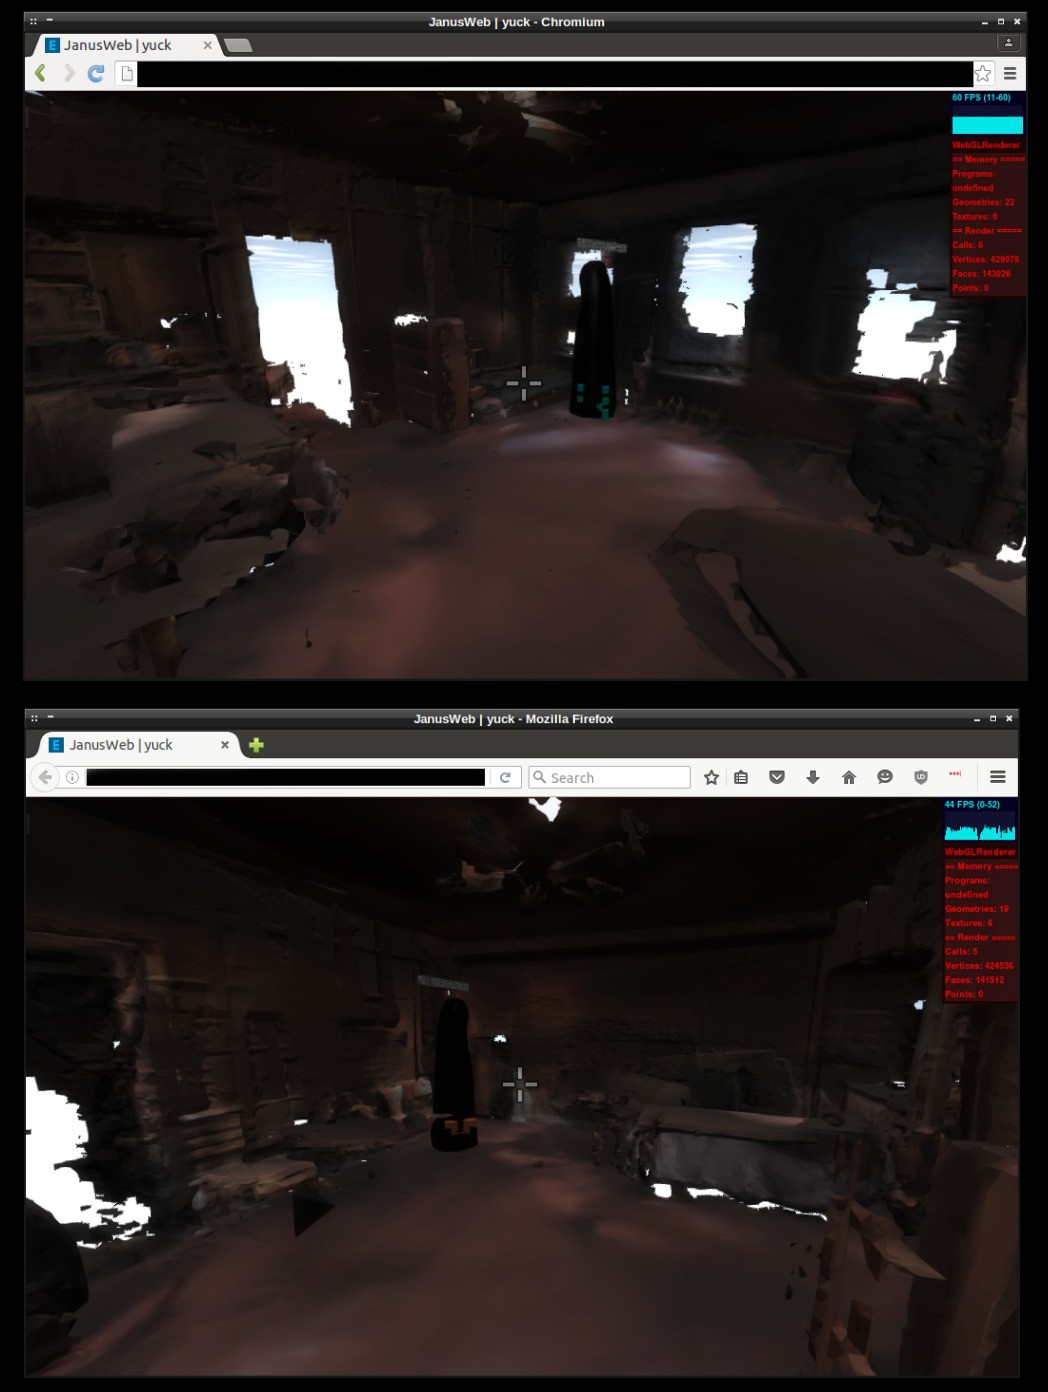
It has proved to work nicely in both Firefox and Chromium.
![]()
The data is there for adding in the missing features from Janus. After all the bugs are sorted, version 1.0 will bring with it network capabilities (such as with the default server) and voice/text.
Rebirth
Bai is so cool so he created a beautiful data visualization from recursively crawling and mapping every portal inside JanusVR. Because every node represents a link, he says he has plans to implement this as a UI for navigating the Metaverse.
![]() Link to full album: http://imgur.com/a/XvVGm
Link to full album: http://imgur.com/a/XvVGm
Release 49.45 brought with it equi render mode, enabling a 360 view inside JanusVR which makes can then be viewed by Cardboard / GearVR more easily.Vimeo has been very slow to acknowledge 360 video support but atleast the video can be downloaded to a headset:
I will create a YouTube and Vrideo channel for hosting videos exported from experiments. Hackaday supports embedding of YouTube videos but not vrideo: http://www.vrideo.com/watch/bcv4r25c I'll update this later with a youtube link.
[+] AVALON [+]
Decentralized Infrastructure for the 3D Internet
Link to past project logs:
- https://hackaday.io/project/5077-metaverse-lab/log/16699-digital-immortality
- https://hackaday.io/project/5077/log/16799-decentralized-infrastructure
- https://hackaday.io/project/5077/log/17006-avalon
- https://hackaday.io/project/5077/log/17307-avalon-pt-2
![]()
Various prototypes of AVALON: Anonymous Virtual Augmented Local Networks
![]()
Distributing this signal is going to combine clever engineering and economics. My processes have evolved with Moore's Law to create smaller and cheaper portals (zsun / esp8266).
![]()
The multiserver is next being rewritten in python, bringing networking support to OpenWRT devices. Since Python is already be installed on many devices I wrote an autostart script:
#!/bin/sh /etc/rc.common
# Start the Janus Multiserver
START=99
start() {
        sleep 5
        echo "Janus Multiserver started"
        cd /opt/server/
        python server.py &
}
After that, chmod +x the file and /etc/init.d/script enable so that it runs at boot time. After that, multiplayer should be enabled with your portal:
![]()
The meshing features for piratebox can be found here: https://github.com/PirateBox-Dev/PirateBox-Mesh
I'm using a customized OpenWrt for the Gl-Inet from here: http://stable.openwrt.piratebox.de/auto/
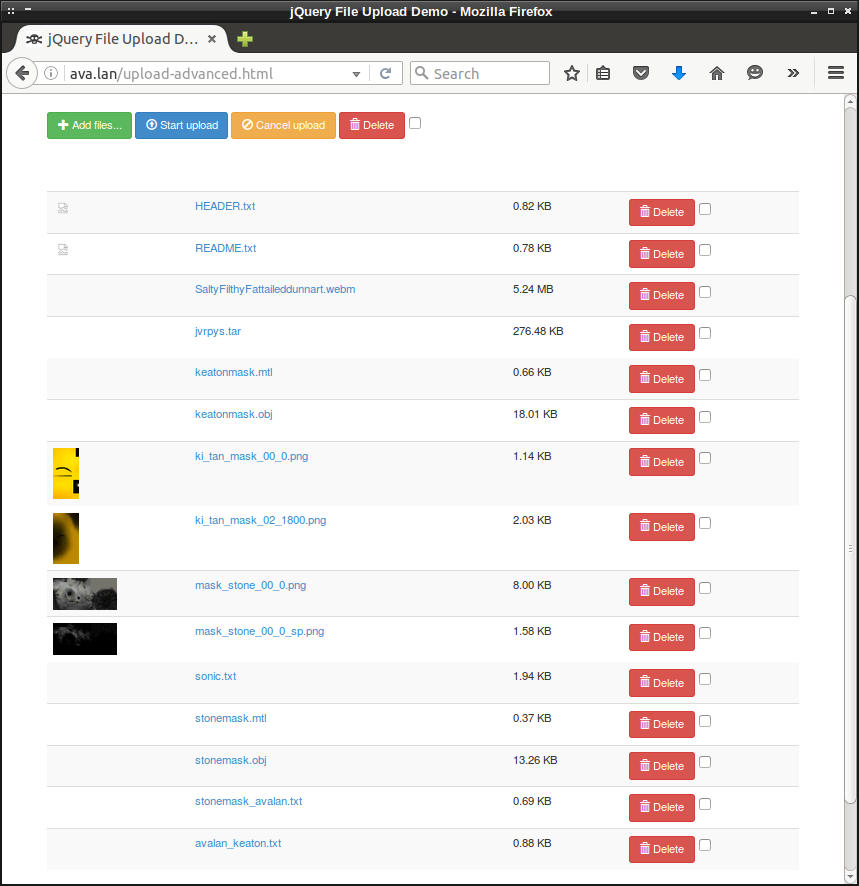
I uploaded a couple of avatars with the advanced uploader (multiple files) and then pulled the links into my userid.txt file (found in janusvr settings folder).
![]()
All of this is possible to do from JanusVR:
![]()
What cooler way to celebrate 1 year of Metaverse Lab than a HACKER ART SHOW IN LA?!
![]()
![]()
-
Metaverse Party
03/04/2016 at 22:06 • 1 commentAbstract Ideas
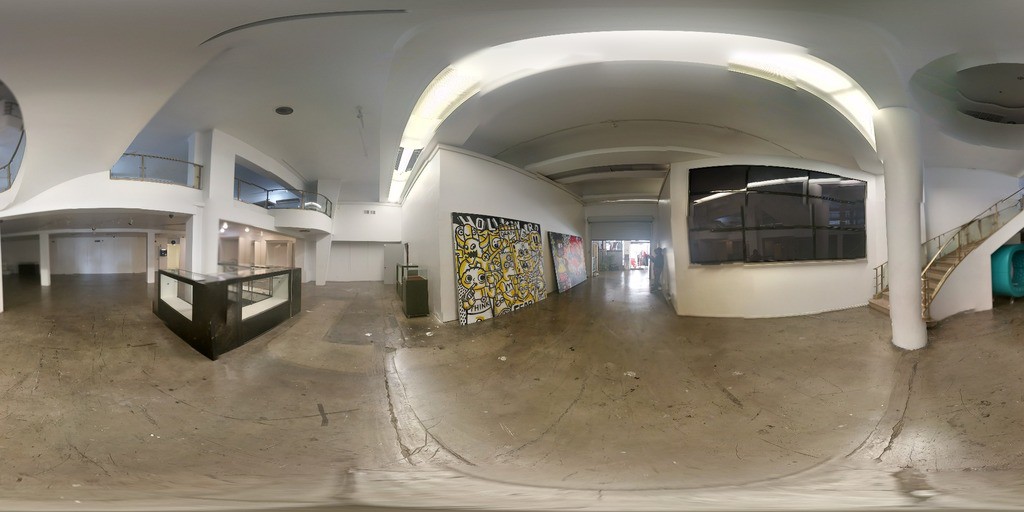
I came to Hollywood with a plan and as doors opened that vision has steadily matured. It was late September 2015 when I was introduced to this space. I snapped this 360 with my phone:
![]()
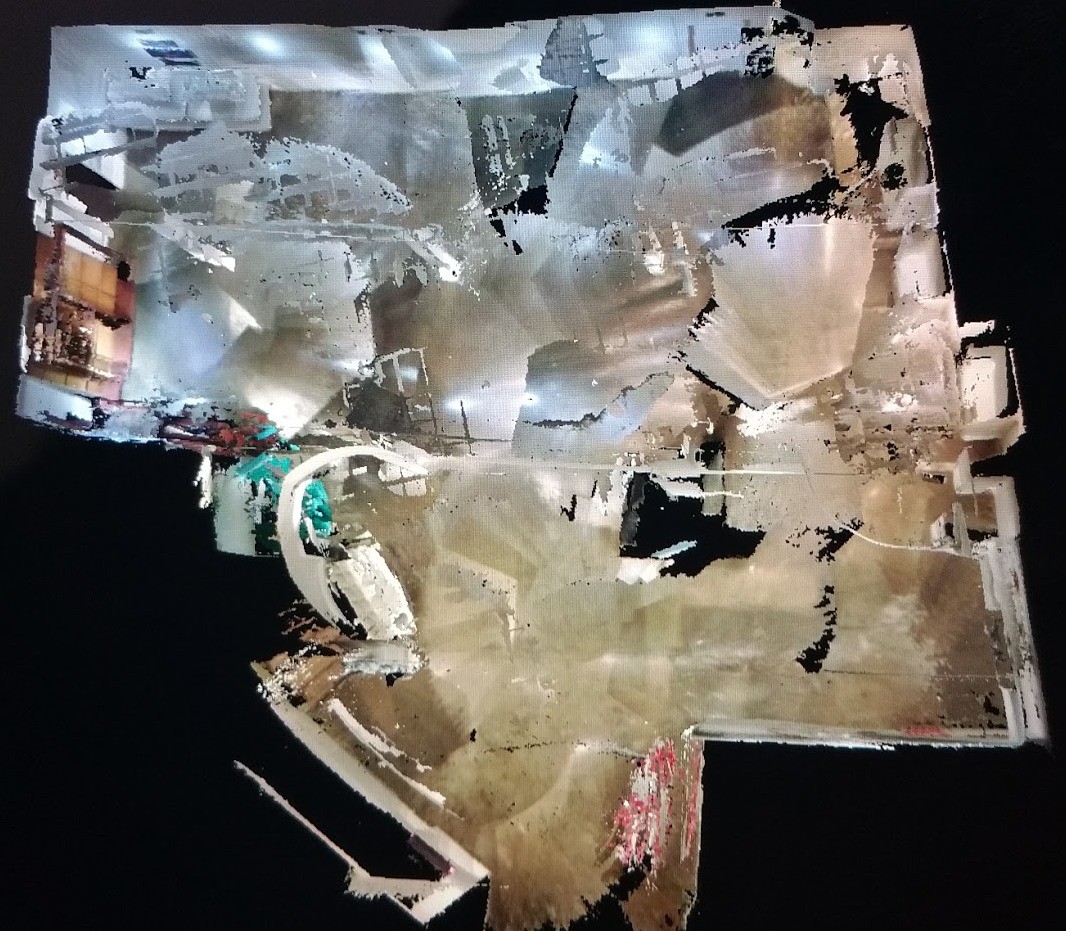
This is the story of a work in progress; a peak into a grand design for the ultimate experiment of connecting the digital and physical world together and starting a new art movement.I explained that this could be done by using a combination of live 360 and 3D scanning technology to transform the physical space into an online mixed reality world. I had the right tools to produce this vision, and so when my Tango came in I got to work scanning the space:
![]()
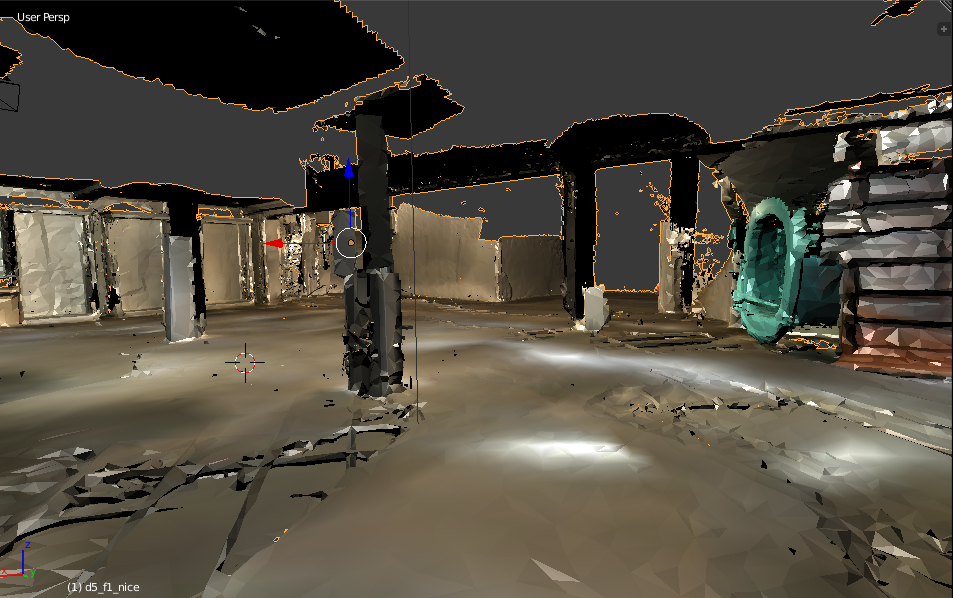
Normally the Tango is meant to scan small spaces or furniture, I had really tested the limits by scanning 10,000+ sq ft space with this device. With a little practice and 15+ scans later, I had pieces that were starting to look good and was ready to texture bake in blender:
![]()
At this point along, I felt victorious. With the space captured into a scale 3D model, everything else that follows gets easier and the astounding possibilities with an engine like Janus will be useful for tasks such as event planning. This can make a 3D modeller’s job easier as well. Link to Album
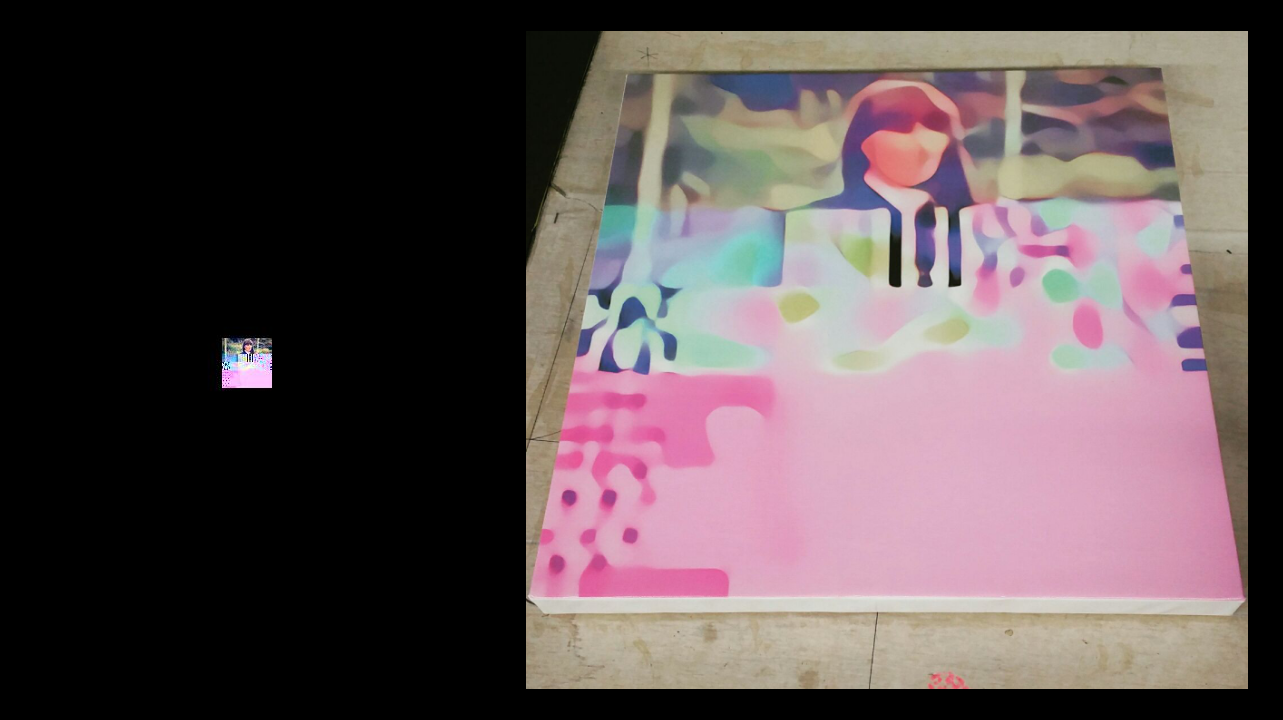
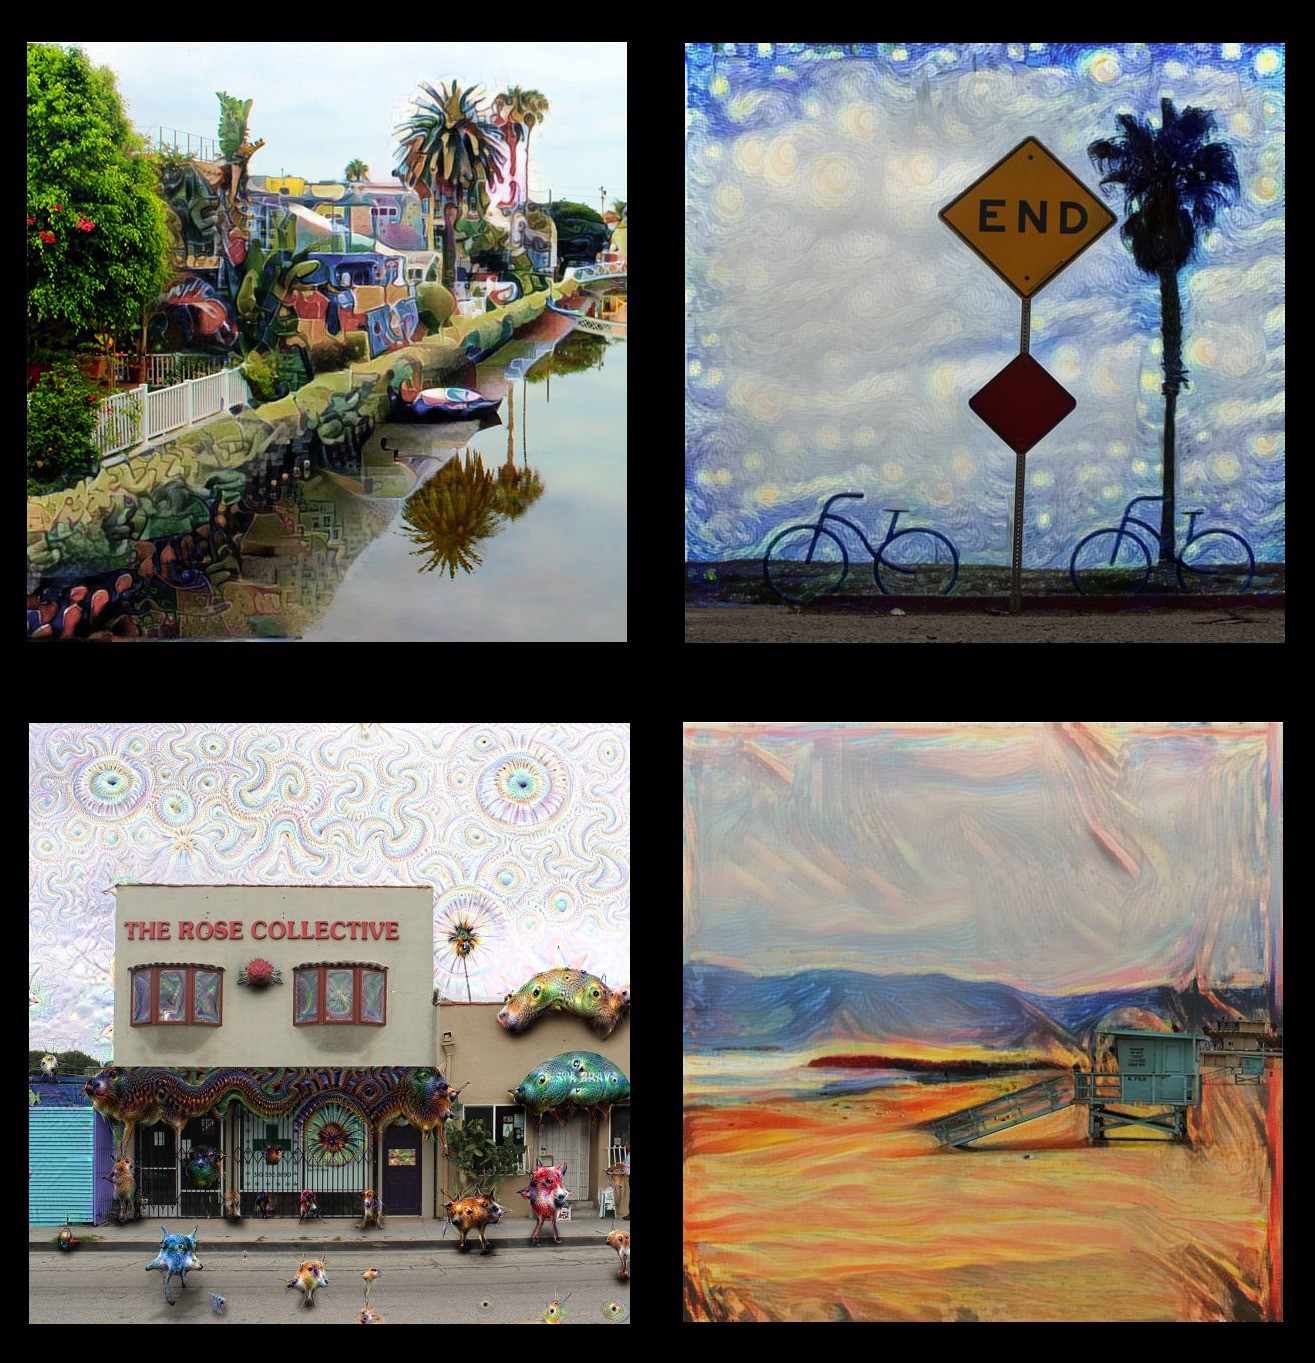
Next I wanted to experiment with the interesting neural network activity I was doing at the time:![]()
I learned that the paint wears thin without substantial GPU processing power available. However, from a distance the results did look good. What if the gallery itself is part of the art show and with AVALON people can take it home with them or making it into a small sized hologram? I had long since stopped believing in mistakes, they are opportunities to obtain a deeper understanding of the system. Link to Video
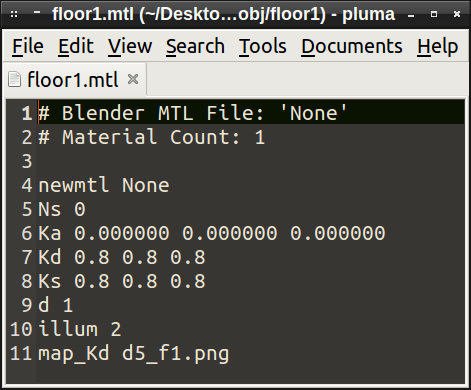
One method I discovered works really well for augmenting physical spaces is by stylizing the texture maps. For standard wavefront object files, they usually come with an mtl file that points to a texture.
newmtl Textured Ka 1.000 1.000 1.000 Kd 1.000 1.000 1.000 Ks 0.000 0.000 0.000 d 1.0 illum 2 map_Ka lenna.tga # the ambient texture map map_Kd lenna.tga # the diffuse texture map (most of the time, it will be the same as the ambient texture map) map_d lenna_alpha.tga # the alpha texture map map_Ks lenna.tga # specular color texture map map_Ns lenna_spec.tga # specular highlight component map_bump lenna_bump.tga # some implementations use 'map_bump' instead of 'bump' below bump lenna_bump.tga # bump map (which by default uses luminance channel of the image) disp lenna_disp.tga # displacement map decal lenna_stencil.tga # stencil decal texture (defaults to 'matte' channel of the image)![]()
You are allowed to change that line to map whatever texture you'd like, including gifs. Very super simple stuff for people with any level of 3D modeling experience.
![]() Digital graffiti. This had planted a seed in my mind that we'll return to later.
Digital graffiti. This had planted a seed in my mind that we'll return to later.
![]()
I played with generative algorithms for creating textures and experimented with alpha channels. What I came up with one night is similar to shadow puppet art, but instead of a shadow it is an object that lights the stage from behind or underneath:
![]()
I began to think about the possibility of using image processing scripts combined with my WiFi data visualization art in order to create puddles where the texture of the place transforms into a painting. Imagine a droplet of information that stains the fabric of the space you're in. Now it is around Christmas 2015 and as homage to the artist who opened the door for me I captured and optimized a photogrammetry scan (Link to album: http://imgur.com/a/mOi7R) so he can overlook this work in progress:
![]()
A New Year
I took a trip to the annual Chaos Communication Congress in Hamburg to create a virtual art installation.
![]() You can check out pictures of it at 32c3.neocities.org or visit the link in Janus to see it in VR.
You can check out pictures of it at 32c3.neocities.org or visit the link in Janus to see it in VR. The year is 2016 and the vision is starting to come to life. During the time I was scanning the Gallery, I got a call about an artist using the space to shoot her music video for VR. Intrigued by the telepresence robot and GoPro rig and equipped with 3D scans of the space already, I agreed to help with post production. It sounded fun ¯\_(ツ)_/¯
If this video was going to transition from 360 video into something that is actual virtual reality, it meant more than simple compositing tricks and video editing. The first thing needed were virtual actors. AssetGhosts will be perfect for this, they're animated and able to be controlled and scripted to do any type of task. Unfortunately they are a bit tedious to set up. I needed a fast way to visualize and play around with my assets so I came up with a simple one liner that will create a webpage of all the gifs in a directory which I can then upload to IPFS:
(echo "<html>"; echo "<body>";echo "<ul>";for i in *.gif;do basename=$(echo $i|rev|cut -d. -f2-|rev);echo "<li style='display:inline-block'><a href='$basename.gif'><img src='$basename.gif'></a>";done;echo "</ul>";echo "</body>";echo "</html>")>index.htmlThis makes it mad simple to go into a directory and build a pallet of assets that I can easily drag and drop in Janus with IPFS there to bring it online, in a peer-to-peer fashion (great for collaboration and version control).
![]()
I should mention that exploring other people's rooms in JanusVR is sometimes like treasure hunting. Because of the open manner in which FireBoxRoom's are built; if someone were to code a car into Janus, then suddenly everyone has a car. I took a sample of 40+ dancing GIFs from my internet collection and dropped them into the club. Then I would go and record a ghost of each dancing avatar in order of sequence by number (ctrl+g, press again to end recording) and Janus would automatically save each text file in the workspace folder. Then you just add in a line for each ghost you record:
<AssetGhost id="ghost_id" src="ghost.txt" />Ghost files will record as much information as you give it, including the avatar that you currently possess in the text file so if you have a lot of ghosts then it is best to have no avatar otherwise you might end up with all cats: https://i.imgur.com/YflvqZN.gif
Also in your assets tree you should have objects that you will tag with each ghost file like such. Label these differently than your AssetGhost.
<AssetObject id="ghost_1" src="" mtl="" />The final part is adding the Ghost underneath the room tag:
<Ghost id="ghost_id" xdir="-0.088896 0 -0.996041" ydir="0.125557 0.992023 -0.011206" zdir="0.988096 -0.126056 -0.088187" scale="0.8 0.8 1" lighting="false" shader_id="room_shader" head_id="ghost_blank_obj" head_pos="0 0 0" body_id="ghost_1" anim_id="idle" userid_pos="0 0.3 0" auto_play="true" cull_face="none" />Overall, the markup should look like this when layering into the HTML code:
<FireBoxRoom>
<Assets>
<AssetGhost id="ghost_id" src="file.txt" />
<AssetObject id="ghost_body_m" src="http://ipfs.io/ipfs/QmRTVpJgfTJBNLcdbfJ1jWhRvkiDaTpizMAxYf2i32Peaw/meme/meme_17.obj" mtl="http://ipfs.io/ipfs/QmRTVpJgfTJBNLcdbfJ1jWhRvkiDaTpizMAxYf2i32Peaw/meme/meme_17.mtl" />
<AssetObject id="ghost_head" src="http://avatars.vrsites.com/mm/null.obj" mtl="http://avatars.vrsites.com/null.mtl" />
</Assets>
<Room>
<Ghost id="ghost_id" js_id="148" locked="false" onclick="" oncollision="" interp_time="0.1" pos="0 0.199 0.5" vel="0 0 0" accel="0 0 0" xdir="0.943801 0 0.330513" ydir="0 1 0" zdir="-0.330513 0 0.943801" scale="0.8 0.8 0.8" col="#ffffff" lighting="false" visible="true" head_id="ghost_head" head_pos="0 1 0" body_id="ghost_body_m" anim_id="" anim_speed="1" eye_pos="0 1.6 0" eye_ipd="0.065" userid_pos="0 0.5 0" loop="false" gain="1" pitch="1" auto_play="false" cull_face="none" play_once="false" />
</Room>
</FireBoxRoom>
The useful feature about ghosts is when a user ctrl-click's one it changes their avatar into that. This is how the seeds will spread throughout the metaverse.
![]()
Link to Album (creds to Spyduck for building the original Cyberia). I really liked the shader that provided the lights for this room. One only needs to look at the bottom of the code in order to modify vectors for the color, time, and placement of this effect:
void applySceneLights() {
    directional(vec3(-0.5,-1,0),vec3(0.15,0.41,0.70)*0.1);
    // dance lights
    light(vec3(-0.3,4,-4), getBeamColor(0,0)*2, -1, 30, 0.8);
    light(vec3(-0.3,4,5), getBeamColor(2,0.2)*2, -1, 30, 0.8);
    light(vec3(0.6,3,-0.4), getBeamColor(2,0.5)*2, -1, 30, 0.8);
    spotlight(vec3(-0.3,6,-4), vec3(0,-1,0), getBeamColor(0,0)*2, 50, 40, 30, 0.45);
    spotlight(vec3(-0.3,6,5), vec3(0,-1,0), getBeamColor(2,0.2)*2, 50, 40, 30, 0.45);
    spotlight(vec3(0.6,6,-0.4), vec3(0,-1,0), getBeamColor(2,0.5)*2, 50, 40, 30, 0.45);
    // neon signs
    spotlight(vec3(-17.71,1.78,7.68), vec3(0,0,-0.9), vec3(0.3,0.5,1)*2, 90, 80, 30, 2);
    spotlight(vec3(-10.28,5.31,-8.79), vec3(0,0,0.9), vec3(0.3,0.5,1)*2, 90, 80, 30, 1.2);
    // other
    spotlight(vec3(-7.754,5.281,11.565), vec3(0,-0.5,0.6), vec3(1,1,1)*2, 75, 60, 30, 1.2);
}
An adjustment on the Room tag will make this shader global:
<Room pos="0 0 1" xdir="1 0 0" ydir="0 1 0" zdir="0 0 1" shader_id="room_shader">
(*・ω・) Party Time (ㆁᴗㆁ✿)![]()
Work needs to be done in several areas:
- Optimize the scans of the gallery
- Implement generative textures
- Introduce 3D dancing avatars
- Build in support for live audio and DJing
- Test live video
- Tweak the particle effects / particle beam
- Decentralize everything as much as possible
This mixed reality project will ideally be platform agnostic. With such decides like the Meta 2 and Hololens finally reaching developers, we're at the DK1 stages of augmented reality. The metaverse party is online and just getting started, join us.
![]()
My vision began as a means to connect the physical and the digital together for an art show in Los Angeles that anybody can attend remotely from the internet. Guests will be able to view live 360 streaming of the event and explore the space. The information will flow both ways: meatspace attendees can have conversations with holograms that represent a person visiting from the internet.
http://alpha.vrchive.com/image/E5j
-
Generative Networks Pt. 2
02/26/2016 at 17:43 • 0 commentsLocation Based Mixed Reality WiFi Glitch Art
![]()
I've been really busy lately. Earlier this month, a hackerspace in Warsaw Poland published a guide to hacking an awesome device called the Zsun, a WiFi card reader that's been hacked to run OpenWrt. It costs $11 and has 64MB RAM, 16MB SPI Flash, and USB SD Card Reader and is perfect for converting into an AVALON node. http://imgur.com/a/XP6oX
When finished, it will receive power through USB and will seed it's own access point or connect with others nodes in a meshnet.
![]()
The vision I have for this art project is that the zsun listen to ambient WiFi signals around it and extract image data to retexture itself. We will need a script to process the images. We will use imagemagick for creating the textures for the leaves.
Basic stuff covered in https://hackaday.io/project/4423-stereo-vision-experiments
![]()
# Convert input image into a binary black and white stencil convert leaf.png matte:- | convert - stencil.png # Make black transparent (can also add fuzz) convert -transparent Black stencil.png mask.png![]()
# Composite the mask over the background image
convert mask.png -channel Black -separate +channel girl.png +swap -composite out.png
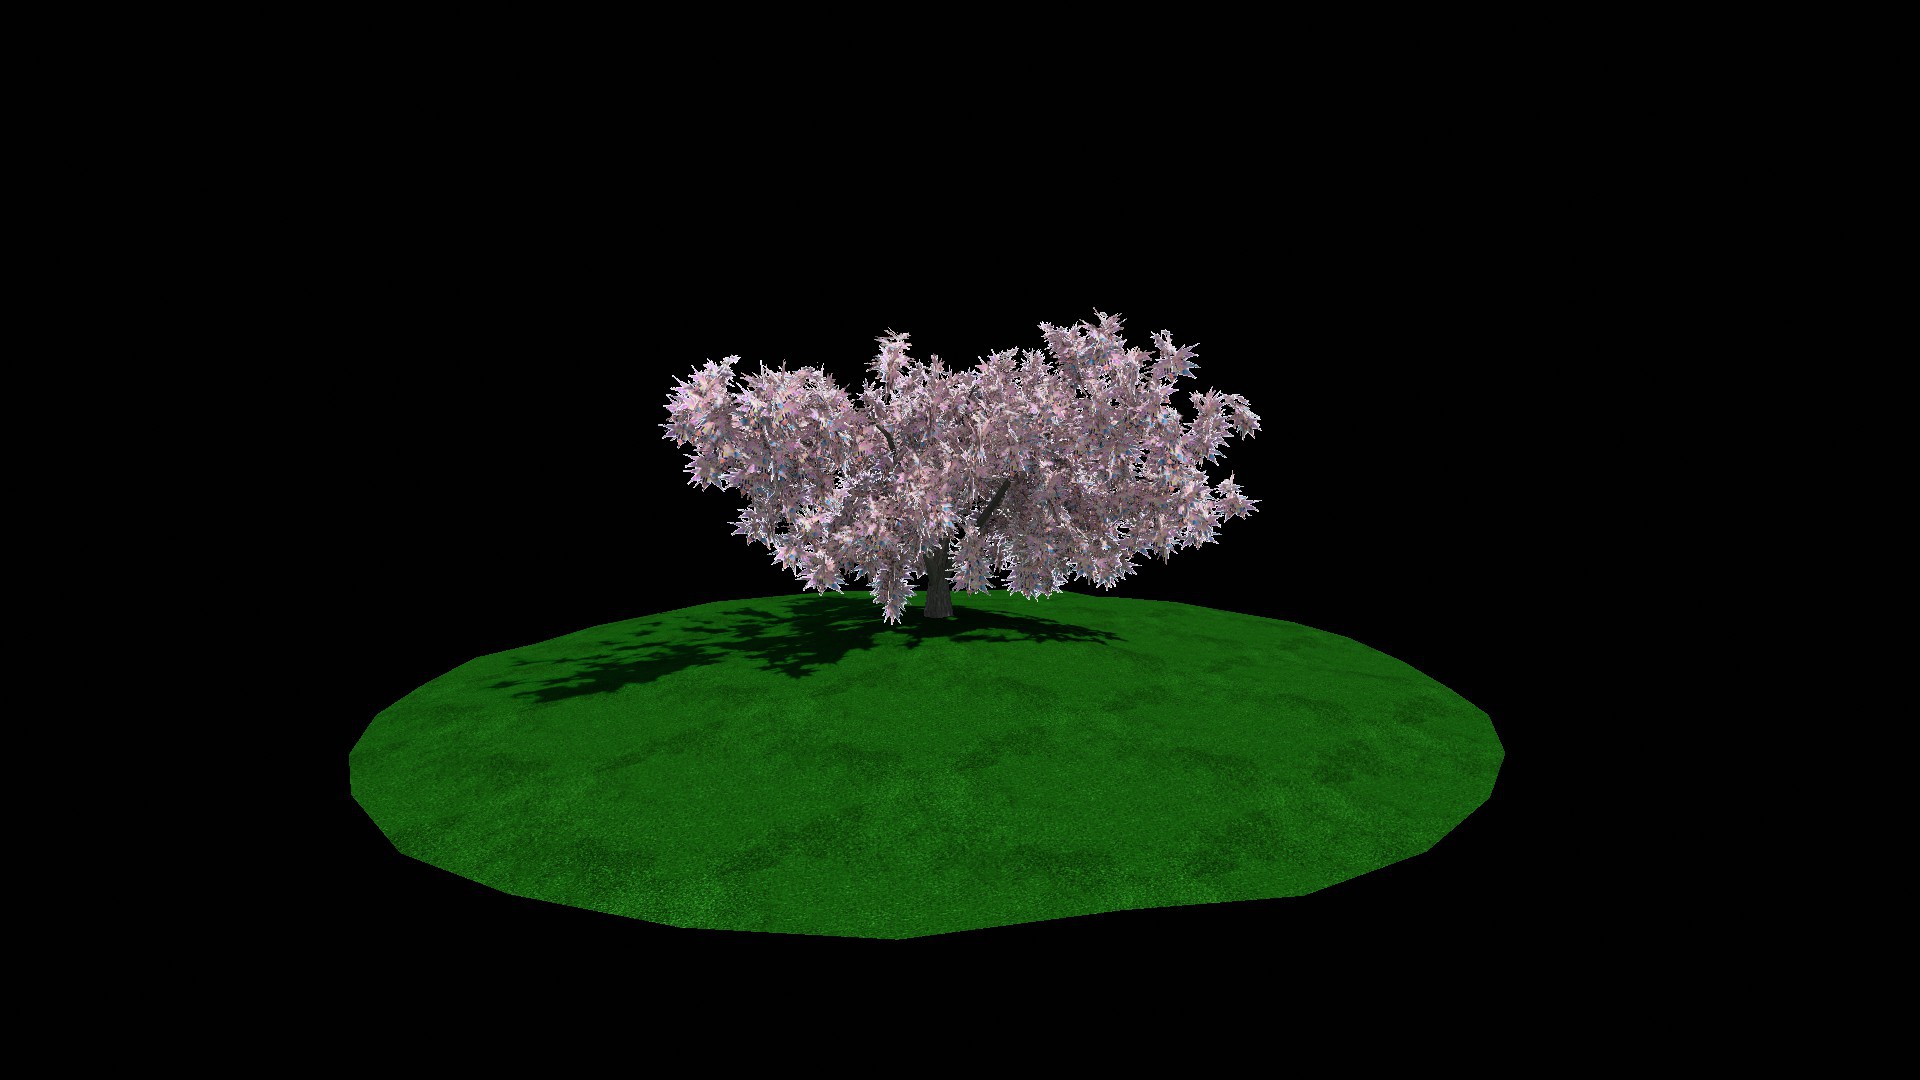
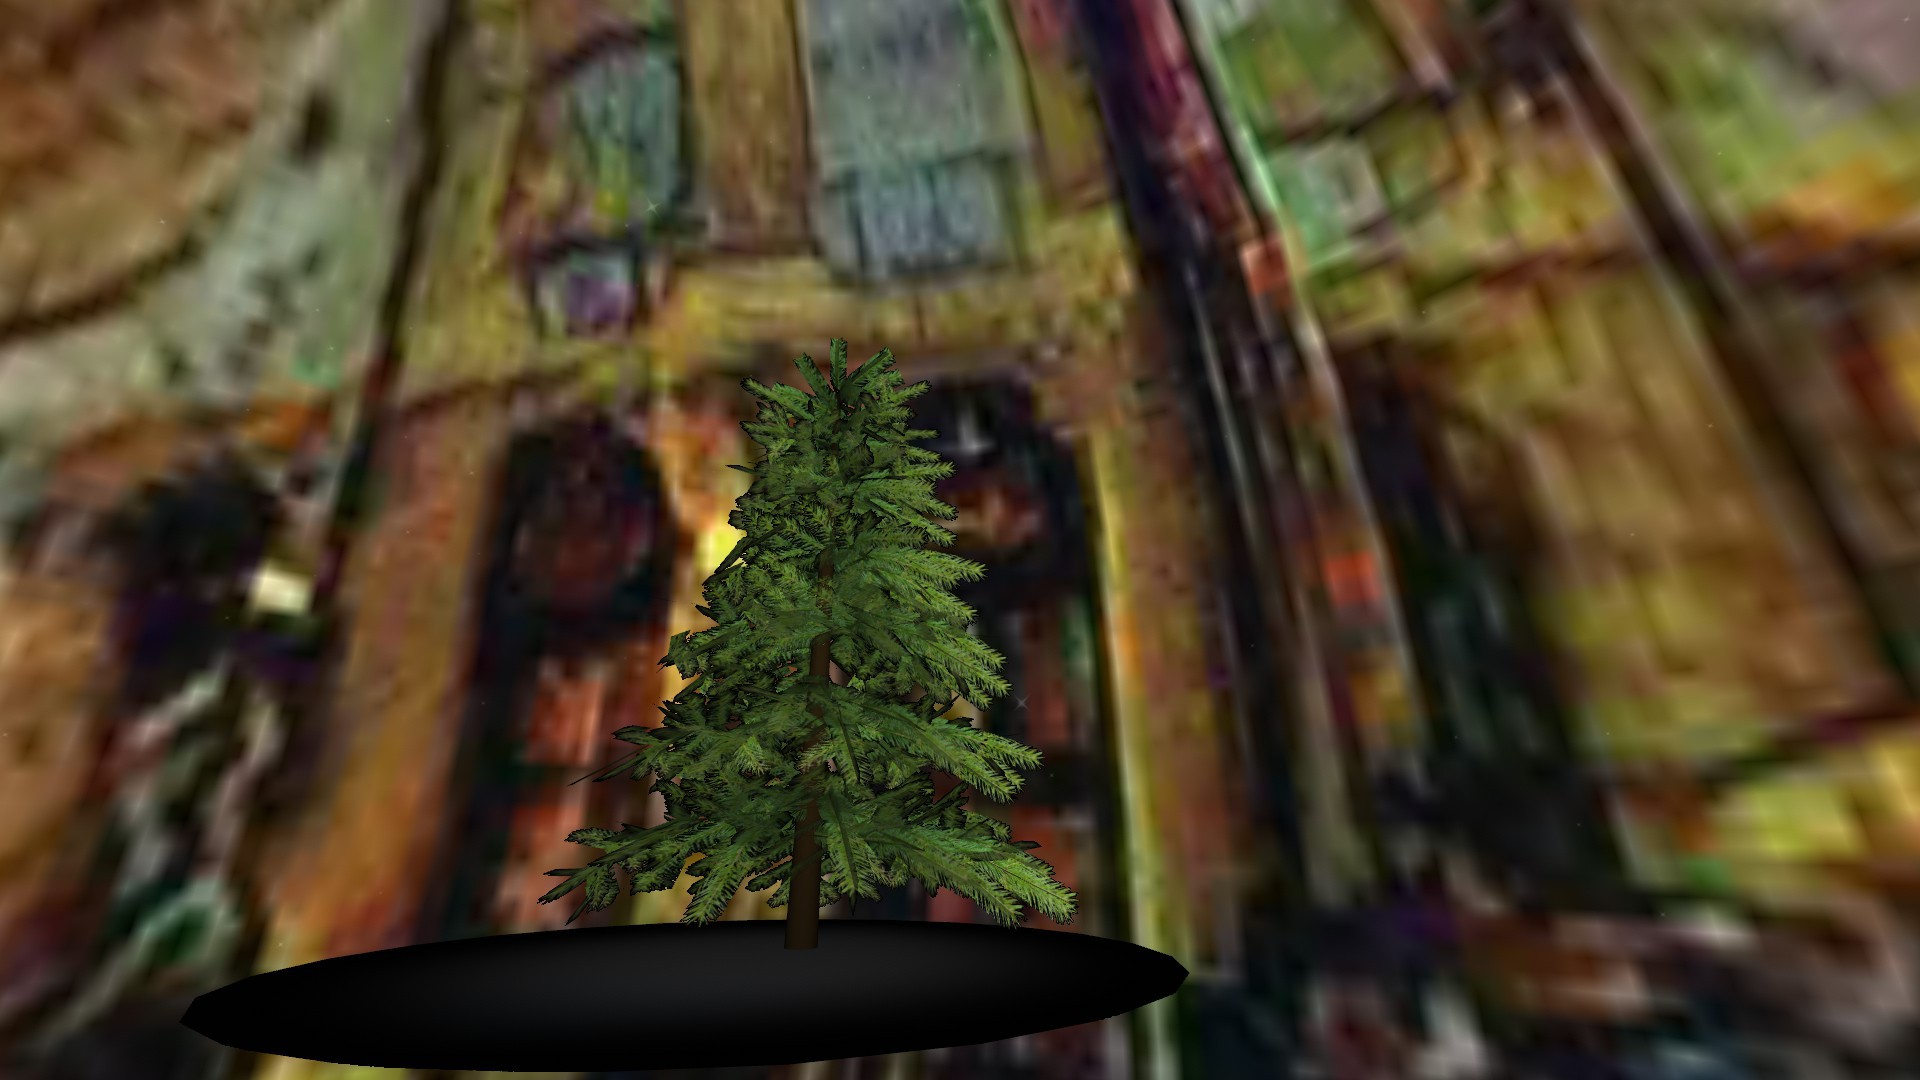
Creating the Initial Scene in BlenderCreating a patch of land, the area could symbolize the signal range.
![]()
Mapping the textures onto a Japanese Maple 3D model.
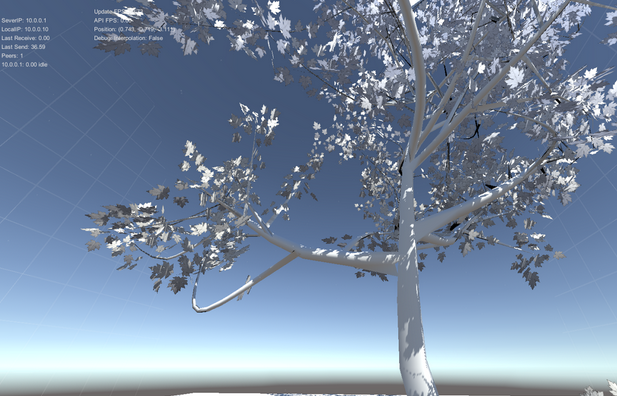
Creating a simple Janus app![]()
<html> <head> <title>Japanese Maple</title> </head> <body> <FireBoxRoom> <Assets> <AssetObject id="room_dae" src="room.dae" /> <AssetObject id="jap_maple_dae" src="jap_maple.dae.gz" /> <AssetImage id="black" src="black.gif" tex_clamp="true" /> </Assets> <Room pos="0 0 1" xdir="1 0 0" ydir="0 1 0" zdir="0 0 1" skybox_down_id="black" skybox_front_id="black" skybox_left_id="black" skybox_back_id="black" skybox_right_id="black" skybox_up_id="black"> <Object id="room_dae" js_id="0" pos="0 -1.6 -5" scale="3.6 3.6 3.6" lighting="false" cull_face="none" collision_id="room_dae" blend_src="src_color" /> <Object id="jap_maple_dae" js_id="1" pos="0 -1.6 -5" scale="3.6 3.6 3.6" lighting="false" collision_id="maple_COLL" blend_src="one" blend_dest="zero" /> </Room> </FireBoxRoom> </body> </html>![]()
This is already looking better than the basic Multiplayer VR sample in Project Tango store:
https://play.google.com/store/apps/details?id=net.johnnylee.multiplayervr&hl=en
No offense to Johnny Lee, he is awesome and I've always been a great fan of his work! Lets build the Metaverse together :)![]()
Sourcing Textures
Web Scraping and Virtual Reality is a powerful combination to visualize data and use computers to create art. A good primer and my personal recommendation for those wishing to get into scraping is Web Scraping with Python. Not only is it a lot of fun, you'll obtain a deeper understanding of the internet and build up some very useful skills along the way.
# Pythonpy will evaluate any python expression from the command line. Install via:
sudo pip install pythonpy
# Make sure you also have BeautifulSoup installed
sudo pip install beautifulsoup4
# scrape from imgur and then name images via sequence
curl http://imgur.com/ | py 'map(lambda _: _.attrs["src"].partition("//")[-1], bs4.BeautifulSoup(sys.stdin).findAll("img"))' | xargs -n1 wget >/dev/null 2>&1 && ls | cat -n | while read n f; do mv "$f" "$n.jpg"; done
The next step is to incorporate these images into our DOM.![]()
To be continued..
-
Generative Networks
02/08/2016 at 04:45 • 0 commentsTexture Synthesis
What is it like to be a computer that makes art? If a computer could originate art, what would it be like from the computer's perspective?
A concept taught to beginner artists to eschew is "schema", a phenomena in which the artist draws from the minds eye rather than what the eye sees. Deep dream is the good example of this neurological indoctrination in which cognitive bias is reinforced at every level from the moment it notices a trend.
Complex systems studies how relationships between parts give rise to the collective behaviours of a system and how the system interacts and forms relationships with its environment. Examples of complex systems are Earth's global climate, the human brain, social organization, an ecosystem, a living cell, and ultimately the entire universe. In many cases it is useful to represent such a system as a network where the nodes represent the components and the links their interactions. Neural networks have been integral in advancing the studies of complex systems. In many ways, the process for generative glitch art is about exploiting chaos within the system.
Chaos theory and science fiction share much in common: tiny alterations about the world that later cause thunderstorms into the future. There is a deep structure in the apparently random, chaotic behaviour that characterizes all natural and some social phenomena. This structure takes the form of a 'strange attractor', a state towards which a system is drawn. A good example would be The Difference Engine where Charles Babbage perfects his Analytical Engine and the computer age arrives a century ahead of its time.
Generative art refers to art that in whole or in part has been created with the use of an autonomous system. Generative art can be viewed developing in real-time. Typically such works are never displayed the same way twice. Some generative art also exists as static artifacts produced by previous unseen processes.
![]()
G'MIC is a research tool. Many commands (900+ all configurable, for a libgmic library file < 5 MB.) routinely produce 'images' which are useful data sets, but do not span a range of values compatible with standard graphic file formats. ZArt is a stand-alone program, distributed within the G'MIC sources, to apply (almost)-real-time image effects on videos. Multiple webcams, image files and video files are now supported. However, the much improved CLI interface is undoubtedly the most powerful and elegant means of using G'MIC. It now uses by default OpenCV to load/save image sequences. We can then apply image processing algorithms frame by frame on video files (command -apply_video), on webcam streams (command -apply_camera), or generate video files from still images for instance. New commands -video2files and -files2video have been added to easily decompose/recompose video files into/from several frames. Processing video files is almost childs play with G’MIC, making it a powerful companion to FFmpeg and ImageMagick.
![]()
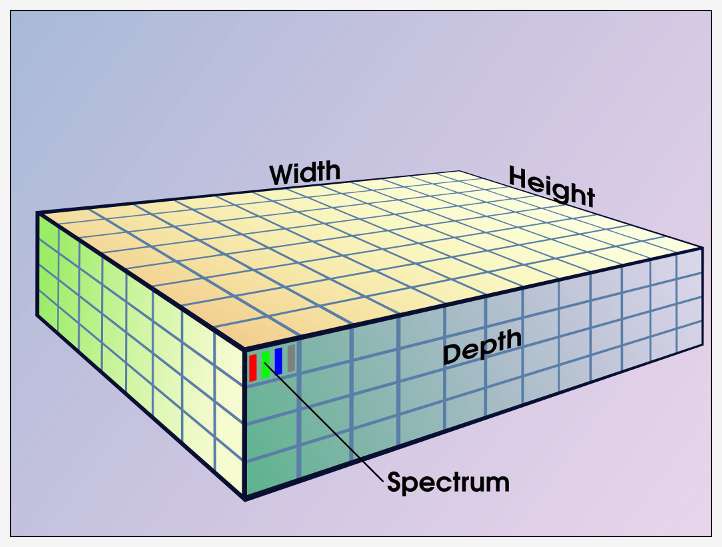
With depth, G'MIC images represent volumes, a construct that readily supports tomographic imaging (i.e., 'CATScans'). Video footage also constitutes one 'image' on a G'MIC image list, depth a proxy for time. Depth-aware commands can produce various animation effects. A one minute NTSC video, 720x480 pixels shot at 29.97 frames per second, becomes a G'MIC image with a depth of 1798 pixels. Increments along the depth axis are often called slices, a frame in the larger context of a video, and a two dimensional section in the larger context of tomographic imaging.
G'MIC is found within the most popular GNU/Linux distributions as gmic and gimp-gmic. One useful filter for virtual reality world building would be the patch-based algorithm for seamless textures. With the gimp plugin installed, you can apply this filter via → → .
![]()
This filter creates a tileable texture that is blended nicely
![]()
View my other generated neural art seamless textures: http://imgur.com/a/gMUTv
With the G'MIC interpreter, you can easily script an array to view the texture tiling:
# Apply patch-based seamless filter to image
gmic file.jpg -gimp_make_seamless 30
# Tile single image into an array
gmic file.jpg -frame_seamless 1 -array 3,3,2
# All images in directory
for i in `ls *.jpg`; do gmic $i -array 2,2,2 -o test/$i; done
Stroke Style Synthesis
Non-Photorealistic Rendering: NPR systems simulate artistic behavior that is not mathematically founded and often seems to be unpredictable.
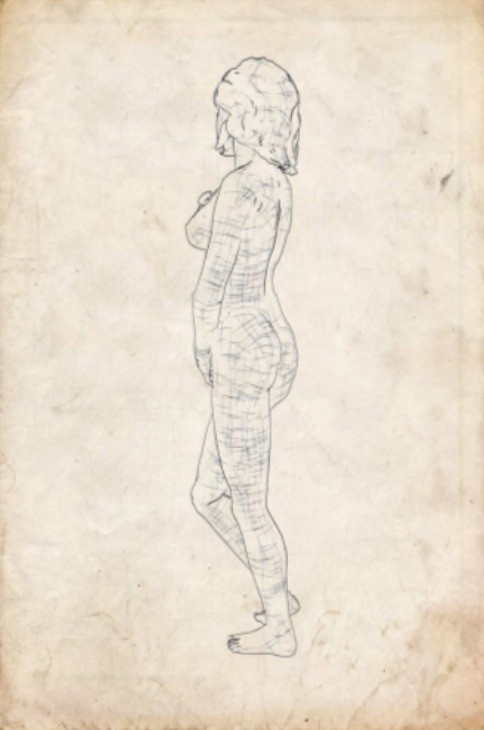
Procedural Generation of Hand-drawn like Line Art: http://sirkan.iit.bme.hu/~szirmay/procgenhand.pdf
![]()
Artistic line drawing generation that supports different contour and hatching line renderings.
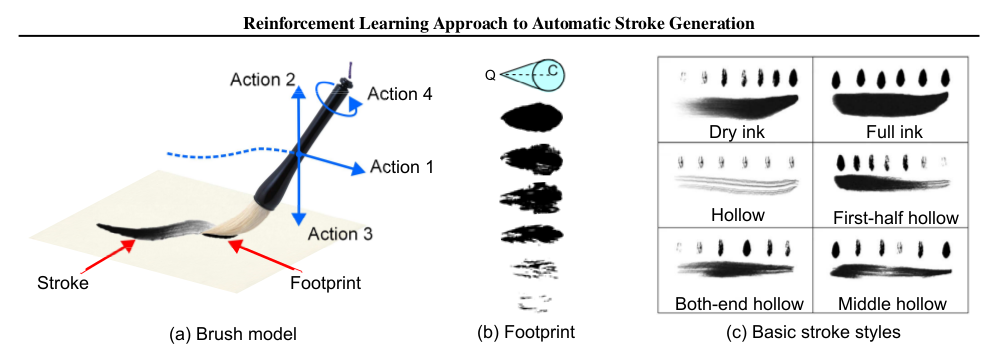
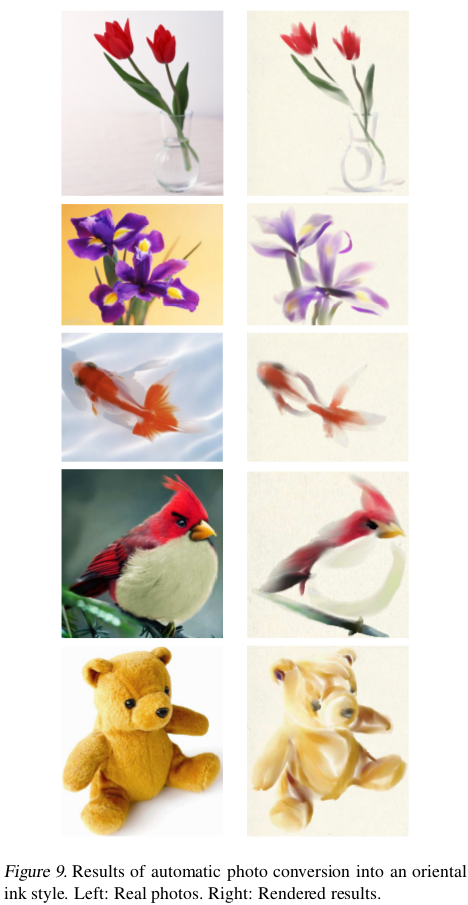
Automatic Stroke Generation in Oriental Ink Painting: http://icml.cc/2012/papers/101.pdf
![]()
The agent uses a Markov Decision Process to learn a (local) optimal drawing policy by being rewarded for obtaining smooth and natural brush strokes in arbitrary shapes.
A Markov chain is a discrete random process with the property that the next state depends only on the current state. An extension of the Markov chain is a Markov Decision Process (MDP) which provides a mathematical framework for modeling decision making in situations where outcomes are partly random and partly under the control of a decision maker, the difference being the addition of actions (allowing choice) and rewards (giving motivation).
![]()
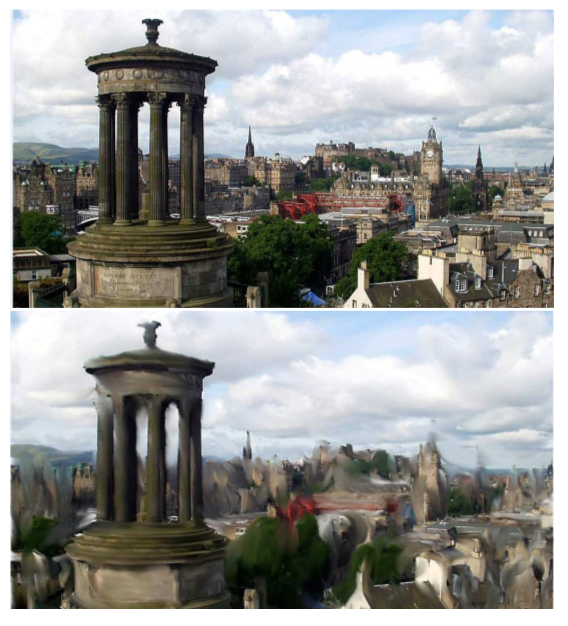
The problem with the process now is the lack of control over rendering with 1 dominant style processing the entire frame. To the eyes of a trained artificial network, a picture should be worth a thousand words. The artist should be able to extract and express unique features from a scene. In other words, we should be able to select parts of the scene rather than process everything. This would go a longer way in generating richer assets for our use with mixed reality art.
![]()
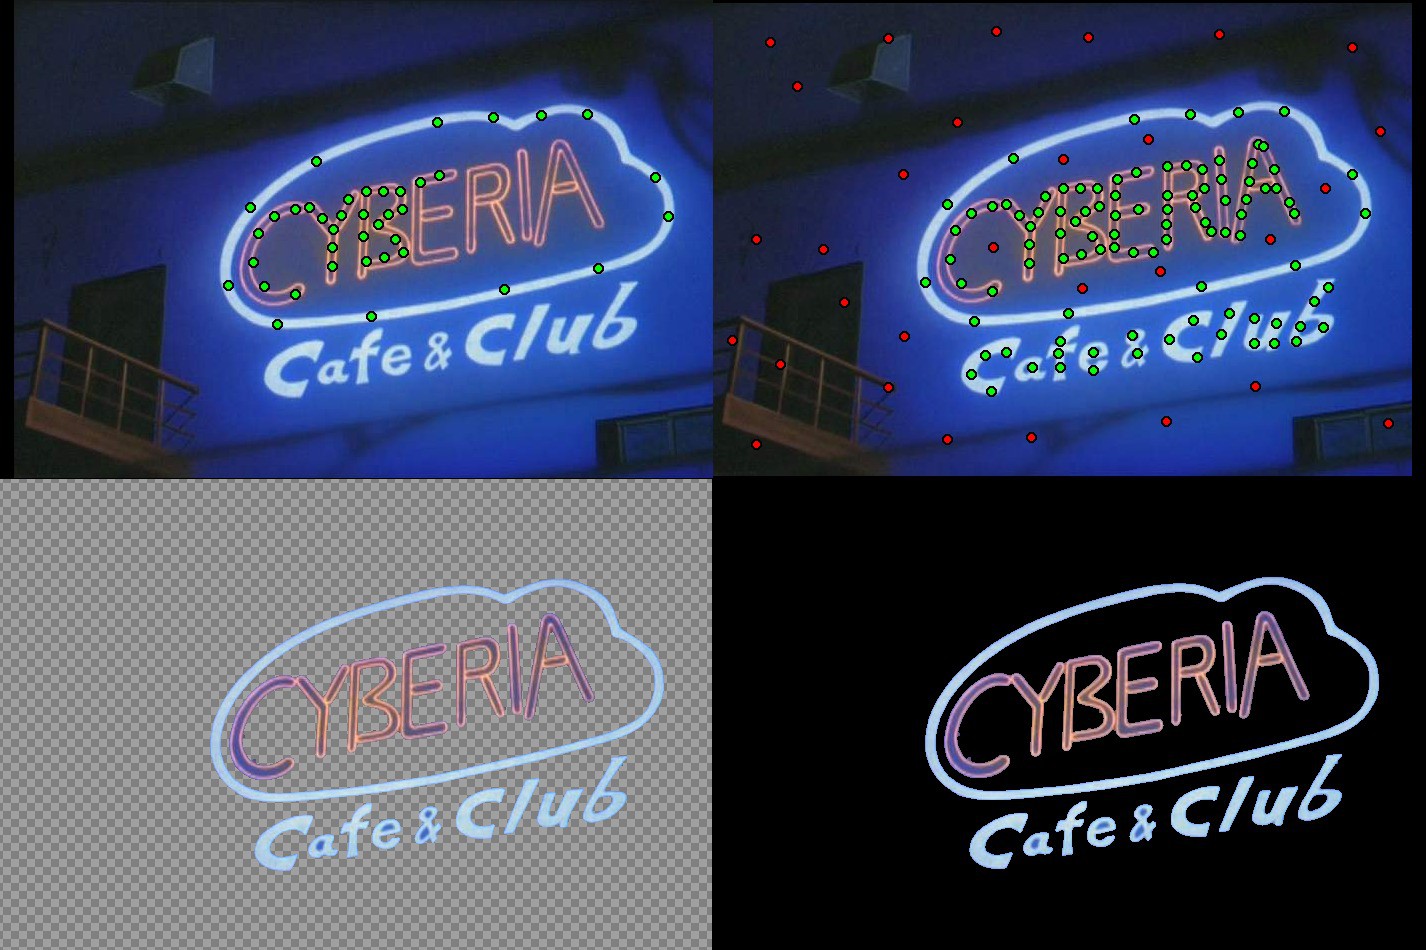
Manual Feature Extraction
This is the fastest way I have found for segmenting parts of a scene manually
gmic image.jpg -x_segment , -output output.png
----------------------------------------------------------------------------------------------------
 ---- Left mouse button or key 'F' create a new foreground control point (or move an existing one).
 ---- Right mouse button or key 'B' create a new background control point (or move an existing one).
 ---- Mouse wheel, or keys 'CTRL+arrows UP/DOWN' zoom view in/out.
 ---- 'CTRL+mouse wheel', 'SHIFT+mouse wheel' or arrow keys move image in zoomed view.
 ---- Key 'SPACE' updates the extraction mask.
 ---- Key 'TAB' toggles background view modes.
 ---- Key 'M' toggles marker view modes.
 ---- Key 'BACKSPACE' deletes the last control point added.
 ---- Key 'PAGE UP' increases background opacity.
 ---- Key 'PAGE DOWN' decreases background opacity.
 ---- Keys 'CTRL+D' increase window size.
 ---- Keys 'CTRL+C' decrease window size.
 ---- Keys 'CTRL+R' reset window size.
 ---- Keys 'ESC', 'Q' or 'ENTER' exit the interactive window.
 ----------------------------------------------------------------------------------------------------
The green and red dots are used to draw the mask points and spacebar will update the preview while pressing tab to flick between channels. I think in a VR environment mapping these functions to different and more discreet processes such as via a pointer / eye tracking / voice. It's about clipping out the important bits from a memory, it's best to try and image simulating its ideal function state AFK because c'mon this is mixed reality.
![]()
There'll be plenty of cooler examples of this technique in the future.
Autonomous Format
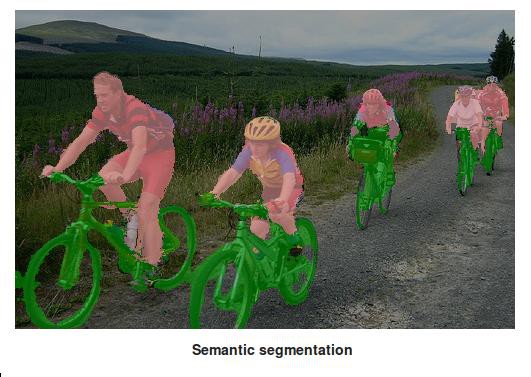
Semantic Segmentation allows computers to recognize objects in images and even recover the 2D outline of the object. Try it out here.
![]()
The traditional approach to dealing with complexity is to reduce or constrain it. Typically, this involves compartmentalisation: dividing a large system into separate parts. Organizations, for instance, divide their work into departments that each deal with separate issues. Engineering systems are often designed using modular components. However, modular designs become susceptible to failure when issues arise that bridge the divisions but atleast you can fix or replace that part instead of the entire system. In order to guide the process better, the algorithm must first learn to classify through observation. This way it will begin to pay closer attention to details within the composition by expressing the unique objects within the scene.
[The future is there... looking back at us. Trying to make sense of the fiction we will have become.]
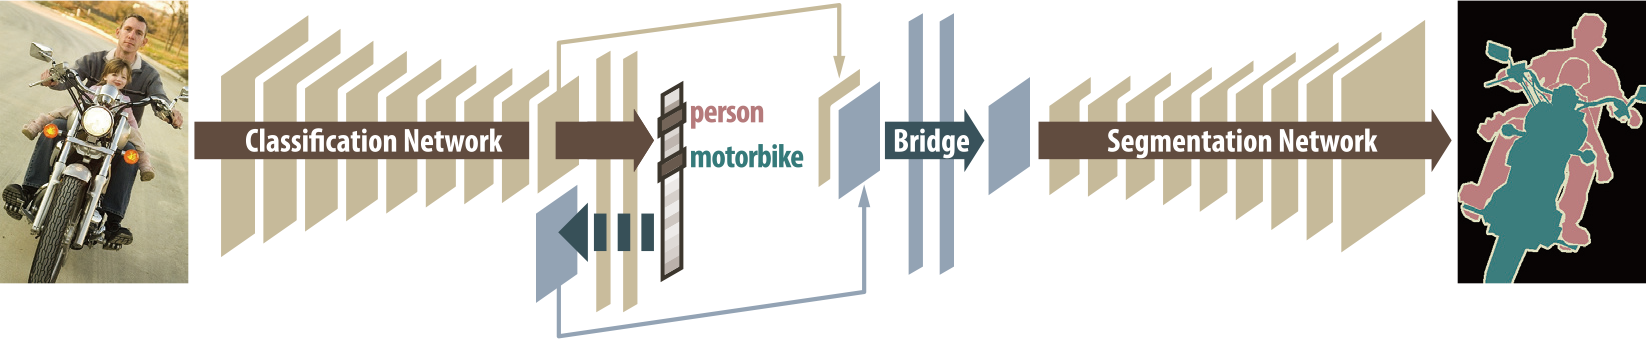
DecoupledNet: Decoupled Deep Neural Network for Semi-supervised Semantic Segmentation
This algorithm learns a separate network for each classification and segmentation task.
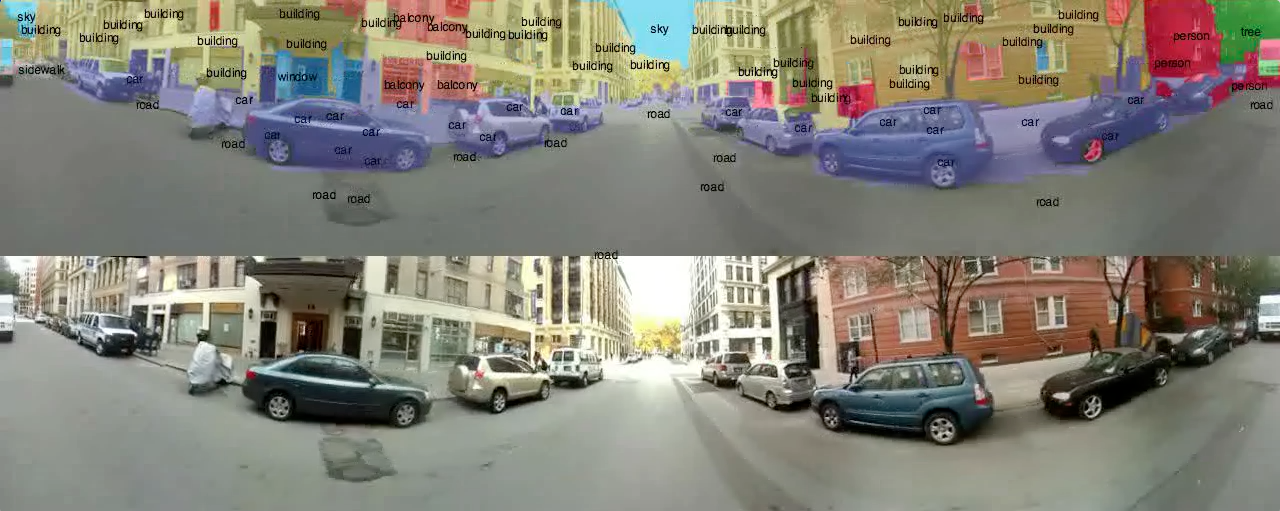
![]()
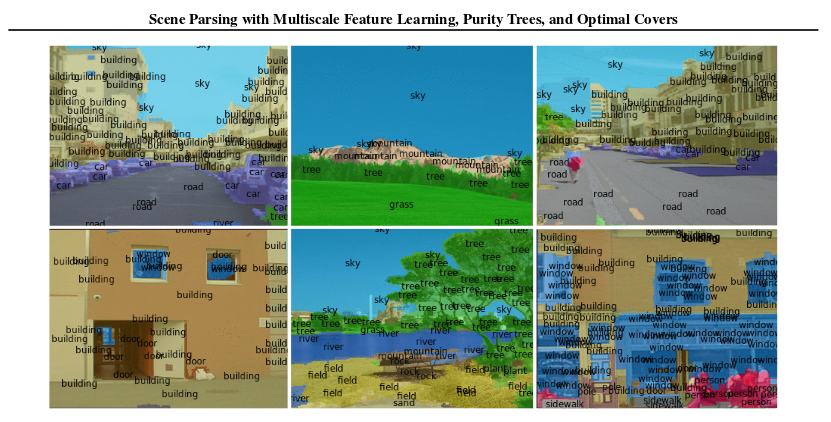
Extracting features from the world and encoding it with more useful metadata like time and position. For building a memory palace from which will sink into dreamspace. The metadata will be piped into the system for processing various textures that will be assimilated into generated virtual worlds. Each mask represents a layer of texture that can be extracted and preserved as numerical data. See: http://gmic.eu/tutorial/images-as-datasets.shtml
![]()
![]()
-
Ricoh Theta S 360 Streaming
01/28/2016 at 20:07 • 4 commentsThinking Outside the Bubble
![]()
Live-Streaming from a $350 360 camera into Virtual Reality
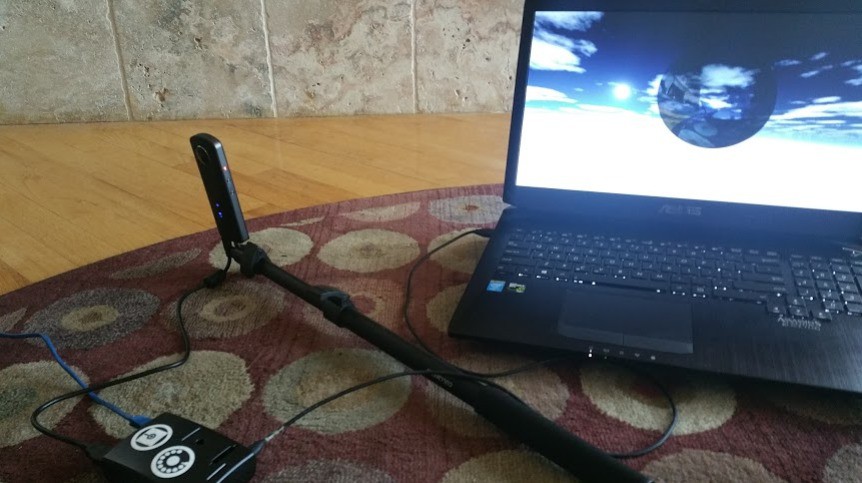
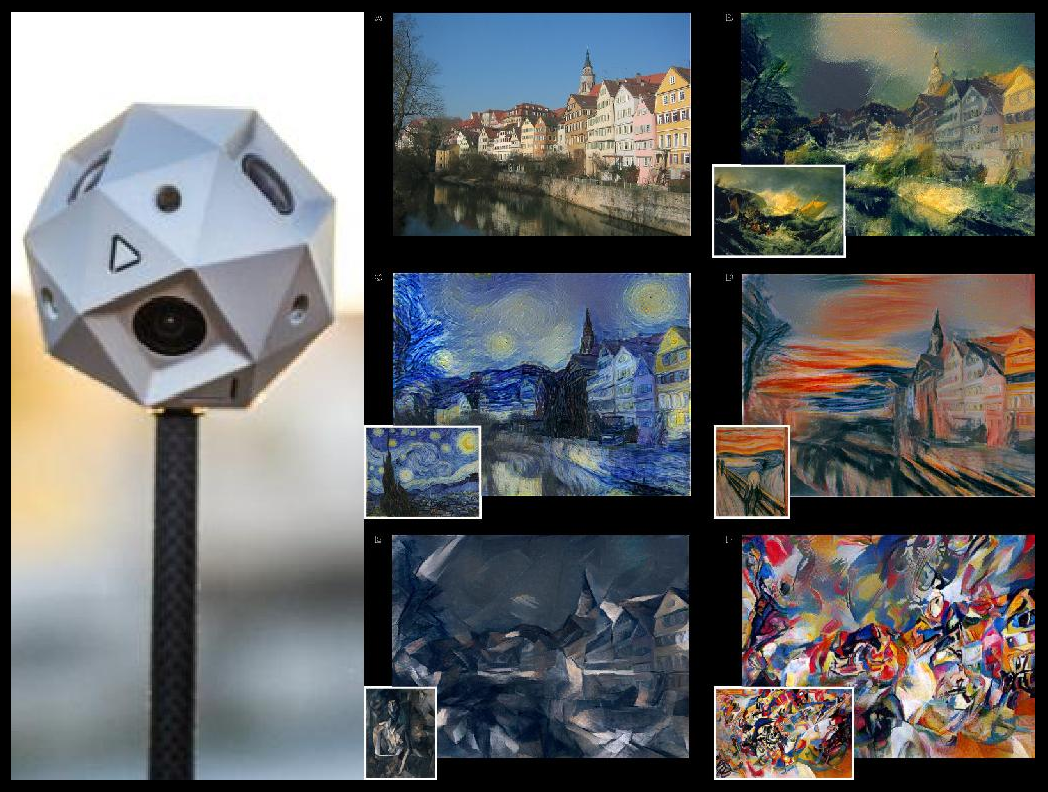
![]() The Ricoh Theta S has achieved much praise within the VR community as being an easily affordable 360 camera that does all the things. The camera has 14MP resolution with spectacular looking images that are stitched from the camera to produce equirectangular format jpeg sizes: 5376x2688 / 2048x1024
The Ricoh Theta S has achieved much praise within the VR community as being an easily affordable 360 camera that does all the things. The camera has 14MP resolution with spectacular looking images that are stitched from the camera to produce equirectangular format jpeg sizes: 5376x2688 / 2048x1024 Full HD (1,920 x 1,080 pixel) video time has been increased more than eight-fold to 25 minutes with the frame rate doubling to 30 fps since the last model. This camera has a live streaming and remote shutter options with 8gb of space available. Shutter speed can be set from 1/6400 sec. to 60 seconds allowing for excellent long exposures, excellent for light-painting. I plan to test the 360 light-painting concept with a friend who just acquired the Pixelstick:
Controlling the Camera
Linux command line can be used to control the camera HTTP API. Wireless LAN is used for communication between the client and RICOH THETA. RICOH THETA operates as an HTTP server when the wireless LAN is ON, and API can be used for GET requests and POST requests. You can read more about Open Spherical Camera API. Here's a few examples that use curl:
# Get Information
$ curl http://192.168.1.1:80/osc/info
{"manufacturer":"RICOH","model":"RICOH THETA S","serialNumber":"XXXXXXXX","firmwareVersigon":"01.11","supportUrl":"https://theta360.com/en/support/","endpoints":{"httpPort":80,"httpUpdatesPort":80},"gps":false,"gyro":false,"uptime":583,"api":["/osc/info","/osc/state","/osc/checkForUpdates","/osc/commands/execute","/osc/commands/status"]}
# Initiate Session
$ curl -X POST http://192.168.1.1:80/osc/commands/execute -d '{"name": "camera.startSession"}'
{"name":"camera.startSession","state":"done","results":{ "sessionId":"SID_0001","timeout":180}}
# Shoot a Still Image
$ curl -X POST http://192.168.1.1:80/osc/commands/execute -d '{"name": "camera.takePicture", "parameters": {"sessionId": "SID_0001"}}'
{"name":"camera.takePicture","state":"inProgress","id":"2","progress":{"completion":0.0}}
# Acquire Photographic State
$ curl -X POST http://192.168.1.1:80/osc/state
{"fingerprint":"FIG_0006","state":{"sessionId":"SID_0001","batteryLevel":1.0,"storageChanged":false,"_captureStatus":"idle","_recordedTime":0,"_recordableTime":0,"_latestFileUri":"100RICOH/R0010174.JPG","_batteryState":"charging"}}
# Get the File
$ curl -X POST http://192.168.1.1:80/osc/commands/execute -d '{"name": "camera.getImage", "parameters": {"fileUri": "100RICOH/R0010174.JPG"}}' > image.jpg && open image.jpg
# Terminate Session
$ curl -X POST http://192.168.1.1:80/osc/commands/execute -d '{"name": "camera.closeSession", "parameters": {"sessionId": "SID_0001"}}'
{"name":"camera.closeSession","state":"done"}
There are also a number of scripts to get media from the camera. First you have to set the Ricoh Theta S to WiFi mode and connect to the access point. Here's a python example to test the API:
import urllib
import json
urllib.urlopen("http://192.168.1.1/osc/info").read()
data = json.dumps({"name":"camera.startSession"})
res = urllib.urlopen('http://192.168.1.1/osc/commands/execute', data)
sessionId = json.loads(res.read())["results"]["sessionId"]
data = json.dumps({"name":"camera.takePicture", "parameters": {"sessionId": sessionId}})
urllib.urlopen('http://192.168.1.1/osc/commands/execute', data)
fileUri = ""
while not fileUri:
    res = urllib.urlopen('http://192.168.1.1/osc/state', urllib.urlencode({}))
    fileUri = json.loads(res.read())["state"]["_latestFileUri"]
data = json.dumps({"name":"camera.getImage", "parameters": {"fileUri": fileUri}})
res = urllib.urlopen('http://192.168.1.1/osc/commands/execute', data)
with open("image.jpg", "wb") as file:
    file.write(res.read())
data = json.dumps({"name":"camera.closeSession", "parameters": {"sessionId": sessionId}})
urllib.urlopen('http://192.168.1.1/osc/commands/execute', data)
Opening the image can look something like this:
import subprocess
subprocess.Popen(['open', 'image.jpg'])
Here's a more advanced version that uses the better requests module: https://raw.githubusercontent.com/theta360developers/python-download-rossgoderer/master/ThetaS-Download.py
There's also a Node.js client that is awesome and makes taking a picture simple as:
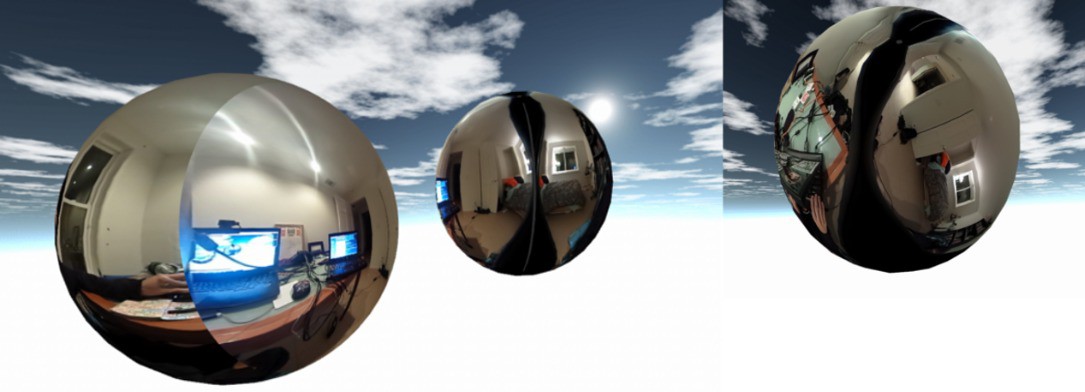
% theta --capture
% theta --capture out.jpg
Available options:
  -h, --help                     show help
      --capture [FILENAME]       take a picture
      --list                     list pictures
      --handle [Object Handle]   specify picture by Object Handle
      --save [FILENAME]          save picture
      --delete [Object Handle]   delete a picture
      --info [Object Handle]     show picture info
      --battery                  check battery level
      --volume [NUMBER]          get/set audio volume (0~100)
By default, the Ricoh Theta will produce still images in the Equirectangular format that can then be wrapped around a sphere for viewing as I have shown how to do in my first project log: https://hackaday.io/project/5077/log/15961-360-photospheres
![]()
This type of projection is better for processing with the neural networks [Sublime] but it has proven not be the most optimized format for streaming. According to Facebook, moving from equirectangular layouts to a cube format in 360 video reduced file size by 25 percent against the original and encoding with a pyramid geometry reduces file size by 80 percent. These are significant improvements when dealing with scale. We'll come back to this later.
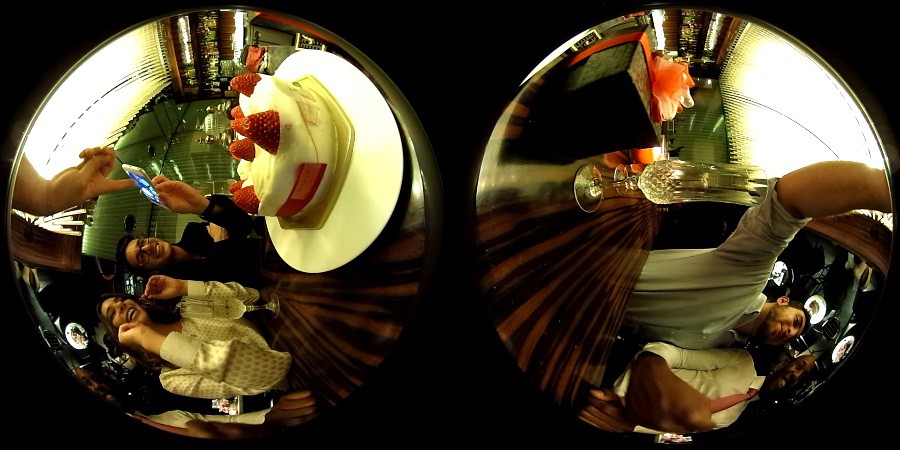
The other type of image that the Ricoh Theta generates is a Dual-Fisheye. The Ricoh Theta S generates this mp4 format video at sizes 1920x1080 / 1280x720.
![]()
My development platform of choice is the Raspberry Pi 2 running a fresh copy of Raspbian Jessie. One method of live-streaming that has worked for me in the past has been mjpeg-streamer. You can refer back to https://hackaday.io/project/5077-metaverse-lab/log/17307-avalon-pt-2 for notes on how to build AVALON on top of the Rpi2 and configure mjpg-streamer to initiate during start-up. The condensed version for installing looks like this: (http://jacobsalmela.com/raspberry-pi-webcam-using-mjpg-streamer-over-internet/)
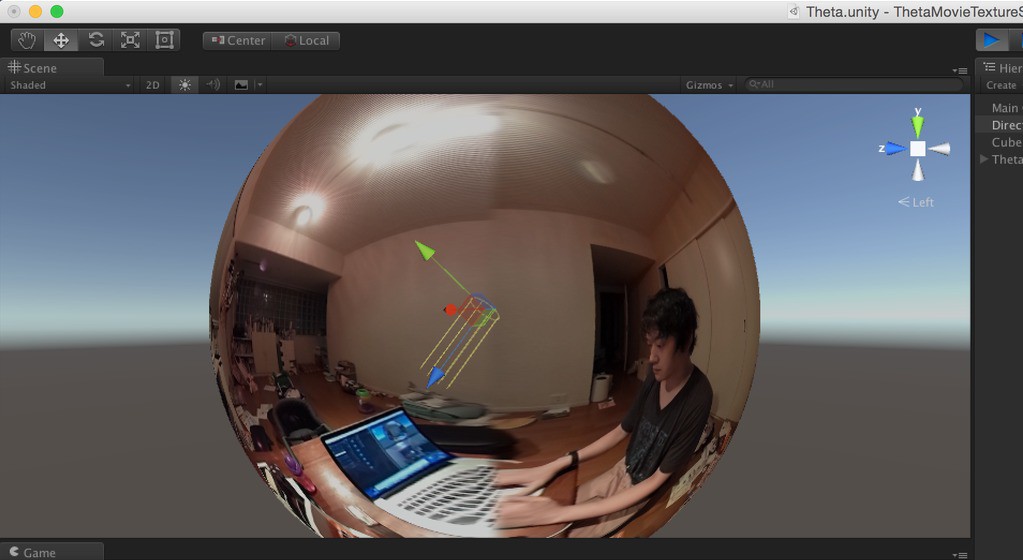
lsusb
sudo apt-get update
sudo apt-get upgrade
sudo apt-get install libjpeg8-dev imagemagick libv4l-dev
sudo ln -s /usr/include/linux/videodev2.h /usr/include/linux/videodev.h
sudo apt-get install subversion
cd ~
svn co https://svn.code.sf.net/p/mjpg-streamer/code/mjpg-streamer/ mjpg-streamer
cd mjpg-streamer
make mjpg_streamer input_file.so input_uvc.so output_http.so
sudo cp mjpg_streamer /usr/local/bin
sudo cp output_http.so input_file.so input_uvc.so /usr/local/lib/
sudo cp -R www /usr/local/www
sudo vi ~/.bashrc
     export LD_LIBRARY_PATH=/usr/local/lib/
source ~/.bashrc
/usr/local/bin/mjpg_streamer -i "/usr/local/lib/input_uvc.so -r 1280x720" -o "/usr/local/lib/output_http.so -w /usr/local/www -p 8090"
     #!/bin/bash
     /usr/local/bin/mjpg_streamer -i "/usr/local/lib/input_uvc.so -r 1280x720" -o "/usr/local/lib/output_http.so -w /var/www/stream -c username:password"
sudo chmod 755 /etc/init.d/livestream.sh
sudo update-rc.d livestream.sh defaults
This is not ready to be streamed yet because the video remains to be in Dual-Fisheye format. We can see that Ricoh Theta has a desktop program for Windows and Mac which will do stitching from Dual-Fisheye into equirectangular and add the video metadata but this is unavailable for streaming. Linux users running the program through Wine will be disappointed as the it fails to convert video or do real-time stitching for streaming into equirectangular format. The lens geometry for the THETA is based on equidistant projection. RICOH does not make detailed lens parameter information available. This is also known as lens distortion data. Developers often ask for this information to improve stitching. It is proprietary and not available as of December 2015. However, stitching is still possible without this information. GOROman released a shader pack for Unity game engine that UV maps each Fisheye view to a sphere pretty well.
![]()
A custom UV mapped is formed for each side then the two images are aligned together as close to being seamless as possible.
![]()
Inspired by this, VR developer FireFoxG helped to create a custom UV mapped object that can stitch the two Fisheye images as close as he can. These first attempts were pretty shabby:
![]() I took a picture while holding grid paper to help visualize the alignment between the lenses. This has greatly improved the stitching:
I took a picture while holding grid paper to help visualize the alignment between the lenses. This has greatly improved the stitching: ![]()
The object file can be found here: Download as .obj
![]()
The process for streaming 360 video over the web involved setting up dynamic DNS and port forwarding on the router.
As mentioned earlier, it is found that the equirectangular format is not the best in terms of streaming. Cube maps have been shown to deliver significantly higher quality while being easier to compress. John Carmack was quick to point this early but we have recently seen a new tool from Facebook emerge called Transform, implemented as an ffmpeg video filter that transforms 360 video in equirectangular projection into a cubemap projection. Facebook's primary goal was to tackle the drawback of the standard equirectangular layout for 360 videos, which flattens the sphere around the viewer onto a 2D surface. This layout creates warped images and contains redundant information at the top and bottom of the image. For the size of Facebook, every optimization method will go a long way in scalability.
When a 360 video is uploaded, we transform it from an equirectangular layout to the pyramid format for each of the 30 viewports, and we create five different resolutions for each stream, for a total of 150 different versions of the same video. We chose to pre-generate the videos and store them on the server rather than encode them in real time for each client request. While this requires more storage and can affect the latency when switching between viewports, it has a simple server-side setup and doesn’t require additional software
The other method of file format compression would be to use H 265 codec for encoding the video. It's extremely efficient for HD and 4K video, using a fraction of predecessor H.264 bandwidth. This provides the highest quality content even at low-bandwidth connections at sometimes half the cost of H.264. Sad to say there's a deal breaker to using this codec:
![]()
¯\_(ツ)_/¯
PS. RICOH, please release code for proper stitching or atleast a Linux version of your desktop program.
-
The Year of Mixed Reality
01/21/2016 at 00:01 • 0 commentsI have set my focus for 2016 on figuring out solutions for developing functional peer-to-peer multidimensional mixed reality networks. I have figured out an optimal path in achieving this by combining the tracking components of project tango with the infrastructure components of AVALON.
What is Mixed Reality?
Mixed reality (MR), sometimes referred to as hybrid reality, is the merging of real and virtual worlds to produce new environments and visualizations where physical and digital objects co-exist and interact in real time.
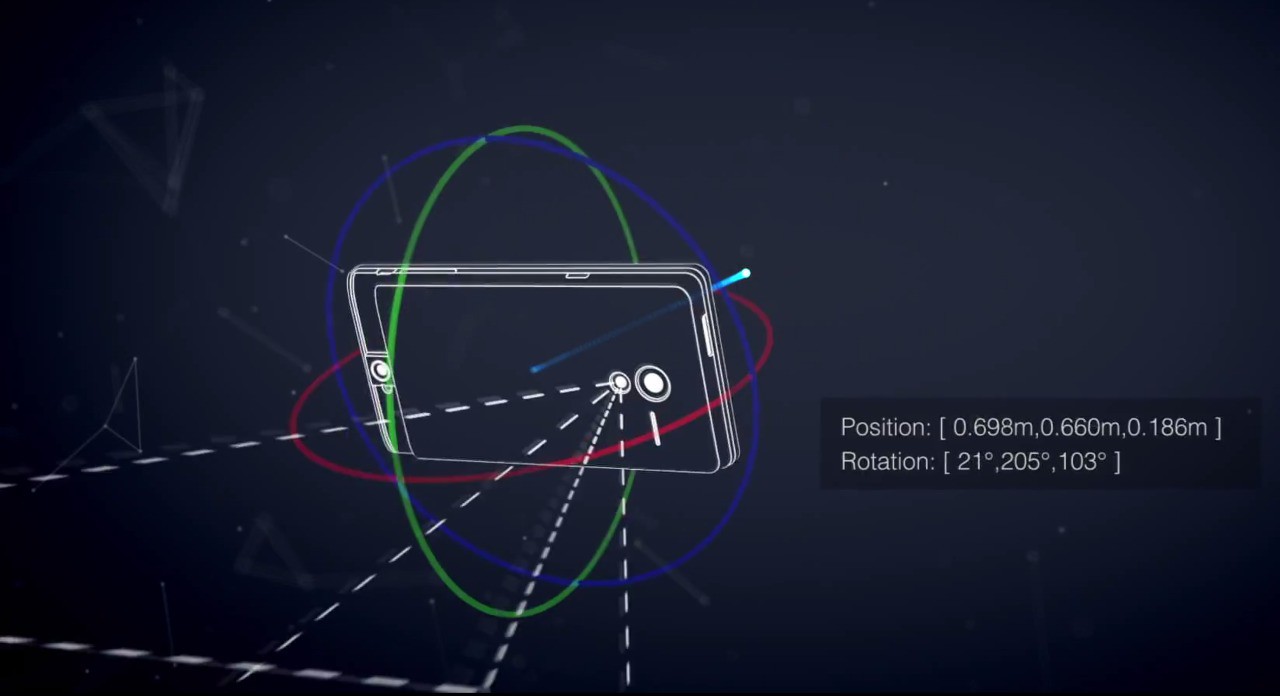
Generally speaking, VR/AR technology is enabled by sensors that allow for 6DOF tracking and screens with low motion to photon latency. It is critical that the physical motions of a persons actions are updated in near real-time on the screen. About 20 milliseconds or less will provide the minimum level of latency deemed acceptable and anything more is noticeably perceptible to the human senses.
![]()
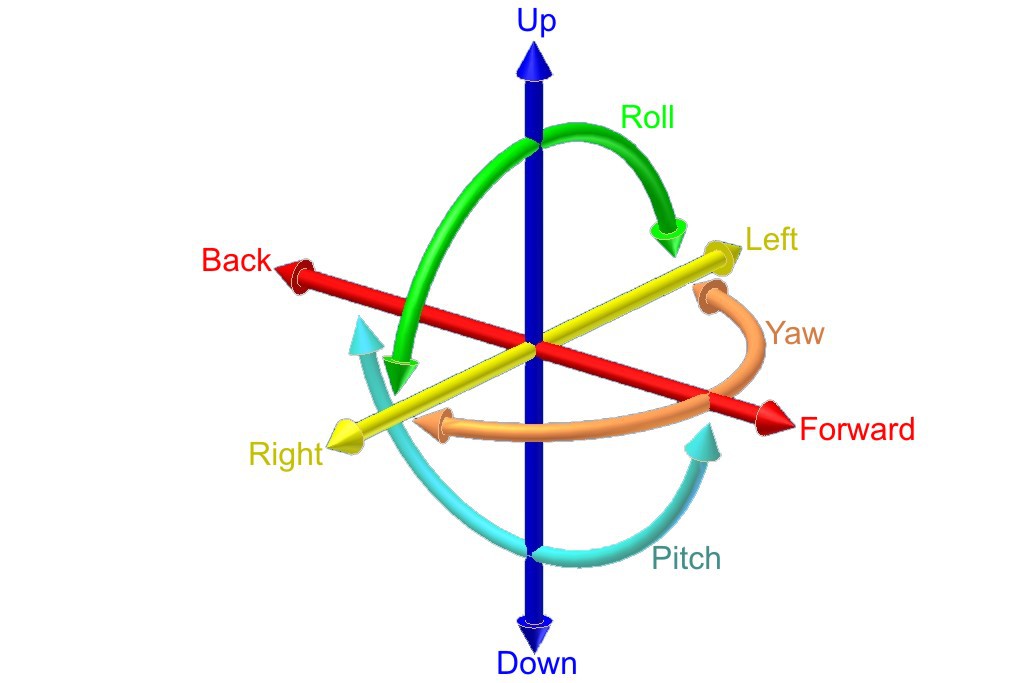
There are three rotations that can be measured: yaw, pitch and roll. If you would also track the translations or movements of the device,
this would add another three (along the X, Y and Z axis): 6 DoF
With 6 DoF we are able to detect the absolute position of an object and represent any type of movement, no matter how complex, and reduce motion sickness at the same time. Moving your head without getting the correct visual feedback can introduce or intensify motion sickness which is a problem with the early headsets that only allow for 3 DoF. It breaks the immersion if you are unable to tilt your head to look around the corner of a building.
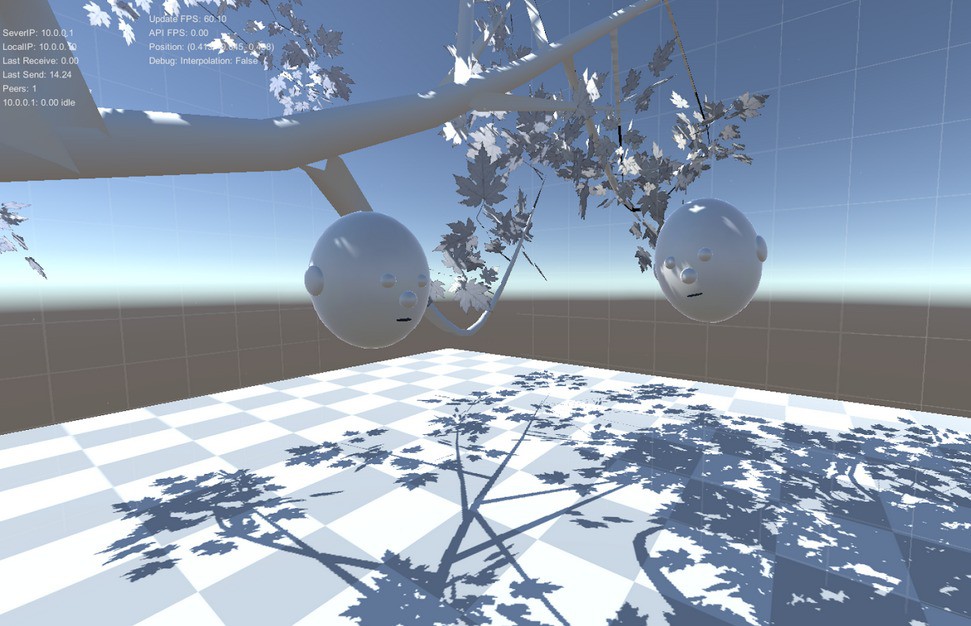
I became intrigued by a particular Project Tango application called MultiplayerVR by Johnny C Lee. This sample app the uses Project Tango devices in a multi-user environment. People can see each other in the same space, and interact under a peaceful tree.
![]()
The question then became, how do I place an object in the space and get other viewers to also see it from their perspective and to see each others position too?
The answer really comes down to proper tracking. When describing the position and orientation, or pose of an object, it is important to specify what the reference frame is. For example, saying "the box is 3 meters away" is not enough. You have to ask, "3 meters from what? Where is the origin, (0,0,0)?" The origin might be the position of the device when the application first started, the corner of your desk, the front door of a building, or perhaps it's the Washington Monument. You must define the location and orientation of something with respect to something else to make the information meaningful. As a result, the Project Tango APIs use a system of coordinate frame pairs to specify pose requests.
In other words, you want to share an Area Definition File (ADF) between all the participants. Given that they all have this file loaded and are in that area then they are able to handle scene objects. In order to see positions of each connected person, you need to exchange ADF relative pose information.
The first challenge is to lock an object in space or a planar surface. With the right tracking, things can be stabilized between the dimensions. In the past we would use optical tracking with AR markers. This works rather well but it requires additional components such as the optical sensors, computer vision algorithms, and line of sight, which all cost on battery performance.
Microsoft Hololens seems to have gotten optical tracking down. The headset is jam packed with sensors and optics that capture as much data as possible, generating terabytes of data which requires a second processor called the Holographic Processing Unit to compute. The device understands where you look, and maps the world around you, all in real time.
The way Valve engineered Lighthouse is very clever in solving the input tracking problem without any cameras. The system beams non-visible light that and functions as a reference point for any positional tracking device (like a VR headset or a game controller) to figure out where it is in real 3D space. The receiver is covered with little photosensors that detect the flashes and the laser beams.
![]()
When a flash occurs, the headset simply starts counting (like a stopwatch) until it “sees” which one of its photosensors gets hit by a laser beam—and uses the relationship between where that photosensor exists on the headset, and when the beam hit the photosensor, to mathematically calculate its exact position relative to the base stations in the room.
I want to learn how Project Tango's positional information can be linked with Janus.
![]()
The first requirement is to have an ADF (AKA a Tango scan) and the ability to track when a user enters the space.
By default in JanusVR, the entrance for the player into the environment will be at 3D position "0 0 0", and the player will be facing direction "0 0 -1" (along the negative Z-axis). Also, in many cases you will find yourself at the origin when walking through a portal. Pressing "/" in Janus enables debug mode. The head movements and body translations will represent the 6 DoF.
I hypothesize that the multiserver is going to be used translate movement from connected devices into Janus because it handles all the methods and data between simultaneously connected clients. The message structure for the API states that every packet must contain a "method" field and optionally a "data" field. In the case of movement, the message structure might look like this:
When you pass through a portal:
{"method":"enter_room", "data": { "roomId": "345678354764987457" }}When the user position has moved:
{"method":"move", "data": [0,0,0,0,0,0,0] }I need the ability to manipulate my avatar in Janus by moving around my Tango device. With ghosts, I can record all of the positional data relative to the Tango from the browser. Here is an example from a ghost script I recorded from walking around the office:
{"method":"move", "data":{"pos":"-5.2118 -0.001 10.0495","dir":"-0.982109 -0.180519 0.0536091","view_dir":"-0.982109 -0.180519 0.0536091","up_dir":"-0.18025 0.983572 0.00983909","head_pos":"0 0 0","anim_id":"idle"}}The ghost script records all types of information, including the users avatar, voice, and any interaction that person has in the room. Here's the snippet belonging to an avatar:
{"method":"move", "data":{"pos":"1.52321 4.06154 -0.578692","dir":"-0.529112 -0.198742 0.82495","view_dir":"-0.528664 -0.202787 0.824252","up_dir":"-0.109481 0.979223 0.170694","head_pos":"0 0 0","anim_id":"idle","avatar":"<FireBoxRoom><Assets><AssetObject id=^head^ src=^http://localhost:8080/ipfs/QmYwP5ww8B3wFYeiYk5AB9v6jqbyF8ovSeuoSoLgmaDdoM/head.obj^ mtl=^http://localhost:8080/ipfs/QmYwP5ww8B3wFYeiYk5AB9v6jqbyF8ovSeuoSoLgmaDdoM/head.mtl^ /><AssetObject id=^body^ src=^http://localhost:8080/ipfs/QmYwP5ww8B3wFYeiYk5AB9v6jqbyF8ovSeuoSoLgmaDdoM/human.obj^ mtl=^http://localhost:8080/ipfs/QmYwP5ww8B3wFYeiYk5AB9v6jqbyF8ovSeuoSoLgmaDdoM/human.mtl^ /></Assets><Room><Ghost id=^LA^ js_id=^148^ locked=^false^ onclick=^^ oncollision=^^ interp_time=^0.1^ pos=^-0.248582 3.432468 0.950055^ vel=^0 0 0^ xdir=^0.075406 0 0.997153^ ydir=^0 1 0^ zdir=^-0.997153 0 0.075406^ scale=^0.1 0.1 0.1^ col=^#ffffff^ lighting=^true^ visible=^true^ shader_id=^^ head_id=^head^ head_pos=^0 0 0^ body_id=^body^ anim_id=^^ anim_speed=^1^ eye_pos=^0 1.6 0^ eye_ipd=^0.065^ userid_pos=^0 0.5 0^ loop=^false^ gain=^1^ pitch=^1^ auto_play=^false^ cull_face=^back^ play_once=^false^ /></Room></FireBoxRoom>"}}Incase you forgot, the only information belonging to an avatar is stored in a text file in ~/.local/share/janusvr/userid.txt
Link to full API documentation
My vision is that someone entering my ADF (Area Definition File) remotely from Janus can be tracked by my multiserver which can then augment their movements as well as avatar information to be represented as an interactive hologram in AR while simultaneously being represented as an object in VR. The potential problem is that this depends on the precision of the tracking: if the motion detection is not perfect, it will introduce virtual movements that you see but that you never actually did!. For the next few years, most communication and interaction with holograms is going to be limited to screens but I am curious to learn of greater potential uses for transmitting 3D information wirelessly. Does it really matter to have this type of information only viewable by humans? What if the 3D information itself is representative of something else such as a new procedure. This year I want to fully understand the capabilities and implications of manipulating geometry en scale with mah decentralized multidimensional mixed reality networks.
Hybrid Reality Experiments
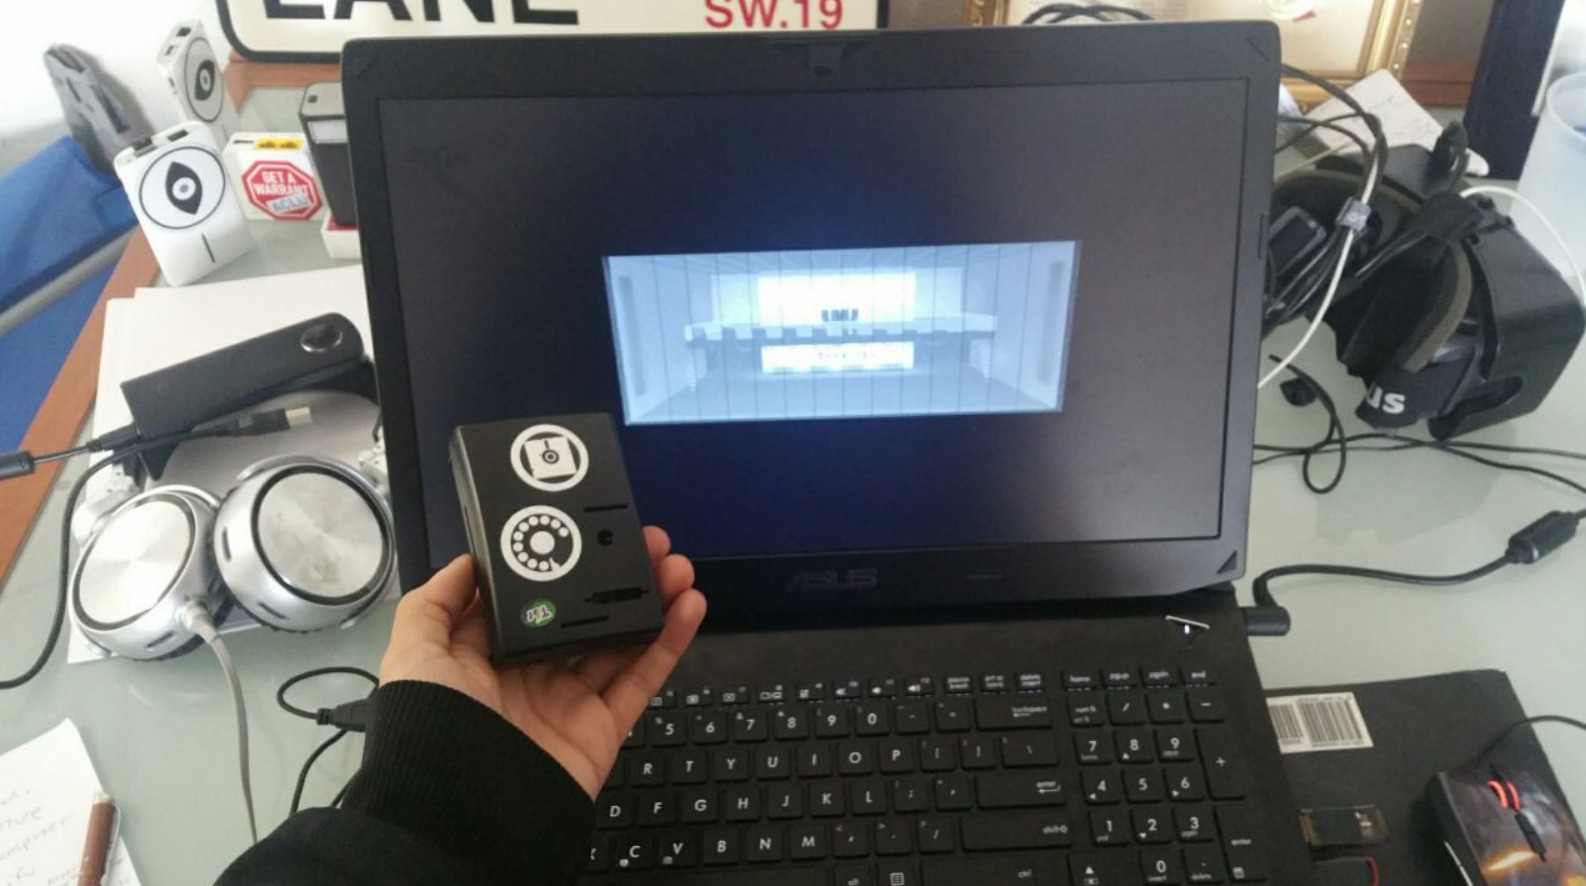
Tiny office is the beginnings of a mixed reality application that I'm working on to make cloud computing a literal term. One inspiration for this work has been from HoloLens and this awesome demo of combining MR with IOT:In contrast, my office app looked really dull and boring compared to Microsoft's...
![]()
so I needed to quickly jazz it up:
![]()
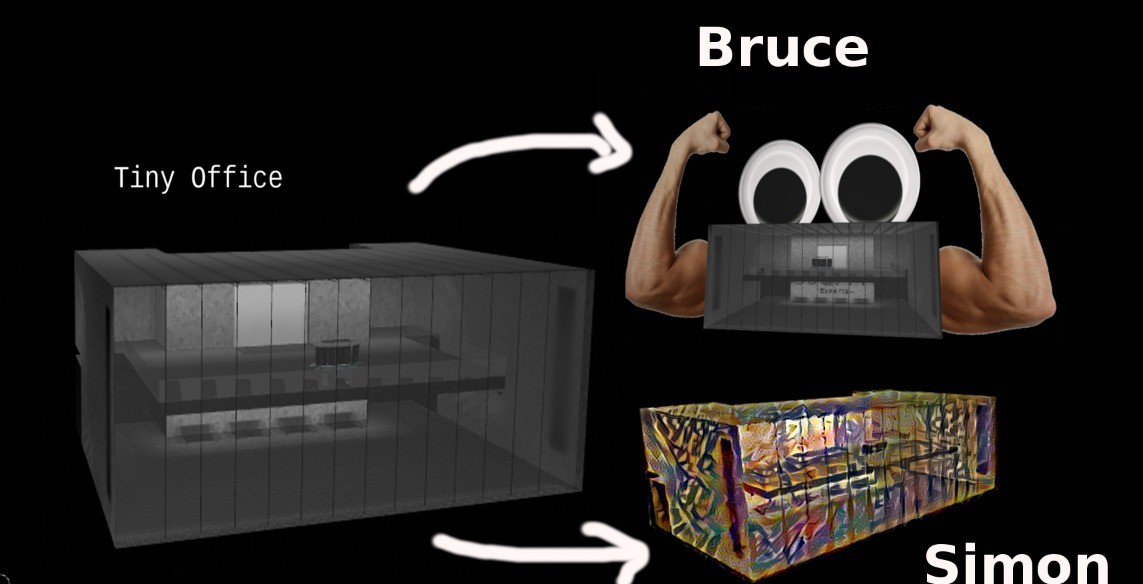
The idea is to give an object a persona [Bruce] or perhaps represent the object in its idle state as an art piece by periodically running its texture files through various creative neural networks that dream new skins. I also want the ability to change perspectives by being able to put on a headset and shrink into my office then peer out the window and feel as tiny as a beetle kind of like this.
Tiny Office represents an avatar for my Raspberry Pi running a GNU/Linux operating system.
For more information, check out Hacking Within VR Pt. 4.
-
Metaverse Tree
12/18/2015 at 21:55 • 1 commentPackets | Particles: Visualize the Network
![]() In Arthurian legend, Avalon is a mythical island upon which King Arthur and Morgan Le Fay are notable characters. In more recent times, one of the most notable allusions is the movie Avalon (2001) which follows Ash, a a player in an illegal virtual reality video game whose sense of reality is challenged as she attempts to unravel the true nature and purpose of the game. It's a good movie if you're interested in simulated reality or if you're a fan of Ghost in The Shell since it's directed by the same person.
In Arthurian legend, Avalon is a mythical island upon which King Arthur and Morgan Le Fay are notable characters. In more recent times, one of the most notable allusions is the movie Avalon (2001) which follows Ash, a a player in an illegal virtual reality video game whose sense of reality is challenged as she attempts to unravel the true nature and purpose of the game. It's a good movie if you're interested in simulated reality or if you're a fan of Ghost in The Shell since it's directed by the same person."As the Internet of things advances, the very notion of a clear dividing line between reality and virtual reality becomes blurred" - Geoff Mulgan
With that said, I have updated the interface to AVALON with visual metaphors that allure to the legend.
![]()
<Particle id="1140" js_id="104" pos="-40 -2 -40" vel="-0.1 -0.1 -0.1" scale="0.02 0.02 0.02" col="#666666" lighting="false" loop="true" image_id="wifi" count="500" rate="50" duration="10" rand_pos="80 8 80" rand_vel="0.2 0.2 0.2" rand_accel="0.1 0.1 0.1" />For creating the WiFi particles, I extract the images from a packet capture and filter out the corrupted files. The files are tagged by the names so I set a cron job to do extraction and rotating files every day for fresh packets to crystallize into snow.
![]()
Network traffic gets visualized as particles in a virtual space as they fall to their doom. This can be applied to any type of network, be it local / wireless / etc. [ Packet | Particle ]
![]()
<Particle id="dog_27" js_id="25" pos="-200 -10 -200" vel="-1 0 0" col="#666666" lighting="false" loop="true" image_id="wifi_27" blend_src="src_color" blend_dest="src_alpha" count="15" rate="50" duration="20" rand_pos="480 480 480" rand_vel="0.1 0.1 0.1" rand_accel="0.1 0.1 0.1" accel="0 -1.2 0" />![]()
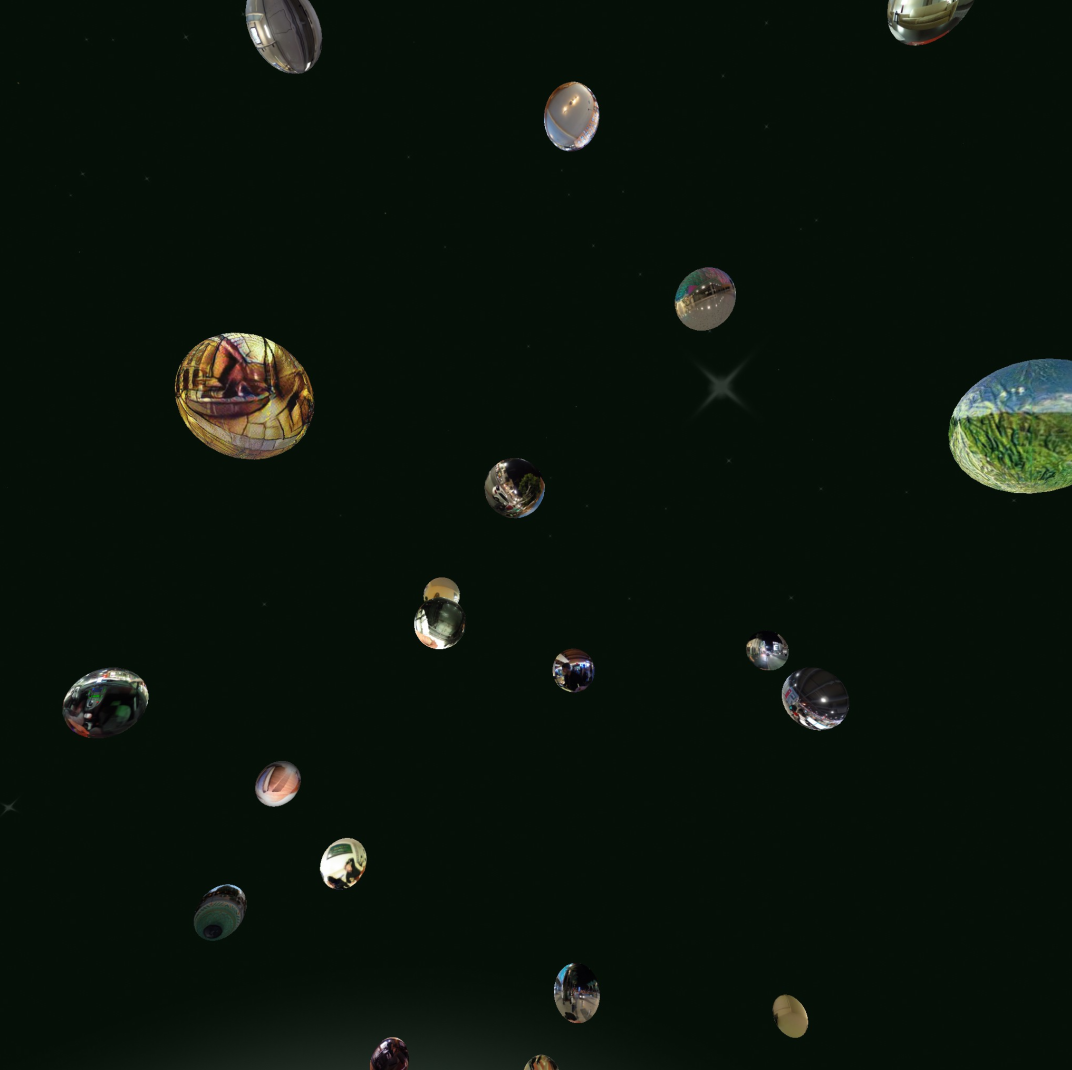
<Particle id="dog_27" js_id="25" pos="-200 -10 -200" vel="-1 0 0" col="#666666" lighting="false" loop="true" image_id="wifi_27" blend_src="src_color" blend_dest="src_alpha" count="15" rate="50" duration="20" rand_pos="480 480 480" rand_vel="0.1 0.1 0.1" rand_accel="0.1 0.1 0.1" accel="0 -1.2 0" />Before long, it was time to decorate the tree with ornaments! I collected 360 media from my Ricoh Theta S and my Sublime paintings into 100+ shiny balls to hang on the tree.
![]()
I was thinking of a cool idea for this tree where you can touch an ornament and it will expand around you, immersing the viewer inside the scene like this:
![]()
Janus markup is remarkably powerful as a VR scripting language. I combine the decorated tree and the particles with only a few lines of code.
![]()
![]()
http://alpha.vrchive.com/image/yo
Link to full album: https://imgur.com/a/WdgK0
AVALON: Your own Virtual Private Island
![]()
In Tango VR, I showed you how one can import a Project Tango scan into JanusVR.
Each section represents an object on the network but you can also conjoin all the sections into 1 piece by joining them in Blender. It can prove useful to have everything as one object if you wanted to move it around freely without having to manipulate every piece individually.
![]()
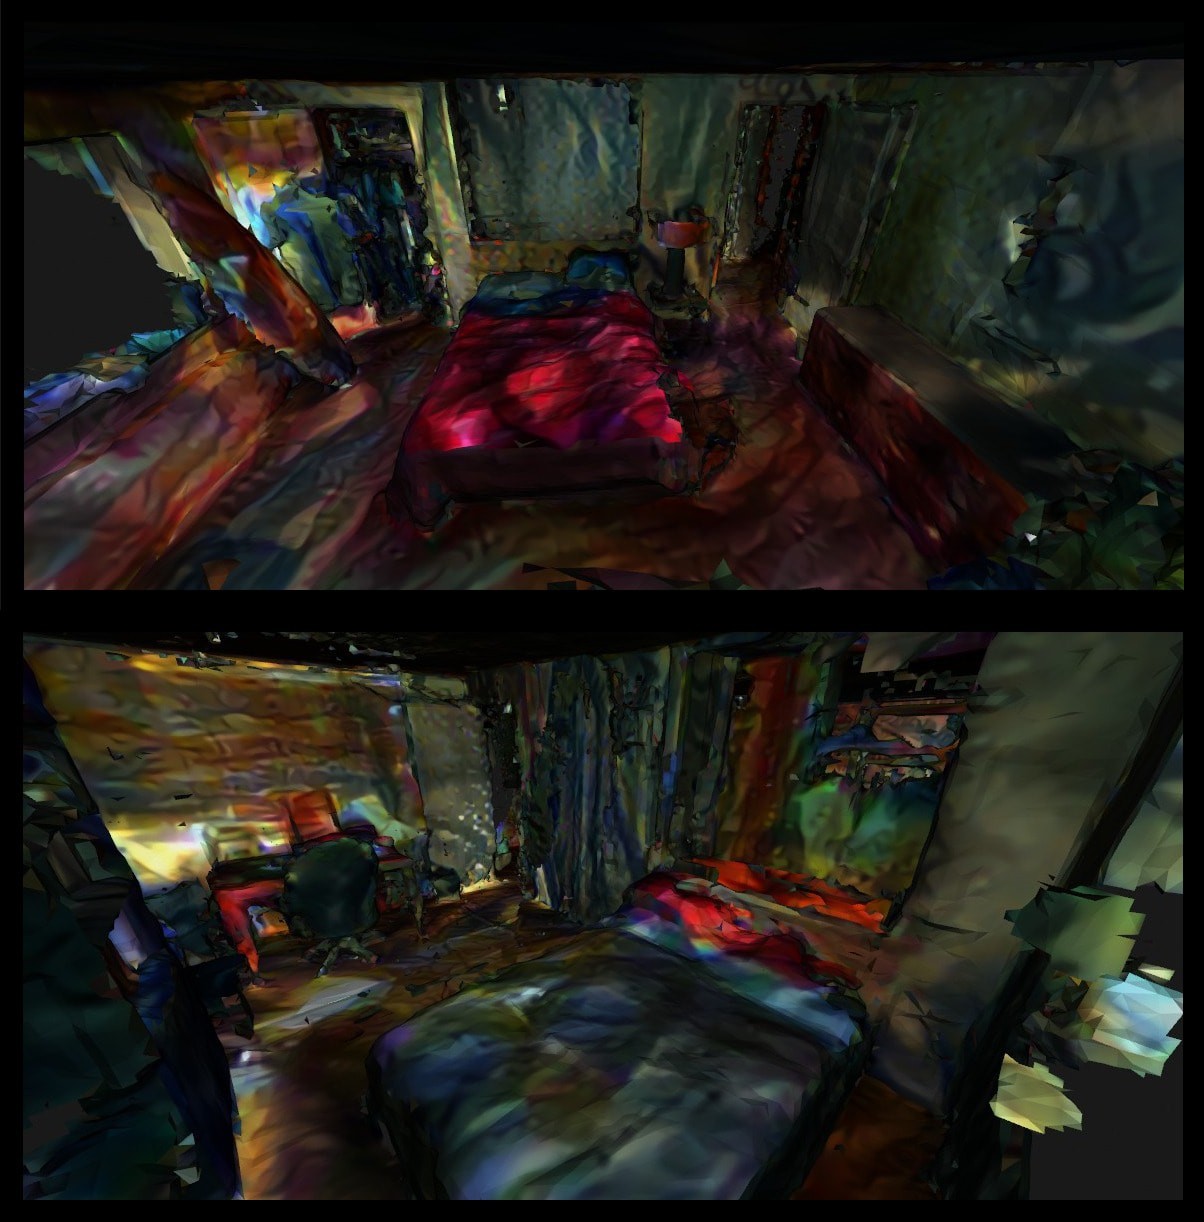
I also demonstrated a technique for separating the textures from the mesh from a 3D scan by baking the vertex colors onto a texture map in Blender. Here I take it one step further to process the texture maps with creativeAI software to stylize them into paintings. Because the texture maps are huge and my lone GTX 960 is a donkey, I had to resize the texture maps and sometimes only process half at a time then combine them in post. The final output resolution was 2048x2048, which is enough for our purposes. I have some ideas about pre-processing the textures by first layering them over with designs; stylizing the images into the skins that the neural networks paint into. My other idea would concern the scans themselves, taking only 1 piece of furniture or section at a time and condensing it with as much detail as possible with its own dedicated texture map.
![]()
Give me a Sistine chapel and I'll paint it with my 3D scanner.
![]()
![]()
With a 3D scanner one can render a painted vision of physical spaces. Kinda like that one movie...
![]()
![]()
Then I drew the xmas tree and the virtual beach house together in the code.
![]()
The sand and water shader complete the illusion for the mythical island AVALON.
![]()
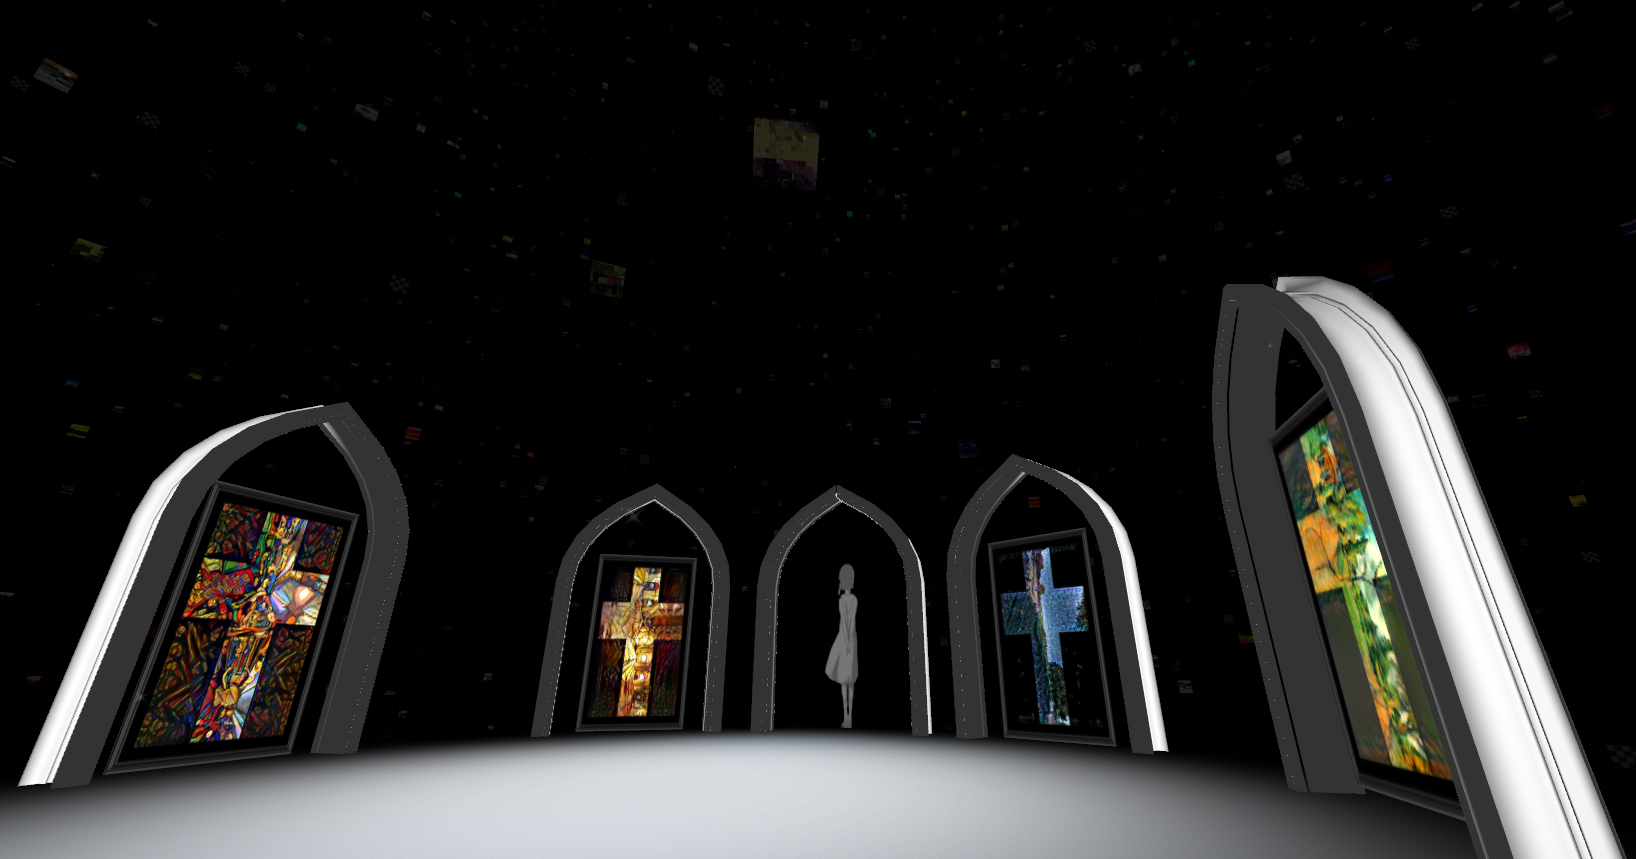
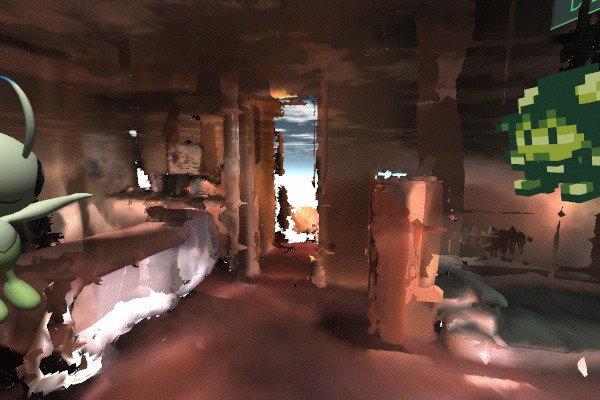
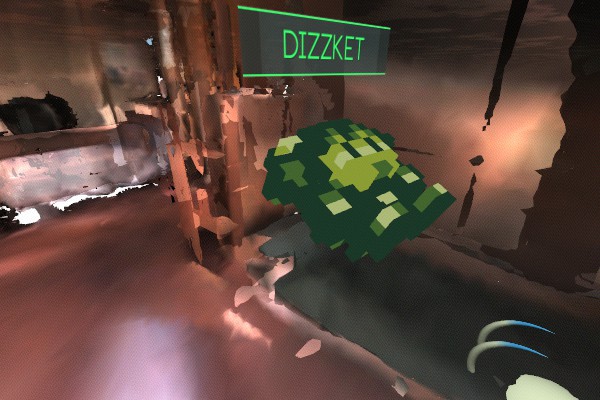
The arches were inspired by Dizzket's start room and represent gateways into the network.
These doors weave between layers of virtualities. Either you can navigate deeper into the world or across other nodes within the mesh network. The painting's are cubemaps [see Sublime VR] that have been processed through creative neural networks such as deep style to represent the channel surfing of mixed reality into an infinite assortment of machine dreams. You might appear in France, but it may be a painted vision of the scene that you're in. This produces interesting artistic scenery and protects privacy to obscure distinguishable features in the face of public 360 cameras.
Art is all around us now. This stack weaves a thread through multiple realities using the 802.11 as the carrier between channels that AI training programs will use to learn from experience and become more useful than painting scenes. The machine learning community is evolving rapidly thanks to the software and hardware becoming more accessible for even hobbyists to use. The video feeds can texture objects in the world [like spheres].![]()
Link to full album: https://imgur.com/a/UntYL
![]()
![]()
![]()
To be continued...
-
Hacking within VR: Pt 4
12/03/2015 at 03:27 • 0 commentsBuilding a Linux Metaverse Workstation
Part 1: https://hackaday.io/project/5077/log/16008-hacking-within-vr
Part 2: https://hackaday.io/project/5077/log/16066-hacking-within-vr-pt-2
Part 3: https://hackaday.io/project/5077/log/19096-x11-application-migration-pt-1
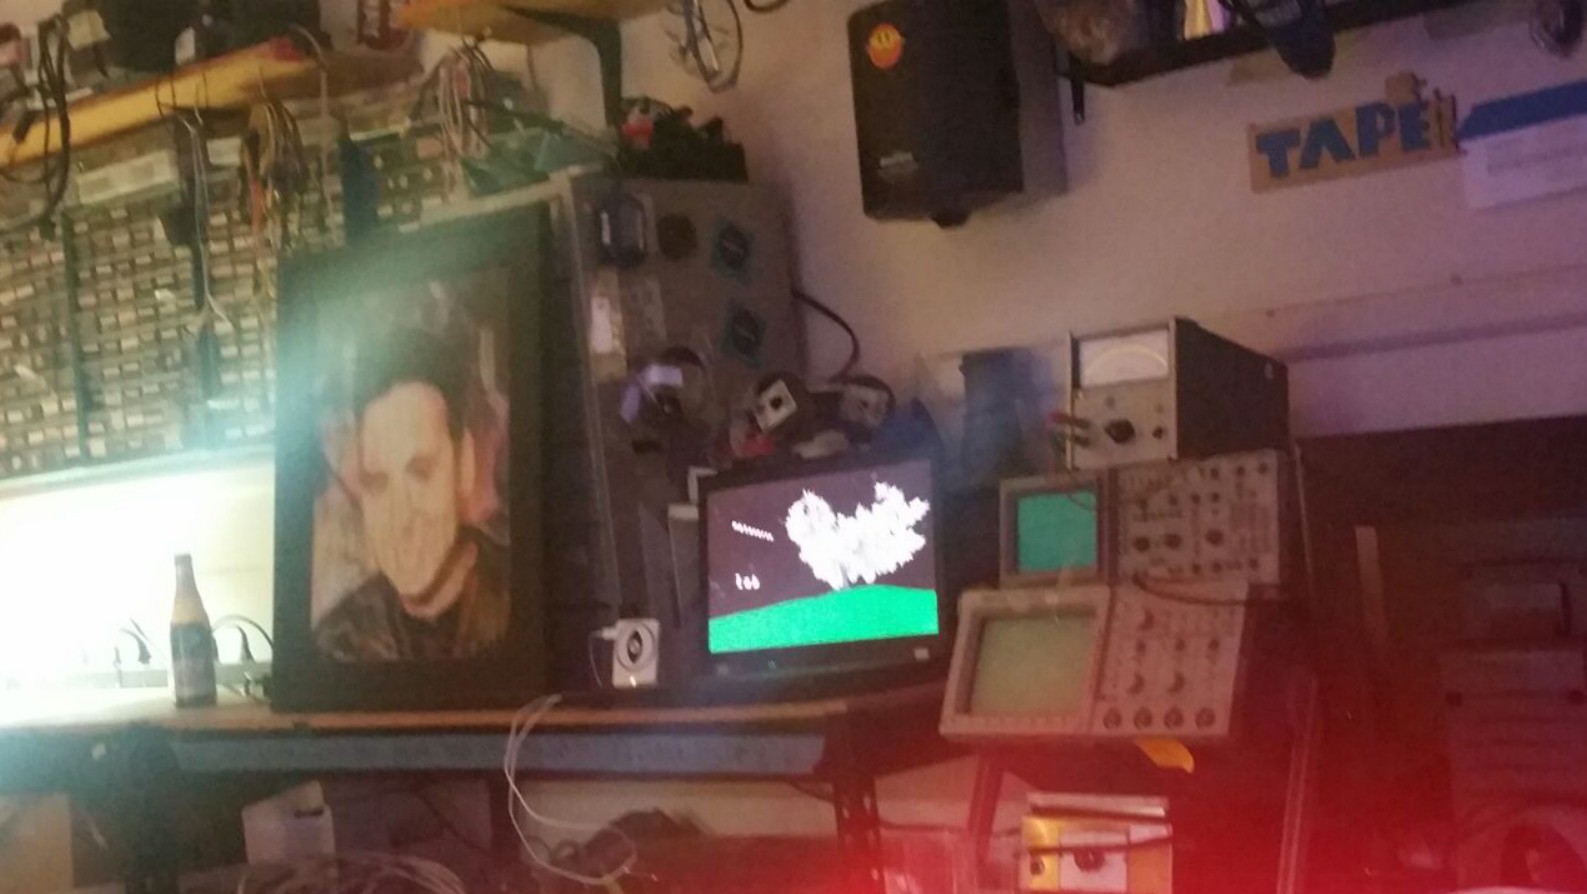
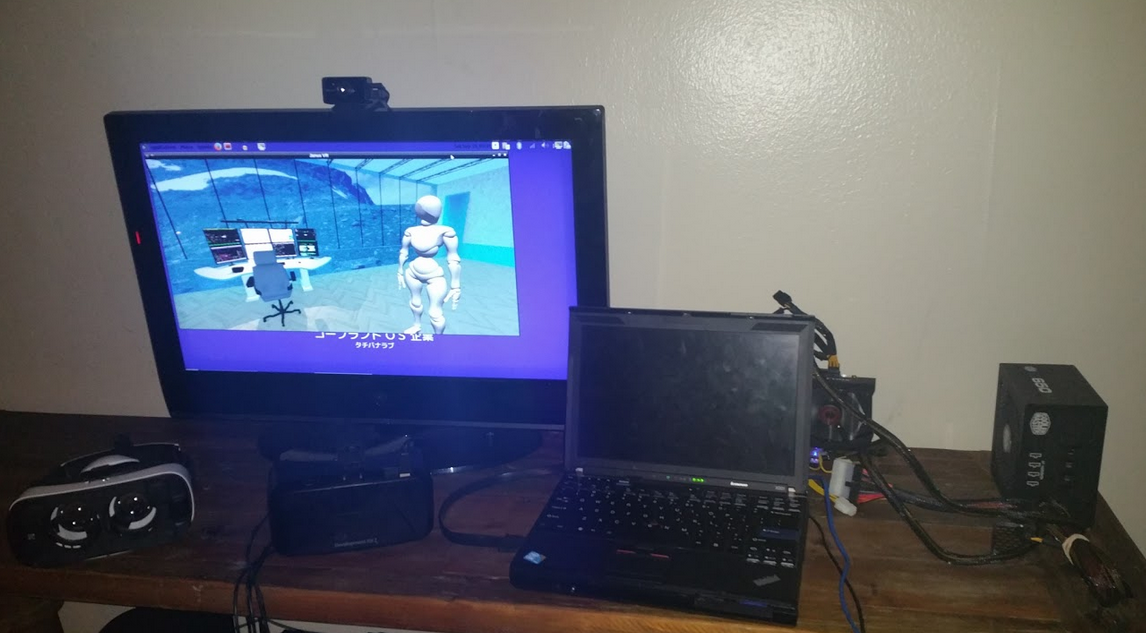
Look noobs, having a rice battlestation is important if you wanna be an uber 1337 h4x0r like me. This was my desk back in 2012:
![]()
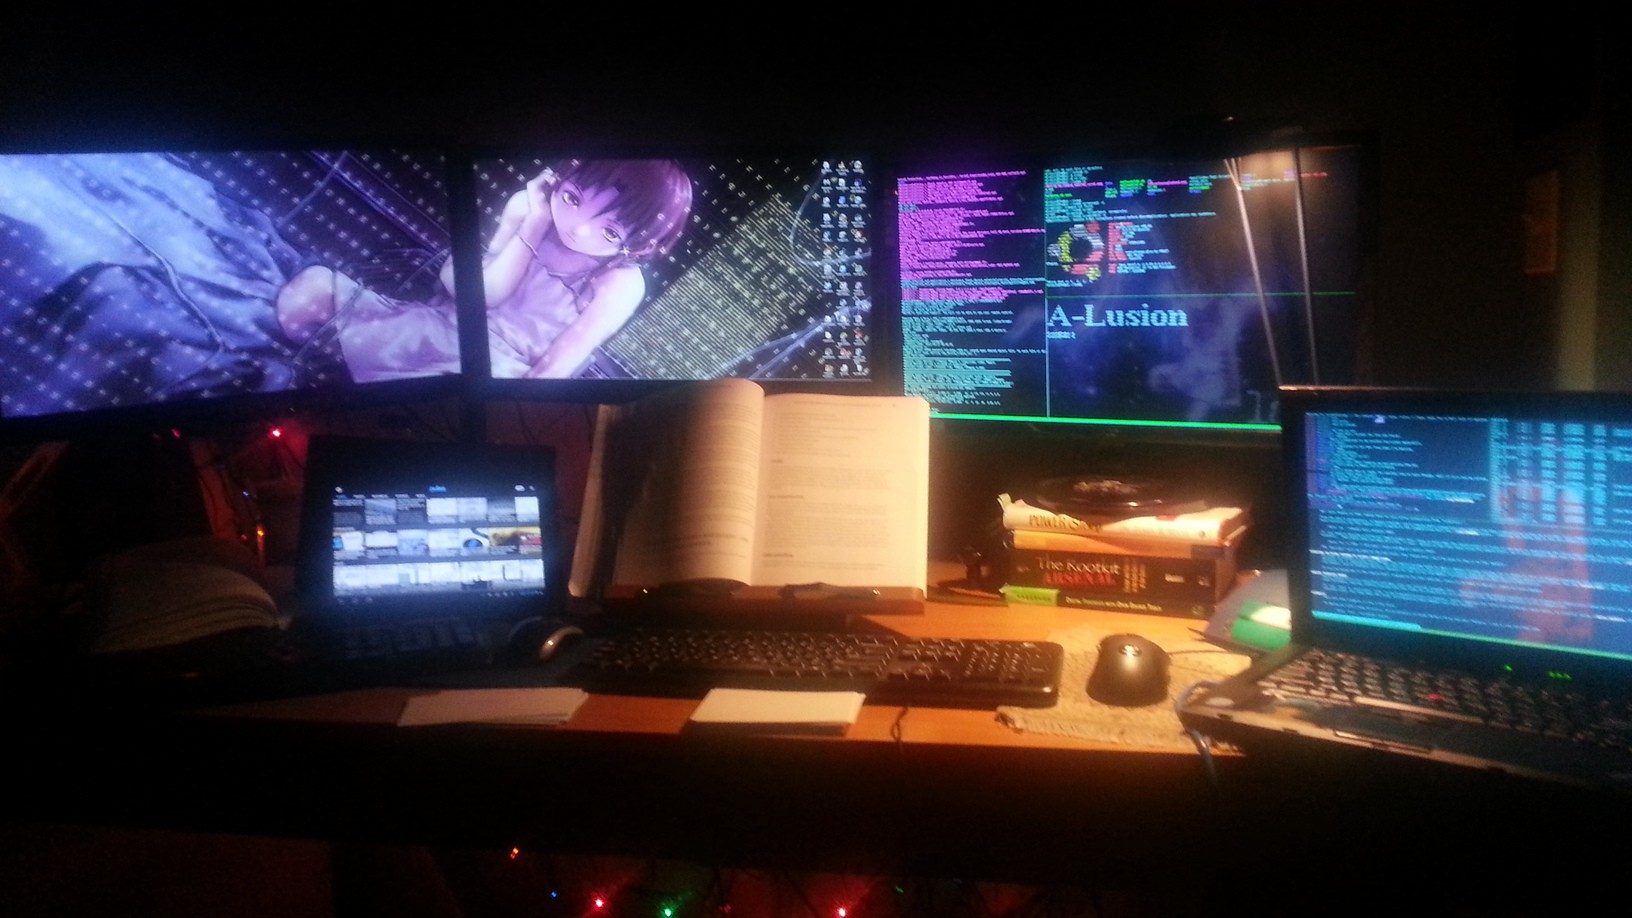
And here's what it now looks like as of 3 months ago, inspired by those 8+ monitor setups that traders and sysadmins use: http://imgur.com/a/eVn4R
X201 Thinkpad with i7 / 8gb RAM running Ubuntu 14.04, external GTX 960 gets 45-60 fps from a DK2 in my virtual office. Not bad![]()
![]()
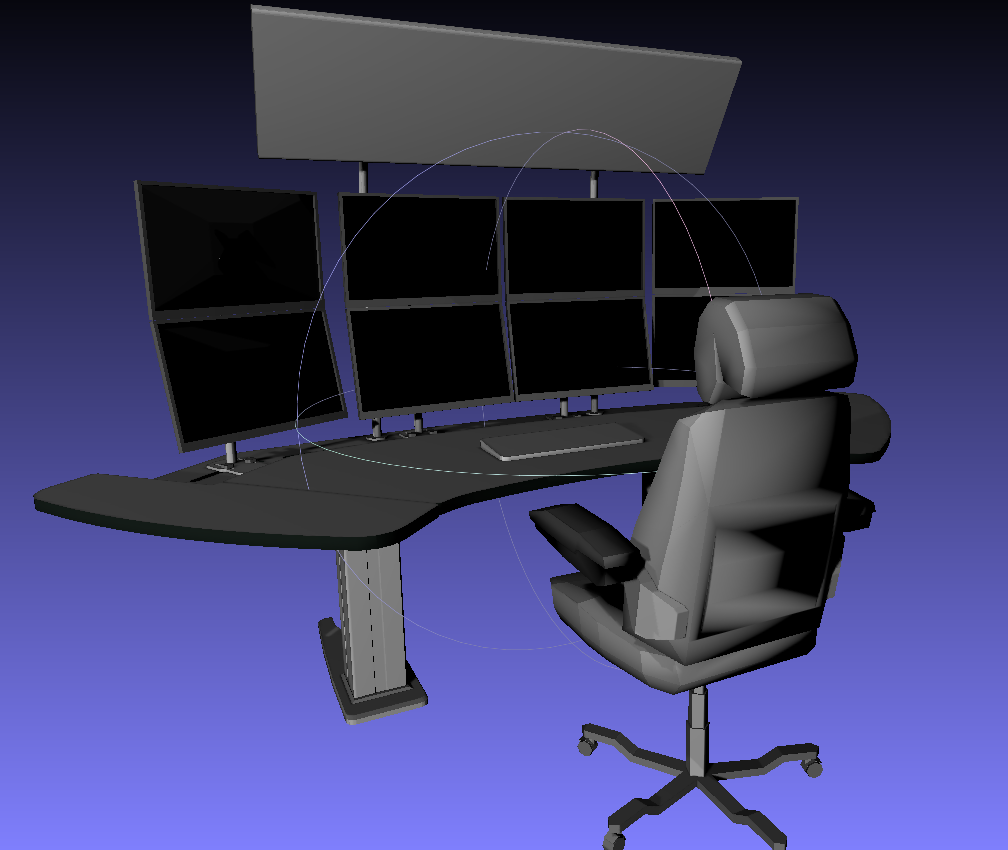
Having the desk was nice but having it bolted to an office didn't make sense in the context of the Metaverse so I separated the model from the office so that I can have it as an object one can add into any room. Just spawn a desk right beside me and we'll work together.
![]()
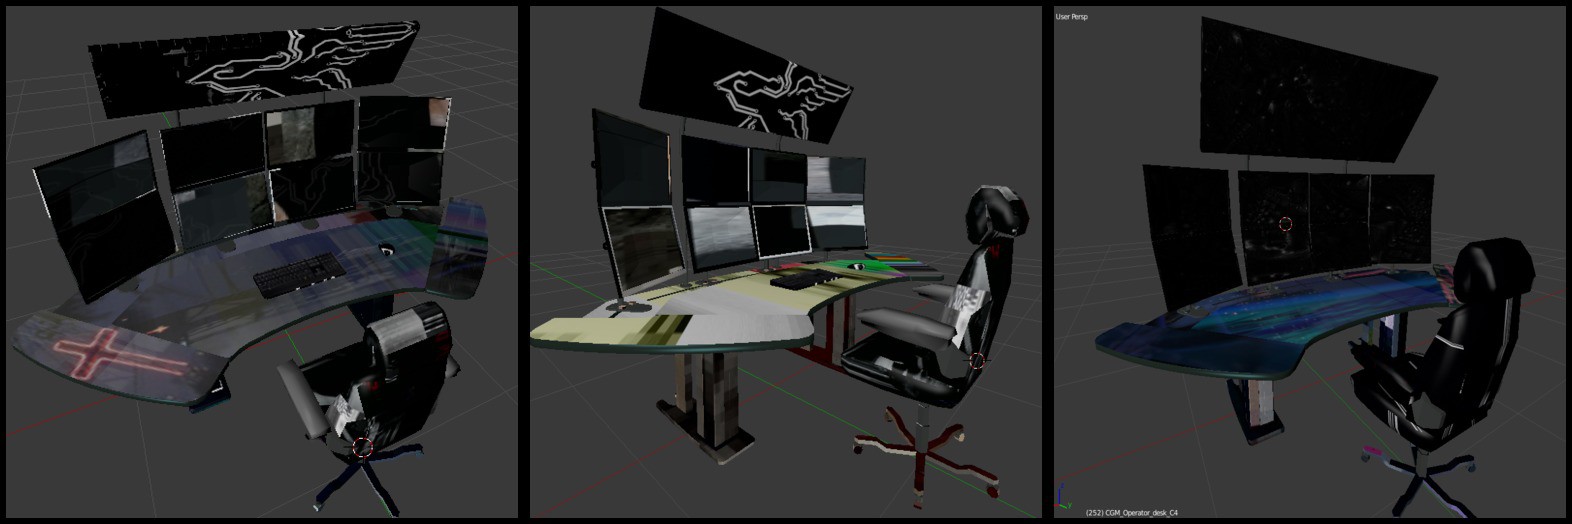
For the sake of style, I created a texture map in blender and made several versions of the desk so people can have something unique:
![]()
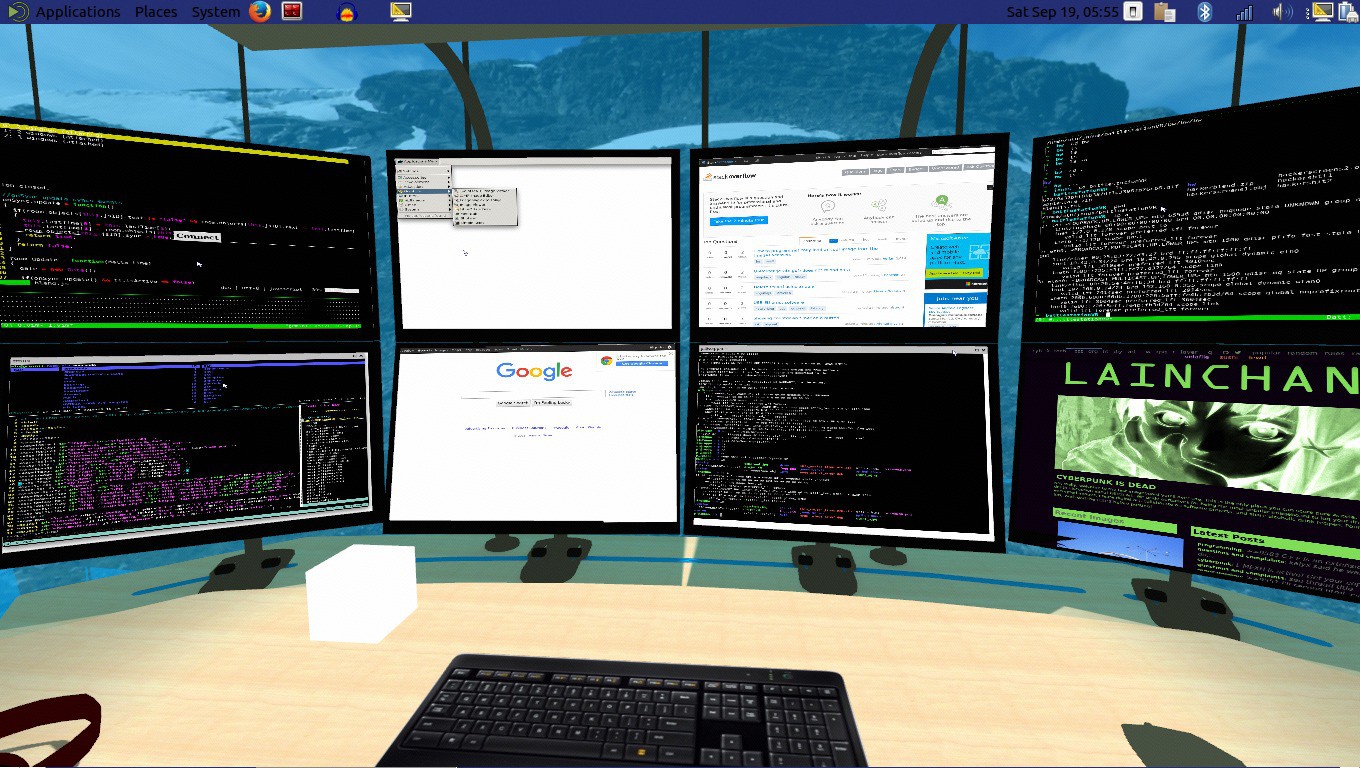
Now we can each have our own desk [the textures are there to remix too] and be able to collaborate in the same room. Referring back to the other parts from this series, websurfaces with linux shells and X servers can be added on as monitors.
![]() Thanks to FireFoxG for creating the blendshape. A trigger that sits on the desk activates 8 more displays like wings unfolding. Check out the video below to see more:
Thanks to FireFoxG for creating the blendshape. A trigger that sits on the desk activates 8 more displays like wings unfolding. Check out the video below to see more:You'll notice that later in the video, the portal that sits behind my desk connects right to the apartment tango scan. It's a nice live work situation. The office view of the beach also has another desk, pizza dancefloor, seapunk jamz, and other cool stuff. Still needs some particles. I'm going cover particles next project log.
![]()
-
Tango VR
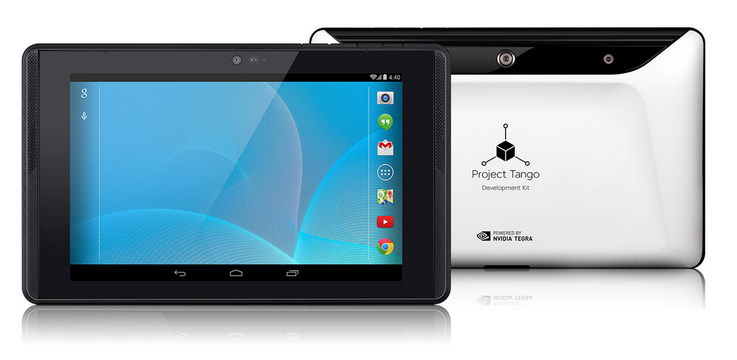
12/01/2015 at 10:44 • 0 commentsFor the past couple of week I've had been playing with a Project Tango dev kit, the 3D scanning tablet from Google. The tablet contains an integrated depth sensor, motion tracking camera, 4MP camera, and is jammed with sensors for 6DOF. Understanding depth lets your virtual world interact with the real world in new ways.
![]()
Project Tango prototype is an Android smartphone-like device which tracks the 3D motion of the device, and creates a 3D model of the environment around it.
https://www.google.com/atap/project-tango/about-project-tango/
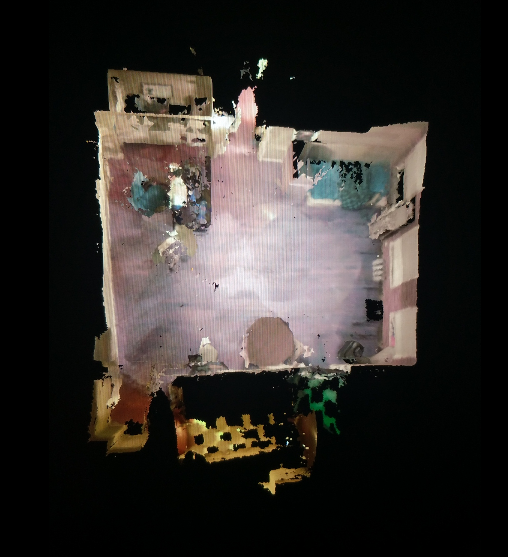
Project Tango technology gives a mobile device the ability to navigate the physical world similar to how we do as humans. Project Tango brings a new kind of spatial perception to the Android device platform by adding advanced computer vision, image processing, and special vision sensors. Project Tango devices can use these visual cues to help recognize the world around them. They can self-correct errors in motion tracking and relocalize in areas they've seen before.I already had experience importing the 3D scan into JanusVR but now was the first time I had physical access to the location of the scan, allowing me to do some very interesting mixed reality experiments. I began to scan of my apartment
![]()
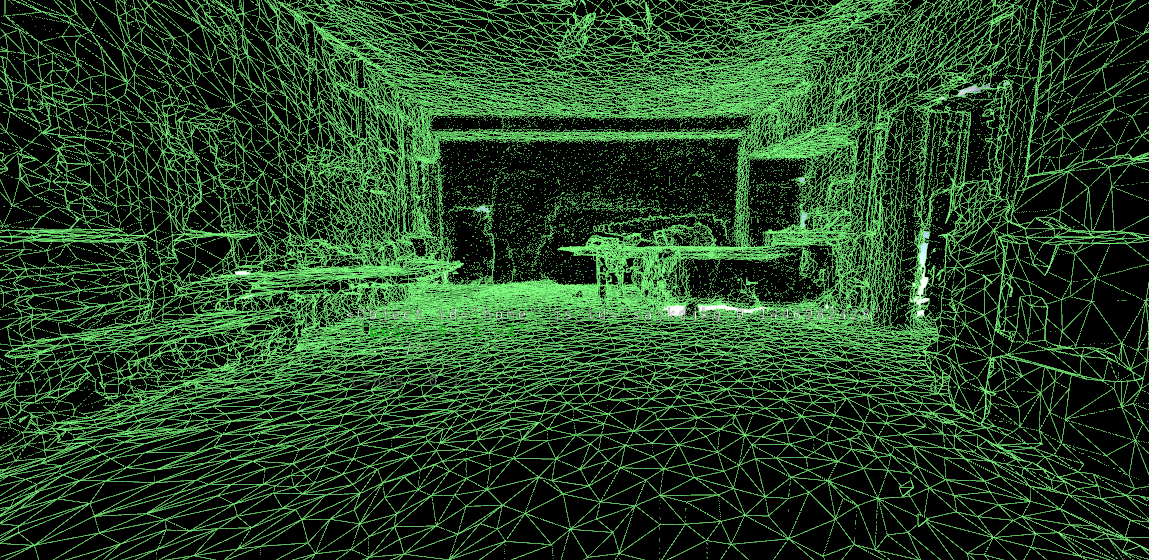
and soon realized how this quickly can fuel a mighty fuckton of triangles:
![]()
Tango allows you to export the scan into a standardized .obj format. I took the file and imported it into blender so that I can decimate the triangle count so something more manageable. One scan alone was about 1.3 million triangles, but can nicely be reduced to a modest < 300K depending on the room. A good rule of thumb has been a ratio of about 0.3 with the decimate modifier. Next, I noticed that the vertex colors were encoded in the wavefront obj.
Some applications support vertex colors, by putting red, green and blue![]()
values after x y and z. The color values range from 0 to 1.
In order to separate the skin from the bone, I had to bake the vertex colors onto a texture map. In order to do this, I loaded the file into meshlab and then exported it back out as a .ply filetype, a format principally designed to store three-dimensional data from 3D scanners.
The main steps I followed in order to separate skin from bone can be found in this video: Import that file into Blender, decimate, create a new image for the texture with atleast 4K resolution for the texture, UV unwrap the model and then go to bake and select vertex colors and have a margin of 2 and hit bake.
Now the texture map can be saved and the model can be exported as an obj with the corresponding mtl file pointing to the textures. The beauty of this is that the textures can be processed separately and re-texture the space, even as an animated GIF.![]()
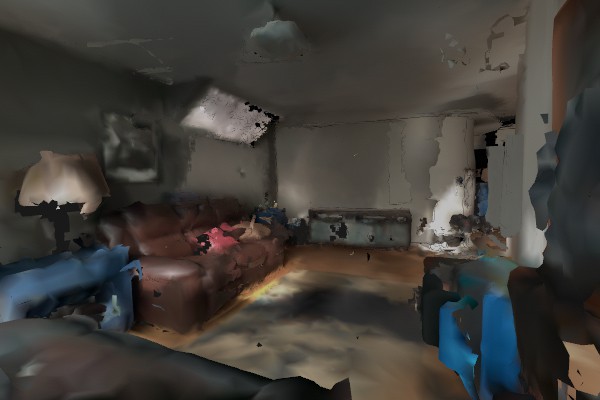
It was time to have some fun in Janus. I made a very simple FireBoxRoom with the apartment scan positioned in place and voila:It was time to invite guests from the internet over:
![]()
It was a surreal experience to have the internet invited into your personal habitat.
![]()
The full album can be found here: http://imgur.com/a/rOAvD
http://alpha.vrchive.com/image/Wc
http://alpha.vrchive.com/image/WF
http://alpha.vrchive.com/image/WS
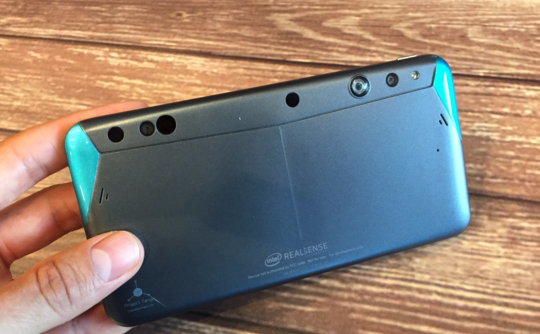
Since August, we learned that Intel is working with Google to bring a Project Tango developer kit for Android smartphones using its RealSense 3D cameras, in a bid to drive depth sensing in the mobile space. Link to article
![]()
![]()
Metaverse Lab
Experiments with Decentralized VR/AR Infrastructure, Neural Networks, and 3D Internet.
 Congress inside the congress, multiple people can connect to the AVALON mesh network and congregate inside a private virtual world. Y
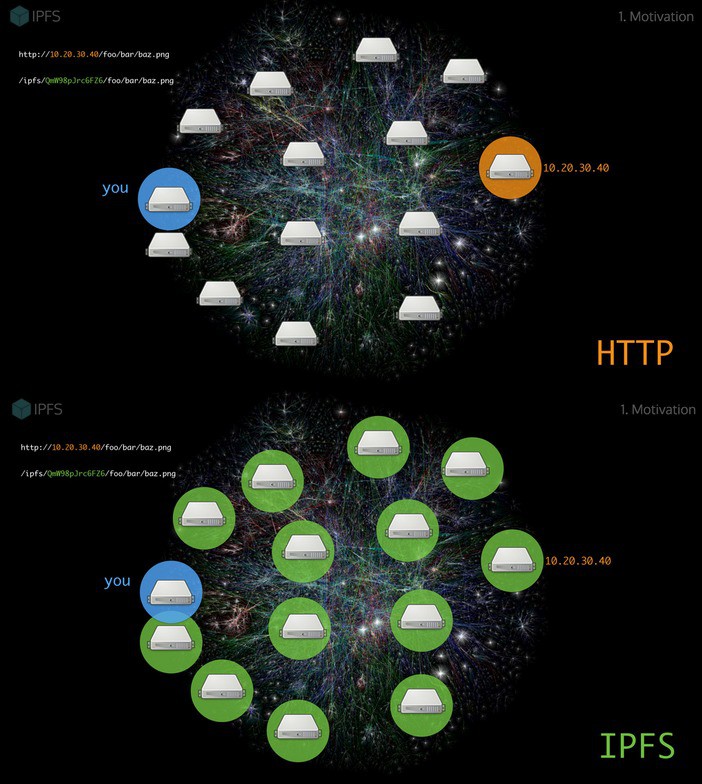


 Link to full album:
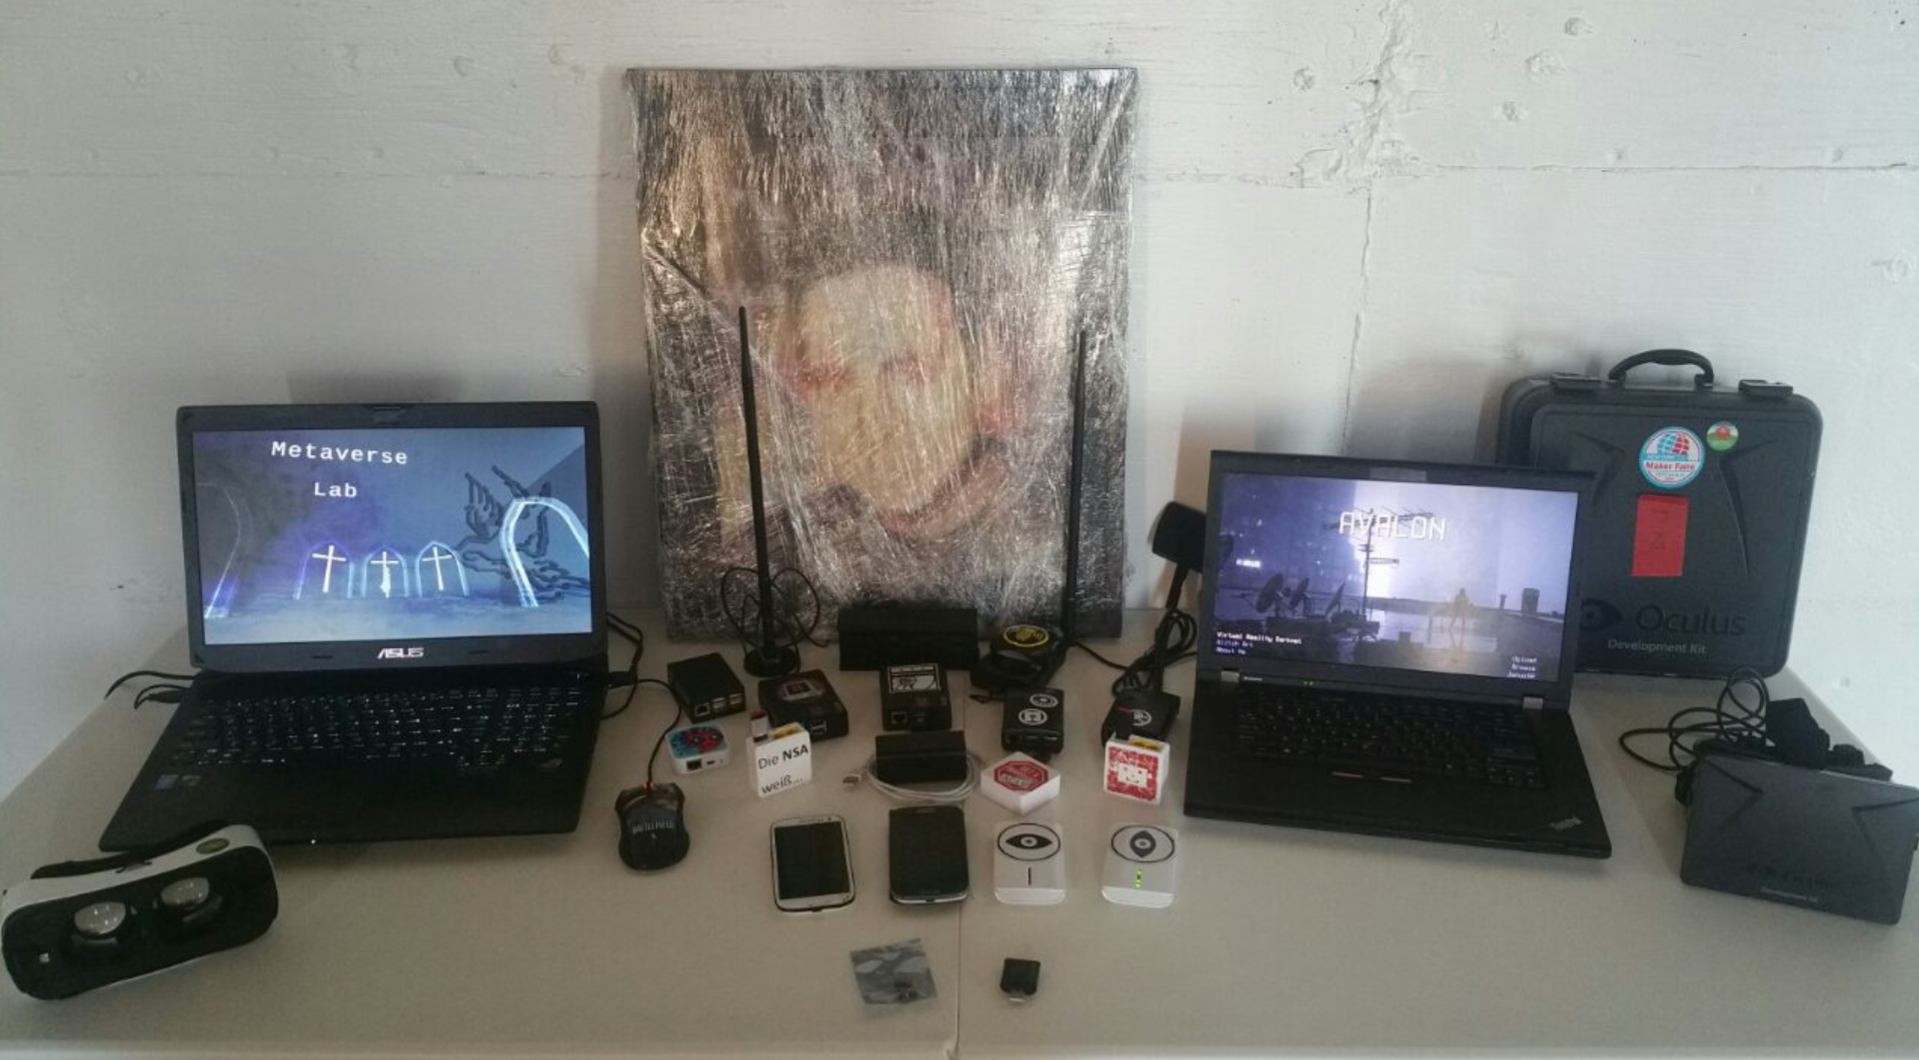


 Digital graffiti. This had planted a seed in my mind that we'll return to later.


 You can check out pictures of it at
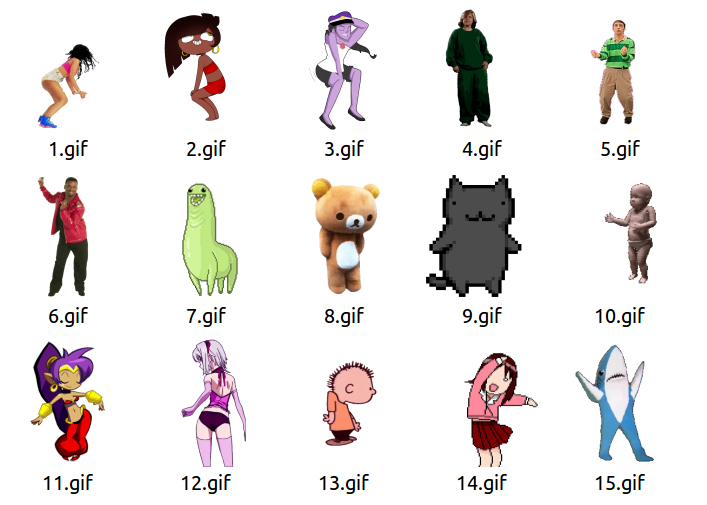


 Full Album http://imgur.com/a/tcmj1
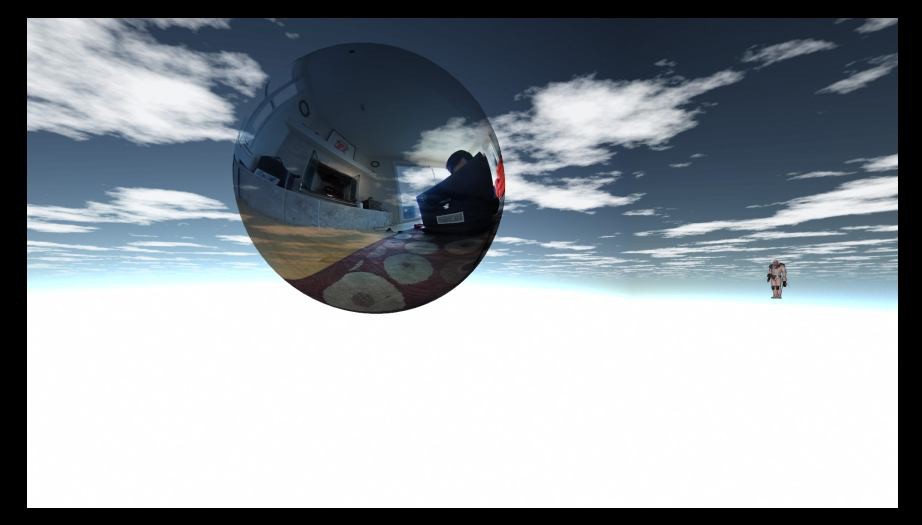
 The Ricoh Theta S has achieved much praise within the VR community as being an easily affordable 360 camera that does all the things. The camera has 14MP resolution with spectacular looking images that are stitched from the camera to produce equirectangular format jpeg sizes: 5376x2688 / 2048x1024

 I took a picture while holding grid paper to help visualize the alignment between the lenses. This has greatly improved the stitching:


 In Arthurian legend, Avalon is a mythical island upon which King Arthur and


 Thanks to FireFoxG for creating the blendshape. A trigger that sits on the desk activates 8 more displays like wings unfolding. Check out the video below to see more:

